This document explains how to install and configure the Cisco Network Registrar (CNR) Login Event Generator (LEG) on the Solaris and Windows NT/2000 platforms.
|
Cisco Service Center Release |
Part Number |
Publication Date |
|---|---|---|
|
Release 3.0.5 |
OL-7201-04 |
November, 2006 |
Description of Changes
Updated documentation for Release 3.0.5. No major changes or new features were added to this release.
|
Cisco Service Center Release |
Part Number |
Publication Date |
|---|---|---|
|
Release 3.0.3 |
OL-7201-03 |
May, 2006 |
Description of Changes
Updated documentation for Release 3.0.3. No major changes or new features were added to this release.
|
Release 3.0 |
OL-7201-02 |
December, 2005 |
This document is intended for System Administrators and Integrators who are responsible for the installation, configuration, and maintenance of the CNR LEG component. The administrator or system integrator should be familiar with the CNR extensions concept and with Cisco Service Control Subscriber Management and Subscriber Integration concepts.
This guide covers the following topics:
|
Chapter |
Title |
Description |
|---|---|---|
|
Chapter 1 |
Describes the Subscriber Manager CNR LEG software module and the terms and concepts used in this guide. | |
|
Chapter 2 |
Provides the package contents list and prerequisites for installing the CNR LEG. | |
|
Chapter 3 |
Details the CNR LEG installation procedures for both Widows and Solaris platforms. It also describes the uninstall procedure. | |
|
Chapter 4 |
Describes the configuration for the CNR LEG and the Subscriber Manager using the CNR LEG. | |
|
Appendix A |
Describes the CNR LEG design, logging, tracing, and operations performed by the CNR LEG. |
This SCMS SM CNR LEG Reference Guide should be used in conjunction with the following Cisco documentation:
Cisco SCMS Subscriber Manager User Guide
Cisco Service Control Application for Broadband User Guide
This document uses the following conventions:
|
Convention |
Description |
|---|---|
|
boldface font |
Commands and keywords are in boldface. |
|
italic font |
Arguments for which you supply values are in italics. |
|
[ ] |
Elements in square brackets are optional. |
|
{x | y | z} |
Alternative keywords are grouped in braces and separated by vertical bars. |
|
[x | y | z] |
Optional alternative keywords are grouped in brackets and separated by vertical bars. |
|
string |
A nonquoted set of characters. Do not use quotation marks around the string, or the string will include the quotation marks. |
|
|
Terminal sessions and information that the system displays are in |
|
|
Information you must enter is in |
|
|
Arguments for which you supply values are in |
|
® |
This pointer highlights an important line of text in an example. |
|
< > |
Nonprinting characters, such as passwords, are in angle brackets. |
|
[ ] |
Default responses to system prompts are in square brackets. |
|
!, # |
An exclamation point (!) or a pound sign (#) at the beginning of a line of code indicates a comment line. |
Note
Means reader take note. Notes contain helpful suggestions or references to materials not covered in this manual.
Caution
Means reader be careful. In this situation, you might do something that could result in loss of data.
The following sections provide sources for obtaining documentation from Cisco Systems.
You can access the most current Cisco documentation on the World Wide Web at the following sites:
Cisco documentation and additional literature are available in a CD-ROM package that ships with your product. The Documentation CD-ROM is updated monthly and may be more current than printed documentation. The CD-ROM package is available as a single unit or as an annual subscription.
Cisco documentation is available in the following ways:
Registered Cisco Direct Customers can order Cisco Product documentation from the networking Products MarketPlace:
Registered Cisco.com users can order the Documentation CD-ROM through the online Subscription Store:
Nonregistered Cisco.com users can order documentation through a local account representative by calling Cisco corporate headquarters (California, USA) at 408 526-7208 or, in North America, by calling 800 553-NETS(6387).
If you are reading Cisco product documentation on the World Wide Web, you can submit technical comments electronically. Click Feedback in the toolbar and select Documentation. After you complete the form, click Submit to send it to Cisco.
You can e-mail your comments to bug-doc@cisco.com.
To submit your comments by mail, use the response card behind the front cover of your document, or write to the following address:
Attn Document Resource Connection Cisco Systems, Inc. 170 West Tasman Drive San Jose, CA 95134-9883
We appreciate your comments.
Cisco provides Cisco.com as a starting point for all technical assistance. Customers and partners can obtain documentation, troubleshooting tips, and sample configurations from online tools. For Cisco.com registered users, additional troubleshooting tools are available from the TAC website.
Cisco.com is the foundation of a suite of interactive, networked services that provides immediate, open access to Cisco information and resources at any time, from anywhere in the world. This highly integrated Internet application is a powerful, easy-to-use tool for doing business with Cisco.
Cisco.com provides a broad range of features and services to help customers and partners streamline business processes and improve productivity. Through Cisco.com, you can find information about Cisco and our networking solutions, services, and programs. In addition, you can resolve technical issues with online technical support, download and test software packages, and order Cisco learning materials and merchandise. Valuable online skill assessment, training, and certification programs are also available.
Customers and partners can self-register on Cisco.com to obtain additional personalized information and services. Registered users can order products, check on the status of an order, access technical support, and view benefits specific to their relationships with Cisco.
To access Cisco.com, go to http://www.cisco.com.
The Cisco Technical Assistance Center (TAC) website is available to all customers who need technical assistance with a Cisco product or technology that is under warranty or covered by a maintenance contract.
If you have a priority level 3 (P3) or priority level 4 (P4) problem, contact TAC by going to the TAC website http://www.cisco.com/tac.
P3 and P4 level problems are defined as follows:
P3—Your network is degraded. Network functionality is noticeably impaired, but most business operations continue.
P4—You need information or assistance on Cisco product capabilities, product installation, or basic product configuration.
In each of the above cases, use the Cisco TAC website to quickly find answers to your questions.
To register for Cisco.com, go to http://tools.cisco.com/RPF/register/register.do.
If you cannot resolve your technical issue by using the TAC online resources, Cisco.com registered users can open a case online by using the TAC Case Open tool at http://www.cisco.com/tac/caseopen.
If you have a priority level 1 (P1) or priority level 2 (P2) problem, contact TAC by telephone and immediately open a case. To obtain a directory of toll-free numbers for your country, go to http://www.cisco.com/warp/public/687/Directory/DirTAC.shtml.
P1 and P2 level problems are defined as follows:
P1—Your production network is down, causing a critical impact to business operations if service is not restored quickly. No workaround is available.
P2—Your production network is severely degraded, affecting significant aspects of your business operations. No workaround is available.
The Cisco Network Registrar (CNR) Login Event Generator (LEG) is a software module that forwards login and logout events from the CNR to the Cisco Service Control Management Suite Subscriber Manager (SCMS SM). The CNR LEG is actually a CNR extension developed in C++. The extension points used by CNR LEG are:
init-entrypost-send-packetpost-packet-decode
The CNR LEG module requires the use of option 82 sub-option 2 (Relay-Agent-Information Option with the Remote-Id sub-option), which contains the CM-MAC, in all DHCP requests. If option 82 does not exist in a renewal transaction, an attempt to extend the lease based solely on the IP address is performed. This will succeed only if the IP address was previously logged in to the Subscriber Manager (SM) by the LEG, in the event of a full DHCP transaction, or via other interfaces to the SM.
The CNR LEG protects the SM and the connection to the SM from any DHCP Denial of Service (DoS) attacks, which are performed on the CNR. To reduce the login rate to the SM, the LEG ignores identical DHCP requests that are approved by the CNR. The requests are sent to the CNR in short time intervals.
For additional information about extending the CNR functionality using extension points, see the CNR CLI Reference Guide.
The CNR LEG was carefully developed and thoroughly tested on Solaris and Windows platforms for both functional correctness and robustness. It does not jeopardize the stability or the reliability of the CNR.
This section defines terms and concepts that are necessary for understanding the CNR LEG and Subscriber Manager (SM) configuration and operation. More information about all items can be found in the Cisco SCMS Subscriber Manager User Guide.
The main function of the CNR LEG is to provide the SM with network-ID-to-subscriber mappings in real time.
The SCE platform requires mappings between the network IDs (IP addresses) of the flows it encounters and the subscriber IDs. The SM database contains the network IDs that map to the subscriber IDs. The SCE network-ID-to-subscriber mappings are constantly updated from the SM database.
For information about the SCE platforms, see the Cisco Service Control Engine Software Configuration Guide.
The SM provides the option of partitioning SCE platforms and subscribers into subscriber domains. A subscriber domain is a group of SCE platforms that share a group of subscribers. Subscriber domains can be configured using the SM configuration file and can be viewed using the SM Command-Line Utility (CLU).
It is also possible to configure domain aliases. A domain alias is a synonym for the actual domain name in the SM. Domain aliases are configured in the SM configuration file.
For additional information about domains and domain aliases, see Chapter 5 and Appendix A of the Cisco SCMS Subscriber Manager User Guide.
The CNR LEG communicates with the SM using a proprietary RPC (PRPC) protocol developed by Cisco. the SM Java, C, and C++ APIs also use PRPC. The CNR LEG uses the C++ API as its communication layer.
The Subscriber Mode defines which entity is referred to as the subscriber in the LEG and in the SM.
Cable providers usually prefer using the Cable Modem (CM) as the subscriber entity to be assigned multiple IP addresses (one per Customer Premises Equipment (CPE)).
The CNR LEG supports the CPE as Subscriber and CM as Subscriber (the default) modes, as defined by the configuration.
The CNR LEG works with the SM cable support module when operating in the “CPE as Subscriber” mode. For additional information about cable environment subscriber modes, see Appendix C of the Cisco SCMS Subscriber Manager User Guide.
The connection between the CNR LEG and the SM is a resource that should be protected against DHCP Denial of Service attacks. Such attacks are dispatched by sending a high rate of DHCP requests from a certain subscriber, which can cause the connection to overflow because of too many logon messages in a short period of time. The CNR LEG enables the administrator to use the filter that identifies such events of multiple identical DHCP requests and filters them to reduce the rate of logon messages to a predefined rate. The filter does not protect the CNR against attacks, but rather protects the connection to the SM.
The cable support module is an SM component that executes an API friendly to cable environment integrations. The cable support module translates between the cable subscriber terminology (CPE, CM, and CMTS) and the generic subscriber terms used by the Cisco Service Control Management system. The CNR LEG uses PRPC to invoke the cableLogin and cableLogout operations that are performed by the cable support module API.
The SM cable support module is used only in the CPE as Subscriber mode.
For additional information about the cable support module, see Appendix C of the Cisco SCMS Subscriber Manager User Guide.
The SM C++ API exposes a set of operations designed to enable subscriber integration with the Cisco system. The CNR LEG uses the SM C++ API as its basic communication layer.
For additional information about the C++ API, see the Cisco SCMS SM C/C++ API Programmer's Guide.
A keep-alive mechanism periodically checks the communication link (socket) between the CNR LEG and the SM. The communication link fails when the socket is closed or a keep-alive timeout occurs. You can configure the keep-alive timeout in the SM configuration file.
In cases where a LEG to SM link fails, you can configure the SM to clear the mappings of all the subscribers that are updated by the failed LEG.
To learn more about communication link failure handling, see Appendix A of the Cisco SCMS Subscriber Manager User Guide.
CNR LEG is operable with any CNR version 5.0 or later.
The platform requirements (OS/CPU/RAM/disk) are the same as the CNR requirements for both Windows and Solaris. See the Cisco Network Registrar (CNR) Installation Guide for platform requirements details.
The CNR LEG distribution part of the SCMS-SM LEG distribution file and is located in the CNR_LEG directory. The following table describes the contents of the CNR LEG distribution package supplied by Cisco.
Table 2.1. File layout of CNR LEG distribution package
|
Root |
Folder (under root) |
File name |
Notes |
|---|---|---|---|
|
|
|
|
|
|
|
|
readme.cnrleg |
Short description of CD content |
|
|
doc |
|
|
|
|
|
cnrleg.cfg |
Sample configuration file |
|
|
solaris |
|
|
|
|
|
libcnrleg.so |
Solaris distribution in a single library file |
|
|
winnt |
|
|
|
|
|
asn1ber.dll |
|
|
|
|
asn1rt.dll |
|
|
|
|
cnrleg.dll |
|
This chapter describes the procedures for installing the CNR LEG on both Windows x86 and Solaris 8 SPARC platforms. It also describes the uninstall procedure.
Note
The directory in which the CNR is installed is referred to as cnr-inst-dir.
To install the CNR LEG on Windows:
Extract the SM LEG distribution file and locate the CNR LEG distribution tar file under the CNR LEG directory.
Extract the CNR LEG distribution and copy the files:
Unzip the CNR Package to
pkg-ext-dir.Copy all files under
pkg-ext-dir\winntto <cnr-inst-dir>\Extensions\DHCP\Dex\.Copy the sample configuration file from
pkg-ext-dir\docto a directory of your choice, hereafter referred to ascfg-dir.
Configure the CNR LEG using the sample configuration file:
Configure the SM:
See Configuring the SM.
Register the CNR LEG with the CNR:
Run the CNR
<cnr-inst-dir>/bin/nrcmdcommand-line utility.Log in to the CNR nrcmd CLU. To log in, type the following command:
nrcmd [-C<cluster>] [-N <user>] [-P <password>].Configure the following:
nrcmd> extension smleg create dex cnrleg.dll cnrLegPostSendPacket
nrcmd> extension smleg set init-entry=cnrLegInitEntry
nrcmd> extension smleg set init-args=cfg-dir/cnrleg.cfg
nrcmd> dhcp attachExtension post-send-packet smleg 1
nrcmd> extension smlegext create dex cnrleg.dll cnrLegPostPacketDecode
nrcmd> dhcp attachExtension post-packet-decode smlegext 1
nrcmd> save
nrcmd> server DHCP reload
Note
You must use the cfg-dir full path in the init-args argument.
Note
You must use a slash (“/”) and not a back-slash (“\”) as the path separator.
To install the CNR LEG on Solaris:
Extract the SM LEG distribution file and locate the CNR LEG distribution tar file under the CNR LEG directory.
Extract the CNR LEG distribution and copy the files:
Extract the CNR Package to
pkg-ext-dir.For example:
#> tar xvf cnr-leg-dist.tarCopy
libcnrleg.sounderpkg-ext-dir/solaristo<cnr-inst-dir>/extensions/dhcp/dex.Copy the sample configuration file from
pkg-ext-dir/docto a directory of your choice, hereafter referred to ascfg-dir.
Configure the CNR LEG using the sample configuration file:
Configure the SM:
See Configuring the SM.
Register the CNR LEG with CNR:
Run the CNR
<cnr-inst-dir>/bin/nrcmdcommand-line utility.Log in to the CNR nrcmd CLU. To log in, type the following command:
nrcmd [-C<cluster>] [-N <user>] [-P <password>].Configure the following:
nrcmd> extension smleg create dex libcnrleg.so cnrLegPostSendPacket
nrcmd> extension smleg set init-entry=cnrLegInitEntry
nrcmd> extension smleg set init-args=cfg-dir/cnrleg.cfg
nrcmd> dhcp attachExtension post-send-packet smleg 1
nrcmd> extension smlegext create dex libcnrleg.so cnrLegPostPacketDecode
nrcmd> dhcp attachExtension post-packet-decode smlegext 1
nrcmd> save
nrcmd> server DHCP reload
Note
You must use the cfg-dir full path in the init-args argument.
Note
You must use a slash (“/”) and not a back-slash (“\”) as the path separator.
This section explains how to uninstall the CNR LEG. The uninstall procedure is applicable for both Windows and Solaris platforms.
To uninstall the CNR LEG:
Un-register CNR LEG from CNR:
Run the CNR
<cnr-inst-dir>/bin/nrcmdcommand-line utility.Log in to the CNR nrcmd CLU. To log in, type the following command:
nrcmd [-C<cluster>] [-N <user>] [-P <password>].Configure the following:
nrcmd> dhcp detachExtension post-send-packet 1
nrcmd> extension smleg delete
nrcmd> dhcp detachExtension post-packet-decode 1
nrcmd> extension smlegext delete
nrcmd> save
nrcmd> server DHCP reload
Delete the LEG distribution files:
This part of the uninstall procedure is optional.
Delete all files copied to
<cnr-inst-dir>/extensions/dhcp/dexDelete the configuration file (
cfg-dir/cnrleg.cfg).
This chapter explains how to configure the CNR LEG and to configure the Subscriber Manager to use the CNR LEG module.
The CNR configuration file offers the following configuration options to the user:
SM IP address—The IP address of the SM
SM port—The TCP port on which the SM PRPC server listens
Subscriber mode—The subscriber entity to be used by the LEG: CM as subscriber (default) or CPE as subscriber
Lease time option—The DHCP option number from which to extract the lease expiration time that is to be sent to the SM
Attack filter parameters—Defines whether the DHCP DoS attack protection is on and defines how to perform the filtering
You must set the SM IP address correctly in order for the LEG to operate.
The default PRPC TCP port number generally does not need to be changed.
The SM port default is TCP 14374. The SM PRPC port can be retrieved from the SM configuration file. For additional information, see Appendix A of the Cisco SCMS Subscriber Manager User Guide.
The LEG can operate in one of two modes:
CM as Subscriber—Each CPE login/logout/lease extension triggers a logon operation to the SM using the corresponding CM MAC as the subscriber ID.
CPE as Subscriber—Each CPE is a separate subscriber entity. Each CPE login/logout/lease extension triggers a logon operation to the SM using both the CPE MAC and the CM MAC as the subscriber ID.
The following example is a portion of a sample CNR configuration file showing how to configure the Subscriber Mode:
CM as Subscriber:
[general]
# defines who is the subscriber to refer to the CM or the CPE.
# default: cm_as_subscriber optional  values: cm_as_subscriber \
# cpe_as_subscriber
subscriber_mode=cm_as_subscriber
CPE as Subscriber:
[general]
# defines who is the subscriber to refer to the CM or the CPE.
# default: cm_as_subscriber optional  values: cm_as_subscriber \
# cpe_as_subscriber
subscriber_mode=cpe_as_subscriber
To enable the DHCP Denial of Service (DoS) attack protection, the enabled option must be set. The attack filter has two parameters that define its operation:
The
timeoutparameter defines the minimal interval in seconds between identical DHCP requests (login/renew transactions). If two identical requests reach the CNR within the time interval specified in this parameter, the LEG ignores the second request. The CNR does not trigger the second login to the SM.The
num_of_entriesparameter defines the number of DHCP transaction information entries that the attack filter can hold at any given time. This parameter affects the amount of memory allocated by the LEG for the DoS attack protection filter. Change this parameter only if the LEG supports a high transaction rate.
The following example is a portion of a sample CNR configuration file showing how to configure the attack filter parameters:
[attack filter]# enable or disable the attack filtering mechanism in the LEG
# can be set to true or false. default true.
enabled=true# minimum time in seconds between DHCP login/renew transactions of
# the same subscriber with the same IP. default = 10 seconds
timeout=10
# the number of attack transactions detected on this user that
# should generate a log message. setting 0 disables this logging.
# note: the first attack detection is always logged (unless
# logging is disabled)
# default: log every 100 attack transactions.
log_interval=100To enable subscriber auto-logout at lease time expiration on the SM, the lease_time option must be set. The CNR LEG can extract the IP address lease expiration from one of the following DHCP option numbers:
51 (default)
58
59
For additional information about the auto-logout mechanism, see Configuring Auto-logout.
Use the SM configuration file to configure the Subscriber Manager. For additional information, see Appendix A of the Cisco SCMS Subscriber Manager User Guide.
Note
It is important to properly configure SM-LEG failure handling on the SM before continuing with the CNR LEG configuration. For information about configuring the SM, See Appendix A of the Cisco SCMS Subscriber Manager User Guide.
To configure the failure handling, you must do the following in the configuration file:
Activate SM-LEG Failure Handling
Set LEG-Domains associations
By default, SM-LEG failure handling is not activated.
To activate SM-LEG failure handling:
Set the
clear_all_mappingsparameter to true.Change the
timeoutvalue (optional).
The following example is a portion of a sample p3sm.cfg configuration file showing how to configure SM-LEG failure handling:
[SM-LEG Failure Handling]# The following parameter defines the behavior of the SM in case of
# LEG-SM connection failure.
# This parameter is relevant only for cases SM and LEG are running
# on different machines.
# Note that this parameter defines a behavior that is similar for
# ALL connected LEGs. If the parameter is set to true then in case
# of LEG-SM connection failure that is not recovered within the
# defined timeout, the mappings of all subscribers in the domains
# defined in the 'LEG-Domains Association' section for the LEG
# that was disconnected, will be removed.
## IMPORTANT: LEG Domains must be defined in the following section
# in case this parameter is set to 'true'.
#
# Optional values: [true/false]. Default: false.

clear_all_mappings=true
# The following parameter defines the time in seconds from a LEG-SM
# connection failure until clearing the mappings in the SM database.
# Default value: 60.

timeout=60You must set LEG-Domains associations in order for the SM-LEG failure handling to work. The CNR-LEG name to be used in this section is a concatenation of the hostname of the machine on which the LEG is installed and the suffix “.CNR.LEG”.
An alternate way to retrieve the CNR-LEG name is by using the p3rpc utility. This utility displays all clients currently connected to the PRPC server, including the CNR.
If the hostname of the machine on which the LEG is installed is netserv5, use netserv5.CNR.LEG for the LEG name in the configuration file. The following example assumes that the name of the subscriber domain associated with the CNR LEG is subscribers.
The following example is a portion of a sample p3sm.cfg configuration file showing how to set LEG-Domains associations.
[LEG-Domains Association]# The following parameter defines domains that the mapping of all
# subscribers that belong to them will be cleared on LEG-SM
# connection failure. The key is the LEG NAME and the value is a
# comma separated list of domain names.
# A value of * in domain names stands for all the subscriber domains
# in the system.
# A value of * in LEG name means all the LEGs that are connected to
# the SM.
# LEG NAME1 = domain_name1,domain_name2
# LEG NAME2 = domain_name2,domain_name3

netserv5.CNR.LEG=subscribersYou must set domain aliases in order for the CNR LEG to operate correctly.
The CNR LEG uses the CMTS IP address for the subscriber domain name. You should make sure that all the CMTS IP addresses appear as an alias to exactly one subscriber domain. Use the SM configuration file to configure domain aliases.
Note
You do not have to configure domain aliases in those cases where each CMTS updates a single subscriber domain and you have configured the subscriber domain names in the SM to be the IP address of the matching CMTS.
In this example, the SM is configured with the following:
A single subscriber domain named
subscribersFour CMTS devices with the following IP addresses:
209.247.228.201209.247.228.20269.42.72.14769.42.72.148
The following example is a portion of a sample p3sm.cfg configuration file showing how to configure the domain aliases.
[Domain.subscribers]
# The following parameter defines domain aliases. When subscriber
# information is received from the LEG with certain alias the
# information will be distributed to the domain that matches this
# alias - domain that contains this alias in its aliases list.
## A typical alias could be a network device IP address. For example,
# each string in the values can be the IP address of a NAS or a
# CMTS.
## In order to distribute all subscriber operations on all unmapped
# domains to a certain domain use aliases=*. Note that only one
# domain section may include this alias.

aliases=209.247.228.201,209.247.228.202,69.42.72.147,69.42.72.148To automatically log out subscribers when their lease time expires, you must configure the SM auto-logout interval. After every auto-logout interval time, the SM checks which subscriber IP addresses have a lease time that has expired and begins to automatically remove these IP addresses from the system.
Lease time is the timeout defined by the LEG during the login operation of each IP address, based on the lease-time option. All subscriber login events will start a timer of lease_time seconds. When the timer expires and the grace_period, which is another configuration parameter, has also passed, the subscriber's IP addresses are removed causing the subscriber to be removed from the SCE platform database. If the subscriber logs on with an existing IP address during the countdown period, the timer is reset and the countdown period restarts.
If the auto-logout value is set to zero (0), the SM's auto-logout mechanism is disabled.
If the auto-logout interval is set to a value greater than zero, the SM's auto-logout mechanism is enabled.
Note
The subscriber record (with no mappings) remains in the SM database, preserving the subscriber state.
The following example is a portion of a sample p3sm.cfg configuration file showing how to configure the auto-logout interval to 6 minutes:
[Auto Logout]
# The following parameter configures the time between each run of
# the auto-logout mechanism. After every “auto-logout” time
# interval, the SM checks which subscriber IP addresses have a lease
# time that has expired, and begins to automatically remove these IP
# addresses from the system (causing it to be removed from the SCE
# platform's database).
# Auto-logout should be activated when the LEG/API cannot provide
# logout indications.

auto_logout_interval=360
# The following parameter defines the grace period in seconds for
# subscriber auto logout. A subscriber will be logged out only after
# timeout period + grace period seconds.

grace_period=10
# The following parameter defines the maximum rate (logouts per
# second) that the auto-logout task will perform logouts from the
# system. This enables to spread the load of the logout operations
# over time, and reduce the performance impact on other operations.
# the value should be calculated so it spreads the logouts over at
# least half of 'auto_logout_interval' time. (default 50)

max_rate=50To enable the CNR LEG to communicate with the SM, the PRPC server must be up and running. The RPC server is started by default, therefore it does not require special configuration.
The following example is a portion of a sample p3sm.cfg configuration file showing the PRPC server configuration:
[RPC.Server]
# RPC server port (default 14374)

port=14374This appendix describes the CNR LEG design, logging, and tracing, and the operations performed by the LEG in each extension point. The purpose of this appendix is to provide insight into the CNR LEG operation and integration with CNR.
The CNR LEG uses extension points:
init-entrypost-packet-decodepost-send-packet
When an extension point hook is called, the following sequence of events takes place:
The extension point hook performs the minimal computation necessary to extract all the required data and calls a Non-blocking C++ API operation.
The Non-blocking operation encodes a message and places it in a queue.
The Non-blocking C++ API network task reads messages from the message buffer and sends them over the network to the PRPC Server on the SM.
The PRPC Server decodes the message and passes it to the cable support module, which sets up the subscribers in the SM database using the SM core functionality.
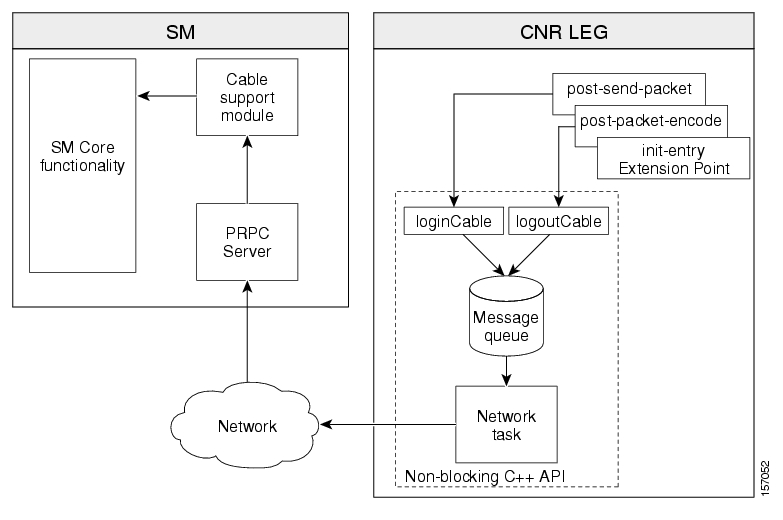
The only operations performed in the context of the CNR extension dispatching thread are message creation and placement in a message queue. A separate thread performs the heavy network operations. Note that if for some reason the message queue is full, the message will be dropped to avoid the risk of creating a delay, which would damage CNR performance.
By default, the CNR LEG logs its messages to the CNR log. The LEG supports a debug mode and several trace levels. The LEG configuration file controls logging and tracing.
Note
Changes made to the LEG configuration file become effective only when the LEG is restarted.
This section briefly describes the operations performed by the CNR LEG at each extension point.
The extension point init-entry initializes and terminates the CNR LEG.
During initialization, the CNR LEG performs the following operations:
Reading the configuration file
Initializing the LEG logging and tracing
Creating a Non-blocking C++ API instance and connecting it to the SM
Starting the C++ API network-task thread
During termination, the CNR LEG performs the following operations:
Stopping and freeing the Non-blocking C++ API instance
Stopping the C++ API network-task thread
The extension point post-send-packet sends the following cableLogin operations to the SM:
Verifying that the request-dictionary is for DHCP REQUEST and the response dictionary is for DHCP ACK
Extracting CM-MAC, CPE-MAC, and CMTS-IP from the request dictionary
Extracting the assigned CPE-IP and lease time from the response dictionary
In CM as Subscriber mode CM requests are ignored
Calling the Non-blocking C++ API
cableLogin\loginoperation with the parameters extractedIf no CM-MAC (option 82) is found, an attempt to extend the lease based solely on the IP address is performed
The extension point post-packet-decode sends the following cableLogout\logout operations to the SM:
Verifying that the request dictionary is for either DHCP RELEASE or DHCP DECLINE
Extracting CM-MAC, CPE-MAC, CPE-IP, and CMTS-IP from the request dictionary
Calling the Non-blocking C++ API
cableLogout\logoutoperation with the parameters extracted