|
|

3Installing and Starting Cisco Broadband Configurator
4Reviewing the Cisco Broadband Configurator Interface
5Task Flow: Using Cisco Broadband Configurator to Provision a CPE Device
6Creating and Modifying Configuration Files
7Using the Multifile Editor to Change Multiple Configuration Files at One Time
8Referencing Sample Configuration Files
9Using a Command-Line Interface with Cisco Broadband Configurator
10Using Non-Specification TLVs and DOCSIS 2.0 TLVs
11Understanding Parameters in the Property File
12Understanding the Set of Mapping Files for MIB OIDs
13Understanding the Vendor File
14Uninstalling Cisco Broadband Configurator
15Sample ASCII Format DOCSIS Configuration File with All Supported TLVs
17Obtaining Technical Assistance
18Obtaining Additional Publications and Information
Cisco Broadband Configurator Release 4.0 is a Java-based, standalone application that collects information and generates a configuration file that is compliant with Data-over-Cable Service Interface Specifications (DOCSIS) or PacketCableTM.. The configuration file is used to provision a customer premises equipment (CPE) device. Cisco Broadband Configurator:
The configuration file that you create with Cisco Broadband Configurator conforms to the format specified in the DOCSIS or PacketCable specifications.
This release runs on the Linux, Solaris, and Windows operating systems.
This section lists the minimum system requirements for each operating system (OS) that Cisco Broadband Configurator supports.
This section provides instructions to install and start Cisco Broadband Configurator on each supported platform.
Step 2 Insert the Cisco Broadband Configurator CD-ROM into the CD-ROM drive.
Step 3 To mount the CD, enter:
Step 4 To change to the Cisco Broadband Configurator Linux directory, enter:
Step 5 To start the installation program, enter:
Step 6 To unmount and eject the CD, enter:
Step 7 To start Cisco Broadband Configurator, change to the /opt/CSCOcbc/docsisConfig/bin directory and run ConfigEdit.sh.
 |
Tip If you log in to the remote host to run clients, you can set the $DISPLAY environment variable to point to your X server so that you do not have to specify your server in the command line every time you run a client. |
Step 2 Insert the Cisco Broadband Configurator CD-ROM into the CD-ROM drive.
Step 3 (Optional) If you are not running Solaris Volume Manager, you have to mount the CD manually:
Step 4 To change to the Cisco Broadband Configurator Solaris directory and install the application, enter:
 |
Note The Solaris installation asks more than once if you want to install Cisco Broadband Configurator. For the first prompt, hit Enter. For the second prompt, enter q to quit the sequence of questions. |
Step 5 (Optional) If you are not running Solaris Volume Manager, to unmount the CD, enter:
|
Note If you are running Solaris Volume Manager, the CD-ROM automatically unmounts. |
Step 6 To eject the CD, enter:
Step 7 To start Cisco Broadband Configurator, change to the /opt/CSCOcbc/docsisConfig/bin directory and run ConfigEdit.sh.
|
Tip If you log in to the remote host to run clients, you can set the $DISPLAY environment variable to point to your X server so that you do not have to specify your server in the command line every time you run a client. |
Step 2 From Windows Explorer, double-click Setup.exe in CDROM_DRIVE\win.
Step 3 In the InstallShield Wizard, follow the directions to install Cisco Broadband Configurator.
Step 4 To start Cisco Broadband Configurator, choose:
Start > Programs > Cisco Broadband Configurator > Start Configurator
After you start Cisco Broadband Configurator, you see the graphical user interface shown in Figure 1:
The tasks in Cisco Broadband Configurator are categorized within four menus:
The next sections describe each task on these menus.
The File menu contains the following tasks:
The Editor menu contains the following tasks:
The Samples menu contains the following tasks:
 |
Caution Do not change the content or names of the sample configuration files that are provided with Cisco Broadband Configurator.These sample configuration files meet specification requirements, are accurate to provision a device, and are referenced by their filenames in Cisco Broadband Configurator's property file. |
The Help menu contains the following tasks:
Below the Cisco Broadband Configurator menu bar, there is a task bar for commonly used tasks on the File and Editor menus. This task bar is shown in Figure 2.
The task each icon represents is described in "Using the File Menu" and "Using the Editor Menu".
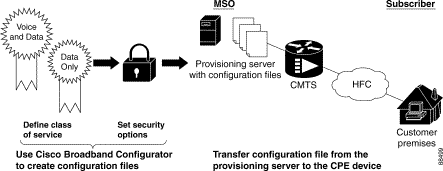
Figure 3 illustrates a high-level task flow for provisioning a customer premises equipment (CPE) device in the field.
This section describes the first and second tasks in the task flow shown in Figure 3.
The Multiple System Operator (MSO) uses Cisco Broadband Configurator to generate configuration files, which provide a CPE device with the information the device needs in order to register with the cable modem termination system (CMTS).
Two primary purposes of the configuration file are to:
This section describes the last task in the task flow shown in Figure 3.
After using Cisco Broadband Configurator to generate configuration files for its customer base, the MSO transfers the configuration file from its provisioning server to the customer premises equipment. The CPE device could be a cable modem for high-speed data or a media terminal adapter (MTA) for voice services.
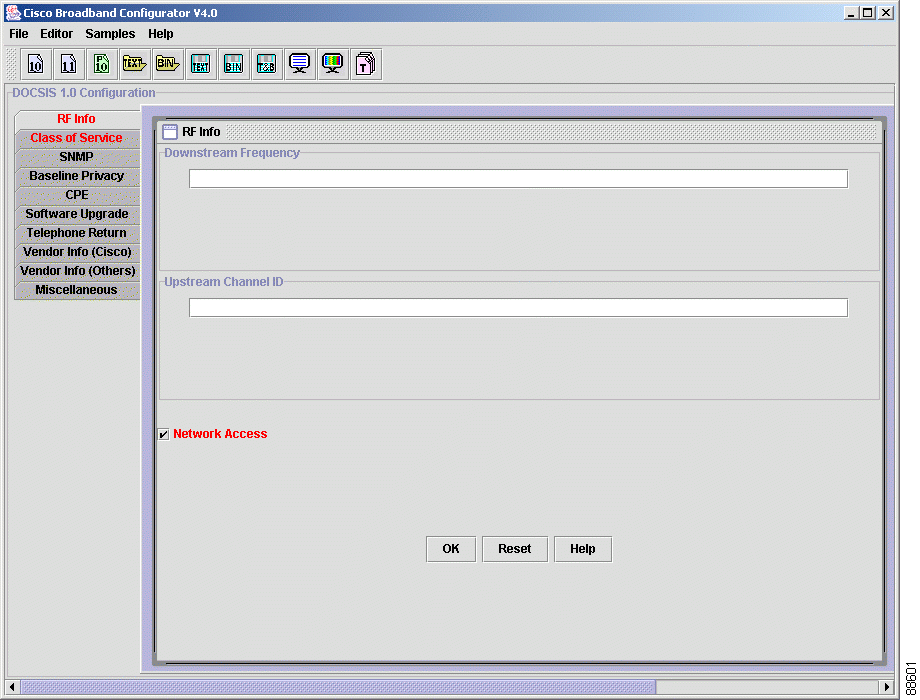
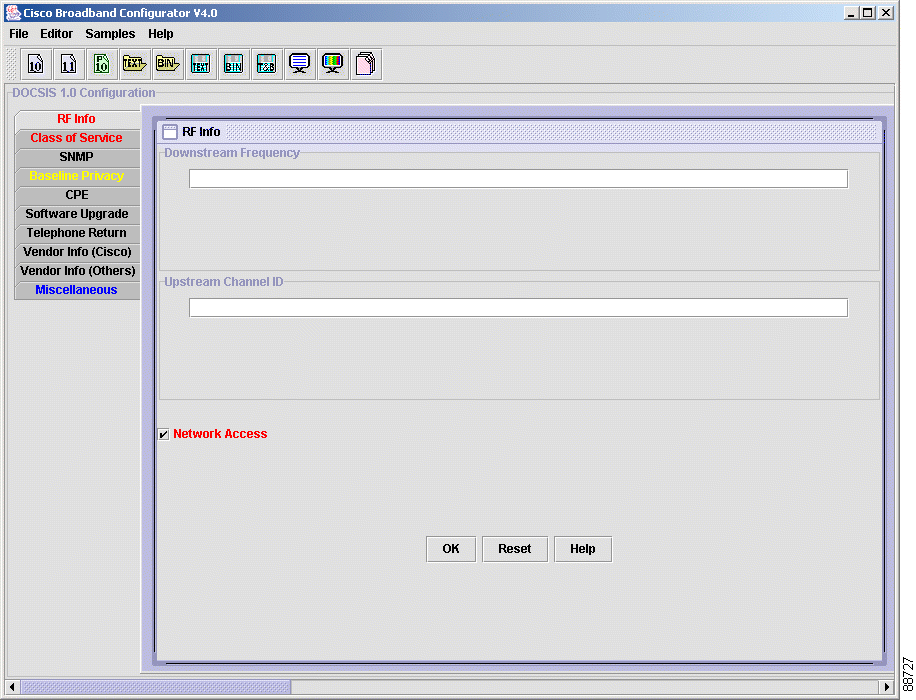
The Cisco Broadband Configurator GUI uses tabs to represent sections of a configuration file, as shown in Figure 4.
The tabs change for DOCSIS 1.0, DOCSIS 1.1, and PacketCable 1.0. Figure 4 shows the tabs for DOCSIS 1.0, which is indicated above the color-coded tabs.
The tabs use the following color-coding scheme:
To create a configuration file:
|
Note For more information on default values, see "The Wizard Mode Parameter". |
Step 2 To create a configuration file, choose one of the following options from the menu or click one of the icons in the icon bar:
Tabs appear for the type of configuration file you chose.
Step 3 Select a tab on the left to display the fields for it. To fill in each field in the tab, click Help to refer to the
Cisco Broadband Configurator online help for directions and acceptable values.
|
Note You can select the tabs in any order. You do not have to go through them in a prescribed sequence. |
Step 4 (Optional) When you view or modify a configuration file, you can work in a text editor or in the GUI. The GUI is the default. To toggle between editors, choose one of the following options from the menu or click one of the icons in the icon bar:
|
Note To get online help with detailed instructions, you must be in the GUI Editor, from which you can click Help. |
Step 5 (Optional) When you are ready to save the file, to automatically append the default file extension to the configuration file, from the File menu, choose Append Default File Extension.
|
Note For details on setting default file extensions, see "File Extension Parameters". |
Step 6 To save the configuration file, choose one of the following options from the menu or click one of the icons in the icon bar:
|
Tip Cisco Broadband Configurator allows you to use a colon (:) in a DOCSIS configuration filename on the Linux and Solaris platforms. The colon is not supported in filenames on the Windows platform because it is reserved to indicate a disk drive. For security reasons, Cisco recommends including the colon in a DOCSIS configuration filename on the Linux and Solaris platforms. A filename with a colon makes it harder for a hacker to obtain and serve their cable modem's DOCSIS configuration file to their modem. |
To modify a configuration file:
| Menu | Icon Bar |
To open an ASCII format configuration file, from the File menu, choose Open Text File. |
|
To open a binary format configuration file, from the File menu, choose Open Binary File. |
Step 2 Select a tab on the left to display the fields for it. To fill in each field, click Help for detailed directions and acceptable values.
|
Note You can select the tabs in any order. You do not have to go through them in a prescribed sequence. |
Step 3 (Optional) When you view or edit a configuration file, you can work in a text editor or in the GUI. The GUI is the default. To toggle between editors, choose one of the following options from the menu or click one of the icons in the icon bar:
| Menu | Icon Bar |
To view or edit a configuration file in ASCII format, from the Editor menu, choose Text Editor. |
|
To view or edit a configuration file in the GUI, from the Editor menu, choose GUI Editor. |
|
Note To get online help for detailed instructions, you must be in the GUI Editor, from which you can click Help for any window. |
Step 4 (Optional) When you are ready to save the file, to automatically save the configuration file with the default file extension automatically appended to it, from the File menu, choose Append Default File Extension.
Step 5 To save the configuration file, choose one of the following options from the menu or click one of the icons in the icon bar:
|
Tip Cisco Broadband Configurator allows you to use a colon (:) in a DOCSIS configuration filename on the Linux and Solaris platforms. The colon is not supported in filenames on the Windows platform because it is reserved to indicate a disk drive. For security reasons, Cisco recommends including the colon in a DOCSIS configuration filename on the Linux and Solaris platforms. A filename with a colon makes it harder for a hacker to obtain and serve their cable modem's DOCSIS configuration file to their modem. |
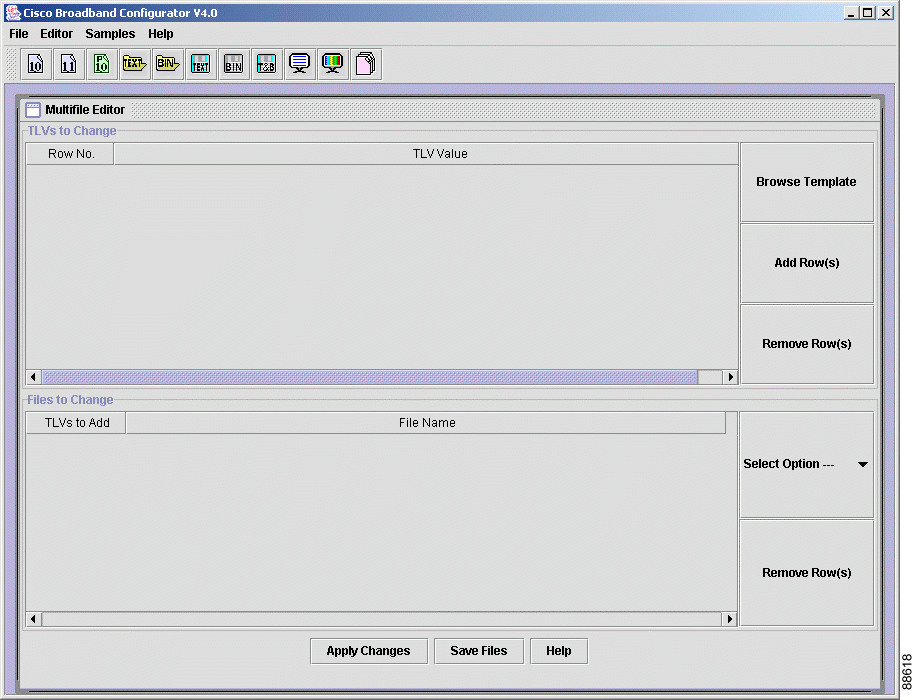
The Multifile Editor allows you to change multiple configuration files at one time. Specifically, you can use the Multifile Editor to open:
As shown in Figure 5, the Multifile Editor has two parts:
In the Multifile Editor, you can manually list TLVs or you can use a template file that contains the TLVs. A template file is a text format configuration file that lists more than one instance of some or all TLVs. Example 1 shows a sample template file that lists more than one instance of three TLVs:
S06 (Max US Transmit Rate) = 1522
S06 (Max US Transmit Rate) = 1522
S06 (Max US Transmit Rate) = 1522
S06 (Max US Transmit Rate) = 1522
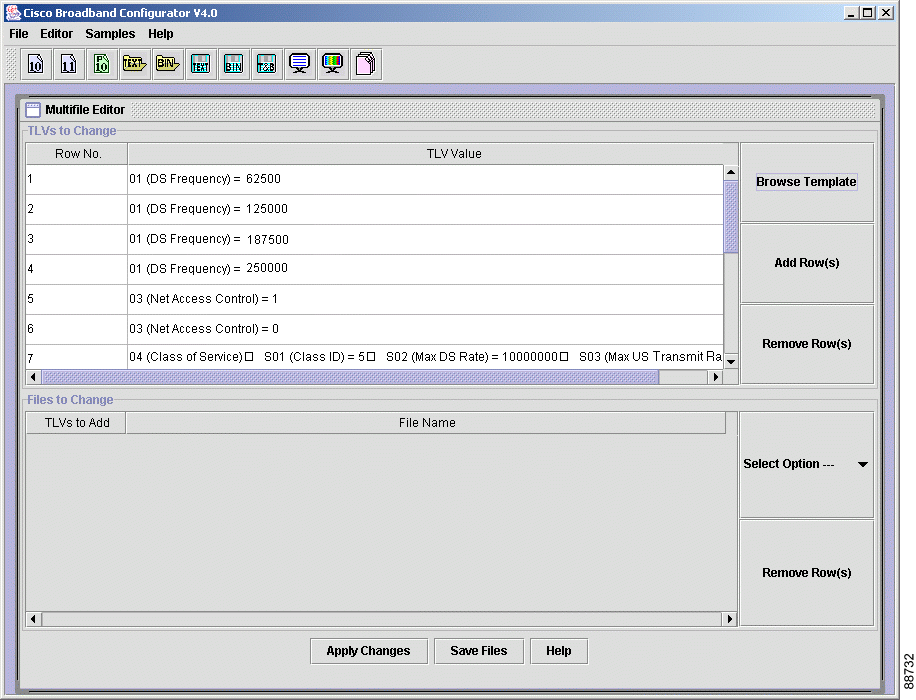
Figure 6 shows the same template file in Example 1, but in the Multifile Editor. The contents of the file are displayed in the TLVs to Change section, in the upper half of the Multifile Editor.
As shown in Figure 6, the TLVs to Change section lists the following TLVs from the template file:
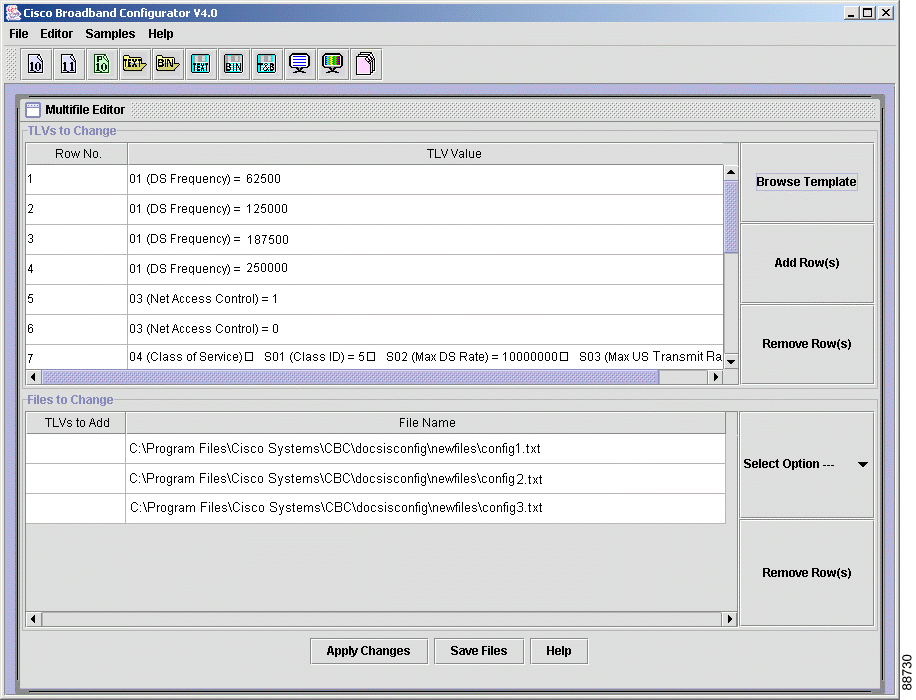
Figure 7 shows a list of configuration files in the Multifile Editor. These files are listed in the Files to Change section, in the lower half of the Multifile Editor.
As shown in Figure 7, the Files to Change section lists three configuration files:
You can create a template file in any text editor, save it with the .tmpl file extension and open it in Cisco Broadband Configurator's Multifile Editor.
Cisco Broadband Configurator supplies two sample templates, example.tmpl and example2.tmpl. Example 1 shows the contents of example.tmpl. Template files are in the following platform-dependent directories:
To create a template file that you use in the Multifile Editor:
Step 2 Using Example 1 as a model, add multiple instances of any TLV to the file. If you want, you can list every TLV in the file.
Step 3 Save the file with a .tmpl extension in the templates directory for your operating system.
To use the Multifile Editor to apply changes to more than one configuration file at a time:
Step 2 List the TLVs that you want to apply to configuration files by doing one of the following:
Step 3 List the configuration files that you want to create or change by doing one of the following:
Step 4 In the Multifile Editor window, click Help for detailed directions on applying TLVs in the upper half of the window to configuration files in the lower half of the window.
You can use sample configuration files that:
On the Samples menu, Cisco Broadband Configurator supplies the following sample configuration files:
|
Caution Do not change the content or names of the sample configuration files that are provided with Cisco Broadband Configurator.These sample configuration files meet specification requirements, are accurate to provision a device, and are referenced by their filenames in the Cisco Broadband Configurator's property file. |
Sample configuration files, which must be in text format, are in the following platform-dependent directories:
The sample configuration files that Cisco Broadband Configurator supplies have the .txt file extension. For details on setting your own default file extensions, see "File Extension Parameters".
As you create your own configuration files, you can add them to the Samples menu for easy access and remove them when you no longer need them. You cannot remove sample configuration files that are supplied with Cisco Broadband Configurator.
To open a sample configuration file from the Samples menu, choose one of the supplied files listed below or one that you created and added to the menu:
|
Note To add or remove a sample configuration file, see "Adding or Removing Your Configuration File on the Samples Menu". |
|
Note You cannot remove a sample configuration file from the Samples menu if that file was supplied with Cisco Broadband Configurator. |
Step 2 For detailed directions, click Help in the Add/Remove Sample Files window.
You can use a command-line interface (CLI) to perform the following tasks in Cisco Broadband Configurator:
This functionality allows you to perform these tasks one at a time or within a script that you create. If you use the commands in a script, you can generate multiple configuration files without using the GUI.
To use a CLI to start Cisco Broadband Configurator, enter the command for your operating system:
To use a CLI to create a configuration file in binary format by entering a configuration file in ASCII format, enter the command for your operating system:
|
Note To see a sample text format configuration file, see "Sample ASCII Format DOCSIS Configuration File with All Supported TLVs". |
When you create a configuration file in binary format by entering a configuration file in ASCII format, you can specify a shared secret. To use a CLI to specify a shared secret, enter the command for your operating system:
To use a CLI to view a configuration file in ASCII format by entering a configuration file in binary format, enter the command for your operating system:
To create a configuration file in ASCII format by entering a configuration file in binary format, enter the command for your operating system:
|
Tip If you edit the ASCII output from this command, you can create a binary format version of it by using the command in the "Creating a Configuration File in Binary Format with a Command-Line Interface". |
When you show a configuration file in ASCII format by entering a configuration file in binary format, you can show vendor-specific subtype options under TLV 43 in hexadecimal, decimal, or ASCII format. To do this, enter the command for your operating system:
The following TLVs can be specified in a configuration file in ASCII format when you enter them in a command-line interface or in Cisco Broadband Configurator's text editor:
|
Note If you switch from Cisco Broadband Configurator's text editor to its GUI editor, these TLVs do not show. Non-specification TLVs and DOCSIS 2.0 TLVs show in the text editor only. |
You can specify whether or not to remove these TLVs from a configuration file when you save it. For more information, see "The Remove Unknown Type TLV Parameter".
Cisco Broadband Configurator supports non-specification TLVs in a configuration file in ASCII format when you enter them in a command-line interface or in Cisco Broadband Configurator's text editor. To use them, you must supply the following parameters in the format shown:
Acceptable values for these parameters are:
The following example shows a TLV in this format:
S128 (Unknown Type) = "/tftpboot/ios.cfg"
Cisco Broadband Configurator supports two TLVs that are specific to DOCSIS 2.0 and can be used in the command-line interface or in Cisco Broadband Configurator's text editor. To use them in a configuration file in ASCII format, you must supply the following parameters in the format shown:
Acceptable values for these parameters are:
The following example shows each of these TLVs in this format:
After you create a configuration file in ASCII format that includes non-specification or DOCSIS 2.0 TLVs, you can:
1. Convert the configuration file from ASCII format to binary format. See "Creating a Configuration File in Binary Format with a Command-Line Interface".
2. Verify that the non-specification or DOCSIS 2.0 TLVs were included correctly in the binary file. See "Viewing and Creating a Configuration File in ASCII Format with a Command-Line Interface".
Cisco Broadband Configurator has a property file that contains application settings, such as which choices appear on each menu. This file, DOCSIS_Config.properties, is located in the following platform-dependent directories:
Although most settings in DOCSIS_Config.properties cannot be edited, you can modify the following settings:
This section describes each setting that you can change and provides step-by-step directions to modify the DOCSIS_Config.properties file.
For text and binary configuration files, you can specify the following criteria:
The default text file extension parameters are shown below:
DefaultBinaryFileExtension=.bin
The default append parameter is shown below:
Acceptable values are yes and no.
If the AppendDefaultFileExtension parameter is set to no, Cisco Broadband Configurator saves a configuration file with the filename only. For example, it would save a configuration file as myconfig rather than myconfig.txt or myconfig.bin.
|
Note From the File menu, you can choose Save As Text & Binary File. When you choose this option, Cisco Broadband Configurator appends the default file extension for each file type, even if the AppendDefaultFileExtension parameter is set to no. This is necessary because you are saving one file in two formats and the file extension is needed to make the filename unique. |
On a file-by-file basis, you can override the DefaultTextFileExtension and DefaultBinaryFileExtension parameters. For example, if you have the DefaultTextFileExtension parameter set to .txt and choose Save As Text File from the File menu, you can name the file myconfig.cm. These parameters in the property file do not prohibit you from using other file extensions on a file-by-file basis.
The Wizard Mode setting determines if default values display when you create a new configuration file. Default values come from .txt files in the following platform-dependent directories:
The default Wizard Mode parameter is shown below:
Acceptable values are yes and no.
You can also provide default values on a file-by-file basis, which overrides the Wizard Mode parameter set to no. For example, if you have the Wizard Mode parameter set to no and want to create three configuration files with default values, you can select the Provide Default Values option when you create each of the three files. This provides flexibility without changing the Wizard Mode parameter and is explained in step 1 of "Creating a Configuration File".
The Vendors setting specifies each vendor that has TLV 43 subtype options. By specifying the vendor here, Cisco Broadband Configurator can display TLV 43 options in ASCII format. The default Vendors parameter is shown below:
The Vendors setting is one part of a two-part relationship. Each vendor specified in this setting must also have a vendor file that lists each subtype option under TLV 43 for that vendor. The vendor filename must:
For example, Cisco is specified in the Vendors setting as cisco. Consequently, Cisco has a vendor file that is also named cisco.
For more information on the vendor file, see "Understanding the Vendor File".
The Remove Unknown Type TLV setting indicates if the following TLVs should be removed from the configuration file when you save it:
The default Remove Unknown Type TLV parameter is shown below:
Acceptable values are yes and no.
For more information on non-specification TLVs or DOCSIS 2.0 TLVs, see "Using Non-Specification TLVs and DOCSIS 2.0 TLVs".
To modify the DOCSIS_Config.properties file:
Step 2 To specify a default file extension, enter the extension for these settings:
Step 3 To specify whether you want to automatically append a default file extension when you save a file, enter yes or no for the following setting:
Step 4 To specify whether you want to default values in a configuration file that you create, enter yes or no for the following setting:
Step 5 To add a vendor to the Vendors setting, enter a space and the additional vendor's name:
|
Note In these directions, newvendor represents the name of the vendor for which you are creating a file. |
Step 6 To specify whether you want to remove non-specification or DOCSIS 2.0 TLVs from a configuration file when you save it, enter yes or no for the following setting:
Step 7 Save the DOCSIS_Config.properties file.
|
Caution Do not change the name of the DOCSIS_Config.properties file. |
Cisco Broadband Configurator has a set of mapping files that lists each MIB object identifier (OID) used by Simple Network Management Protocol (SNMP) to generate a DOCSIS or PacketCable configuration file. These files are located in the following platform-dependent directories:
The following files specify the MIBs for each set of features:
Example 2 shows the contents of one file, mibs_DOCSIS10.
The following files list all parent OIDs that are required by each MIB:
Example 2 shows the contents of one file, mibs_prefixes_DOCSIS10.
internet , 1.3.6.1 , nonLeaf , ,
directory , 1.3.6.1.1 , nonLeaf , ,
mgmt , 1.3.6.1.2 , nonLeaf , ,
mib_2 , 1.3.6.1.2.1 , nonLeaf , ,
transmission , 1.3.6.1.2.1.10 , nonLeaf , ,
private , 1.3.6.1.4 , nonLeaf , ,
enterprises , 1.3.6.1.4.1 , nonLeaf , ,
cisco , 1.3.6.1.4.1.9 , nonLeaf , ,
ciscoMgmt , 1.3.6.1.4.1.9.9 , nonLeaf , ,
cableLabs , 1.3.6.1.4.1.4491 , nonLeaf , ,
clabProject , 1.3.6.1.4.1.4491.2 , nonLeaf , ,
Each SNMP MIB attribute is listed in a MIB OID name mapping file. Cisco Broadband Configurator supplies nine MIB OID name mapping files. Table 1 lists each supplied MIB OID name mapping file and the set of features to which each one applies:
| Supplied MIB OID Name Mapping File | Set of Features to Which it Applies |
|---|---|
Supplied MIB OID Name Mapping Files and Applicable Feature Sets
For each SNMP MIB attribute defined in a MIB OID name mapping file, the attribute must contain four parameters:
Each parameter must be separated by a comma, in the format shown below:
snmp mib attribute name, object id, value type, max-access
The value type and max-access parameters do not apply to every attribute. In such cases, a comma is required, as shown below:
snmp mib attribute name, object id, , ,
|
Note If no maximum access value is provided, the attribute is treated as non-accessible. |
Example 4 shows a portion of the MIB OID name mapping file for DOCS-IF-MIB. The upper rows do not have a maximum access value, but the lower ones do.
docsIfMib , 1.3.6.1.2.1.10.127 , nonLeaf, ,
docsIfMibObjects , 1.3.6.1.2.1.10.127.1 , nonLeaf , ,
docsIfBaseObjects , 1.3.6.1.2.1.10.127.1.1 , nonLeaf , ,
docsIfDownstreamChannelTable, 1.3.6.1.2.1.10.127.1.1.1, Aggregate, not-accessible
docsIfDownstreamChannelEntry , 1.3.6.1.2.1.10.127.1.1.1.1, Aggregate, not-accessible
docsIfDownChannelId, 1.3.6.1.2.1.10.127.1.1.1.1.1, Integer32(0..255), read-only
docsIfDownChannelFrequency,1.3.6.1.2.1.10.127.1.1.1.1.2,Integer32(0..1000000000),read-write
docsIfDownChannelWidth , 1.3.6.1.2.1.10.127.1.1.1.1.3, Integer32(0..16000000), read-write
docsIfDownChannelModulation , 1.3.6.1.2.1.10.127.1.1.1.1.4, INTEGER, read-write
docsIfDownChannelInterleave , 1.3.6.1.2.1.10.127.1.1.1.1.5, INTEGER, read-write
docsIfDownChannelPower , 1.3.6.1.2.1.10.127.1.1.1.1.6 , Integer32, read-write
|
Note Cisco Broadband Configurator 4.0 does not perform validation to ensure that a value does not exceed the range specified in a MIB OID name mapping file. |
Step 2 For each SNMP MIB attribute you add, enter values for the following four parameters in the format shown:
snmp mib attribute name, object id, value type, max-access
Step 3 Save the file.
Step 4 To include all parent OIDs of the MIB you added, update the appropriate parent OID file:
Step 5 For the MIB you added, update the MIBs list file to include the name of the mapping file you saved in step 3:
Step 2 To add an SNMP MIB attribute, enter the attribute in the format shown:
snmp mib attribute name, object id, value type, max-access
If the SNMP attribute does not have a value type or maximum access value, the format must be:
snmp mib attribute name, object id, , ,
Step 3 Save the file.
|
Caution Do not change the name of the supplied MIB OID name mapping files. |
For each vendor or manufacturer of CPE devices referenced in a configuration file, Cisco Broadband Configurator can present vendor-specific subtype options under TLV 43 in ASCII format if the vendor defines its vendor-specific subtype options in a vendor file. Vendor files are located in the following directories, depending on which operating system you have:
Cisco Broadband Configurator comes with one vendor file, cisco, which is in the following locations:
The vendor filename can not have a file extension, because it must agree with the vendor's name as it is specified in the Vendors setting in the property file, which is show below:
For more information, see "The Vendors Parameter".
A vendor file defines all vendor-specific subtype options under TLV 43. Each subtype option is defined by the following fields:
To show the format of a vendor file, Example 5 shows Cisco's vendor-specific subtype options under TLV 43.
# <subtypeid> , <format>, <default>, <length>, <multivalue>, <validrange>, <description>
cisco , SUBOPTION, , , , , , Cisco Specific Info
cisco.8 , HEXSTRING, 00 00 0c, 3, false, , , Vendor ID
cisco.1 , UINT, , 4, false, , , Static DS Frequency
cisco.2 , UINT, , 4, false, , , Sync Loss Timeout
cisco.3 , STRING, , , false, , , Update Boot Mon...
cisco.4 , UINT, , 2, false, , , Power Backoff
cisco.9 , UINT, , 1, false, , , Update Factory Sys...
cisco.10 , UINT, , 1, true, , , Number of Phone Lines
cisco.11 , SUBOPTION, , , true, , , IP Precedence
cisco.11.1 , UINT, , 1, false, , , Value
cisco.11.2 , UINT, , 4, false, , , Rate Limit
cisco.128 , STRING, , , false, , , IOS Filename
cisco.131 , STRING, , , true, , , IOS Config Command
cisco.132 , SUBOPTION, , , false, , , Flow Encoding
cisco.132.1 , UINT, , 1, false, , , FLOW ID
cisco.132.2 , UINT, , 1, false, , , Class ID
cisco.132.3 , UINT, , 2, false, 1, 65535, Unsolicited Grant Size
cisco.132.4 , UINT, , 4, false, 1, 65535, Nominal Grant Interval
cisco.132.5 , UINT, , 1, false, 0, 127, Grant per Interval
cisco.132.6 , UINT, , 1, false, 0, 127, Embedded Calls
cisco.132.7 , UINT, , 2, false, 0, 4096, Hold Queue Length
cisco.132.8 , SUBOPTION, , , false, , , Fair Queue
cisco.132.8.1 , UINT, , 2, false, 1, 4096, Congestive Discard...
cisco.132.8.2 , UINT, , 2, false, 16, 4096, Dynamic Conversation...
cisco.132.8.3 , UINT, , 2, false, 0, 1000, Reservable Conversation
cisco.132.9 , UINT, , 1, false, 1, 16, Custom Queue List...
cisco.132.10 , BOOLEAN, , 1, false, , Random Detection
cisco.132.11 , UINT, , 1, false, 1, 16, Priority Group
cisco.132.12 , STRING, , , false, , , Service Policy File
cisco.132.13 , UINT, , 2, false, 1, 10080, Inactivity Timer
cisco.132.14 , STRING, , , false, , , COS Tag
cisco.133 , UINT, , 1, false, 0, 15, DS SubChannel ID
cisco.134 , STRING, , , false, , , SU Tag
|
Note In the Description column, an ellipse (...) indicates that a description was shortened for display purposes in this guide only. |
The subtypeid field is a unique identifier for the subtype option. It is a required field. In the subtypeid field, the characters to the left of the first period are called the prefix. The prefix of each subtypeid must be the same as the:
As shown in the Subtypeid column of Example 5, the prefix for the Cisco subtypeid fields is cisco.
The format field specifies the data format and how the subtype option is encoded. It is a required field. The format types are:
Several of these format types are shown in the Format column of Example 5.
The default field specifies the default value of the subtype option. If there is no default value for the subtype option, enter a comma.
As shown in Example 5, most of Cisco's subtype options do not have a default value and show a comma in the Default column.
The length field specifies the length of the subtype value. The following caveats apply:
As shown in Example 5, the Length column shows that most of Cisco's subtype options have a specified length from 1 to 4 digits.
The multivalue field specifies whether multiple instances can be specified for the subtype option in the configuration file. Possible values are true and false.
As shown in Example 5, the Multivalue column shows that most Cisco subtype options do not allow multiple options.
The validrange field specifies the valid range for the subtype option. If the subtype option does not have a valid range, enter two commas. This indicates that there is no need to perform validation.
As shown in Example 5, the Validrange column shows that about half of Cisco subtype options have a valid range and half do not.
The description field is a text description that describes the purpose of the subtype option. A sample description is Vendor ID.
As shown in Example 5, the Description column shows short descriptions that are unique to each subtype option.
Every vendor has a subtype 8 option, which must be defined on the line below the vendor subtypeid, such as cisco. The subtype 8 option, such as cisco.8, must have the following settings:
Example 6 shows the sequence and format of the subtype 8 option in the Cisco vendor file.
# <subtypeid> , <format>, <default>, <length>, <multivalue>, <validrange>, <description>
cisco , SUBOPTION, , , , , , Cisco Specific Info
cisco.8 , HEXSTRING, 00 00 0c, 3, false, , , Vendor ID
Step 2 Save the file as newvendor, without a file extension.
|
Note In these directions, newvendor represents the name of the vendor for which you are creating a file. |
Step 3 In the first line, define the vendor subtypeid for newvendor:
# <subtypeid>, <format>, <default>, <length>, <multivalue>, <validrange>, <description>
newvendor, SUBOPTION, , , , , , Newvendor Specific Info
Step 4 Below the subtypeid, define the vendor subtype 8 option for newvendor:
# <subtypeid>, <format>, <default>, <length>, <multivalue>, <validrange>, <description>
newvendor.8, , HEXSTRING, 00 00 01, 3, false, , , Vendor ID
|
Note The sample subtype 8 option above uses a fake OUI, 00 00 01, in the default field for newvendor. |
Step 5 Enter as many vendor-specific subtype options for newvendor as necessary, by filling in the following seven fields in the format shown:
# <subtypeid>, <format>, <default>, <length>, <multivalue>, <validrange>, <description>
See the previous topics in this section for details on acceptable values for each of the seven fields.
Step 6 Save the file.
|
Note The name of the vendor file must be the same as the value in property file. For more information, see "The Vendors Parameter". |
This section provides instructions to uninstall Cisco Broadband Configurator on each supported platform.
Step 2 To uninstall Cisco Broadband Configurator, enter:
Step 2 To uninstall Cisco Broadband Configurator, enter:
Start > Settings > Control Panel > Add/Remove Programs
Step 2 Select Cisco Broadband Configurator.
Step 3 Click Change/Remove.
Step 4 In the InstallShield Wizard, select Remove and click Next.
This section contains an ASCII format DOCSIS configuration file that shows all supported TLVs.
# Information: Successfully loaded file Config-ascii.cm.
04 (Class of Service Encodings Block)
S05 (Guaranteed Min US rate) = 5
S06 (Max US transmit rate) = 6
S01 (Concatenation Support) = No
09 (Software Upgrade Filename) = tftp.file
10 (SNMP Write Access) = 1.2.3.4.5.6.0
10 (SNMP Write Access) = 2.3.4.5.6.7.1
11 (SNMP MIB Object) = 1.2.3.4 (Integer) = 1
11 (SNMP MIB Object) = 2.1.3.4 (Integer) = 2
11 (SNMP MIB Object) = 1.2.4.5 (Integer) = 3
11 (SNMP MIB Object) = 2.1.4.5 (IP Address) = 2.3.4.5
11 (SNMP MIB Object) = 1.3.4.5 (Octet String) = string
11 (SNMP MIB Object) = 1.3.4.6 (Octet String) = " string with space "
11 (SNMP MIB Object) = 1.3.4.7 (Octet String) = "0xea-f-f1-12-ab"
11 (SNMP MIB Object) = 1.3.4.8 (Octet String) = 0xea-f-f1-12-ab
14 (CPE Ethernet MAC Address) = ab-1c-e-f-23-41
14 (CPE Ethernet MAC Address) = 1e-cd-ef-1-2-3
S02 (Service Provider Name) = uunet
S06 (Connection Threshold) = 4
S08 (Login Password) = password
S10 (DHCP Server IP) = 1.2.3.4
S13 (Demand Dial Inactivity Timer Threshold) = 7
16 (SNMP Manager IP) = 1.2.3.4
S01 (Authorize Wait Timeout) = 1
S02 (Reauthorize Wait Timeout) = 2
S03 (Authorize Grace Timeout) = 3
S04 (Operational Wait Timeout) = 4
S07 (Authorize Reject Wait Timeout)= 7
18 (Maximum Number of CPE) = 1
22 (Upstream Packet Classification Block)
S09 (IP Packet Classification)
T01 (IP ToS Range & Mask) = 8.9.10
T03 (Source Address) = 1.2.3.4
T04 (Source Mask) = 255.255.255.255
T05 (Destination Address) = 1.2.3.4
T06 (Destination Mask) = 255.255.255.255
T09 (Destination Port Start)= 1
T10 (Destination Port End) = 2
S10 (Ethernet LLC Packet Classification)
T01 (Destination MAC Addr) = 1-2-3-4-5-6-7-8-9-a-b-c
T02 (Source MAC Addr) = 1-2-3-4-5-6
T03 (Enet/DSAP/MAC Type) = 7.8.9
S11 (IEEE 802.1P/Q Packet Classification)
T01 (IEEE 802.1P User Priority)= 8.9
T02 (IEEE 802.1Q VLAN ID) = 12.1
S43 (Vendor Specific Options) = 10.11.12
23 (Downstream Packet Classification Block)
S09 (IP Packet Classification)
T01 (IP ToS Range & Mask) = 8.9.10
T03 (Source Address) = 1.2.3.4
T04 (Source Mask) = 255.255.255.255
T05 (Destination Address) = 1.2.3.4
T06 (Destination Mask) = 255.255.255.255
T09 (Destination Port Start)= 1
T10 (Destination Port End) = 2
S10 (Ethernet LLC Packet Classification)
T01 (Destination MAC Addr) = 1-2-3-4-5-6-7-8-9-a-b-c
T02 (Source MAC Addr) = 1-2-3-4-5-6
T03 (Enet/DSAP/MAC Type) = 7.8.9
S11 (IEEE 802.1P/Q Packet Classification)
T01 (IEEE 802.1P User Priority)= 8.9
T02 (IEEE 802.1Q VLAN ID) = 12.1
S43 (Vendor Specific Options) = 10.11.12
24 (Upstream Service Flow Block)
S06 (QoS Parameter Set Type) = 4
S08 (Max Substained Traffic Rate) = 6
S10 (Max Reserved Traffic Rate) = 8
S11 (Assumed Min Reserved Rate Packet Size) = 9
S12 (Timeout for Active QoS Parameters) = 10
S13 (Timeout for Admitted QoS Parameters) = 11
S14 (Max Concatenated Burst) = 12
S15 (Service Flow Scheduling Type) = 0
S16 (Request/Transmission Policy) = 514
S17 (Nominal Polling Interval) = 15
S18 (Tolerated Poll Jitter) = 16
S19 (Unsolicited Grant Size) = 17
S20 (Nominal Grant Interval) = 18
S21 (Tolerated Grant Interval) = 19
S23 (IP ToS Overwrite) = 21.22
S43 (Vendor Specific QoS Parameter) = 23.24.25
25 (Downstream Service Flow Block)
S06 (QoS Parameter Set Type) = 4
S08 (Max Substained Traffic Rate) = 6
S10 (Max Reserved Traffic Rate) = 8
S11 (Assumed Min Reserved Rate Packet Size) = 9
S12 (Timeout for Active QoS Parameters) = 10
S13 (Timeout for Admitted QoS Parameters) = 11
S14 (Max Downstream Latency) = 12
S43 (Vendor Specific QoS Parameter) = 13.14.15
26 (Payload Header Suppression Block)
S01 (Classifier Reference) = 1
S43 (Vendor Specific PHS Parameter) = 11.12.13
28 (Max Number of Classifiers) = 1
S01 (Security Name) = docsisManager
S02 (Manager Public Number) = 1-2-3
S01 (Security Name) = docsisOperator
S02 (Manager Public Number) = 1e-a2-c3
35 (Subscriber Mgmt Control) = 10.0.1
36 (Subscriber Mgmt CPE IP Table) = 172.27.3.20
36 (Subscriber Mgmt CPE IP Table) = 172.27.3.21
36 (Subscriber Mgmt CPE IP Table) = 172.27.3.22
37 (Subscriber Mgmt Filter Groups) = 1.2.3.4.5.6.7.8
43 (Vendor Cisco Systems Specific Info Block)
S10 (Number of Phone Lines) = 2
S131 (IOS Config Command) = ip http server
43 (Vendor Cisco Systems Specific Info Block)
T03 (Unsolicited Grant Size)= 3
T04 (Nominal Grant Interval)= 4
U01 (Congestive Discard Threshold) = 8
U02 (Dynamic Conversation Queues) = 16
U03 (Reservable Conversation Queues)= 10
T12 (Service Policy File) = 14
43 (Vendor Specific Info) = 1.2.3.4.5.6
Cisco provides several ways to obtain documentation, technical assistance, and other technical resources. These sections explain how to obtain technical information from Cisco Systems.
You can access the most current Cisco documentation on the World Wide Web at this URL:
http://www.cisco.com/univercd/home/home.htm
You can access the Cisco website at this URL:
International Cisco web sites can be accessed from this URL:
http://www.cisco.com/public/countries_languages.shtml
Cisco documentation and additional literature are available in a Cisco Documentation CD-ROM package, which may have shipped with your product. The Documentation CD-ROM is updated monthly and may be more current than printed documentation. The CD-ROM package is available as a single unit or through an annual subscription.
Registered Cisco.com users can order the Documentation CD-ROM (product number DOC-CONDOCCD=) through the online Subscription Store:
http://www.cisco.com/go/subscription
You can find instructions for ordering documentation at this URL:
http://www.cisco.com/univercd/cc/td/doc/es_inpck/pdi.htm
You can order Cisco documentation in these ways:
http://www.cisco.com/en/US/partner/ordering/index.shtml
http://www.cisco.com/go/subscription
You can submit comments electronically on Cisco.com. On the Cisco Documentation home page, click Feedback at the top of the page.
You can e-mail your comments to bug-doc@cisco.com.
You can submit your comments by mail by using the response card behind the front cover of your document or by writing to the following address:
Cisco Systems
Attn: Customer Document Ordering
170 West Tasman Drive
San Jose, CA 95134-9883
Cisco provides Cisco.com, which includes the Cisco Technical Assistance Center (TAC) Website, as a starting point for all technical assistance. Customers and partners can obtain online documentation, troubleshooting tips, and sample configurations from the Cisco TAC website. Cisco.com registered users have complete access to the technical support resources on the Cisco TAC website, including TAC tools and utilities.
Cisco.com offers a suite of interactive, networked services that let you access Cisco information, networking solutions, services, programs, and resources at any time, from anywhere in the world.
Cisco.com provides a broad range of features and services to help you with these tasks:
To obtain customized information and service, you can self-register on Cisco.com at this URL:
The Cisco TAC is available to all customers who need technical assistance with a Cisco product, technology, or solution. Two levels of support are available: the Cisco TAC website and the Cisco TAC Escalation Center. The avenue of support that you choose depends on the priority of the problem and the conditions stated in service contracts, when applicable.
We categorize Cisco TAC inquiries according to urgency:
You can use the Cisco TAC website to resolve P3 and P4 issues yourself, saving both cost and time. The site provides around-the-clock access to online tools, knowledge bases, and software. To access the Cisco TAC website, go to this URL:
All customers, partners, and resellers who have a valid Cisco service contract have complete access to the technical support resources on the Cisco TAC website. Some services on the Cisco TAC website require a Cisco.com login ID and password. If you have a valid service contract but do not have a login ID or password, go to this URL to register:
http://tools.cisco.com/RPF/register/register.do
If you are a Cisco.com registered user, and you cannot resolve your technical issues by using the Cisco TAC website, you can open a case online at this URL:
http://www.cisco.com/en/US/support/index.html
If you have Internet access, we recommend that you open P3 and P4 cases through the Cisco TAC website so that you can describe the situation in your own words and attach any necessary files.
The Cisco TAC Escalation Center addresses priority level 1 or priority level 2 issues. These classifications are assigned when severe network degradation significantly impacts business operations. When you contact the TAC Escalation Center with a P1 or P2 problem, a Cisco TAC engineer automatically opens a case.
To obtain a directory of toll-free Cisco TAC telephone numbers for your country, go to this URL:
http://www.cisco.com/warp/public/687/Directory/DirTAC.shtml
Before calling, please check with your network operations center to determine the level of Cisco support services to which your company is entitled: for example, SMARTnet, SMARTnet Onsite, or Network Supported Accounts (NSA). When you call the center, please have available your service agreement number and your product serial number.
Information about Cisco products, technologies, and network solutions is available from various online and printed sources.
http://www.cisco.com/en/US/products/products_catalog_links_launch.html
http://www.cisco.com/en/US/about/ac123/ac114/about_cisco_packet_magazine.html
http://business.cisco.com/prod/tree.taf%3fasset_id=44699&public_view=true&kbns=1.html
http://www.cisco.com/en/US/about/ac123/ac147/about_cisco_the_internet_protocol_journal.html
http://www.cisco.com/en/US/learning/le31/learning_recommended_training_list.html
![]()
![]()
![]()
![]()
![]()
![]()
![]()
![]()
Posted: Thu May 1 14:15:42 PDT 2003
All contents are Copyright © 1992--2002 Cisco Systems, Inc. All rights reserved.
Important Notices and Privacy Statement.