|
|

| Prepare for Installation |
The Cisco uBR924 cable access router is available in differing bulk box and single packages:
 | Caution Use only a Cisco-provided power supply and cord. Using any other vendor's power supply and cord can cause loss of data or permanent damage. |
The service provider documentation set includes:
Two additional hardware-related documents are available via Cisco Connection Online (CCO): Cisco uBR924 Cable Access Router Installation and Configuration Guide and the Quick Start Guide, Cisco uBR924 Cable Access Router Installation and Startup---this document.
The subscriber documentation set includes the Quick Start, Cisco uBR924 Cable Access Router Subscriber Setup and the Regulatory Compliance and Safety Information for the Cisco uBR924 Cable Access Router publication.
| Prepare for Installation (continued) |
| Item | Description |
General |
|
| Coaxial cable is run from the CATV trunk to the subscriber building or residence. |
| The site is characterized from the headend to support upstream transmission and meets DOCSIS upstream and downstream RF requirements. Follow procedures in the NCTA Recommended Practises for Measurements on Cable Television Systems. |
| All required headend routing and network interface equipment is installed, configured, and operational. This includes all routers, servers (DHCP, TFTP, and TOD), network management systems, and/or other configuration or billing systems. |
| DHCP, Cisco IOS images, and DOCSIS configuration files have been created and pushed to appropriate servers such that each Cisco uBR924 cable access router, when initialized, can transmit a DHCP request, receive an IP address, obtain TFTP and TOD server addresses, and download a DOCSIS configuration file (and/or updated software image) in compliance with DOCSIS. |
| PCs at each subscriber site meet the minimum computing requirements and that TCP/IP and DHCP operating modes are enabled. Cisco recommends that the PC have a 486 DX 33 MHz processor minimum configuration (a 75 MHz Pentium or greater processor is recommended); 16 MB of RAM; Windows for Workgroups for 486-based PCs and Windows 95 (or higher) for Pentiums; an Internet browser; and a pre-installed Ethernet Network Interface Card (NIC) with DHCP enabled. |
IP Telephony |
|
| Telephones at each subscriber site support touch-tone dialing; rotary dialing is not supported.Wiring is in place at subscriber sites supporting multiple telephones and fax devices per VoIP telephone line. |
| Fax devices---standard Group III and computer-based Group III machines up to 14,400 baud---are supported in Cisco IOS Release 12.0(5)T or higher. Note: In general, fax/modem cards are not supported over Voice over IP (VoIP) links. Contact your network management, provisioning, or operations team to determine what your network supports. |
| A regular voice grade line and RJ-11 modular jack (USOC code) is installed near the location to install the router for all sites that support backup PSTN connections. |
| Install the Router and Connect Cables |

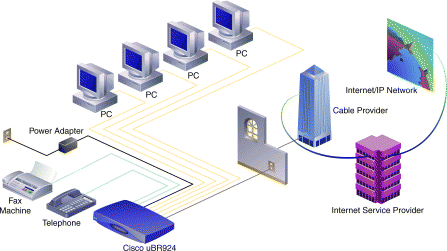
The Cisco uBR924 cable access router is DOCSIS-based and interoperates with any DOCSIS-qualified CMTS. The router uses Cisco IOS Release 12.0(4)XI, 12.0(5)T, or higher software, and supports many advanced routing features. The router can be configured to support data, voice, or a mixture of data and voice.
 | Warning Only trained and qualified personnel should be allowed to install or replace this equipment. |
Step 1 Place the router on a stable, flat surface close to the CATV drop connection and all devices to be connected at the subscriber site.
Step 2 Make sure the bottom, sides, and rear of the router are clear and well-ventilated to prevent the unit from overheating.
| Install the Router and Connect Cables (continued) |
Step 3 Install the router in compliance with national and local electrical codes:
 | Warning This product relies on the building's installation for short-circuit (overcurrent) protection. Ensure that a fuse or circuit breaker no larger than 120 VAC, 15A US (240 VAC, 10A International) is used on the phase conductors (all current-carrying conductors). |
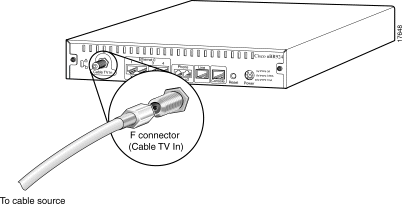
Step 1 Locate the RF coaxial cable coming from the CATV wall outlet.
Step 2 Connect the cable to the router's rear Cable TV In F connector. Hand tighten the connector, making sure it is finger tight; then give it a 1/6 turn.
 | Warning Do not overtighten the connector. Overtightening can break off the connector. |
| Install the Router and Connect Cables (continued) |
Step 3 Make sure all other coaxial cable connectors are securely tightened from the distribution tap to the Cisco uBR924 cable access router, following instructions in step 2. This includes all intermediate splitters, couplers, or ground blocks.
 | Caution To ensure compliance with FCC limits, connection to the cable system must be made with a high-quality, shielded cable. If the quality or general condition of the coaxial cable at the subscriber site is in question, replace the coaxial cable. |
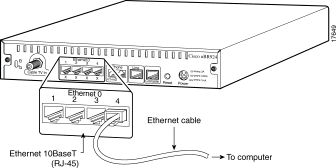
Step 1 Locate all needed 10BaseT Ethernet cables.
Step 2 Connect one end of the Ethernet cable to one of the router's Ethernet hub rear ports (labeled 1X, 2X, 3X, or 4X).
Step 3 Press the cable end firmly into the router's Ethernet receptacle and connect the other end to the computer or Ethernet hub as appropriate.
Step 4 Repeat steps 2 and 3 for each Ethernet connection from the Cisco uBR924 cable access router.
| Install the Router and Connect Cables (continued) |

Step 1 Locate one RJ-11 to RJ-11 cable for each device to directly connect to the two FXS Cisco uBR924 cable access router VoIP ports if voice is supported.
Step 2 Connect one end of the cable to one of the Phone ports (labeled V1+V2 and V2) at the rear of the router. Press the cable firmly into the receptacle.
Step 3 Connect the other end to the telephone, fax device, or adapter as appropriate.
 | Caution Multiple telephones or fax devices can be connected to the two VoIP telephone lines, provided the sum of the REN of all devices on the line does not exceed five. A two-line telephone can be plugged into the V1+V2 rear connector of the router using a single cable if the cable has four wires. |
Step 4 Repeat steps 2 and 3 for other devices to connect to the second VoIP telephone line.
 | Warning Install equipment using an acceptable method of connection per your country. This equipment contains a ring signal generator (ringer), which is a source of hazardous voltage. Do not touch the RJ-11 (phone) port wires (conductors), the conductors of a cable connected to the RJ-11 port, or the associated circuit board when the ringer is active. |
| Install the Router and Connect Cables (continued) |
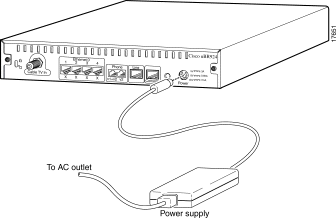
Step 1 Locate the power receptacle at the rear of the router.
Step 2 Plug the 7-pin end of the power supply cord into the power connector at the rear of the router and connect the AC power cord to the power supply.
 | Caution Use only the Cisco-provided power supply and cord. Using any other vendor's power supply and cord can cause permanent damage. Ensure the power cord is appropriate to your country of operation. Cisco uBR924 and Cisco uBR904 power supplies and cords are identical and interchangeable, provided the power cords are applicable to the country of operation. |
Step 3 Plug the 3-prong end of the power cord into a standard electrical power outlet at the site. Power is immediately supplied to the router.
Step 4 Turn on the power for all other equipment and wait for the devices to complete their startup processes.
| Install the Router and Connect Cables (continued) |
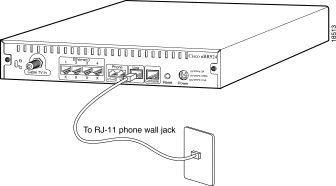
Step 1 Locate the needed minimum 26 AWG RJ-11 to RJ-11 cable to connect the router to a backup POTS line.
 | Caution The backup POTS connection enables only one of the two voice lines connected to the router to function during a power outage. Calls in progress prior to the power outage will be disconnected. |
 | Warning This equipment is to be installed and maintained by personnel only as defined by AS/NZS 3260 Clause 1.2.14.3 Service Personnel. |
Step 2 Connect one end of the cable to the backup POTS line port (labeled Line) at the rear of the router. Press the cable firmly into the receptacle.
Step 3 Connect the other end of the cable to the telephone wall jack.
| Initialize the Router |
When the router is connected and powered on, it executes automatic self-diagnostic and installation procedures. For this to occur, a number of actions must be performed at the headend. Refer to the "Prepare for Installation" section of this guide. The initialization process follows:
| Initialize the Router (continued) |
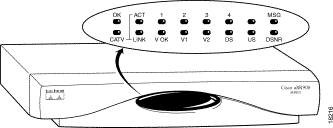
| LED Label | Description |
|---|---|
OK | On = Power-on and self-test have completed successfully, the system image has been booted, and the system is operational. Blink = After power-on and self-test have completed successfully, LED blinks as the system image is booted. Off = No power |
ACT | On = Cable activity Off = No activity |
1, 2, 3 or 4 | On = Ethernet link up for the port Blink = Activity on Ethernet link for the port Off = Ethernet link down for the port |
V OK | On = Healthy VoIP system for a Cisco uBR924 cable access router configured to support voice Off = VoIP system problem or the router has switched over to the PSTN |
V1 | On = Call in progress on the voice port for a router configured to support voice Off = No call |
V2 | On = Call in progress on the voice port for a router configured to support voice Off = No call |
LINK | On = Cable (RF) connection up Blink = Router searching for a downstream frequency Off = Cable (RF) connection down |
DS | On = Router locked to a downstream frequency Off = Router not locked to a downstream frequency or the router has not yet located a digital signal |
US | On = Router has established communications with the CATV headend per DOCSIS Off = Router has not completed secondary ranging |
DSNR | On = Receiving quality, downstream signal 5 dB above the downstream lock threshold Off = Receiving low downstream signal strength or quality |
| Verify Installation |
Step 1 From a PC connected to the router, start the Internet browser program installed on the PC.
Step 2 In the appropriate area of the web browser screen, enter a URL of your choice.
If the selected web page displays, the Ethernet network installation is successful.
Step 3 Watch the appropriate Ethernet LED (1 through 4) on the front of the router blink as data is transmitted on the link.
Step 4 Repeat steps 1 through 3 for each PC connected to the router.
Step 1 Pick up a telephone connected to one of the router's VoIP (V1+V2 or V2) rear ports.
Step 2 Dial a telephone number.
The Cisco uBR924 cable access router is able to implement multiple classes of service (CoS) on the cable interface.
 | Caution The Cisco uBR924 cable access router interoperates with a DOCSIS 1.0 CMTS that does not support multiple classes of service per router. Because voice and data will be mixed, however, voice traffic will be transmitted on a best effort basis. This can cause poorer voice quality and lower data throughput when calls are made from the router's telephone ports. Voice quality is also affected by users transmitting or downloading large files, as well as other significant network traffic. |
| Verify Installation (continued) |
Step 3 Watch the appropriate VoIP LED (V1 or V2) on the front of the router light when data is transmitted on the link.
Any call-progress indications and other signals that can be carried inband (for example, remote telephone ringing) are cut through the voice path as soon as an end-to-end audio channel is up. As applicable, class reservations are put in place to achieve the desired CoS over the cable interface.
Step 4 Ensure the call is picked up before hanging up.
Step 1 Place a document in the document feeder of a fax machine connected to the router, referencing instructions appropriate to the fax device.
Step 2 Enter a destination number to receive the fax and press Dial or Start on most fax machines.
The protocol appropriate to fax is turned on and the fax proceeds. Any call-progress indications and other signals that can be carried inband (for example, remote telephone ringing) are cut through the voice path as soon as an end-to-end audio channel is up.
Step 3 Watch the appropriate VoIP LED (V1 or V2) on the front of the router light as data is transmitted on the link.
Step 4 Listen for a fax tone on the other end and verify that the fax is transmitted.
Step 5 Verify completion of the fax transmission at the destination.
| Verify Installation (continued) |
| LED | Status | Possible Problem | Suggested Action |
|---|---|---|---|
OK | System LED is off. | Power cord not properly seated. | Check power connections. |
1, 2, 3, or 4 | Ethernet LEDs are off when data is transmitted to/from the device. | PC/device not powered on. | Verify PC/device powered on. |
LINK | Cable RF LED is off. | Router searching for a signal; RF levels wrong. | Check for a DOCSIS system signal and verify the nearby analog video signal is within the correct range---0 to +15 dBmV for most CATV systems. |
DS | Downstream LED is off. | RF coaxial cable is not properly connected to the router. | Reconnect the cable. |
| Verify Installation (continued) |
| LED | Status | Possible Problem | Suggested Action |
US | Upstream LED is off. | Upstream signal is not reaching the headend; router is unable to communicate with the remote end. Systematic RF noise problem or other outage. | Verify continuity back to the headend using the standard procedures for your system. Temporarily locate the router closer to the ground block, the tap, or another tap closer to the headend---ensuring correct RF input levels at all times. |
DSNR | Downstream signal-to-noise ratio LED is off. | Systematic RF noise problem or other outage. | Verify correct RF input to the router. Temporarily locate the router closer to the ground block, the tap, or another tap closer to the headend---ensuring correct RF input levels at all times. |
| Verify Installation (continued) |
| LED | Status | Possible Problem | Suggested Action |
|---|---|---|---|
V OK | Voice status LED is off for a router configured to support voice. | VoIP system configuration problem. | Contact your provisioning or billing administrator or customer service department. If your provisioning or billing system is designed to support automatic feature upgrades, and the router's cable MAC address is already in the billing system and configured for use with voice, ask to have the router refreshed with the correct voice configuration. Note: This procedure can take several minutes. |
V1 or V2 | Voice port LED is off when a call on the port is initiated for a router configured to support voice. | Bad telephone or fax machine connection. | Reseat the RJ-11 to RJ-11 cable at both ends. If multiple telephones or fax machines are connected to a telephone line, make sure the sum of the REN of all devices on the telephone line does not exceed five. |
| Reconfigure the Router |
 | Caution Before attempting to reconfigure a Cisco uBR924 cable access router at a subscriber site, contact your network management, provisioning, or billing system administrator to ensure remote configuration is allowed. If remote configuration is disabled, settings you make and save at the local site will not remain in effect after the router is powered off and on. Instead, settings will return to the previous configuration. |
Step 1 Configure the terminal to support:
Step 2 Connect the terminal to the Cisco uBR924 cable access router's console port.
 | Caution After you connect a laptop to a Cisco uBR924, perform all actions, and save configuration changes, power cycle the router if that laptop will not be used at the subscriber site. This is particularly important when the Cisco uBR924 is configured to operate in a DOCSIS-compliant bridging mode. Power cycling the Cisco uBR924 ensures the laptop computer does not remain in the list of CPE devices at the subscriber site for the Cisco uBR924 to support. Only reinitialization of the cable interface clears out the bridge table and resets the counter that specifies the number of CPE devices being bridged. Refer to the "Basic Internet Access Bridging Example" section of this document. |
| Reconfigure the Router (continued) |
| Command | Purpose |
|---|---|
uBR924enable

Password: <password>

uBR924#
| Enters enable mode. Enters the enable password. You have entered enable mode when the prompt changes to |
| Enters global configuration mode and the prompt changes to |
uBR924(config)# ?

interface Select an interface to configure
| Displays the configuration commands available for your router. |
uBR924(config)# interface ?
| Displays the interface configuration commands for your router. |
uBR924(config)# interface cable-modem0
| Enters the interface configuration mode for your router. |
uBR924(config-if)# cable-modem ?
| Displays the router interface parameters you can set. |
 | TimeSaver Entering exit at the prompt returns you to the previous mode. Entering Ctrl-z immediately returns you to the enable mode. |
To view the current configuration, enter the show running-config command in the global configuration mode. A response displays based on the configuration set up for the router. Review the examples that follow.
| Reconfigure the Router (continued) |
A configuration file to support a typical residential, Internet-access (data only) subscriber appears below:
Current configuration:
!
! No configuration change since last restart
!
version 12.0
service config
no service pad
service timestamps debug uptime
service timestamps log uptime
no service password-encryption
!
hostname Router
!
!
clock timezone - 4
ip subnet-zero
no ip routing
!
!
!
!
voice-port 0
!
!
voice-port 1
!
!
interface Ethernet0
 ip address 10.1.0.25 255.255.0.0
 no ip directed-broadcast
 no ip route-cache
 bridge-group 59
 bridge-group 59 spanning-disabled
!
interface cable-modem0
 ip address 10.1.0.25 255.255.0.0
 no ip directed-broadcast
 no ip route-cache
 cable-modem downstream saved channel 477000000 56
 bridge-group 59
 bridge-group 59 spanning-disabled
!
ip classless
no ip http server
!
| Reconfigure the Router (continued) |
!
line con 0
 transport input none
line vty 0 4
!
end
The plug-and-play router is able to locate a downstream and upstream channel; find TOD, TFTP, and DHCP server(s); obtain an IP address; download a DOCSIS configuration file; and obtain DHCP parameters to work in a bridging mode. For a better understanding of the processes involved, refer to the Cisco uBR924 Cable Access Router Installation and Configuration Guide.
The Cisco uBR924 cable access router acts as a transparent bridge for up to four PCs directly connected to it. Cisco IOS software treats all four of the router's Ethernet hub ports as one Ethernet interface.
 | Caution The ability of the router to grant access to CPE devices is controlled by the "MAC CPE" field in the DOCSIS configuration file. The Cisco uBR924 cable access router defaults to one CPE MAC address unless this option is set to a higher number. |
The Cisco uBR924 cable access router can also be configured to act as a router to preserve IP address space and limit broadcasts that can impact the performance of the network. A sample configuration file follows.
| Reconfigure the Router (continued) |
Current configuration:
!
! No configuration change since last restart
!
version 12.0
service config
no service pad
service timestamps debug uptime
service timestamps log uptime
no service password-encryption
!
hostname Router
!
!
clock timezone - 4
ip subnet-zero
!
!
!
!
voice-port 0
!
voice-port 1
!
!
interface Ethernet0
 ip address 24.1.0.1 255.255.0.0
 no ip directed-broadcast
!
interface cable-modem0
 ip address 10.1.0.25 255.255.0.0
 no ip directed-broadcast
cable-modem downstream saved channel 477000000 56
 no cable-modem compliant bridge
!
router rip
 version 2
 network 10.0.0.0
 network 24.0.0.0
!
ip classless
no ip http server
!
!
line con 0
 transport input none
line vty 0 4
!
end
| Reconfigure the Router (continued) |
A routing configuration file, where the cable modem is configured to belong to a specific multicast group, is shown below. This example shows PIM sparse-dense-mode. Other multicast routing protocols, such as PIM sparse-mode or PIM dense-mode, can be used. Applicable commands are in bold.
Current configuration:
!
! Last configuration change at 23:16:44 - Thu Mar 18 1999
!
version 12.0
service config
no service pad
service timestamps debug uptime
service timestamps log uptime
no service password-encryption
!
hostname Router
!
!
clock timezone - 4
ip subnet-zero
!
!
ip multicast-routing
ip dvmrp route-limit 20000
!
!
!
voice-port 0
!
voice-port 1
!
!
interface Ethernet0
 ip address 24.1.0.1 255.255.0.0
 no ip directed-broadcast
 ip pim sparse-dense-mode
 no ip route-cache
 no ip mroute-cache
!
interface cable-modem0
 ip address 10.1.0.25 255.255.0.0
 no ip directed-broadcast
 ip pim sparse-dense-mode
 no ip route-cache
 no ip mroute-cache
| Reconfigure the Router (continued) |
no keepalive
 cable-modem downstream saved channel 477000000 56
 no cable-modem compliant bridge
!
!
router rip
 version 2
 network 24.0.0.0

network 10.0.0.0
!
!
ip classless
no ip http server
!
!
line con 0
 transport input none
line vty 0 4
!
end
Current configuration:
!
! No configuration change since last restart
!
version 12.0
service config
no service pad
service timestamps debug uptime
service timestamps log uptime
no service password-encryption
!
hostname Router
!
!
clock timezone - 4
ip subnet-zero
no ip routing
!
voice-port 0
!
!
voice-port 1
!
dial-peer voice 1 pots
destination-pattern 1000
port 0
| Reconfigure the Router (continued) |
!
dial-peer voice 2 pots
 destination-pattern 2000
 port 0
!
dial-peer voice 10 voip
 destination-pattern 1000
 session target ras
!
dial-peer voice 20 voip
 destination-pattern 2000
 session target ras
!
interface Ethernet0
 ip address 10.1.0.25 255.255.0.0
 no ip directed-broadcast
 no ip route-cache
 bridge-group 59
 bridge-group 59 spanning-disabled
!
interface cable-modem0
 ip address 10.1.0.25 255.255.0.0
no ip directed-broadcast
 no ip route-cache
 cable-modem downstream saved channel 477000000 56
 bridge-group 59
 bridge-group 59 spanning-disabled
!
ip classless
no ip http server
!
!
line con 0
 transport input none
line vty 0 4
!
end
| Reconfigure the Router (continued) |
Current configuration:
!
Last configuration change at 23:24:55 - Thu Mar 18 1999
!
version 12.0
service config
no service pad
service timestamps debug uptime
service timestamps log uptime
no service password-encryption
!
hostname Router
!
clock timezone - 4
ip subnet-zero
ip host-routing
!
voice-port 0
!
voice-port 1
!
dial-peer voice 1 pots
 destination-pattern 1001
 port 1
!
dial-peer voice 2 pots
 destination-pattern 1000
 port 0
!
dial-peer voice 10 voip
 destination-pattern 1001
 codec g711ulaw
 session target ras
!
dial-peer voice 20 voip
 destination-pattern 1000
 codec g711ulaw
 session target ras
!
dial-peer voice 30 voip
 destination-pattern 2000
 codec g711ulaw
 session target ras
!
| Reconfigure the Router (continued) |
dial-peer voice 40 voip
 destination-pattern 2001
 codec g711ulaw
session target ras
interface Ethernet0
 ip address 24.1.0.1 255.255.0.0
 no ip directed-broadcast
 no ip mroute-cache
!
interface cable-modem0
 ip address 10.1.0.25 255.255.0.0
 no ip directed-broadcast
 no ip mroute-cache
 no keepalive
 cable-modem downstream saved channel 477000000 56
 no cable-modem compliant bridge
!
router rip
 version 2
 network 10.0.0.0
 network 24.0.0.0
!
ip classless
no ip http server
!
line con 0
 transport input none
line vty 0 4
!
end
| Reconfigure the Router (continued) |
Current configuration:
!
Last configuration change at 23:24:55 - Thu Mar 18 1999
!
version 12.0
no service pad
service timestamps debug uptime
service timestamps log uptime
!
hostname Router
!
clock timezone - 0 6
ip subnet-zero
no ip domain-lookup
!
crypto isakmp policy 1
 hash md5
 authentication pre-share
 lifetime 5000
crypto isakmp key 1111 address 30.1.1.1
crypto isakmp identity hostname
!
crypto ipsec transform-set test-transform ah-md5-hmac esp-des esp-md5-hmac
!
 crypto map test-ipsec local-address cable-modem0
 crypto map test-ipsec 10 ipsec-isakmp
 set peer 30.1.1.1
 set transform-set test-transform
 match address 100
!
interface Ethernet0
 ip address 24.1.0.1 255.255.0.0
 no ip directed-broadcast
!
interface cable-modem0
 ip address 10.1.0.25 255.255.0.0
 no ip directed-broadcast
 no keepalive
 cable-modem downstream saved channel 213000000 30
 no cable-modem compliant bridge
crypto map test-ipsec
| Reconfigure the Router (continued) |
!
router rip
 version 2
 network 10.0.0.0
 network 24.0.0.0
!
ip classless
no ip http server
!
access-list 100 permit ip host 10.1.0.25 30.1.1.0 0.0.0.255
!
line con 0
 exec-timeout 0 0
 transport input none
line vty 0 4
 login
!
end
Current configuration:
!
! Last configuration change at 20:24:59 - Thu Apr 1 1999
! NVRAM config last updated at 20:34:52 - Thu Apr 1 1999
!
version 12.0
no service pad
service timestamps debug uptime
service timestamps log uptime
!
hostname Router
!
class-map class-default
  match any
!
!
!
clock timezone - 0 1
ip subnet-zero
ip tftp source-interface cable-modem0
no ip domain-lookup
!
| Reconfigure the Router (continued) |
vpdn enable
!
vpdn-group 1
 accept dialin l2tp virtual-template 1 remote L2TP_LAC
 no l2tp tunnel authentication
 !
 !
 interface Ethernet0
 ip address 80.1.1.1 255.255.255.0
 no ip directed-broadcast
!
interface Virtual-Template1
 ip unnumbered Ethernet0
 no ip directed-broadcast
 peer default ip address pool dialup
 ppp authentication chap
!

interface cable-modem0
 ip address 255.255.0.0
 no ip directed-broadcast
 cable-modem downstream saved channel 639000000 38
no cable-modem compliant bridge
!
router rip
 version 2
 network 10.0.0.0
 network 24.0.0.0
!
ip local pool dialup 24.1.0.100
ip classless
no ip http server
!
!
line con 0
 transport input none
line vty 0 4
 login
!
end
 | Warning Incorrectly configuring the Cisco uBR924 cable access router can cause loss of network connectivity. Before attempting to reconfigure the router, print the last working configuration and ensure remote configuration is enabled for the site. If the router does not connect to the network after you have reconfigured it, enter the cable downstream saved frequency from the printout and then clear the interface. Power off and on the router. If network connectivity is not restored, contact your network management, provisioning, or billing system administrator to reload software. |
| Reconfigure the Router (continued) |
To configure routing, follow the instructions below in global configuration mode. After you have completed the procedure, enter the show startup-config command to verify that routing is enabled. Refer to the "Basic Internet Access Routing Example" section for a sample.
| Step | Command | Purpose | ||
|---|---|---|---|---|
| uBR924(config)#int c 0 | Enter interface configuration mode for the router interface. | ||
| uBR924(config-if)#no cable-modem compliant bridge ip address x.x.x.x (0-255) subnet mask x.x.x.x (0-255) uBR924(config-if)#exit | Turn off DOCSIS-compliant bridging. | ||
| uBR924(config)#int e 0 uBR924(config-if)#no bridge group number and remove bridge-group number. uBR924(config-if)#ip address mask ip address x.x.x.x (0-255) subnet mask x.x.x.x (0-255) uBR924(config-if)#exit | Enter interface configuration mode for Ethernet 0. | ||
| uBR924(config)#ip routing | Enable IP routing for the router. | ||
| uBR924(config)#router rip uBR924(config)#version 2 rip network-number | Enter router configuration mode and enable RIP version 2 routing. Return to global configuration mode. | ||
| uBR924(config-if)#Ctrl-z uBR924#copy running-config startup-config | Return to privileged EXEC mode. Save the configuration to nonvolatile RAM so that it will not be lost in the event of a reset, power cycle, or power outage. |
| Reconfigure the Router (continued) |
To reconfigure the Cisco uBR924 to support bridging after it has been configured for routing, follow the instructions below. After you have completed the procedure, enter the show startup-config command to verify that bridging is enabled. Refer to the "Basic Internet Access Bridging Example" section for a sample.
| Step | Command | Purpose | ||
|---|---|---|---|---|
| uBR924(config)#no ip routing | Disable IP routing on the uBR924. | ||
| uBR924(config)#int e 0 | Enter interface configuration mode for Ethernet0. | ||
| uBR924(config-if)#no ip address | Disable IP address on Ethernet0. | ||
| uBR924(config-if)#no ip route-cache | Disable high-speed switching caches for IP routing. | ||
| uBR924(config-if)#bridge-group bridge-group | Assign the Ethernet0 interface to a bridge group. The bridge group must be an integer between 1 and 63. | ||
| uBR924(config-if)#bridge-group bridge-group spanning-disabled | Disable spanning tree on the Ethernet interface. | ||
| uBR924(config)#int c 0 | Enter interface configuration mode for the cable modem interface. | ||
| uBR924(config-if)#no ip address | Disable the IP address of the cable interface, if one has been set. | ||
| uBR924(config-if)#no keep alive | Disable keepalives on the cable interface. | ||
| uBR924(config-if)#no ip route-cache | Disable high-speed switching caches for IP routing on the cable interface. | ||
| uBR924(config-if)#cable modem compliant bridge | Enable DOCSIS-compliant bridging. | ||
| uBR924(config-if)#bridge-group bridge-group | Assign the cable modem interface to a bridge group. The bridge group must be an integer from 1 to 63. | ||
| uBR924(config-if)#bridge-group bridge-group spanning-disabled | Disable spanning tree on the cable interface. | ||
| uBR924(config-if)#exit | Exit interface configuration mode. | ||
| uBR924(config-line)#Ctrl-z | Return to privileged EXEC mode. |
DOC-785902
78-5902-01
![]()
![]()
![]()
![]()
![]()
![]()
![]()
![]()
Posted: Mon Jul 19 01:23:48 PDT 1999
Copyright 1989-1999©Cisco Systems Inc.


