|
|


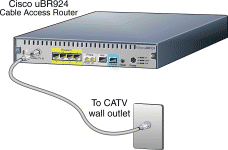
1. Locate the cable TV (CATV) wall outlet.
2. Connect one end of the CATV cable into the CATV wall outlet.
3. Connect the other end of the CATV cable to the connector with the label Cable TV In, on the cable access router's rear panel.
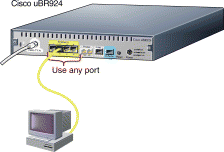
1. Connect one end of the Ethernet cable (provided by your service provider) into one of the four yellow Ethernet ports (labeled 1, 2, 3, and 4), on the cable access router's rear panel.
2. Connect the other end of this cable to the Ethernet port on a PC.
3. Repeat Step 1 and Step 2 for each additional PC. The cable access router contains four Ethernet ports to connect directly to four PCs.
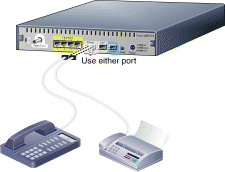
1. Connect one end of a standard telephone cable (an RJ-11---not provided) into one of the two Phone ports (labeled V1+V2 and V2), on the cable access router's rear panel.
2. Connect the other end of this cable to the telephone (which must have a push button dial set) or fax line port.
3. Repeat Step 1 and Step 2 for a second one-line telephone or external fax device.
D Connect Power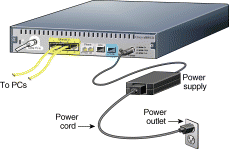
1. Connect the provided black power supply to the black power connector on the cable access router's rear panel.
2. Connect one end of the power cord to the power supply and the other end of the power cord to a grounded AC power outlet. The cable access router powers on after you connect it to the power outlet.
3. If your computer power cable is not already connected to a grounded AC power outlet, connect it now.
4. Power on all other equipment and wait for the devices to complete startup.
If the Cisco uBR924 cable access router loses power while Voice over IP calls are in progress and the cable access router has a backup connection to the public telephone company, you can reestablish one of the two connections.
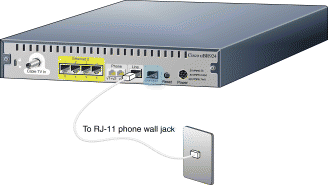
1. Connect one end of a standard telephone cable (an RJ-11---not provided) into the Line port on the cable access router's rear panel.
2. Connect the other end of this cable to the telephone wall jack.

When the cable access router is connected and powered on, it executes an automatic installation procedure and self-diagnostics.
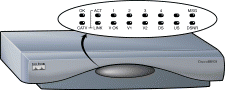
At the start of initialization, most of the LEDs (lights) on the cable access router light briefly, then turn off. The following events occur during initialization:
1. Various LEDs light during the self-test to display progress and error codes.
2. The OK LED starts to blink as the cable access router completes self-test.
3. The cable access router initializes, establishes communication with the service provider network, and is then ready for use.
After initialization, the OK LED goes on to indicate the system is operational. Additionally, the LINK, DS, US, and DSNR LEDs go on to indicate the cable access router is operational.
| LED | Description | Function |
|---|---|---|
OK | System status | On = System OK |
ACT | Cable activity | Blink = Cable activity |
1,2,3, or 4 | Ethernet 1,2,3, or 4 | On = Link up |
MSG | Message | Reserved |
LINK | Cable link | On = Link up |
V OK1 | Voice system status | On = VoIP2 system OK |
V11 | Voice port 1 | On = Call in progress |
V21 | Voice port 2 | On = Call in progress |
DS | Downstream LED | On = Locked to downstream channel |
US | Upstream LED | On = Upstream communication with the CATV headend |
DSNR | Downstream signal-to-noise ratio LED | On = Receiving good downstream signal |
| 1Operational only when cable access router is enabled to carry voice traffic. 2VoIP = Voice over IP. |

Check the LEDs on your cable access router to make sure that it is properly connected:
To verify Internet connectivity, start your web browser software and connect to a web site of your choice, or try the Cisco web site at:
To verify Voice over IP telephone or fax connectivity, dial a number to make a telephone call or follow instructions from your fax device documentation to send a fax. The appropriate Voice port LED (V1 or V2) goes on when the call is in progress.
___________________________________________
If you can access a web page, make a telephone call, or send a fax, your cable access router installation is now complete.
If you cannot access a web page, make a telephone call, or send a fax, repeat the appropriate steps in this quick start. If you still cannot get a connection, contact your cable service provider for assistance.
![]()
![]()
![]()
![]()
![]()
![]()
![]()
![]()
Posted: Wed Jun 9 15:17:59 PDT 1999
Copyright 1989-1999©Cisco Systems Inc.