|
|


1. Locate the cable TV (CATV) outlet.
2. Connect one end of the CATV cable into the CATV outlet.
3. Connect the other end of the CATV cable to the connector with the label Cable TV In, on the cable modem's rear panel.
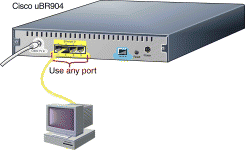
1. Connect one end of the yellow Ethernet cable into 1 of the 4 yellow Ethernet ports (labeled 1, 2, 3, and 4), on the cable modem's rear panel.
2. Connect the other end of this cable to the Ethernet port on a PC.
3. Repeat Steps 1 and 2 for each additional PC. The cable modem contains 4 ports to connect directly to 4 PCs.
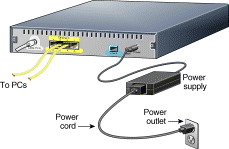
1. Connect the provided black power supply to the black power connector on the cable modem's rear panel.
2. Connect one end of the power cord to the power supply and the other end of the power cord to a grounded AC power outlet. The cable modem powers on after you connect it to the power outlet.
3. If your computer power cable is not already connected to a grounded AC power outlet, connect it now.
4. Turn on your PC power switch.

When connected and powered on, the cable modem executes an automatic installation procedure.
The cable modem:
1. Scans and locks on to the service provider's downstream frequency.
2. Obtains timing, signal, power level, authentication, addressing, and other operational parameters from the CATV headend.
3. Downloads its configuration file and is then operational.
During the initialization, the LEDs (lights) on the cable modem go on:
See the following section for more descriptions of the LEDs.
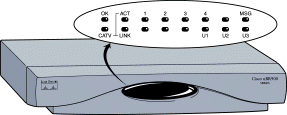
| LED | Description | Function |
|---|---|---|
OK | System status | On = System OK |
ACT | Cable activity | Blink = Cable activity |
1 | Ethernet 1 | On = Link up |
2 | Ethernet 2 | On = Link up |
3 | Ethernet 3 | On = Link up |
4 | Ethernet 4 | On = Link up |
MSG | Message | Used by your cable service provider to provide additional information. Contact your service provider for status details. |
LINK | Cable link | On = Link up |
U1 | User LED 1 | On = Receiving valid signal |
U2 | User LED 2 | On = Service provider receiving signal from modem |
U3 | User LED 3 | On = Good signal received |

Check the LEDs on your cable modem to make sure that it is properly connected:
Start your Web browser software and connect to a Web site of your choice, or try the Cisco Web site at:

Following are safety instructions that you must follow when installing a Cisco uBR904. Failure to install the cable modem in accordance with these instructions will invalidate the agency approvals for the Cisco uBR904.
![]()
![]()
![]()
![]()
![]()
![]()
![]()
![]()
Posted: Fri Jun 4 18:02:31 PDT 1999
Copyright 1989-1999©Cisco Systems Inc.