|
|

This chapter provides information on how to install the Cisco DVB CAR100 cable access router. It includes the following sections:
The following paragraphs describe the cable modem installation procedure that the subscriber typically performs. This information is here to give a comprehensive picture of the installation of the Cisco DVB CAR100 at the subscriber premises and the configuration program for the Cisco DVB CAR100 at the cable service provider premises.
 |
Note Cisco recommends that you connect a maximum of 20 PCs to one Cisco DVB CAR100-LAN. |
The Cisco DVB CAR100 package includes:
The requirements are different for the Cisco DVB CAR100-PC and the Cisco DVB CAR100-LAN.
Cisco DVB CAR100-PC
The minimum requirements for installing the Cisco DVB CAR100-PC at the subscriber are:
 |
Note It is the subscriber's responsibility to ensure that the PC is equipped with an Ethernet network adapter. |
CAR100-LAN
The minimum requirements for installing the Cisco DVB CAR100-LAN are:
 |
Note Before upgrading from the DVB CAR100-PC to the CAR100-LAN, make sure you have the necessary number of CAR100-LAN licenses. |
 |
Note In addition to ensuring the PCs have Ethernet connectivity, it is the subscriber's responsibility to ensure the hub is correctly connected. |
Figure 2-1 shows the rear view of the Cisco DVB CAR100 with all the connectors available.

The Cisco DVB CAR100 is installed at the subscriber's premises. To install the Cisco DVB CAR100:
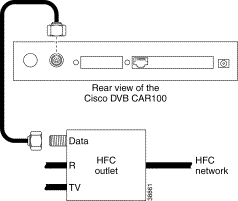
Use a shielded coaxial cable. If the wall outlet is prepared for bidirectional transmission, connect the cable modem as shown in Figure 2-2.

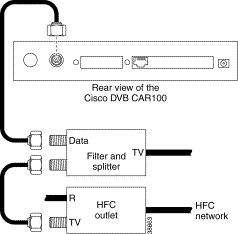
If the wall outlet is not prepared for bidirectional transmission, you will need extra cables and a filter and splitter (not included in the delivery) as illustrated in Figure 2-3.

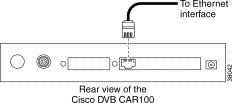
Step 2 Connect a 10BaseT Ethernet cable to the cable modem as shown in Figure 2-4.

For the Cisco DVB CAR100-PC, the Ethernet cable is connected directly to a PC using a Class 5, RJ-45, crossover, shielded Ethernet cable.
For the Cisco DVB CAR100-LAN, the Ethernet cable is connected to a hub using a Class 5, RJ-45 straight-through shielded Ethernet cable.
Step 3 Connect the DC power adapter to the cable modem as shown in Figure 2-5.

Step 4 Connect the power adapter to the mains.
The Cisco DVB CAR100 has now been installed and the Master LED on the front of the cable modem will start blinking (amber) while the Cable LED on the rear side of the Cisco DVB CAR100 will be green.
The Cisco DVB CAR100 starts the sign-on procedure automatically after power on.
 |
Tips Cisco recommends advising subscribers to leave the Cisco DVB CAR100 on at all times. This will ensure it is always available for sofware upgrades and other management tasks. |
 |
Note The Cisco DVB CAR100 functions as a stub router and is therefore unable to operate with another CAR100 connected in parallel between the cable and the Ethernet. |

After the Cisco DVB CAR100 is installed, it is typically the subscriber's responsibility to configure the TCP/IP protocol and set the IP address, subnet mask, and gateway in the connected PCs, based on information supplied by the service provider.
You can change the default private IP address and local subnet for the Cisco DVB CAR100's Ethernet interface prior to installation.
Basic instructions for Windows 95 and Windows 98 are included in the "Cisco DVB CAR100 Cable Access Router Hardware Installation Guide".
The Cisco DVB CAR100-LAN will be connected to a hub. For information on how to do this, refer to the documentation supplied with that device.
When you have connected and powered up the Cisco DVB CAR100 according to the instructions above, it will automatically initiate the sign-on procedure. After it has successfully signed on, it will stay on-line until the power supply is turned off.
Here is an overview of the startup sequence initiated when the Cisco DVB CAR100 connects to the HFC network.
 |
Note The Cisco DVB CAR100 uses the last saved settings each time it powers up—it does not revert to the factory defaults. This means that if Network Address Translation (NAT) was turned off last time the cable modem was shut down, it will still be off the next time you sign on. |
For further information see the "Setting Downstream Channel Frequencies" section.
Step 2 Having found a valid downstream frequency, the Cisco DVB CAR100 signs on using its factory-configured MAC address and requests an IP address from your BOOTP or DHCP server by issuing a BOOTP request.
Step 3 Using its MAC address, the Cisco DVB CAR100 is granted access to the HFC network.
Step 5 The DVB CAR100's internal clock is synchronized with the headend unit using Simple Network Time Protocol (SNTP) if your network is connected to an SNTP server.
Step 6 The factory default setting for Network Address Translation (NAT) is ON, while the IP address and subnet mask of the Ethernet side of the Cisco DVB CAR100 are set to their default values (unless other values were defined the last time the cable modem was shut down—see the note above).
Step 7 The factory default settings for downstream multicast is ON, while for upstream transmissions it is OFF (unless other values were defined the last time the cable modem was shut down—see the note above).
Step 8 The service provider can change these settings using SNMP and a MIB browser.
For more information, see the "Introducing the Cisco Cable DVB/DAVIC Management Program" section.
The first sign-on procedure might take up to 20 minutes because the Cisco DVB CAR100 has to find a valid downstream channel frequency. After this frequency is found, it is written in the memory of the unit and is available for the next sign-on procedure. For more information, see the "Setting Downstream Channel Frequencies" section.
 |
Tips If the Cisco DVB CAR100 is powered off, it should remain off for at least 10 minutes before being restarted. If the unit is powered on within 10 minutes, it is possible it will fail to reestablish communication with the service provider's headend unit. If this occurs, power the unit off again, and leave it off for at least 10 minutes. Then power on the Cisco DVB CAR100 again and communication with the service provider's headend unit should be reestablished as normal. |
 |
Tips |
![]()
![]()
![]()
![]()
![]()
![]()
![]()
![]()
Posted: Thu Sep 28 05:49:40 PDT 2000
Copyright 1989-2000©Cisco Systems Inc.