|
|

This chapter explains the procedures for installing the Cisco DVB CAR100 cable access router. The chapter contains the following sections:
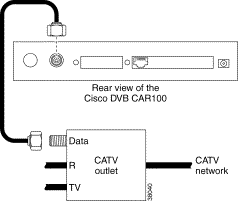
Figure 3-1 shows the locations for connecting all cables to the rear panel connectors of the Cisco DVB CAR100.

If your CATV wall socket is prepared for bi-directional transmission, proceed to the next section: Connecting to a Bidirectional CATV Wall Outlet. If your CATV wall socket has NOT been prepared for bi-directional transmission, proceed to Connecting to an Unprepared CATV Wall Outlet below.
Connect the CATV wall outlet to the Cisco DVB CAR100 using a shielded coaxial cable.

If your wall outlet is NOT prepared for bidirectional transmission, you will need an extra length of shielded coaxial cable, plus a filter and a splitter (not included).
Connect the CATV wall outlet to the filter and splitter using a shielded coaxial cable.

If you have the DVB CAR100-PC proceed to the "Connecting to a Single Computer" section. If you have the Cisco DVB CAR100-LAN and are connecting to an Ethernet hub or an existing LAN network, proceed to the "Connecting to Multiple Computers" section.
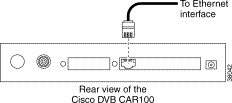
Connect the Cisco DVB CAR100-PC to the single computer, using a crossover Ethernet cable (Class 5, shielded, RJ-45).

 |
Tips The Ethernet port is located on the back of the computer if an internal Ethernet card is installed. On a laptop computer, the Ethernet port is usually located on an adapter cable connected to a PCMCIA (PC) card installed in the computer's PCMCIA slot. If you need additional information to locate the Ethernet port on the computer, consult the user documentation for the computer. |
Connect the DVB CAR100-LAN to multiple computers, using a straight-through Ethernet cable (Class 5, shielded, RJ-45) and an Ethernet hub.

Connect the computers to the Ethernet hub according to the hub manufacturer's instructions. Consult the user documentation supplied with your Ethernet hub in order to install and configure it correctly.
To connect the power supply to the Cisco DVB CAR100:

This completes the installation of the Cisco DVB CAR100 cable access router.
![]()
![]()
![]()
![]()
![]()
![]()
![]()
![]()
Posted: Fri May 12 06:03:04 PDT 2000
Copyright 1989 - 2000©Cisco Systems Inc.