|
|

Audience · Organization · Related Documentation · Acronyms and Abbreviations
This document will help you prepare your site for the installation of LightStream® 2020 enterprise ATM switches. Use these instructions to
The primary audience for this book is customers who have purchased or are considering the purchase of LightStream switches.
The secondary audience includes employees of LightStream Corp. and partner companies who need information on setting up LightStream hardware.
This manual is arranged as follows
The following is a list of LightStream manuals and other material relevant to LightStream users.
Before attempting to install, configure, operate, or troubleshoot a network of LightStream switches, read the LightStream 2020 System Overview. This overview provides important background information about the LightStream product and the ATM technology on which the product is based. After reading the LightStream 2020 System Overview, refer to Table 1-1 to determine which manuals you should read next.
| If you want to: | Read the following manuals in the order listed below: |
|---|---|
Install LightStream switches | LightStream 2020 Release Notes1 LightStream 2020 Site Planning and Cabling Guide LightStream 2020 Installation and Troubleshooting Manual |
Configure LightStream switches | LightStream 2020 Release Notes 1 LightStream 2020 Configuration Guide LightStream 2020 Online Help Screens |
Set up or expand a LightStream network | LightStream 2020 Release Notes1 LightStream 2020 Administration Guide LightStream 2020 Online Help Screens |
Operate a LightStream network | LightStream 2020 Release Notes1 LightStream 2020 Operations Guide LightStream 2020 Command and Attribute Reference Guide LightStream 2020 Command Line Interface (CLI) Reference Card LightStream 2020 Traps Reference Manual LightStream 2020 Online Help Screens |
Manage or troubleshoot a LightStream network | LightStream 2020 Release Notes1 LightStream 2020 Operations Guide LightStream 2020 Administration Guide LightStream 2020 Command and Attribute Reference Guide LightStream 2020 Command Line Interface (CLI) Reference Card LightStream 2020 Traps Reference Manual LightStream 2020 Online Help Screens |
Troubleshoot LightStream hardware | LightStream 2020 Release Notes1 LightStream 2020 Installation and Troubleshooting Manual LightStream 2020 Site Planning and Cabling Guide |
Below is a list of acronyms and abbreviations used in this book.
| Acronyms and Abbreviations | Meanings |
|---|---|
btu | British thermal unit |
°C | degrees Celsius |
cm | centimeters |
db(A) | decibels (A-weighted) |
EIA | Electronic Industries Association |
EMI | electro-magnetic interference |
°F | degrees Fahrenheit |
ft | feet |
Hz | Hertz |
in | inches |
kg | kilograms |
km | kilometers |
lb | pounds |
m | meters |
TIA | Telecommunications Industry Association |
V | volts |
VAC | volts of alternating current |
VDC | volts of direct current |
W | watts |
Site Prep Checklist · Space Requirements · Electrical Requirements · Environmental Requirements · Unpacking and Inspecting the Hardware
This chapter tells you how to prepare your site for the installation of LightStream 2020 enterprise ATM switches. It includes information on the system's weight, dimensions, environmental and electrical requirements, and a site planning checklist.
LightStream switches can be installed in any area that meets the specifications outlined in this chapter. A dedicated computer room with raised floors, controlled temperature and humidity, and clean air is desirable, but is not required.
Use this checklist several weeks before the expected delivery date to ensure that your site is ready to receive LightStream hardware.
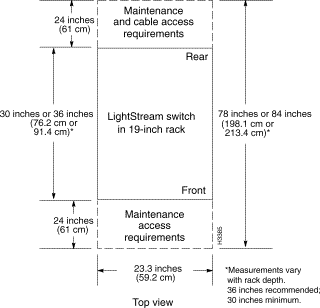
1. Ensure that the area you select to house your LightStream system allows enough space for front and rear access to the LightStream chassis, as shown in Figure 2-1.
2. We recommend that you develop a plan for managing external data cables. (This might involve running the cables under a raised floor, or through a dropped ceiling, or placing the system in a low-traffic area where cables won't be disturbed.)
3. Ensure that the floor is strong enough to support the system. See the subsection entitled Weight for LightStream weights, and add the weights of the rack and cables.
4. Calculate the heat dissipation of your LightStream system using the information in Table 2-6. Taking into account the heat generated by the LightStream switch and any other equipment installed in the same room, ensure that your HVAC system can maintain the temperature and humidity ranges outlined in Table 2-9.
5. Ensure that each LightStream system has its own dedicated branch power circuit with circuit breaker and a grounded outlet. If you're installing a DC-powered LightStream system, you may wish to arrange to have an electrician present at installation time. An electrician or other qualified person must wire the chassis to a DC power source.
6. If several LightStream switches will be installed at your site, develop a method for telling them apart. We recommend that you assign a unique name or number to each system and label each chassis clearly.
7. Obtain an equipment rack for the LightStream system. (See Chapter 3 for rack guidelines.)
8. To provide connectivity to each node in the case of network problems, consider obtaining modems for each switch card in your LightStream network. (Each switch chassis can have one or two switch cards.) Modems must be Hayes-compatible and able to operate at 2400 baud.
9. Ensure that a Sun workstation is available to manage your LightStream network, and that the workstation meets all the hardware and software requirements listed in Chapter 4.
10. Obtain IP addresses for each switch in your LightStream network. (See the LightStream 2020 Installation and Troubleshooting Manual for more information on IP addresses.)
11. Order data cables. (See Chapter 5 for information about I/O connectors and selected cables.)
12. Order the appropriate country power kit or DC mounting kit. (See Chapter 5 for information about the power cords included in kits.)
Keep the following considerations in mind when choosing a location for your LightStream hardware:
Use Table 2-2 to determine the weight of your system. Starting with the weight of a chassis with blowers only (no boards, line cards, disks, or power supplies), add the weight of each option included with your unit. (Cables and the equipment rack are excluded from this table.)
| Number of units
| |||||
|---|---|---|---|---|---|
| Specification
| Weight | Min. | Max. | ||
Start with chassis w/blowers only: | 74 lb (33.5 kg) |
|
| ||
Add weights of optional components: |
|
|
| ||
NP option1 | 8 lb (3.6 kg) | 1 | 2 | ||
Switch card | 3.4 lb (1.5 kg) | 1 | 2 | ||
Line card option2 | 3.75 lb (1.7 kg) | 1 | 9 | ||
Bulk power tray |
| 1 | 2 | ||
AC | 10 lb (4.5 kg) |
|
| ||
DC | 4.5 lb (2 kg) |
|
| ||
Fantail (for LSC only) | 1.9 lb (0.9 kg) | 0 | 18 | ||
Minimum configurations:3 |
|
|
| ||
AC power |
| 99.2 lb (44.9 kg) |
|
| |
DC power | 93.7 lb (42.4 kg) |
|
| ||
Maximum configurations:4 |
|
|
| ||
without fantails |
| 146,8 lb (66.5 kg) |
|
| |
with 16 fantails | 177.2 lb (80.3 kg) |
|
| ||
| 1Includes NP card, NP access card, and disk assembly including hard disk, floppy drive and associated power supply. 2Includes line card and associated access card. 3Includes one of each option: NP, switch card, line card, and bulk power tray. 4Includes 2 NPs, 2 switch cards, 2 AC power trays, and 8 line cards. |
Each LightStream chassis requires a dedicated branch circuit. See Table 2-3, Table 2-4, and Table 2-5, which specify the power requirements and power ratings of LightStream systems.
The following notice applies to each LightStream switch:
The LightStream switch is designed to operate with all boards, bulkheads, filler panels, covers, and components (disks and blowers) in place and firmly screwed to the chassis frame. When all these items are in place, they form an enclosure that performs three important functions:
| Power Option | Voltage | Current |
|---|---|---|
AC | 100 to 240 | 20A to 10A |
DC | 48 | 24A |
| Characteristic | Rating |
|---|---|
Inlet Power Connector | IEC 320 C20 |
Input Voltage Frequency Phase | 100 - 240 VAC 50 - 60 Hz Single |
Input Current | 16 A - 8 A |
Power Consumption* | 975 Watts maximum |
Heat Dissipation* | 3330 Btu/hr maximum |
| * See Table 2-6 for more information. | |
| Characteristic | Rating |
|---|---|
Input Connections | Support for up to 2 separate -48 VDC input feeds via 3-position terminal blocks |
Input Voltage | -43 to -60 VDC |
Input Current | 24 A |
Power Consumption* | 975 W maximum |
Heat Dissipation* | 3330 Btu/hr maximum |
| * See Table 2-6 for more information. |
|
| Component | Power Consumption in Watts | Dissipation (Btu/hr) |
|---|---|---|
Chassis with no I/O1 | 335 | 1145 |
NP option2 | 70 | 240 |
Switch card | 40 | 140 |
Low-speed line card option3 | 65 | 225 |
Medium-speed line card option3 | 65 | 225 |
Packet line card option3 | 55 | 190 |
Cell line card option3 | 30 | 105 |
Max. configuration4 | 975 | 3330 |
| Safety | UL 1950 (AC systems) UL 1459 (DC systems) TUV (EN 60950) CSA 22.2 #9501 |
|---|---|
| Emissions | FCC Part 15 Class A CISPR 22 Class A (EN 55022) |
| 1Certified by Underwriters Laboratories to Canadian requirements. |
| V.35 Interface1 | NET 2 Layer 1 |
|---|---|
| RS-449 Interface1 | NET 2 Layer 1 |
| E3 Interface | G.703 at 34 Mbps (Germany) SIN 219 (UK) |
| 1Host-independent approval |
The physical environment during operation, storage, and transport of the LightStream switch must meet the specifications outlined in Table 2-9.
| Operating temperature at sea level (760 mm Hg)1 | 41º to 104º F (5º to 40º C) |
|---|---|
| Relative operating humidity | 10% to 90% noncondensing |
| Altitude1 | Up to 10,000 ft (3048 m) |
| Nonoperating temperature | -4º to 140º F (-20º to 60º C) |
| Nonoperating humidity | 10% to 95% noncondensing |
| Air quality | The LightStream switch is designed to run in a non- corrosive, relatively dust-free environment. The enclosure does not contain air filters; a relatively dust-free environment prevents accumulation of dust on the circuit boards and in the air flow inlet, internal flow paths, and exhaust openings. |
| Noise Emission | 68 db(A) maximum |
| 1Reduce the maximum operating temperature by 15° F (.565 °C) for every 1000 ft (304.8 m) above 10,000 ft (3048 m) altitude. |
A LightStream chassis takes in cooling air through the bottom of the front panel and exhausts it at the top rear and the top right side. (The air vents on the right side can safely be covered with rack side panels, but should not be otherwise blocked.) To minimize thermal problems, position the chassis such that
When it arrives, unpack the LightStream switch as follows:
1. Before moving the shipping container from your loading dock, inspect it for any signs of in-transit damage.
2. Transfer the container to the systems area.
3. Cut the straps and lift the cardboard box off the chassis. Remove the packing material.
4. Inspect all external surfaces for signs of damage. Pay special attention to any areas where you noticed damage to the shipping container.
5. Document any damage noted during the inspections and notify your LightStream vendor.
6. See the LightStream 2020 Installation and Troubleshooting Manual for instructions on installing the switch.
Rack Characteristics · Rack Space: Height and Depth
This chapter provides guidelines on selecting an equipment rack for your LightStream 2020 enterprise ATM switch.
The rack you use for your LightStream switch should be a TIA or EIA standard 19-inch (48.3 cm) wide rack that meets the specifications outlined below.
A LightStream chassis needs 26.25 in. (15 rack units, or 66.7 cm) of vertical rack space.
A LightStream rack should be at least 30 in. (76.2 cm) deep; 36 in. (91.4 cm) is recommended so there is comfortable clearance at the rear for fantails and cables.
If your system contains low-speed line cards, consider the system's fantails when you plan rack space. One LightStream switch using V.35 and/or RS-449 fantails can have up to 18 fantails—two per low-speed line card. (A system using only X.21 fantails can have a maximum of nine fantails—one per low-speed line card.) Each fantail is 1.75 inches (1 rack unit, or 4.45 cm) high; thus a switch fully loaded with fantails uses up to 31.5 inches (80 cm) of fantail space at the rear. (Medium-speed, packet, and cell line cards do not use fantails.)
Hardware Requirements · Software Requirements
To manage a network of LightStream® 2020 enterprise ATM switches, you need a workstation that meets the hardware and software requirements listed in this chapter.
The network management system (NMS) workstation must be a Sun SPARCstation (Sun-4). Although LightStream management software is designed to run on any SPARCstation model that runs SunOS 4.1.x and HP OpenView, only the following models are supported and tested:
The NMS workstation must have:
The NMS workstation must have the following software loaded:
In addition, you may choose to run HP OpenView version 3.3 network management software on your NMS workstation. For information on HP OpenView's requirements, see the HP OpenView Management Platform Performance and Configuration Guide, available from Hewlett-Packard.
Low-Speed Connectors and Cables · Medium-Speed Connectors and Cable · OC-3c Connectors and Cables · FDDI Connectors and Cables · Ethernet Connectors and Cables · Console, Modem Connectors and Cable · Country Kits and Power Cordsets
The first six sections of this chapter describe I/O interfaces of the LightStream 2020 enterprise ATM switch and data cables for each interface. Signal diagrams are provided for each I/O connector and cable. This chapter's last section describes LightStream power cords.
For each cable sold by LightStream Corp., two part numbers are provided: the manufacturing number, which appears on the cable, and the order number, which you should use to order the cable. Some cables described here do not have numbers; these cables are not offered for sale by LightStream. The information here is provided to help you procure the cables from other sources.
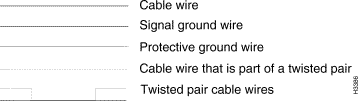
Figure 5-1 shows the graphic conventions used in this chapter.
This section describes the following connectors on low-speed fantails:
The cable that connects low-speed access cards to fantails is discussed in the subsection entitled Fantail Cable. X.21, RS-449, and V.35 cables are described in the subsections entitled X.21 Cable, RS-449 Straight-Through Cable, RS-449 Crossover Cable, V.35 Straight-Through Cable, and V.35 Crossover Cable.
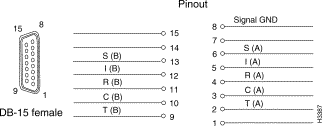
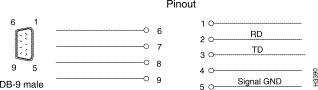
Interface connector type: DB15 female
Connectors per fantail: 8 (numbered 0 - 7)
Figure 5-2 shows a X.21 connector signal
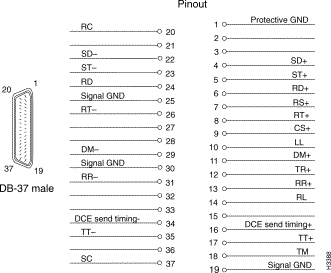
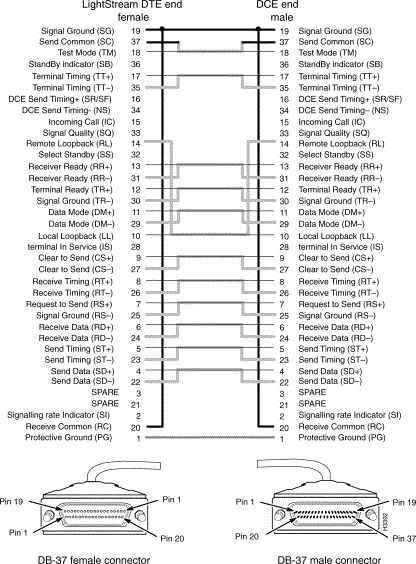
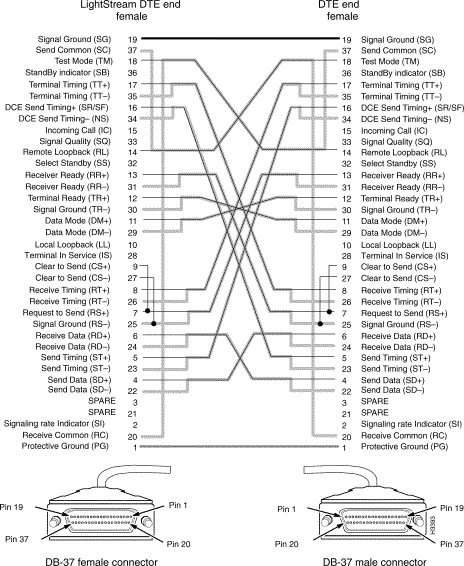
Interface connector type: DB37 male
Connectors per fantail: 4 (numbered 0 - 3)
Figure 5-3 shows a RS-499 connector signal.
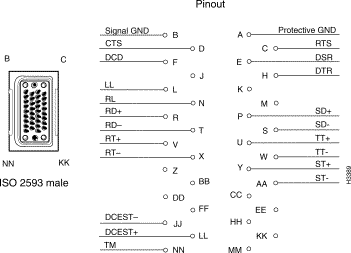
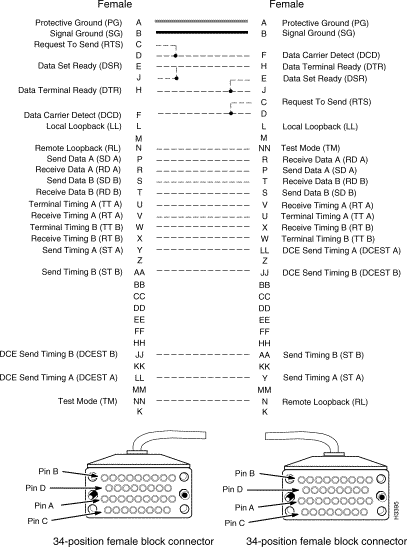
Interface connector type: ISO 2593 male (34-pin block type)
Connectors per fantail: 4 (numbered 0 - 3)
Figure 5-4 shows a V.35 connector signal
The RS-232 connector shown in Figure 5-5 appears on both the V.35 and RS-449 fantails. If you connect the control port to the craft port on a DSU/CSU device, you can use the csumon program to communicate with the DSU/CSU from a LightStream switch.
Interface connector type: DB9 male
Connectors per fantail: 4 (numbered 0 - 3)
To connect fantails to low-speed access cards, LightStream offers a 100-pin cable in three lengths:
| Manufacturing No. | Length | Order No. |
|---|---|---|
2422865-02 | 4 feet | 9303-1 |
2422865-03 | 8 feet | 9303-2 |
2422865-04 | 12 feet | 9303-3 |
Two fantail cables are required to connect one X.21 fantail to a low-speed access card. One fantail cable is required to connect each V.35 or RS-449 fantail to a low-speed access card.
Where used: To connect a LightStream 2020's X.21 fantail interface to an X.21 device. This cable is available from LightStream Corp. See Figure 5-6.
| Manufacturing No. | Length | Order No. |
|---|---|---|
2418483G01 | 30 feet | 9321-1 |
2418483G02 | 50 feet | 9321-2 |
2418483G03 | 100 feet | 9321-3 |
Where used: To connect a LightStream 2020's RS-449 fantail interface to an RS-449 DCE device. This cable is available from LightStream Corp.
| Manufacturing No. | Length | Order No. |
|---|---|---|
2423253G01 | 30 feet | 9349-1 |
2423253G02 | 50 feet | 9349-2 |
2423253G03 | 100 feet | 9349-3 |
Where used:
This cable is available from LightStream Corp.
| Manufacturing No. | Length | Order No. |
|---|---|---|
2423254G01 | 30 feet | 9349-5 |
2423254G02 | 50 feet | 9349-6 |
2423254G03 | 100 feet | 9349-7 |
2423254G04 | 8 feet | 9349-4 |
Where used: To connect a LightStream 2020's V.35 fantail interface to a V.35 DCE device. This cable is available from LightStream Corp.
| Manufacturing No. | Length | Order No. |
|---|---|---|
2423880G01 | 30 feet | 9335-1 |
2423880G02 | 50 feet | 9335-2 |
2423880G03 | 100 feet | 9335-3 |

Where used:
This cable is available from LightStream Corp.
| Manufacturing No. | Length | Order No. |
|---|---|---|
2420721G01 | 30 feet | 9335-5 |
2420721G02 | 50 feet | 9335-6 |
2420721G03 | 100 feet | 9335-7 |
2420721G04 | 8 feet | 9335-4 |
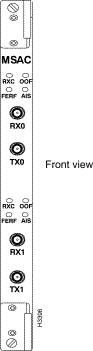
This page shows the external connectors on the medium-speed access card. The data cable is described in the subsection entitled T3/E3 Coaxial Cable. See Figure 5-11.
Interface connector type: 75 ohm BNC jacks
Connectors per access card: 4 (2 receive and 2 transmit)
Where used:
This cable is available from LightStream Corp.
| Manufacturing No. | Length | Order No. |
|---|---|---|
2423252G01 | 3 feet | 9203-1 |
2423252G02 | 25 feet | 9203-2 |
2423252G03 | 50 feet | 9335-3 |
2423252G04 | 100 feet | 9335-4 |
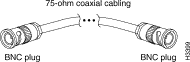
Figure 5-13 shows external connectors on the multimode and single mode OC-3c access cards. OC-3c cables are described in the subsections entitled Multimode OC-3c Cable and Single Mode OC-3c Cable.
Multimode interface connector type: Duplex SC
Connectors per multimode access card: 4 (2 per port; ports are numbered 0 and 1)
Single mode interface connector type: ST
Connectors per single mode access card: 4 (2 per port; ports are numbered 0 and 1)
Figure 5-14 shows Multimode OC-3c cable with simplex SC connectors.
Where used: To connect a multimode OC-3c access card on a LightStream switch to another OC-3c device. LightStream Corp. does not provide this cable; it is widely available from other sources.
The LightStream OC-3c interfaces operate at a wavelength of 1300 nanometers. Multimode cables should conform to the following specifications:
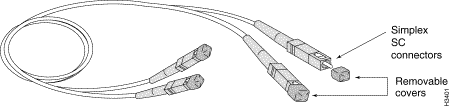
Figure 5-15 shows a Single mode OC-3c cable with ST connectors.
Where used: To connect a single mode OC-3c access card on a LightStream switch to another OC-3c device. LightStream Corp. does not provide this cable; it is widely available from other sources.
LightStream's OC-3c interfaces operate at a wavelength of 1300 nanometers. Single mode cables should conform to the following specifications:
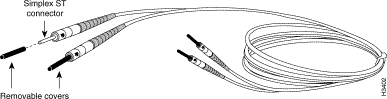
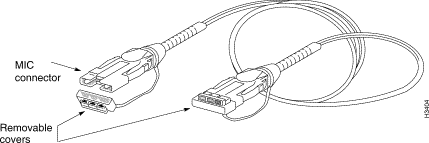
Figure 5-16 shows MICs (media interface connectors) on an FDDI access card. An FDDI cable is show in Figure 5-17.
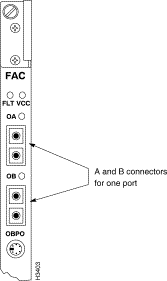
Each FDDI port consists of two connectors, A (red) and B (blue). FDDI connectors are keyed to ensure proper connection of the cable to the access card.
Where used: To connect a LightStream switch's multimode FDDI access card to another FDDI device. LightStream Corp. does not provide this cable; it is widely available from other sources.
LightStream's FDDI interface operates at a wavelength of 1300 nanometers. Cables should conform to the following specifications:
This section describes Ethernet connectors and cables on the NP access card and the Ethernet access card.
This page describes the 15-pin Ethernet AUI connector on the NP access card and the Ethernet access card (ports 0 and 7). The data cable is described in the subsection entitled Ethernet AUI Cable. See Figure 5-18.
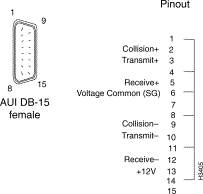
Figure 5-19 shows the RJ-45 connectors on the Ethernet access card. These connectors are used by the twisted pair (10Base-T) ports. The cables used with these ports are shown in Figure 5-21 and Figure 5-22.
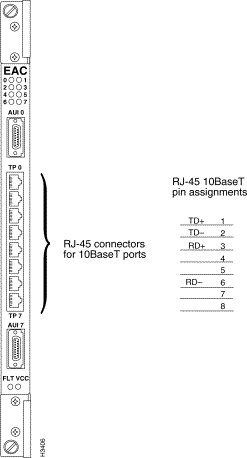
Figure 5-20 shows an Ethernet AUI cable.
Where used: Connects an AUI port on the NP access card or Ethernet access card of a LightStream switch to an Ethernet 10Base2 or 10Base5 transceiver. LightStream Corp. does not provide this cable; it is widely available from other sources.
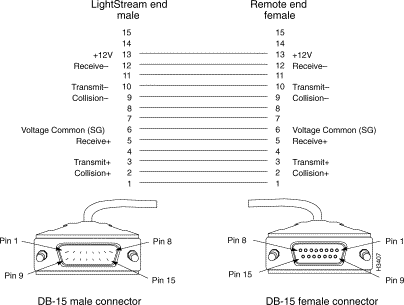
Where used:
LightStream Corp. does not provide this cable; it is widely available from other sources. See Figure 5-21.
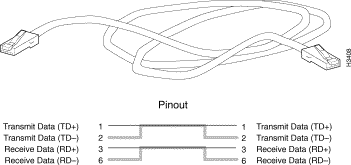
Where used: To connect an Ethernet access card on a LightStream switch directly to another device on the Ethernet, such as a workstation.
LightStream Corp. does not provide this cable; it is widely available from other sources. See Figure 5-22.
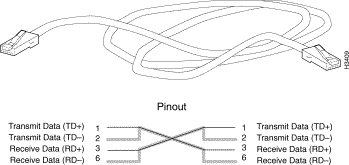
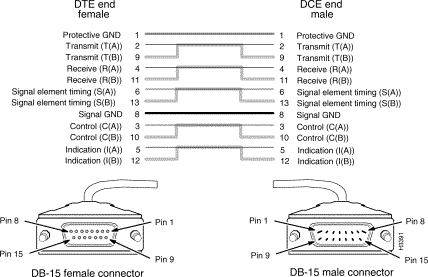
Figure 5-23 and Figure 5-24 describe the modem and console connectors, respectively, on the switch card's console/modem assembly. The data cable used for both ports is described in the subsection entitled RS-232 Straight-Through Cable.
Interface connector type: DB25 male, DTE
Connectors per assembly: labeled MODEM
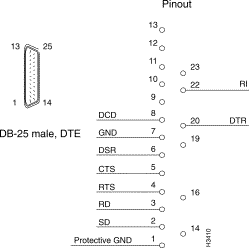
Figure 5-24 shows a RS-232 DB-25 console port signal diagram.
Interface connector type: DB25 female, DCE
Connectors per assembly: labeled CNSL
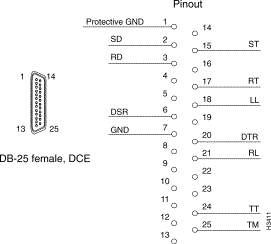
Figure 5-25 shows a RS-232 straight-through cable.
Where used: To connect the LightStream console port or modem port to a console or modem. LightStream Corp. does not provide this cable; it is widely available from other sources.
Several power cordsets are available for AC-powered LightStream ATM switches, both with systems and as spare parts. This section can help you choose the right cordset for your site.
If you are specifying a cordset as part of a new system order, refer to the LightStream Price List or Product Catalogue and order the appropriate Country Power Kit. This ensures that you will also receive the appropriate labels and instructions for the country of destination.
If you want to check the cordset included in a specific Country Power Kit, use TableTable 5-1, which cross-references cordset product numbers and Country Power Kit models.
If you need to order a replacement cordset that is not part of a Country Power Kit, you must use the cordset's part number. (The part number (P/N) of each cordset appears above the cordset illustration, later in this section.)
An AC-powered LightStream chassis is equipped with a recessed male power inlet. The chassis connector follows IEC standard 320 C20 and requires a cordset with an IEC 320 C19 female connector. (All the cordsets offered for the LightStream switch have IEC 320 C19 female connectors.)
Table 5-1 summarizes the information in this section; it lists the countries of use, cordset rating, plug type, part number, and Country Power Kit for each cordset. Figure 5-26 through 5-26 illustrate the cordsets.
| Countries | Cordset Rating | Plug | P/N | Ctry. Kit |
|---|---|---|---|---|
North America, Japan | 125 V @ 20 A | NEMA 5-20P | 9814927-01 | 0104-1 |
North America | 125 V @ 20 A | NEMA L5-20P | 9814927-02 | 0104-24 |
North America | 250 V @ 20 A | NEMA L5-20P | 9814927-04 | 0104-25 |
Continental Europe, including Finland, France, Germany, Norway, Sweden | 250 V @ 16 A | CEE 7/7 | 9814927-05 | 0104-5 |
Israel | 250 V @ 16 A | SI 32 | 9814927-08 | 0104-13 |
Switzerland | 250 V @ 10 A | SEV 1011 | 9824106-01 | 0104-11 |
U.K., Ireland, Scotland, Hong Kong | 250 V @ 13 A | BS 1363 | 9814927-11 | 0104-2 |

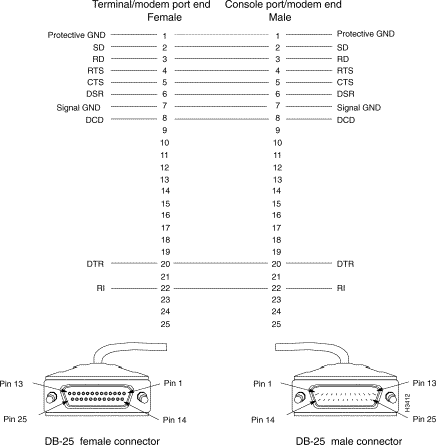
 Country Kit 0104-24
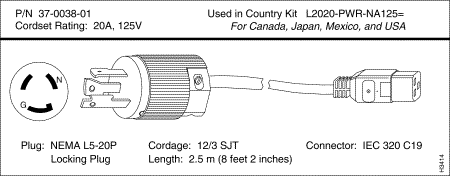
 Country Kit 0104-25
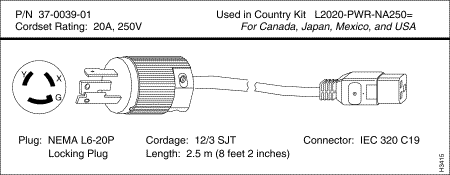
 Country Kit 0104-5
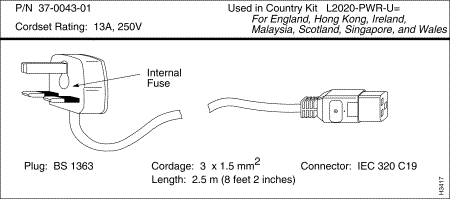 0104-2
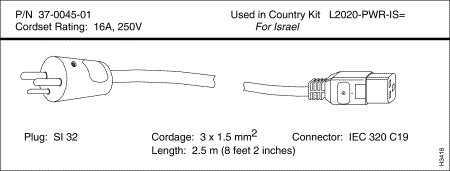 Country Kit 0104-13
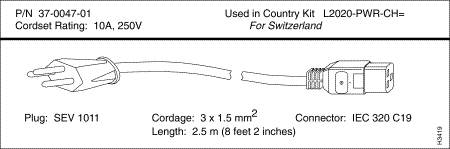 Country Kit 0104-11
![]()
![]()
![]()
![]()
![]()
![]()
![]()
![]()
Posted: Wed Oct 2 05:06:29 PDT 2002
All contents are Copyright © 1992--2002 Cisco Systems, Inc. All rights reserved.
Important Notices and Privacy Statement.