|
|

Statistics are counters collected by a LightStream 2020 multiservice ATM switch (LS2020 switch). This chapter tells you how to monitor and evaluate the state and performance of your LS2020 switch by reviewing and sometimes processing the statistics.
LS2020 statistics are stored in MIB objects. Examples of statistics include the following MIB objects:
Many statistics of interest for the LS2020 switch are defined in some of the standard MIBs and the LS2020 private MIB. For a list of standard MIBs and information on the LS2020 private MIB, see the LightStream 2020 CLI Reference Manual.
All statistics in an LS2020 switch are initialized at system startup. When they reach their maximum value (or if you do another startup), they are reset to 0. You can use the collector to collect statistics at regular intervals.
To view port statistics, use the show command. All of the information displayed for port interfaces is generic and applies to all interfaces, regardless of the interface type.
If you need instructions on changing the target switch, see the "Setting the Target Switch for CLI Commands" section in the chapter entitled "Command Line Interface."
Step 2 Enter the following at the cli> prompt:
<c.p> is the number of the port for which statistics are displayed. The port number is in card.port format (card = 2 - 10; port = 0 - 7).
The following is an example of the information that displays when you enter show port 2.0 statistics:
Octets Rcvd is the total octets received from the media.
Normal Packets Rcvd is the number of unicast packets delivered (a portion of the total).
Multicast Packets Rcvd is the number of broadcast/multicast packets delivered (a portion of the total).
Discarded Rcvd Packets is the packets from the switch discarded due to resource limitation.
Receive Errors is the packets discarded due to format error.
Unknown Protocols Rcvd is the packets destined for unknown protocols.
Octets Sent is the total octets sent on the media.
Normal Packets Sent is the umber of unicast packets sent (a portion of the total).
Multicast Packets Sent is the number of broadcast/multicast packets sent (a portion of the total).
Discarded Output Packets is the packets discarded due to resource limitation.
Output Errors is the packets discarded due to error.
The first time you request statistics for a particular port, you see a display like the one shown above. However, if you request statistics on that port again, the current value of each statistic displays with additional information. The additional information shows the amount that each statistic increased since your last request and the rate at which the statistic is changing. The following example shows the statistics that display when you enter show port 2.0 statistics command anytime after the first time.
The LS2020 switch provides a data collection facility called the collector. The collector allows you to define a set of MIB objects, collect their values at regular intervals, and save the information in a file. The set of MIB objects and their collected values is a collection.
The collector maintains a table called collectTable in the private section of the LS2020 MIB. It uses the information in this table to control the operations of its collections. Table 7-1 shows a sample collection table. Each row defines a collection.
Table 7-1 Sample Collection Table
| Collection Number |
Collection Status | Operational Status | Begin Time | End Time | Interval | File Name | File Size |
You can use the begintime and endtime arguments to control the collection duration and the filesize argument to control the collection size. If you do not specify the begintime and endtime arguments, the collection runs continually.
The collector can run up to 25 collections simultaneously on a particular switch. If you attempt to start more than 25 collections, any additional collections have an operational status of waiting. When the number of running collections falls below 25, the next waiting collection begins running.
You can collect any set of MIB objects you want at various time intervals. For example, you can define a collection of ifInErrors and ifOutErrors objects for a particular set of ports to be collected once an hour or once a day. Once the collection starts, the specified information is collected at the correct interval and appended to the collection file.
The collector automatically generates the file and file name for every collection that you create. The file name is of the form collect.<collection number>. All collection files are placed in the /usr/tmp/collector directory. Sample names are /usr/tmp/collector/collect.6 and /usr/tmp/collector/collect.128.
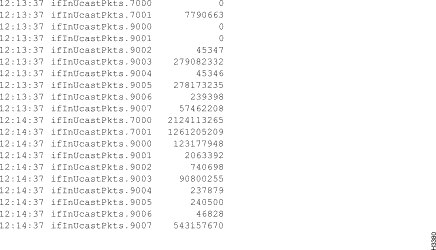
Collection files are circular ASCII files containing the time each object was collected, the object name, and the object value. Figure 7-1 shows a sample collection file. When the circular file is full, the oldest data (including start date) is overwritten by newer data. Files are displayed in chronological order from the oldest entries to the newest. The default for the maximum file size is 100 kilobytes (KB).
You can view and use the collection files as they are or you can process the data. (You may want to sort the data or make calculations to determine when changes in performance or state occur.)
You may want to perform these functions on your collections:
To begin a new collection, follow these procedures in the order given here:
2. Set the collection time interval
3. Add or delete collection objects
6. Specify collection start and end times
Each of these procedures is explained in the sections that follow.
These steps enable you to create a collection. They set up a row in the collectTable object for a collection with the number you specify.
<community name> is the name for the SNMP community with read/write privileges that you want to access.
Step 2 Enter the following at the cli> prompt:
cli> set collection <collection number> create
<collection number> is an integer between 1 and 128, inclusive.
Step 3 To verify that the collection has been created, enter the following at the cli> prompt:
These steps enable you to set the time interval for collecting data for a particular collection:
<community name> is the name for the SNMP community with read/write privileges that you want to access.
Step 2 Enter the following at the cli> prompt:
<collection number> is the number of a collection for which you are setting the collection interval.
<interval> is the interval (in seconds) at which you want to collect the data. The default is 60 seconds.
Note If you set extremely short intervals to collect many objects, there is a noticeable difference in response time.
Step 3 To verify the collection interval for a particular collection, enter the following at the cli> prompt:
Check the information in the Collection Interval field.
This procedure explains how to specify a MIB object and add it to or delete it from a collection. Each MIB object is added or deleted individually.
<community name> is the name for the SNMP community with read/write privileges that you want to access.
Step 2 If you do not know which MIB objects are available for collection, use the browse or the walksnmp command (described in the "SNMP Commands" chapter) to list the objects that are available.
Step 3 To add MIB objects to a collection, enter the following at the cli> prompt:
<collection number> is the number of a collection for which you are adding objects.
<MIB address> is the MIB name or address of the object you want to add to the collection. The MIB address must include the instance identifier as described in the "SNMP Commands" chapter.
For example, to collect the ifInOctets MIB object for ports 1 and 2 on card 3, enter the following at the cli> prompt:
Step 4 To verify that the object(s) you specified in step 3 are collected, enter the following from the cli> prompt:
Check the information in the Collection Items field. You should see the MIB object(s) listed that you added to the collection.
<community name> is the name for the SNMP community with read/write privileges that you want to access.
Step 2 To delete objects from a collection, enter the following at the cli> prompt:
<collection number> is the number of a collection for which you are deleting objects.
<MIB address> is the MIB name or address of the object you want to delete from the collection.
Step 3 To display the current objects to be collected for the collection, enter the following at the cli> prompt:
Check the information in the Collection Items field. The MIB object you specified should not appear in the display.
To specify the size of a collection file, follow these steps:
<community name> is the name for the SNMP community with read/write privileges that you want to access.
Step 2 Enter the following at the cli> prompt:
<collection number> is the number of a collection for which you are specifying the collection file size.
<size> is the size of the collection file in kilobytes. The default is 100 KB. The actual file size is 100 x 1024 bytes.
Step 3 To display the size of the collection, enter the following from the cli> prompt:
Check the information in the Collection File Size.
Starting the collector causes the LS2020 switch to collect the specified MIB objects (at the defined times) and store the data in the collection file. To start a collection, follow these steps:
<community name> is the name for the SNMP community with read/write privileges that you want to access.
Step 2 Enter the following at the cli> prompt:
<collection number> is the number of a collection that you are starting.
Step 3 To confirm that the collection has been started, enter the following from the cli> prompt:
Look at the Collection Status field.
If the Collection Status field status is Valid, the collection has been started and is running. If the status is Waiting, you have more than 25 collections running on this switch, or the collection is scheduled to start at a future time.
This optional procedure enables you to specify a start and end time for a collection.
<community name> is the name for the SNMP community with read/write privileges that you want to access.
Step 2 To specify the start time, enter the following at the cli> prompt:
<collection number> is the number of a collection for which you are specifying the start time.
<time> is the time when you want the collection to start. Enter the time in [[[yy:]mm:]dd:]hh:mm:ss format. The default is the current time and date.
Step 3 To determine collection start time, enter the following from the cli> prompt:
<community name> is the name for the SNMP community with read/write privileges that you want to access.
Step 2 To specify the stop time, enter the following from the cli> prompt:
<collection number> is the number of a collection for which you are specifying the end time.
<time> is the time when you want the collection to stop. Enter the time in [[[yy:]mm:]dd:]hh:mm:ss format. The default is the time when the LS2020 system clock runs out (for example, Thu Dec 31 23:59:59 2037).
You can view the collection file from the command line interface (CLI), or you can copy it to a third-party network management system (NMS) or workstation, where you can view it or process it.
Two procedures can be used to view the collection from CLI. The first is used if you are running CLI on the network processor (NP) of the LS2020 switch on which the collection is being run, and the second is used if you are running CLI on a remote NP or Sun SPARCstation.
Note You must be in protected mode to view a collection if CLI is running from a remote NP or Sun SPARCstation, or if you are moving the collection file to a third-party NMS or workstation. See the chapter entitled "Command Line Interface" for instructions on accessing protected mode. You must also have an account (user name and password) for the workstation or host to which you are moving the collection file. Your network administrator should provide you with this information.
Enter the following at the *cli> prompt:
For more information on the circular buffer print (cbufpr) command, see the chapter entitled "Command Line Interface."
Step 2 Enter the protected mode password when you see the following prompt:
Step 3 Enter the following at the *cli> prompt:
The LS2020 switch responds with a message similar to the following:
Step 4 When you see the following prompt, enter the user name for the account on the workstation or host to which you are moving the collection file:
Step 5 Enter the password for the account when you see the following prompt:
If you enter the user name and password correctly, the workstation or host displays information similar to the following:
Step 6 Enter the following at the ftp> prompt:
<new name> is the name of the file that identifies the chassis or appropriate directory name for the file. For example, if you are moving a trap log for a switch called Light5, the new name could be mma_Light5.traplog.
The put command sends the log file to the specified workstation or host. The system tells you when the transfer is complete.
You can use a standard UNIX command such as more or cat to view the collection file on the workstation or host. You can also use the text file with any text processing tool you have available.
Step 7 To exit the file transfer program and return to CLI, enter bye or quit at the ftp> prompt:
To get a list of all defined collections and to determine the status and contents of any defined collection, follow these steps:
The walksnmp command displays a list of all collections that have been defined, as follows:
The numbers following the term Value are the collection numbers that have been defined.
Step 2 Once you know the numbers of the collections that have been defined, you can determine the contents and status of each collection by typing the following at the cli> prompt:
If you do not enter a collection number, all collections are displayed.
The following is an example of the output that displays when you enter show collection 10:
To temporarily stop a collection, follow these steps:
<community name> is the name for the SNMP community with read/write privileges that you want to access.
Step 2 Enter the following at the cli> prompt:
<collection number> is the number of a collection you are stopping.
Step 3 To determine if a collection has been stopped, enter the following from the cli> prompt:
If you restart this collection at a later time, new data is appended to the existing collection file.
The show collection <collection number> command displays the Collection Status field. If the status is Under Creation, the collection has been stopped.
If a collection has been restarted, the Collection Status changes from Under Creation to Valid.
If you have 25 collections running and you stop one or more of them, collections with a Collection Status of Waiting may be started as a result. (In this case, you may not be able to restart the collection you just stopped, unless you halt another collection.)
The following steps tell you how to delete the definition of a collection.The procedure deletes the definition of the collection from the collecTable, but it does not delete the collection file itself. Once a collection is deleted, you can no longer restart it because its definition no longer exists.
<community name> is the name for the SNMP community with read/write privileges that you want to access.
Step 2 Enter the following at the cli> prompt:
<collection number> is the number of a collection to be deleted.
Step 3 To list the collection numbers that have been defined for this switch, enter the following from the cli> prompt:
The walksnmp collectIndex command displays the collection numbers that have been defined for this switch. The number that you deleted should not appear on this list.
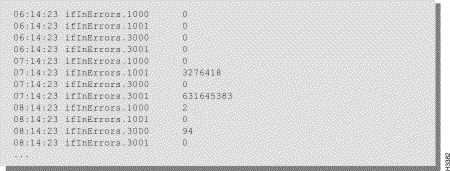
The following shows a list of commands used to create, define, and then start a collection. This sample collection is defined to collect the ifInErrors MIB object for two ports on card 1 and two ports on card 3 of the target LS2020 switch. It is placed in /usr/tmp/collector/collect.2. The data is collected every hour starting when you issue the set collection start command and continuing until you stop it. (No end time has been defined.)
You can view the collection file by following the instructions in the section "Procedure 1: Viewing a Collection." Figure 7-2 shows a sample display of the collection file.
![]()
![]()
![]()
![]()
![]()
![]()
![]()
![]()
Posted: Wed Jan 22 23:53:08 PST 2003
All contents are Copyright © 1992--2002 Cisco Systems, Inc. All rights reserved.
Important Notices and Privacy Statement.