Beginning with this software release, Cisco will be providing the ZeitNet version of the Solaris and SunOS driver software. ZeitNet, Inc, is the OEM supplier to Cisco of these products, and this software is certified to run on both the Cisco and ZeitNet version of the ATM SBus adapter hardware.
We are making this change in order to facilitate the more rapid update and release to new versions of the software. By eliminating the time-consuming process of changing the names in the software -- and more significantly, converting the documentation to Cisco formats -- this change will allow you to receive software and documentation updates more quickly.
Although the software displays the ZeitNet name, its look and feel are identical to those of prior releases of the Cisco driver versions. In addition, you can continue to rely on the features of Cisco support:
- Technical support from Cisco's Technical Assistance Center (TAC).
- Access to driver updates on Cisco Connection Online
- Ability to open cases with the TAC via CCO
The documentation for this product will no longer be contained on the CD-ROM Cisco Connection Documentation, Enterprise Series (formerly UniverCD). You may order the documentation via Cisco Express by calling (800) 553-6387 or (408) 526-7208 and charging it to your credit card. Alternatively, you can send a credit card order by fax to (408) 526-7118, or send a credit-card order by e-mail to express@cisco.com. Corporate purchase orders are also accepted, by fax only.
For further information on ordering, refer to the Cisco Express page at Cisco Connection Online (http://www.cisco.com) or see the Cisco Price List.
The manual, ZeitNet Z-ATM Solaris/SunOS User Guide, can be ordered as product number DOC-ATMSOLSUNUG=.
These Release Notes describe product features, important information, and troubleshooting suggestions for the Z-ATM Sbus Adapter software release for Solaris/SunOS, version 3.0 (1). These Release Notes supplement the ZeitNet Z-ATM Solaris/SunOS User Guide, version 3.0.
|
| Part Number
| Version
| Description
|
| Product
| WA-C401
WA-C402
|
| SBus Fiber (equivalent to ZeitNet ZN1211)
SBus Copper (equivalent to ZeitNet ZN1215)
|
| Release Notes
|
| 3.0
| Describes release notes information
|
| Software
|
| 3.0 (1)
3.0 (1)
| ZeitNet ATM Sbus Adapter Solaris 2.3/2.4/2.5 Setup Disk (Three 3.5"diskettes)
ZeitNet ATM Sbus Adapter SunOS 4.1.3/4.1.4 Setup Disk (Three 3.5"diskettes)
|
| Manuals
|
| 3.0
3.0
| ZeitNet Z-ATM Solaris/SunOS User Guide, version 3.0
ZeitNet Z-ATM Sbus Adapter Guide
|
SBus Solaris and SBus SunOS Adapters Notes
The following notes pertain to both the Solaris and SunOS systems. You should read these notes before you install and use the Z-ATM Sbus Adapter:
- The Z-ATM Sbus Adapter does not support model 20, 30, and the early version of model 40 of the SPARC station 10, with bus speeds less than 20MHz. These workstations will exhibit cell loss (reported as CRC errors) under some heavily-loaded conditions.
- You can display the bus speed (on most systems), as follows:
- The
ok prompt appears.
- At the
ok prompt, enter module-info.
- If the system is booted with kadb, enter $q to display the
ok prompt.
- The Z-ATM Solaris/SunOS software supports two adapters per host.
- You can set the physical transmission mode to SDH or SONET by modifying the
zninit.db file. Specify the transmission mode after the BEGIN_LINK statement and before the VLANs definition.
- The following example is for SDH:
BEGIN_LINK_GLOBALS
FRAMING_TYPE: SDH STM-1END_LINK_GLOBALS
- The following example is for SONET (STS-3c):
BEGIN_LINK_GLOBALS
      FRAMING_TYPE:SONET STS-3c
END_LINK_GLOBALS
- The Z-ATM Sbus Adapter does not work with UltraSparc workstations that have OpenBoot 3.x Beta firmware. You can verify which firmware your workstation uses on the banner that appears when you boot the workstation.
- When you delete a VLAN, the ifconfig utility might still display the VLAN. The VLAN does not appear when you reboot the workstation.
- The Z-ATM Initializer (zninit) utility does not always validate values against bounds.
- Under some heavily-loaded conditions, the znsigd daemon might terminate and create a core file in the root (
/) directory. If this occurs, do the following to ensure that the ATM stack operates properly:
- Remove the core file.
- Restart the terminated znsigd daemon. You can check which daemon terminated with the ps command.
- This software has been tested with Solaris 2.3, Solaris with mandatory patch level 1, Solaris 2.4. and Solaris 2.5. Make sure to apply any mandatory patches to your operating system. On a Solaris system, to display installed patches, enter the showrev -p command.
- An error message might appear when the driver is added during installation. If you reboot the system, the driver should load successfully. If an error does occur during a reboot, refer to the "Troubleshooting" chapter of the ZeitNet Z-ATM Solaris/SunOS User Guide.
The following notes pertain only to installing and using the Z-ATM SBus Adapter on a SunOS system:
- The Z-ATM Sbus Adapter software is supported on SunOS 4.1.3, patch level U1, and later versions of SunOS operating systems.
- The Z-ATM Sbus Adapter software for SunOS is supported only on machines with sun4m architecture, which includes the models Sparc-5, Sparc-10, and Sparc-20. You can find the Sun architecture with the uname -m command.
- The Z-ATM Sbus Adapter driver for SunOS cannot be unloaded. However, you can remove the driver using the /etc/uninstall_ZNatm command.
- The IP layer supports only packet sizes less than 32K. If you attempt to transmit or receive packets greater than this size, an error is reported.
- The installation of the Z-ATM Sbus Adapter software requires at least 8MB of available disk space under the /usr/tmp/unbundled directory.
- You cannot change the MTU size for any VLAN.
- If the in.routed daemon is started before the VLAN configuration is complete, the route tables might not get updated properly. You should flush the route table (route -f) if you have a problem. To avoid this problem across reboots, you can move the csatmstartup entry at the end of the /etc/rc.local file, just before the entry that starts the
in.routed daemon.
The following notes are for the Z-ATM Administrator utility (znadmin). This information pertains to both the Solaris and SunOS systems.
- When you start the AAL tests, you cannot stop the tests or refresh the screen until the test is completed. The standard number of packets used for the test is large. You might want to reduce the number of packets to reduce the time it takes to complete the test.
- When you use the Z-ATM Administrator to initialize and then delete a VLAN without starting it, the Z-ATM Sbus Adapter driver does not recognize that the VLAN existed. The no such interface error message appears. You can ignore this error message.
- If you attempt to quit from a subwindow by clicking on the icon in the upper-left corner of the window, the Z-ATM Administrator exits with a segmentation fault. This fault is recorded and stored in a core dump file. This fault occurs with a subwindow that periodically updates itself. Instead of clicking on the icon, you should click the OK or Close button to close the subwindow.
- When you select menu options, the windows displayed are inactive until you close the subwindows.
- You can access the Z-ATM Administrator from a remote system by setting the DISPLAY environment variable the same way as for any other X application. You cannot access the Z-ATM Administrator remotely using Telnet.
- The Z-ATM Administrator will not function as expected if you have activated the Numlock function on the keyboard.
- Some tables appear wider than the normal screen width. You can view the right portion of the table by scrolling to the right. Data in these tables is updated after a preset interval. When data is updated, the screen is returned to the left portion of the table. You can set the refresh interval to a longer period of time, so that the right side of the screen is visible for a longer period.
- The Timer value for the ARP table appears in minutes.
- The system displays error messages when you run an external loopback test. You can ignore these messages.
- Under certain circumstances, when you select the Exit option, the Z-ATM Administrator might exit abnormally and create a core file.
- When the Z-ATM Administrator saves the configuration information for a LANE VLAN that is not operational, it might store the LECID as 0. You should delete this line from the zninit.db file.
- You cannot individually reset the VC statistics for a VCI that is greater than 1023. You can reset the VC statistics for all VCs by entering 0 for the VCI number.
- The Individual VC Statistics screen will display up to 168 VCs.
- When you run an External Loopback Test, you must use a loopback cable. You can create a loopback cable as follows:
- If your cable is fiber, create a loopback cable by connecting one end of one fiber to TX and the other end to RX.
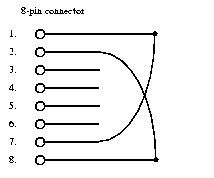
- If your cable is copper, create a loopback cable by modifying an existing category 5 RJ-45 8-wire cable. For loopback connections, on one end, solder pins 1 and 7 together, and solder pins 2 and 8 together according the schematic below. Then replace the connector shell and plug in the modified RJ-45 connector cable.
To connect the adapters on two endstations back to back (without going through a switch), disable the signaling on the endstations. In the same way, when connecting an endstation to an AIP directly or when a switch with no signaling support is used, disable the signaling on the endstations.
Note You must undo these changes before you connect to the switch.
Enter the following instructions at the command line to disable signaling on the endstations for SunOS systems:
# cd /sys/zatm
# adb -w zatm.o
zipc_svc?W 0 (0 to turn SVC off; 1 to turn SVC on)
^D
# reboot
Enter the following line to the /etc/system file to disable signaling on the endstations for Solaris systems:
set zatm:zipc_svc = 0 (0 to turn signalling off)
The following procedure is for a network installation:
Step 1 Issue the following command to create and extract files into the +install directory:
# cd /tmp
# bar /dev/rfd0c 18
Step 2 When prompted, remove the inserted diskette and insert the next one.
Step 3 Export and mount the +install directory on the client system.
Step 4 On the client system, enter the following commands:
# cd +install
# ./install_unbundled
The following appears:
< A list of all the installed files >
.
.
<Installation of Zatm is complete. >
**************************************************************************
Now edit the /etc/zninit.db file to reflect your VLAN Configuration and make sure that /etc/atms and /etc/hosts files have been updated appropriately before rebooting the system.
**************************************************************************
#
Step 5 Edit the system network configuration files and ATM adapter configuration files as described in the "Understanding VLAN Configuration File Syntax" section of the ZeitNet Z-ATM Solaris/SunOS User Guide.
Step 6 Reboot the system log using the /usr/etc/reboot command.
- Fiber: FCC Class B, EN55022 Class B, CISPIR22 Class B
- Copper: FCC Class A (Unshielded Category 5 cable)
- Copper: FCC Class B, EN55022 Class B, CISPIR22 Class B (Unshielded Category 5 cable with shielded connectors)
On the CCO server, the SunOS package image will be kept in a tar format. You need to copy the image from the CCO server into a directory with approximately 20MB of available space. The contents of this tar image can be extracted under the current directory using the following command:
tar xvf <tarimagename>
From the same directory, execute the ./install_unbundled command to install the SunOS package.
On the CCO server the Solaris package image will be kept in tar format. You must copy the image from the CCO server in to a directory with approximately 4MB of available disk space. The contents of the tar image can be extracted under the current directory using the following command:
tar xvf <tarimagename>
From the same directory, execute pkgadd -d 0. to install the Solaris package.