|
|

Overview 2
Basic BBSM 5-Step Setup Process 4
4. BBSM Server Configuration 15
Obtaining Technical Assistance 26
This guide is designed to help you quickly set up and configure a Building Broadband Service Manager (BBSM) 5.3 server.
 |
Caution Carefully follow the steps below to ensure a successful BBSM configuration. If critical items such as IP addresses are not configured correctly, the system will become unstable and you will have to reinstall the BBSM software. |
The basic setup process consists of five steps that are covered in detail in the next section:
1. Site Preparation—Provides information on designing your network and configuring your network devices to work with the BBSM server.
2. BBSM Hardware Connection—Describes how to set up a BBSM appliance and connect it to your network.
3. BBSM Server Preparation—Provides information about running the BBSM wizards to prepare the BBSM server for configuration.
4. BBSM Server Configuration—Describes how to use WEBconfig from the Dashboard to configure the minimum items needed to activate Site 1.
5. BBSM System Checkout—Provides steps on how to test your new BBSM network to determine if all items are properly configured.
After the basic setup is complete, these optional steps can be performed. Refer to the Cisco BBSM 5.3 Configuration Guide and the Cisco BBSM 5.3 Operations Guide for additional information, processes, and details on advanced BBSM topics.
Follow these five key steps to prepare a BBSM server for your use.
To prepare the site for BBSM, Cisco recommends you follow these steps:
1. Work with your ISP to determine your needs.
2. Complete the Cisco BBSM 5.3 Configuration Requirements Checklist document located in the BBSM 5.3 Documents folder on the server desktop. The file is named Checklist.html.
3. Prepare a network diagram with a detailed IP address scheme for both internal and external networks that connect to the BBSM.
4. Mount, install, power on, and configure all the internal network devices.
5. Mount, install, power on, and configure the external router and any other network devices used to connect the BBSM to the Internet.
Be sure the NIC that connects BBSM to the external router is properly configured with a public or private IP address. A NAT pool with overflow is necessary for private IP addresses.
For the internal network to support plug-and-play functionality that provides support for clients with static configurations, a bridged network connection must be installed between the BBSM server and the client ports. If you do not plan to support plug-and-play functionality, you can use any type of network.
At a minimum, the internal subnet managed by BBSM needs to be configured with these IP address ranges:
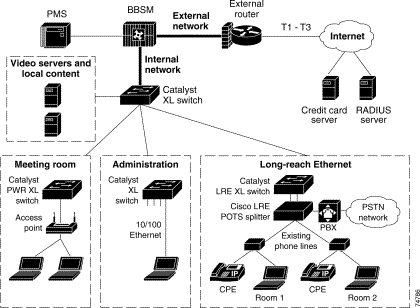
Figure 1 is an example of a BBSM network showing different building areas and how they can connect through the BBSM server.
The BBSM 5.3 software is available on two different platforms—the rack-mounted platform and the Hotspot desktop platform. Both come with the BBSM software already installed.
|
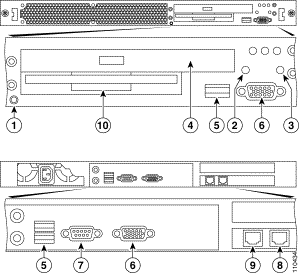
Caution Do not change the physical location of the internal NIC port. The NIC card must remain in the lower PCI slot as it appears in Figure 2 and Figure 3. |
|
Caution Before you begin, make sure that the BBSM server is off. Also, do not attach external devices to the server while it is on. |
Review the following diagrams before proceeding with the set up and connection of your BBSM server hardware.
The following table describes the callouts for Figure 2:
 |
Note The system status indicator (2) denotes system problems with your BBSM server. During normal system operations, the system status indicator is blue. An amber-blinking system status indicator indicates a fault with the system. |
The following table describes the callouts for Figure 3:
|
Note If you are using only one access point with BBSM 5.3 Hotspot, you can avoid using a switch by connecting an Ethernet crossover cable from the internal NIC port (9) directly to the end of the power injector labeled To Network or to the access point, as appropriate. |
Follow these steps to assemble and connect the BBSM server:
1. If you are installing the rack-mounted server, mount it to your rack using the appropriate brackets and screws. A four-post, rack-mounting kit and instructions are included with the server.
2. Refer to Figure 2 (rack-mounted server) or Figure 3 (Hotspot server) to connect the external devices to the BBSM back panel:
3. Connect any of this optional equipment to the BBSM server:
4. Plug the AC power cord into the power supply connector on the back of the BBSM server.
5. If desired, snap the bezel onto the front of the rack-mounted server.
6. To start the server, press the Power button (1).
You are now ready to prepare the BBSM server for configuration.
After all of the network devices are installed and configured, you need to set up the BBSM server to communicate with the various network devices.
|
Caution For security reasons, you should change all passwords and install all service packs before configuring anything else on the BBSM server. |
1. Enter the key passwords for the BBSM server.
You are prompted to do this the first time you power on the server.
2. Verify that the latest service packs are installed on the BBSM server by comparing the versions listed in WEBpatch to the versions listed on the BBSM Software Download site.
A link to the BBSM Software Download site is located on the link toolbar in IE.
3. To configure the internal and external IP addresses for BBSM, choose Start > BBSM Configuration Wizards > Address Change Wizard.
If you are using dual VLANs, you use this wizard to also select which one is for clients and which one is for management IP addresses.
4. To add all network devices to the BBSM configuration, choose Start > BBSM Configuration Wizards > Switch Discovery Wizard.
This step also creates Site 1 and selects the default page set.
5. Enter the required configuration information for your DNS server by enabling forwarders and entering the DNS addresses in the BBSM properties located under Start > Programs > Administrative Tools > DNS.
Now you are ready to configure the BBSM server for your site. The steps shown are necessary for hospitality environments that use PMS billing. Your configuration may require additional steps or settings. Refer to the Cisco BBSM 5.3 Configuration Guide for details and advanced options.
|
Note To prevent billing your PMS during the room activation process, be sure to do the activation (Step 1) before setting up PMS billing (Step 2). However, to test PMS billing by having the rooms billed during activation, reverse Steps 1 and 2. |
1. For a wired network, activate each port location by entering each room, connecting to the BBSM server, and accessing Map Rooms. Perform a Port Test to verify the success of the activation.
If configuring a CMTS network, refer to the Cisco BBSM 5.3 Configuration Guide.
2. Configure the server for PMS billing by configuring both the Settings and the Call Type under Billing > PMS or Printer.
When the required basic BBSM configuration is done, verify that the BBSM system functions correctly:
1. Verify a successful BBSM Administrative logon and full access to the desktop.
2. Verify that all expected ports have been mapped by creating a Mapping report. Choose Dashboard > Reporting Pages > Mapping.
3. If using a PMS system, run WEB PMS Test from the Dashboard.
4. Log on as a client from several different locations and confirm that you can access the Internet.
5. Test any additional options you configured such as a walled garden or bandwidth reservations.
Your BBSM system is now activated.
After the basic configuration steps are complete and BBSM is working, you can configure additional BBSM features to meet your specific needs. To take advantage of the power of BBSM, consider some of the following options. Details are available in the Cisco BBSM 5.3 Configuration Guide.
By configuring different sites to manage different rooms or areas, it is easier to assign the type of page set for each site to control the appropriate type of access.
This feature enables you to put the management traffic and equipment on one VLAN and end-user clients on the other VLAN.
Use this option if your page set requires the end user to enter sensitive information such as credit card numbers or RADIUS usernames and passwords.
The associated domain name is specified by using the Security/SSL web page on WEBconfig. You must also install a security certificate.
This is typically used for meeting rooms that will be used by groups that plan to use bandwidth-intensive applications. Bandwidth can be reserved for the meeting to meet the needs of your end users.
By designing your connect page with links that users can access for free, you create an opportunity to generate incremental revenue while offering the end user valuable services.
BBSM uses page sets that consist of a collection of active server page (ASP) files that execute when the end user opens a browser. These page sets define the access and accounting methods used for the end user's session.
A Page Set Wizard is available from the Dashboard. You can use the wizard to create a basic DailyHotel page set in seven easy steps.
Page set templates are also provided for the most common BBSM applications. They can be used to create customized page sets that are then activated using Custom Page Sets in WEBconfig.
Refer to the Cisco BBSM 5.3 Configuration Guide and the Cisco BBSM 5.3 SDK Developer Guide for details and examples.
This section describes a few of the most common BBSM configuration problems and how to resolve them. Refer to the Cisco BBSM 5.3 Operations Guide for more detailed information.
|
Note Misconfiguration of network devices is the most common reason that end users cannot connect to the Internet. You should always check network device configurations before troubleshooting the BBSM server. |
One of the following error messages is displayed on client's computer:
Resolution: Verify all connections and IP configurations. The jack, patch cable, and network hardware frequently cause this behavior. Also verify that the IP addresses were changed correctly using the Address Change Wizard.
If there is no good connection to BBSM, the browser resets to Work Offline when the user enters an address. The setting for working offline is in the browser File menu.
The following error messages are displayed on client's computer:
Resolution: Verify that all connection settings, such as IP addresses or NICs, are correct, and then change this setting by unchecking the Work Offline check box.
When opening the browser, the end user receives a Sorry, a network error has occurred error message instead of the BBSM connect page. This is also known as the RME 19+7 error because this code appears at the bottom of the error message.
Resolution: While there are many possible causes for this condition, the most common is an unsupported or misconfigured network device. Refer to the Cisco BBSM 5.3 Operations Guide for other possible solutions.
DNS Forwarding is not configured or has cached bad information.
Resolution: Configure or restart DNS Forwarding in Windows. Refer to the Cisco BBSM 5.3 Configuration Guide for additional information.
A PIX firewall is blocking VPN access to Internet.
Resolution: Follow the PIX instructions for allowing access through a firewall.
XP is trying to register with its corporate domain server.
Resolution: Client for Microsoft Networks must be turned off in the Network and Dial-up Connections properties dialog box.
End users are experiencing poor Internet performance.
Resolution: Run Port Test or ping the BBSM server from the room. If packet loss is high, check wiring for loose connections.
Users cannot send or receive e-mail using their ISP account while connected to BBSM.
Resolution: The network provider needs to add the BBSM external IP address to their SMTP server list of IP addresses from which their server is allowed to receive SMTP packets. Their server's address then needs to be configured in the SMTP Forwarding IP Address field on the Server Settings web page.
Should the BBSM server stop functioning for any reason, such as a major virus infection, use the restore CD that came with the appliance to restore the server back to its initial state.
|
Caution If you restore the image on your BBSM server, you will lose all data on the hard drive including port mappings, usage history, and server configuration. The image can only be loaded onto the hardware platform that it came with. |
1. Depending on your appliance, insert the proper restore CD into the CD-ROM drive and reboot the server.
2. From the image loading screen, press any key to continue.
Wait while the image is installed.
3. When the image finishes loading, remove the CD from the CD-ROM drive, and reboot the computer.
Wait while the server reboots.
5. From the System Settings Change dialog box, select Yes to restart the BBSM server.
This server is now back to the factory-installed configuration. You must reconfigure the software to meet your specific environment.
To assist you in setting up or troubleshooting your BBSM server, numerous BBSM documents are available online. We recommend that you check the following documents in the order listed for the information you need:
1. To ensure that you have the latest information on BBSM, refer to the release notes on Cisco.com website before installing, configuring, or upgrading the BBSM server.
2. Open the IE browser to view ReadMeFirst. It contains other key links to documents such as the BBSM 5.3 Configuration Requirements Checklist.
3. Click the Help button on the wizard and Dashboard screens. The BBSM 5.3 online help contains all the key information from the manuals.
4. Use the link on the IE Links toolbar to access the Cisco BBSM Documentation website which contains all the latest documents:
http://www.cisco.com/en/US/products/sw/netmgtsw/ps533/prod_techni cal_documentation.html
5. If Internet service is not available, PDF versions of these documents are provided in the BBSM 5.3 Documents folder. A shortcut to this folder is located on the BBSM server desktop. The folder contains these documents:
Additional documents supporting BBSM can be found on Cisco.com:
You can find instructions for ordering documentation at this URL:
http://www.cisco.com/univercd/cc/td/doc/es_inpck/pdi.htm
You can order Cisco documentation in these ways:
http://www.cisco.com/en/US/partner/ordering/index.shtml
You can submit e-mail comments about technical documentation to bug-doc@cisco.com.
You can submit comments by using the response card (if present) behind the front cover of your document or by writing to the following address:
Cisco Systems
Attn: Customer Document Ordering
170 West Tasman Drive
San Jose, CA 95134-9883
For all customers, partners, resellers, and distributors who hold valid Cisco service contracts, the Cisco Technical Assistance Center (TAC) provides 24-hour-a-day, award-winning technical support services, online and over the phone. Cisco.com features the Cisco TAC website as an online starting point for technical assistance. If you do not hold a valid Cisco service contract, please contact your reseller.
The Cisco TAC website provides online documents and tools for troubleshooting and resolving technical issues with Cisco products and technologies. The Cisco TAC website is available 24 hours a day, 365 days a year. The Cisco TAC website is located at this URL:
Accessing all the tools on the Cisco TAC website requires a Cisco.com user ID and password. If you have a valid service contract but do not have a login ID or password, register at this URL:
http://tools.cisco.com/RPF/register/register.do
Using the online TAC Case Open Tool is the fastest way to open P3 and P4 cases. (P3 and P4 cases are those in which your network is minimally impaired or for which you require product information.) After you describe your situation, the TAC Case Open Tool automatically recommends resources for an immediate solution. If your issue is not resolved using the recommended resources, your case will be assigned to a Cisco TAC engineer. The online TAC Case Open Tool is located at this URL:
http://www.cisco.com/tac/caseopen
For P1 or P2 cases (P1 and P2 cases are those in which your production network is down or severely degraded) or if you do not have Internet access, contact Cisco TAC by telephone. Cisco TAC engineers are assigned immediately to P1 and P2 cases to help keep your business operations running smoothly.
To open a case by telephone, use one of the following numbers:
Asia-Pacific: +61 2 8446 7411 (Australia: 1 800 805 227)
EMEA: +32 2 704 55 55
USA: 1 800 553-2447
For a complete listing of Cisco TAC contacts, go to this URL:
http://www.cisco.com/warp/public/687/Directory/DirTAC.shtml
CCIP, CCSP, the Cisco Arrow logo, the Cisco Powered Network mark, Cisco Unity, Follow Me Browsing, FormShare, and StackWise are trademarks of Cisco Systems, Inc.; Changing the Way We Work, Live, Play, and Learn, and iQuick Study are service marks of Cisco Systems, Inc.; and Aironet, ASIST, BPX, Catalyst, CCDA, CCDP, CCIE, CCNA, CCNP, Cisco, the Cisco Certified Internetwork Expert logo, Cisco IOS, the Cisco IOS logo, Cisco Press, Cisco Systems, Cisco Systems Capital, the Cisco Systems logo, Empowering the Internet Generation, Enterprise/Solver, EtherChannel, EtherSwitch, Fast Step, GigaStack, Internet Quotient, IOS, IP/TV, iQ Expertise, the iQ logo, iQ Net Readiness Scorecard, LightStream, MGX, MICA, the Networkers logo, Networking Academy, Network Registrar, Packet, PIX, Post-Routing, Pre-Routing, RateMUX, Registrar, ScriptShare, SlideCast, SMARTnet, StrataView Plus, Stratm, SwitchProbe, TeleRouter, The Fastest Way to Increase Your Internet Quotient, TransPath, and VCO are registered trademarks of Cisco Systems, Inc. and/or its affiliates in the United States and certain other countries.
All other trademarks mentioned in this document or Website are the property of their respective owners. The use of the word partner does not imply a partnership relationship between Cisco and any other company. (0401R)
Copyright © 2004 Cisco Systems, Inc. All rights reserved.
![]()
![]()
![]()
![]()
![]()
![]()
![]()
![]()
Posted: Mon Feb 9 11:31:38 PST 2004
All contents are Copyright © 1992--2004 Cisco Systems, Inc. All rights reserved.
Important Notices and Privacy Statement.