|
|

Table Of Contents
Supported Standards, MIBs, and RFCs
Assigning a VPN ID and On-net and Off-net Indices to a Trunk Group
Assigning a VPN ID to a System
Disabling Feature Transparency
Disabling the Call Forwarding Reroute Capability on a Trunk Group
Disabling the Call Forwarding Reroute Capability on a System
File Names for Supported SS7 Protocols
Obtaining Technical Assistance
QSIG Feature Transparency
Document Release History
August 15, 2003
Initial version of the document.
September 30, 2003
Final version of the document.
Feature History
The Q Signaling (QSIG) Feature Transparency Feature is described in the following sections:
•
Supported Standards, MIBs, and RFCs
•
•
Feature Overview
QSIG Feature Transparency enables the Cisco PGW 2200 Softswitch to allow QSIG supplementary services and any currently unreferenced QSIG data items to be transmitted over an outgoing QSIG signaling link—if selected by routing. This feature applies to both call dependent and call independent signaling, calls that do not reference a bearer channel. Additionally, backward requests for call forwarding invocation/rerouting will be treated in the Cisco PGW 2200 Softswitch, in which the new destination number will be reanalyzed and routed upon.
To flexibly configure QSIG Feature Transparency, each QSIG trunk group can be assigned a virtual private network (VPN) name and assigned on-net and off-net index values into a set of predefined, constant tables that describe how a particular feature will be handled. If the VPN names match on ingress and egress trunk group, the on-net index is used to decide the behavior for a feature that may be presented on the call. Likewise, if the VPN names do not match, then the off-net index is used. Currently, the only valid defined tables are in the range of 1 through 8. Table 1 dictates that completely transparent operation is required, or the call will not complete. Tables 2, 3, and 4 are set to feature transparency preferred, but a nontransparent destination can be used if necessary to complete the call. Table 5 is set to indicate that the attempted feature will be removed from the onward routed call, and the requestor is informed of this. Tables 6 and 7 are set to release a feature call, and table 8 is set to remove the feature string and continue.
Note
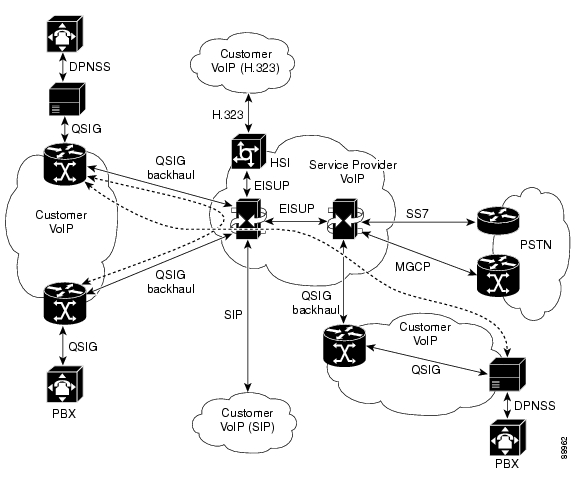
Figure 1 represents an example network with Cisco PGW 2200 Softswitches interconnecting customer VoIP islands and providing an interface to the PSTN; customers are interconnected through protocols, such as session initiation protocol (SIP), H.323, and QSIG. If QSIG is being used, QSIG feature transparency is needed when calls complete via the Cisco PGW 2200 Softswitch and when QSIG signaling is used for both incoming and outgoing call legs.
Figure 1 Example network with feature transparency requirements and SS7 interfaces
Related Documents
This document contains information that is related strictly to the QSIG Feature Transparency Feature. The documents that contain additional information related to the Cisco Media Gateway Controller (MGC) are listed below:
•
•
•
•
•
•
•
•
•
•
•
•
•
•
Supported Platforms
The hardware platforms supported for the Cisco MGC software are described in the Release Notes for Cisco Media Gateway Controller Software Release 9.4(1).
Supported Standards, MIBs, and RFCs
Standards
No new or modified standards are supported by this feature.
MIBs
No new or modified standards are supported by this feature.
For more information on the MIBs used in the Cisco MGC software, refer to the Cisco Media Gateway Controller Release 9 MIB Guide.
RFCs
No new or modified standards are supported by this feature.
Prerequisites
•
•
Provisioning Tasks
The following sections describe the provisioning tasks related to this feature:
Planning for Provisioning
Before you provision QSIG Feature Transparency-related commands, you must have the following information about your installation:
•
For more information on planning the provisioning for the rest of the Cisco MGC software, refer to the Cisco Media Gateway Controller Software Release 9 Provisioning Guide.
Provisioning Procedures
The provisioning procedures for this feature can be found in the following sections:
•
•
Provisioning Basics
The procedures in this section describe how to start a provisioning session and how to save and activate the changes you have made.
•
•
•
•
For more detailed information about provisioning your Cisco PGW 2200 Softswitch, refer to the Cisco Media Gateway Controller Software Release 9 Provisioning Guide.
Starting a Provisioning Session
You may need to start a provisioning session as part of your system operations. To do this, log into the active Cisco MGC, start an MML session, and enter the following command:
prov-sta::srcver="curr_ver",dstver="mod_ver"Where:
•
–
–
Note
•
For example, to use a configuration version called ver1 as the basis for a version to be called ver2, you would enter the following command:
prov-sta::srcver="ver1",dstver="ver2"Once a provisioning session is underway, you may use the prov-add, prov-ed, or prov-dlt MML commands to add, modify, and delete components on your system. For more information on provisioning other components on your Cisco PGW 2200, refer to the Cisco Media Gateway Controller Software Release 9 Provisioning Guide.
There are two ways to close your provisioning session: saving and activating your provisioning changes, as described in the "Saving and Activating your Provisioning Changes" section or ending your provisioning session without saving and activating your changes, as described in the "Ending a Provisioning Session Without Activating your Changes" section.
Saving and Activating your Provisioning Changes
When you have completed making provisioning changes in your session, you must enter a command to save and activate your changes. There are two different provisioning MML commands that do this: prov-cpy and prov-dply.
Caution
The prov-cpy MML command is used to save and activate your changes on the active Cisco MGC. This command is typically used to save and activate changes on a Cisco MGC in a simplex configuration. However, you can use the prov-cpy MML command on Cisco MGCs in high-availability or continuous-service configurations, to save and activate your changes on the active Cisco MGC. If you choose to do this, you should enter the prov-sync MML command immediately afterwards, to have your changes saved and activated on the standby Cisco MGC.
Note
Caution
Note
The prov-dply MML command is used to save and activate your changes on the active and standby
Cisco MGCs. This command is typically used to save and activate changes on Cisco MGCs in high-availability or continuous-service configurations. This command should not be used on a Cisco MGC in a simplex configuration.
Note
Ending a Provisioning Session Without Activating your Changes
You may find that you want to end a provisioning session without saving and activating the changes you have entered during your session. If this is the case, you can enter the prov-stp MML command. This command ends your current provisioning session and your changes are not entered.
Retrieving Provisioning Data
You can use the prov-rtrv MML command to retrieve information about your current provisioning settings. The ways in which you can use this command to retrieve provisioning data are described in the following sections:
•
•
•
•
•
Retrieving Data for an Individual Component
You can retrieve provisioning data on any individual component on your system. To do this, log in to the active Cisco MGC, start an MML session, and enter the following command:
prov-rtrv:component:name=MML_nameWhere:
•
•
For example, to view the provisioning data for individual components, enter commands as shown (in bold text) in this section. The resulting output follows each command.
mml> prov-rtrv:ipfaspath:name="qsig1"MGC-01 - Media Gateway Controller 2003-05-20 22:10:30.314 PSTM RTRV"session=05-12:ipfaspath"/*NAME = qsig1DESC = backhaulEXTNODE = qs-mgcp6MDO = ETS_300_172CUSTGRPID = 1111SIDE = networkABFLAG = nCRLEN = 2*/;mml> prov-rtrv:dchan:name="dchan1"MGC-01 - Media Gateway Controller 2003-05-20 22:10:53.879 PSTM RTRV"session=05-12:dchan"/*NAME = dchan1DESC =SVC = qsig1PRI = 1SESSIONSET = sess1SIGSLOT = 1SIGPORT = 0*/;intvsc19 mml> prov-rtrv:sesssession - Provisioning Sessionsessionprop - Session Set Propertiessessionset - Session Setintvsc19 mml> prov-rtrv:sessionset:name="sess1"MGC-01 - Media Gateway Controller 2003-05-20 22:11:21.161 PSTM RTRV"session=05-12:sessionset"/*NAME = sess1-1DESC = Session Set sess1 Backhaul Link 1EXTNODE = qs-mgcp6IPADDR = IP_Addr1PORT = 1100PEERADDR = 172.22.121.252PEERPORT = 1100TYPE = IPFASIPROUTE =*/;intvsc19 mml> prov-rtrv:sigsvcprop:name="qsig1"MGC-01 - Media Gateway Controller 2003-05-20 22:11:52.187 PSTM RTRV"session=05-12:sigsvcprop"/*ADigitCCPrefix = 0AInternationalPrefix = NULLANationalPrefix = NULLBcInitState = ISBDigitCCPrefix = 0BDigitCCrm = NULLBInternationalPrefix = NULLBNationalPrefix = NULLBothwayWorking = 1CallForwardRerouteDisabled = 0CCOrigin = NULLCGBA2 = 0CLIPEss = 0CompressionType = 1CorrelationCallIDFormat = 0CotInTone = 2010<Press 'SPACE' for next page, 'Enter' for next line or 'q' to quit this output>CotOutTone = 2010CotPercentage = 0CustomerVPNid = 0001CustomerVPNOffNetTblNum = 1CustomerVPNOnNetTblNum = 1ExtCOT = LoopFastConnect = 0FAXsupport = 0FeatureTransparencyDisabled = 0ForwardCLIinIAM = 1ForwardSegmentedNEED = 1GLARE = 0GRA2 = 0GtdCapTypeProp = t0GtdMsgFmt = cIsupTransEarlyBackwardDisabled = 0lapdDropErr = truelapdKval = 7lapdN200 = 6lapdN201 = 260<Press 'SPACE' for next page, 'Enter' for next line or 'q' to quit this output>lapdT200 = 10lapdT203 = 500NatureOfAddrHandling = 0Normalization = 0OMaxDigits = 24OMinDigits = 0OOverlap = 0OverlapDigitTime = 6PostConnectToneDuration = 0PostConnectToneValue = 0PropagateSvcMsgBlock = trueRedirectingNbrMap = 0RedirMax = 5ReleaseMode = AsyncRoutePref = 0SdpXmitToH323Trigger = 0spanId = ffffSuppressCLIDigits = 0T309Time = 90000T310Time = 10000<Press 'SPACE' for next page, 'Enter' for next line or 'q' to quit this output>TMaxDigits = 24TMinDigits = 0TOverlap = 0VOIPPrefix = 0*/;Retrieving Data for All Components
You can retrieve data on all of the components provisioned on your system. To do this, log in to the active Cisco MGC, start an MML session, and enter the following command:
prov-rtrv:allThe system returns a response similar to the following:
mml> prov-rtrv:allMGC-01 - Media Gateway Controller 2003-05-20 22:04:24.422 PSTM RTRV"session=05-12:all"/*NAME COMPID Parent Name TID Description---- -------- ----------- --- -----------"linkset1" 00080001 "dpc1" LNKSET "Linkset 1""linkset2" 00080002 "dpc2" LNKSET "Linkset 2""linkset3" 00080003 "dpc3" LNKSET "Linkset 2""linkset4" 00080004 "dpc4" LNKSET "Linkset 2""linkset5" 00080005 "dpc5" LNKSET "Linkset 2""sc1-mgcp1" 00100001 "sp1-mgcp1" IPLNK "sigchannel 1 for mgcp sig path 1""sc1-mgcp2" 00100002 "sp1-mgcp2" IPLNK "sigchannel 1 for mgcp sig path 2""sip-sigchan" 00100003 "sip-sigpath" SIPLNK "SIP sigchan""dp2-mgcp2" 00100004 "sp1-mgcp5" IPLNK "sigchannel 1 for mgcp sig path 2""qs1-mgcp2" 00100005 "sp1-mgcp6" IPLNK "sigchannel 1 for mgcp sig path 2""qs2-mgcp2" 00100006 "sp1-mgcp7" IPLNK "sigchannel 1 for mgcp sig path 2""eisup-pgwlnk1" 00100007 "eisup-pgw" IPLNK "sigchannel 1 for eisup""eisup-hsilnk1" 00100008 "eisup-hsi1" IPLNK "sigchannel 1 for eisup""eisup-hsilnk2" 00100009 "eisup-hsi2" IPLNK "sigchannel 1 for eisup"<Press 'SPACE' for next page, 'Enter' for next line or 'q' to quit this output>"sc1-mgcp3" 0010000a "sp1-mgcp3" IPLNK "sigchannel 1 for mgcp sig path 2""dp1-mgcp1" 0010000b "sp1-mgcp4" IPLNK "sigchannel 1 for mgcp sig path 2""route1" 00110001 "mgc-01" SS7ROUTE "Route to DPC-2-2-2""route2" 00110002 "mgc-01" SS7ROUTE "Route to DPC-3-3-3""route3" 00110003 "mgc-01" SS7ROUTE "Route to DPC-3-3-3""route4" 00110004 "mgc-01" SS7ROUTE "Route to DPC-3-3-3""route5" 00110005 "mgc-01" SS7ROUTE "notSet""opc" 00130001 "mgc-01" OPC "The vsc point code""dpc1" 00130002 "mgc-01" DPC "Orig. point code""dpc2" 00130003 "mgc-01" DPC "Dest. point code""dpc3" 00130004 "mgc-01" DPC "Dest. point code""dpc4" 00130005 "mgc-01" DPC "Dest. point code""opc1" 00130006 "mgc-01" OPC "The vsc point code""dpc5" 00130007 "mgc-01" DPC "Dest. point code""ss7svc1" 00150001 "dpc1" SS7PATH "SS7 service to DPC-2-2-2""ss7svc2" 00150002 "dpc2" SS7PATH "SS7 service to DPC-3-3-3""ss7svc3" 00150003 "dpc3" SS7PATH "SS7 service to DPC-3-3-3""ss7svc4" 00150004 "dpc4" SS7PATH "SS7 service to DPC-3-3-3""ss7svc5" 00150005 "dpc5" SS7PATH "Nothing defined""slt1" 00160001 "mgc-01" EXTNODE "SLT-c2600"<Press 'SPACE' for next page, 'Enter' for next line or 'q' to quit this output>"slt2" 00160002 "mgc-01" EXTNODE "SLT-c2600""mgcp1" 00160003 "mgc-01" EXTNODE "external node - mgcp1""mgcp2" 00160004 "mgc-01" EXTNODE "external node - mgcp2""mgcp3" 00160005 "mgc-01" EXTNODE "external node - mgcp2""dp-mgcp4" 00160006 "mgc-01" EXTNODE "external node - mgcp2""dp-mgcp5" 00160007 "mgc-01" EXTNODE "external node - mgcp2""qs-mgcp6" 00160008 "mgc-01" EXTNODE "external node - mgcp2""qs-mgcp7" 00160009 "mgc-01" EXTNODE "external node - mgcp2""eisup1" 0016000a "mgc-01" EXTNODE "external node - eisup""eisup2" 0016000b "mgc-01" EXTNODE "external node - eisup""eisup3" 0016000c "mgc-01" EXTNODE "external node - eisup""slt3" 0016000d "mgc-01" EXTNODE "SLT-c2600""slt4" 0016000e "mgc-01" EXTNODE "SLT-c2600""slt5" 0016000f "mgc-01" EXTNODE "SLT-c2600""eisup-pgw" 00190001 "eisup1" EISUPPATH "signal service - mgc""eisup-hsi1" 00190002 "eisup2" EISUPPATH "signal service - mgc""eisup-hsi2" 00190003 "eisup3" EISUPPATH "signal service - mgc""slink1-1" 001d0001 "linkset1" C7IPLNK "Signal link 1-1""slink1-2" 001d0002 "linkset2" C7IPLNK "Signal link 1-1""slink1-3" 001d0003 "linkset3" C7IPLNK "Signal link 1-1"<Press 'SPACE' for next page, 'Enter' for next line or 'q' to quit this output>"slink1-4" 001d0004 "linkset4" C7IPLNK "Signal link 1-1""slink1-5" 001d0005 "linkset5" C7IPLNK "notSet""qsig1" 00340001 "qs-mgcp6" IPFASPATH "backhaul""qsig2" 00340002 "qs-mgcp7" IPFASPATH "backhaul""sp1-mgcp1" 00350001 "mgcp1" MGCPPATH "signal service - mgcp1""sp1-mgcp2" 00350002 "mgcp2" MGCPPATH "signal service - mgcp1""sp1-mgcp3" 00350003 "mgcp3" MGCPPATH "signal service - mgcp1""sp1-mgcp4" 00350004 "dp-mgcp4" MGCPPATH "signal service - mgcp1""sp1-mgcp5" 00350005 "dp-mgcp5" MGCPPATH "signal service - mgcp1""sp1-mgcp6" 00350006 "qs-mgcp6" MGCPPATH "signal service - mgcp1""sp1-mgcp7" 00350007 "qs-mgcp7" MGCPPATH "signal service - mgcp1""t1" 00370001 "mgc-01" GTDPARAM "notSet""t3" 00370002 "mgc-01" GTDPARAM "notSet""t4" 00370003 "mgc-01" GTDPARAM "notSet""t6" 00370004 "mgc-01" GTDPARAM "notSet""sip-sigpath" 003e0001 "SIP" SIPPATH "SIP sigpath""c7-2611-1" 00480001 "slt1" SESSIONSET "Session Set c7-2611 Backhaul Link 1""c7-2612-1" 00480002 "slt2" SESSIONSET "Session Set c7-2612 Backhaul Link 1""c7-2613-1" 00480003 "slt2" SESSIONSET "Session Set c7-2613 Backhaul Link 1""c7-2614-1" 00480004 "slt2" SESSIONSET "Session Set c7-2614 Backhaul Link 1"<Press 'SPACE' for next page, 'Enter' for next line or 'q' to quit this output>"sess1-1" 00480005 "qs-mgcp6" SESSIONSET "Session Set sess1 Backhaul Link 1""sess2-1" 00480006 "qs-mgcp7" SESSIONSET "Session Set sess2 Backhaul Link 1""c7-2615-1" 00480007 "slt5" SESSIONSET "Session Set c7-2615 Backhaul Link 1""dchan1" 00490001 "qsig1" DCHAN """dchan2" 00490002 "qsig2" DCHAN """assoc1" 004a0001 "dp-mgcp4" ASSOCIATION """assoc2" 004a0002 "dp-mgcp5" ASSOCIATION """dpnss1" 00550001 "dp-mgcp4" DPNSSPATH "backhaul to nas2600""dpnss2" 00550002 "dp-mgcp5" DPNSSPATH "backhaul to nas2600"Retrieving Data for All Components of a Particular Type
You can retrieve provisioning data on all components of a particular type on your system. To do this, log in to the active Cisco MGC, start an MML session, and enter the following command:
prov-rtrv:component:"all"Where: component is the MML component type associated with the desired component group. You can find a complete list of MML component types in the Cisco Media Gateway Controller Software Release 9 Provisioning Guide.
For example, to view the provisioning data for all SS7 signaling services, you would enter the following command:
prov-rtrv:ss7path:"all"The system returns a response similar to the following:
mml> prov-rtrv:ss7path:"all"MGC-01 - Media Gateway Controller 2003-05-20 22:15:10.488 PSTM RTRV"session=05-12:ss7path"/*NAME DPC OPC MDO CUSTGRPID SIDE M3UAKEY---- --- --- --- --------- ---- -------ss7svc1 dpc1 opc Q761_GERMAN 1111 networkss7svc2 dpc2 opc1 ANSISS7_STANDARD 1111 networkss7svc3 dpc3 opc ISUPV2_ISRAEL 1111 networkss7svc4 dpc4 opc ISUPV2_ISRAEL 1111 networkss7svc5 dpc5 opc BTNUP_IUP 1111 network*/;Retrieving Data on the Current Provisioning Session
You can retrieve provisioning data on the current provisioning session. To do this, log in to the active Cisco MGC, start an MML session, and enter the following command:
prov-rtrv:sessionThe system returns a response similar to the following:
MGC-02 - Media Gateway Controller 2003-01-13 13:39:19M RTRV"session=jtest:session"/*Session ID = mml1SRCVER = activeDSTVER = jtest*/Retrieving Data on Supported Signaling Protocols
You can retrieve protocol data for the current provisioning session. To do this, log in to the active Cisco MGC, start an MML session, and enter the following command:
prov-rtrv:variantsThe system returns a response similar to the following:
mml> prov-rtrv:variantsMGC-01 - Media Gateway Controller 2003-05-20 22:15:37.303 PSTM RTRV"session=05-12:variants"/*MDO File name Protcol Family Switch Type------------- -------------- -----------ANSISS7_92 SS7-ANSI 0ANSISS7_C2 SS7-ANSI 20ANSISS7_C3 SS7-ANSI 0ANSISS7_E1 SS7-ANSI 23ANSISS7_STANDARD SS7-ANSI 0ATT_41459 ISDNPRI 17ATT_41459_C2 ISDNPRI 17BELL_1268 ISDNPRI 22BELL_1268_C2 ISDNPRI 22BELL_SGCP MGCP 0BTNUP_BTNR167 SS7-UK 5BTNUP_IUP SS7-UK 5DPNSS_BTNR188 DPNSS 26EISUP EISUP 0<Press 'SPACE' for next page, 'Enter' for next line or 'q' to quit this output>ETS_300_102 ISDNPRI 27ETS_300_102_C2 ISDNPRI 27ETS_300_121 SS7-ITU 0ETS_300_172 ISDNPRI 29ETS_300_356 SS7-ITU 0GR317 SS7-ANSI 0HONGKONG SS7-ITU 0IETF_DCS SIP 0IETF_SIP SIP 0ISUPV1_POLI SS7-ITU 0ISUPV2_32DIG SS7-ITU 0ISUPV2_AUSTRIAN SS7-ITU 0ISUPV2_CZECH SS7-ITU 0ISUPV2_DUTCH SS7-ITU 0ISUPV2_FINNISH96 SS7-ITU 0ISUPV2_FRENCH SS7-ITU 0ISUPV2_GERMAN SS7-ITU 0ISUPV2_ISRAEL SS7-ITU 40ISUPV2_JAPAN SS7-Japan 10ISUPV2_JAPAN_C2 SS7-Japan 0<Press 'SPACE' for next page, 'Enter' for next line or 'q' to quit this output>ISUPV2_NORWEGIAN SS7-ITU 0ISUPV2_POLISH SS7-ITU 0ISUPV2_SPANISH SS7-ITU 0ISUPV2_SPANISH_C2 SS7-ITU 0ISUPV2_SWISS SS7-ITU 0ISUPV2_SWISS_C2 SS7-ITU 0ISUPV2_VIETNAM SS7-ITU 0ISUPV3 SS7-ITU 0ISUPV3_UK SS7-UK 0ISUPV3_UK_C2 SS7-UK 0ISUPV3_UK_C3 SS7-UK 0ISUPV3_UK_C4 SS7-UK 0MGCPCAS CAS 0Q721_BASE SS7-ITU 5Q721_BRAZILIAN SS7-ITU 5Q721_CHINA SS7-China 5Q721_FRENCH SS7-ITU 5Q721_PHILLIPINE SS7-ITU 5Q761_97VER SS7-ITU 0Q761_ARGENTINA SS7-ITU 0<Press 'SPACE' for next page, 'Enter' for next line or 'q' to quit this output>Q761_ARGENTINA_C2 SS7-ITU 0Q761_AUSTRL SS7-ITU 0Q761_AUSTRL_C2 SS7-ITU 0Q761_BASE SS7-ITU 0Q761_BELG SS7-ITU 0Q761_BELG_97VER SS7-ITU 0Q761_CHILE SS7-ITU 0Q761_CHINA SS7-China 0Q761_CHINA_C2 SS7-China 0Q761_DANISH SS7-ITU 0Q761_GERMAN SS7-ITU 0Q761_INDIA SS7-ITU 0Q761_JAPAN SS7-Japan 10Q761_KOREAN SS7-ITU 0Q761_NEWZEALAND SS7-ITU 0Q761_PERU SS7-ITU 0Q761_PORTUGAL SS7-ITU 0Q761_SINGAPORE SS7-ITU 0Q761_SINGAPORE_C2 SS7-ITU 0Q761_TAIWAN SS7-ITU 0<Press 'SPACE' for next page, 'Enter' for next line or 'q' to quit this output>Q761_THAILAND SS7-ITU 0Q767_AUSTRALIA SS7-ITU 0Q767_BASE SS7-ITU 0Q767_BRAZIL SS7-ITU 0Q767_COLOMBIA SS7-ITU 0Q767_GUATEMALA SS7-ITU 0Q767_INDONESIA SS7-ITU 0Q767_ITAL SS7-ITU 0Q767_ITAL_C2 SS7-ITU 0Q767_MEXICAN SS7-ITU 0Q767_RUSS SS7-ITU 0Q767_SINGAPORE SS7-ITU 0Q767_SPAN SS7-ITU 0Q767_SWED SS7-ITU 0Q767_TURKISH SS7-ITU 0Q931 ISDNPRI 27Q931_AUSTRALIA ISDNPRI 19Q931_SINGAPORE ISDNPRI 27dummy AVM 0dummy MGCP 0<Press 'SPACE' for next page, 'Enter' for next line or 'q' to quit this output>dummy SGCP 0dummy TCAPOverIP 0dummy VSI 0*/;Provisioning QSIG Feature Transparency
Note
QSIG Feature Transparency is provisioned when
1.
2.
3.
If, in addition, the VPN IDs match, then the call is considered on-net. In all other cases, the call defaults to off-net.
Note
Assigning a VPN ID to a Trunk Group
To assign a VPN ID to a trunk group, perform the following steps:
Step 1
Step 2
prov-ed:trnkgrpprop:name="name", CustomerVPNid ="id"Where:
•
•
Note
For example, to assign the VPN ID ABIGBIZ1 to trunk group 1000, you would enter the following command:
prov-ed:trnkgrpprop:name="1000", CustomerVPNid="ABIGBIZ1"Step 3
Step 4
Assigning a VPN ID to a Sigpath
To assign a VPN ID to a Sigpath, perform the following steps:
Step 1
Step 2
prov-ed:sigsvcprop:name="name", CustomerVPNid="id"Where:
•
•
Note
For example, to assign the VPN ID ABIGBIZ1 to system sigpath1, you would enter the following command:
mml>prov-ed:sigsvcprop:name="sigpath1", CustomerVPNid ="ABIGBIZ1"Step 3
Step 4
Assigning an On-net Table Index to a Trunk Group
To assign an on-net table index to a trunk group, perform the following steps:
Step 1
Step 2
prov-ed:trnkgrpprop:name="name", CustomerVPNOnNetTblNum="int"Where:
name—The MML name of the previously configured trunk group.
int—The on-net index value that you want to assign to the trunk group. The default value is 0. Absence of property will also be treated as if no VPN on-net table number is present. Valid values are 1 to 8 and are defined as follows:
–
–
–
–
–
–
–
–
For example, to set the on-net index value of trunk group 1000 to feature transparency preferred, you would enter the following command:
prov-ed:trnkgrpprop:name="1000", CustomerVPNOnNetTblNum="2"Step 3
Step 4
Assigning an Off-net Table Index to a Trunk Group
To assign an off-net table index to a trunk group, perform the following steps:
Step 1
Step 2
prov-ed:trnkgrpprop:name="name", CustomerVPNOffNetTblNum="int"Where:
name—The MML name of the previously configured trunk group.
int—The off-net index value that you want to assign to the trunk group. The default value is 0. Absence of property will also be treated as if no VPN off-net table number is present. Valid values are 1 to 8 and are defined as follows:
–
–
–
–
–
–
–
–
For example, to set the off-net index value of trunk group 1000 to indicate the attempted feature will be removed from the onward routed call, you would enter the following command:
prov-ed:trnkgrpprop:name="1000", CustomerVPNOnNetTblNum="5"Step 3
Step 4
Verifying QSIG Feature Transparency Is Enabled or Disabled
To verify QSIG Feature Transparency is enabled or disabled, perform the following steps:
Step 1
Step 2
prov-rtrv:sigsvcprop:name="name"Where:
name—The MML name of the previously configured Sigpath.
Or
Enter the following command to check if QSIG Feature Transparency is enabled for a trunkgroup:
prov-rtrv:trnkgrpprop:name="name"Where:
name—The MML name of the previously configured trunk group.
Step 3
prov-rtrv:sigsvcprop:name="qsig1"MGC-01 - Media Gateway Controller 2003-05-20 22:11:52.187 PSTM RTRV"session=05-12:sigsvcprop"/*...FeatureTransparencyDisabled=0Where:
0—Indicates that the QSIG Feature Transparency is enabled.
1—Indicates that the QSIG Feature Transparency is disabled.
Step 4
Disabling QSIG Feature Transparency
To disable QSIG Feature Transparency, perform the following steps:
Step 1
Step 2
prov-ed:trnkgrpprop:name="name", FeatureTransparencyDisabled="1"Where:
name—The MML name of the previously configured trunk group.
1—This property will disable QSIG Feature Transparency toward another Cisco PGW or connected H.323 signaling interface (HSI) when set to 1. The default value is 0, enabled, and absence of property will also be treated as 0.
Note
For example, to disable QSIG Feature Transparency on trunk group 1000, you would enter the following command:
prov-ed:trnkgrpprop:name="1000", FeatureTransparencyDisabled="1"Step 3
Provisioning Call Forwarding
Disabling Call Forwarding Reroute Capability on a Trunk Group
To disable Call Forwarding reroute capability on a trunk group, perform the following steps:
Step 1
Step 2
prov-ed:trnkgrpprop:name="name", CallForwardRerouteDisabled="1"Where:
name—The MML name of the previously configured QSIG trunk group.
I—This property will disable Call Forwarding reroute functionality when requested by the PBX if set to 1.The default value is 0, enabled, and absence of property will also be treated as 0.
Note
For example, to disable Call Forwarding reroute capability on trunk group 500, you would enter the following command:
prov-ed:trnkgrpprop:name="500", CallForwardRerouteDisabled ="1"Step 3
Disabling Call Forwarding Reroute Capability on a System
To disable Call Forwarding reroute capability on a system, perform the following steps:
Step 1
Step 2
prov-ed:sigsvcprop:name="name", CallForwardRerouteDisabled="1Where:
name—The MML name of the previously configured QSIG system.
I—This property will disable Call Forwarding reroute functionality when requested by the PBX if set to 1.The default value is 0, enabled, and absence of property will also be treated as 0.
Note
For example, to disable Call Forwarding reroute capability on system sigpath1, you would enter the following command:
prov-ed:sigsvcprop:name="sigpath1", CallForwardRerouteDisabled ="1"Step 3
Verifying Call Forwarding Reroute Capability Is Disabled
To verify Call Forwarding reroute capability is disabled, enter the following commands:
Step 1
Step 2
prov-rtrv:sigsvcprop:name="name"Where:
name—The MML name of the previously configured Sigpath.
Step 3
prov-rtrv:sigsvcprop:name="qsig1"MGC-01 - Media Gateway Controller 2003-05-20 22:11:52.187 PSTM RTRV"session=05-12:sigsvcprop"/*...CallForwardRerouteDisabled=1Where:
0—Indicates that the feature is enabled.
1—Indicates that the feature is disabled.
Step 4
Troubleshooting Tips
For more information on troubleshooting the rest of the Cisco MGC software, refer to the Cisco Media Gateway Controller Software Release 9 Operations, Maintenance, and Troubleshooting Guide.
Provisioning Examples
This section provides a provisioning example for this feature. For additional examples (including a complete provisioning procedure for the Cisco PGW 2200 Softwitch) refer to the Cisco Media Gateway Controller Software Release 9 Provisioning Guide.
Assigning a VPN ID and On-net and Off-net Indices to a Trunk Group
prov-ed:trnkgrpprop:name="1000", CustomerVPNid="ABIGBIZ1"prov-ed:trnkgrpprop:name="1000", CustomerVPNOnNetTblNum="2"prov-ed:trnkgrpprop:name="1000", CustomerVPNOffNetTblNum="5"Assigning a VPN ID to a System
prov-ed:sigsvcprop:name="sigpath1", CustomerVPNid="ABIGBIZ1"Disabling Feature Transparency
prov-ed:trnkgrpprop:name="1000", FeatureTransparencyDisabled="1"Disabling the Call Forwarding Reroute Capability on a Trunk Group
prov-ed:trnkgrpprop:name="500", CallForwardRerouteDisabled ="1"Disabling the Call Forwarding Reroute Capability on a System
prov-ed:sigsvcprop:name="sigpath1", CallForwardRerouteDisabled ="1"Command Reference
The following sections contain reference material related to this feature. Information is included on the following areas:
Properties
New Properties
The following new properties are added to the PROV-ED provisioning command for this feature:
CustomerVPNid
CustomerVPNOnNetTblNum
CustomerVPNOffNetTblNum
FeatureTransparencyDisabled
CallForwardRerouteDisabled
Reference Information
The following sections contain reference material related to this feature. Information is included on the following areas:
•
•
•
XECfgParm.dat Parameters
This feature does not add, modify, or delete XECfgParm.dat parameters in the MGC software.For information on the other XECfgParm.dat parameters, refer to the Cisco Media Gateway Controller Software Release 9 Installation and Configuration Guide.
Alarms
This feature does not add, modify, or delete alarms in the MGC software.For information on the other alarms for the Cisco MGC software, refer to the Cisco Media Gateway Controller Software Release 9 Messages Reference Guide.
Logs
This feature does not add, modify, or delete logs in the MGC software.For information on the other alarms, refer to the Cisco Media Gateway Controller Software Release 9 Messages Reference Guide.
Measurements
This feature does not add, modify, or delete measurements in the MGC software.For information on the other system measurements, refer to the Cisco Media Gateway Controller Software Release 9 Operations, Maintenance, and Troubleshooting Guide.
Billing Interface
The following tables contains the billing interfaces that are added to support this feature.
Originating VPN ID (Tag: 4211)
Terminating VPN ID (Tag: 4212)
For billing interface information for the rest of the Cisco MGC software, refer to the Cisco Media Gateway Controller Software Release x Billing Interface Guide.
Components
This feature does not add, modify, or delete components in the MGC software. For information on the rest of the components in the Cisco MGC software, refer to the Cisco Media Gateway Controller Software Release x Provisioning Guide.
Properties
The following new properties are added to the prov-ed provisioning command for this feature:
For more information on these properties, see the "New Properties" section.
For information on other properties for the Cisco MGC software, refer to the Cisco Media Gateway Controller Software Release 9 Provisioning Guide.
Processes
This feature does not add, modify, or delete processes in the MGC software.For information on other processes for the Cisco MGC software, refer to the Cisco Media Gateway Controller Software Release x Operations, Maintenance, and Troubleshooting Guide.
External Node Types
This feature does not add, modify, or delete external node types in the MGC software.
File Names for Supported SS7 Protocols
This feature does not add, modify, or delete supported SS7 protocols in the MGC software.
Result Type Definitions
This feature does not add, modify, or delete result type definitions in the MGC software. For information on other result type definitions for the Cisco MGC software, refer to the Cisco Media Gateway Controller Software Release 9 Provisioning Guide.
MGCP Results
This section does not add, modify, or delete MGCP results in the MGC software.For information on other MGCP results for the Cisco MGC software, refer to the Cisco Media Gateway Controller Software Release 9 Provisioning Guide.
NOA and NPI Codes
This feature does not add, modify, or delete NOA and NPI codes in the MGC software. For information on other NOA and NPI codes for the Cisco MGC software, refer to the Cisco Media Gateway Controller Software Release 9 Dial Plan Guide.
CPC and TMR Values
This feature does not add, modify, or delete CPC and TMR vales in the MGC software. For information on other CPC and TMR values for the Cisco MGC software, refer to the Cisco Media Gateway Controller Software Release 9 Dial Plan Guide.
Cause and Locations Codes
This feature does not add, modify, or delete cause and location codes in the MGC software. For information on other cause and location codes for the Cisco MGC software, refer to the Cisco Media Gateway Controller Software Release Dial Plan Guide.
Provisioning Worksheets
For worksheets covering the rest of the provisioning components in the Cisco MGC software, refer to the Cisco Media Gateway Controller Software Release 9 Provisioning Guide.
Dial Plan Worksheets
For worksheets covering the rest of the dial plan components in the Cisco MGC software, refer to the Cisco Media Gateway Controller Software Release 9 Dial Plan Guide.
Obtaining Technical Assistance
Cisco provides Cisco.com as a starting point for all technical assistance. Customers and partners can obtain online documentation, troubleshooting tips, and sample configurations from online tools by using the Cisco Technical Assistance Center (TAC) Web Site. Cisco.com registered users have complete access to the technical support resources on the Cisco TAC Web Site.
Cisco.com
Cisco.com is the foundation of a suite of interactive, networked services that provides immediate, open access to Cisco information, networking solutions, services, programs, and resources at any time, from anywhere in the world.
Cisco.com is a highly integrated Internet application and a powerful, easy-to-use tool that provides a broad range of features and services to help you with these tasks:
•
•
•
•
•
If you want to obtain customized information and service, you can self-register on Cisco.com. To access Cisco.com, go to this URL:
Technical Assistance Center
The Cisco Technical Assistance Center (TAC) is available to all customers who need technical assistance with a Cisco product, technology, or solution. Two levels of support are available: the Cisco TAC Web Site and the Cisco TAC Escalation Center.
Cisco TAC inquiries are categorized according to the urgency of the issue:
•
•
•
•
The Cisco TAC resource that you choose is based on the priority of the problem and the conditions of service contracts, when applicable.
Cisco TAC Web Site
You can use the Cisco TAC Web Site to resolve P3 and P4 issues yourself, saving both cost and time. The site provides around-the-clock access to online tools, knowledge bases, and software. To access the Cisco TAC Web Site, go to this URL:
All customers, partners, and resellers who have a valid Cisco service contract have complete access to the technical support resources on the Cisco TAC Web Site. The Cisco TAC Web Site requires a Cisco.com login ID and password. If you have a valid service contract but do not have a login ID or password, go to this URL to register:
http://www.cisco.com/register/
If you are a Cisco.com registered user, and you cannot resolve your technical issues by using the Cisco TAC Web Site, you can open a case online by using the TAC Case Open tool at this URL:
http://www.cisco.com/tac/caseopen
If you have Internet access, we recommend that you open P3 and P4 cases through the Cisco TAC Web Site.
Cisco TAC Escalation Center
The Cisco TAC Escalation Center addresses priority level 1 or priority level 2 issues. These classifications are assigned when severe network degradation significantly impacts business operations. When you contact the TAC Escalation Center with a P1 or P2 problem, a Cisco TAC engineer automatically opens a case.
To obtain a directory of toll-free Cisco TAC telephone numbers for your country, go to this URL:
http://www.cisco.com/warp/public/687/Directory/DirTAC.shtml
Before calling, please check with your network operations center to determine the level of Cisco support services to which your company is entitled: for example, SMARTnet, SMARTnet Onsite, or Network Supported Accounts (NSA). When you call the center, please have available your service agreement number and your product serial number.
Glossary
The following table contains definitions of acronyms and technical terms used in this feature module.
![]()
![]()
![]()
![]()
![]()
![]()
![]()
![]()
Posted: Mon Mar 12 16:39:55 PDT 2007
All contents are Copyright © 1992--2007 Cisco Systems, Inc. All rights reserved.
Important Notices and Privacy Statement.