CMNM provides user access control, which allows a system administrator to control what different users are able to do. Each user has a different login name and password, with a specific set of privileges within the system.
A standard administrator user (admin) is available by default. The administrator user has access to all features at all times. The administrator user may not be edited other than to change the password.
CMNM requires every user to have a login ID and password. Before users can start the application, they must specify their login ID and enter the correct password. An administrator account is provided to allow for creating, modifying, resetting, and deleting user accounts.
Within CMNM, access to features can be restricted on the basis of the user's access level to a subset (or group) of these features.
For example, administration of particular managed objects should be performed only by operators who are responsible for that particular site or for a region in which that site belongs. However, these operators may also require visibility of objects outside their own area of control.
The basic building blocks used to control user access are described below.
User Groups
CMNM user accounts can be collected by an administrator into groups. These user groups can be used to model user roles. A typical setup might involve a user group for system administrators, for network fault detail users, and for operators to manage a given site.
It is on the basis of these user groups that CMNM applies access control. The CMNM administrator configures access control by assigning access specifications to the relevant user groups.
Feature Lists
All features offered to a user are grouped together into feature lists. The benefit of feature lists is that it is easy to give access to a related set of features by simply choosing a feature list instead of having to assign features individually. Any given feature may appear in more than one feature list.
The feature lists available in CMNM are described in Table 5-1.
Note In CMNM, features are preassigned to feature lists and cannot be modified.
Access Specifications
Access specifications connect together the user groups, the features that can be invoked by a group, and the objects upon which these features can be invoked.
A number of access specifications are provided by default with the CMNM. More access specifications can be built at the discretion of the system administrator.
Each access specification may include the following components:
Feature lists—Lists the CMNM features that the users in this group have access to. A feature list can appear in more than one access specification.
User groups—CMNM user accounts can be collected by an administrator into groups. These user groups can be used to model user roles. It is on the basis of these user groups that CMNM applies access control.
A permission level—For example, read-only, read-write, and so on.
An optional object group—Where an object group is supplied, the users in the group have access to the features specified by this access specification only for those objects contained within the group. Where no object group is supplied, the access specification provides the specified access to features for all objects. This object group could be used to grant the administrative user group for a site read-write access to the objects on that site, while another access specification would be used for read-only access for nonadministrative users.
Setting Up Accounts
CMNM allows the administrator to associate privileges with user accounts. For example, regular users can be prevented from performing certain management functions, while more technically sophisticated users can be given full management privileges.
CMNM provides the following security features:
User login IDs and alphanumeric passwords
Per-user privileges and control of administrative functions
Administrative control of accounts and password resets
Attack alerts (the connection is closed after three unsuccessful login attempts)
Setting Up New Accounts
You must set up new accounts for all users. You may also define user groups.
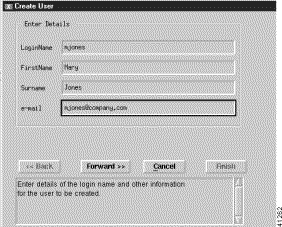
To create a new account for a user and assign a password:
Step 1 Click the Access icon on the CEMF Launchpad, as shown in Figure 5-1.
Figure 5-1 CEMF Launchpad Screen
You see the Access Manager screen.
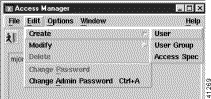
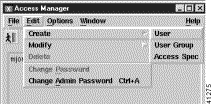
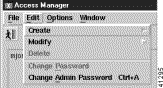
Step 2 From the Access Manager screen, select Edit, Create, then User as shown in Figure 5-2.
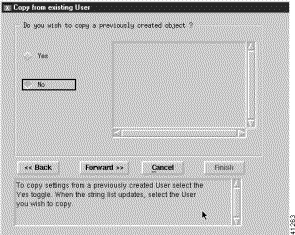
Step 4 To use an existing user as a template for the user you are adding, click Yes, select the user you want to copy, then click Forward. If you do not want to copy an existing user or none exists, click No then click Forward.
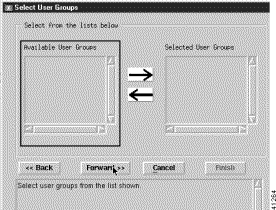
Step 5 Select a user group, click an arrow to move it to the Selected User Groups list, and click Forward.
If no user groups are defined at this time, you may define a user group later and assign the user to it at any time. For more information on user groups, see the "Creating User Groups" section.
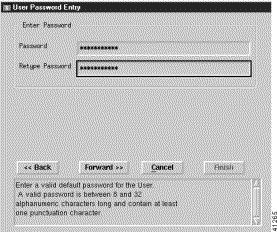
Step 6 Enter a password for the user and confirm it. Passwords must contain 8 to 32 alphanumeric characters and at least one punctuation character such as _, %, (, or ^. Click Forward.
If you typed a valid password, you see the screen in Figure 5-7. If you typed an invalid password, you see Figure 5-6 again with an error message. Reenter a valid password.
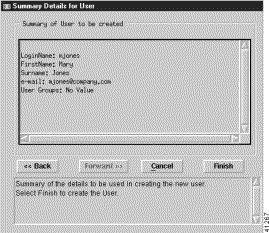
Figure 5-7 Summary Details for User Screen
Step 7 To make changes, click Back and enter the corrected information. To add the user, click Finish.
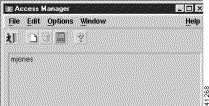
You see the screen in Figure 5-8 listing the defined users.
Figure 5-8 Access Manager Screen—List of Users
Creating User Groups
To divide users into groups by creating user groups:
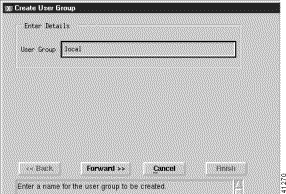
Step 1 From the Access Manager screen, select Edit, Create, then User Group as shown in Figure 5-9. Figure 5-9 Access Manager Screen—Edit->Create->User Group Option
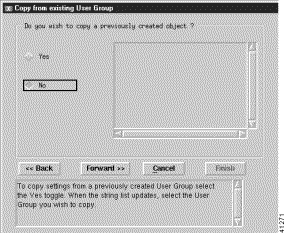
Want to use an existing user group as a template for the user group you are adding, click Yes, select the user group you want to copy, then click Forward. You see the screen in Figure 5-14.
Do not want to copy an existing user group or none exists, click No, then click Forward. You see the screen in Figure 5-12.
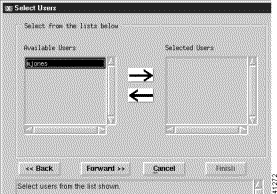
Figure 5-12 Select Users Screen
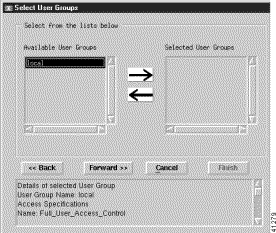
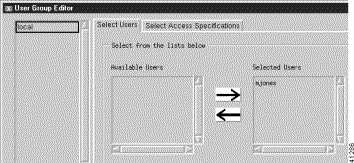
Step 5 Select each user you want in the new group and click the arrow to move each to the Selected Users list. When you are finished, click Forward.
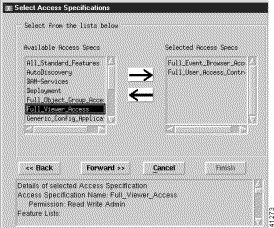
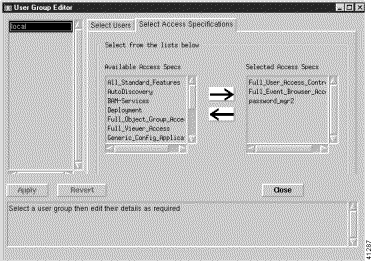
Step 6 Select each access specification you want for the new group and click the arrow to move each to the Selected Access Specs list. When you are finished, click Forward.
Caution Giving a user group full access allows each user in the user group to add or delete other users and to change specifications for all other users.
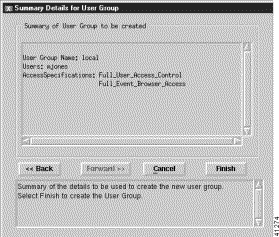
Step 7 To make changes, click Back and enter the corrected information. To add the user group, click Finish.
Creating New Access Specifications
To create new access specifications:
Step 1 From the Access Manager screen, select Edit, Create, then Access Spec, as shown in Figure 5-15. Figure 5-15 Access Manager Screen—Edit->Create->Access Spec Option
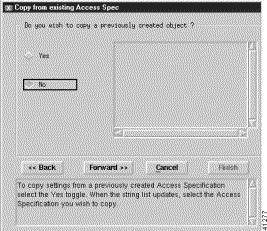
Want to use an existing access specification as a template for the access specification you are adding, click Yes, select the access specification you want to copy, then click Forward. You see the screen in Figure 5-22.
Do not want to copy an existing access specification or none exists, click No, then click Forward. You see the screen in Figure 5-18.
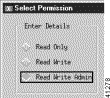
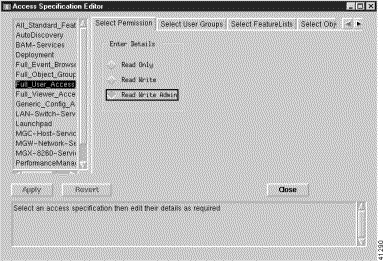
Figure 5-18 Select Permission Screen
Step 4 Select the permission level desired and click Forward.
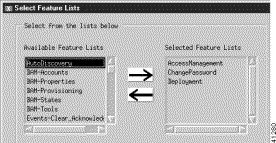
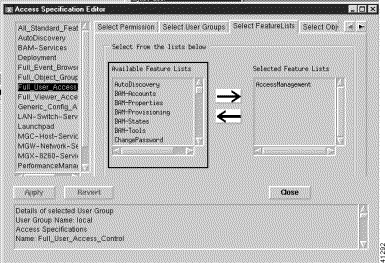
Step 6 Select each feature you want for the new access specification and click the right arrow to move each to the Selected Feature Lists. When you are finished, click Forward.
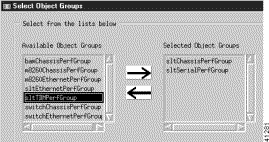
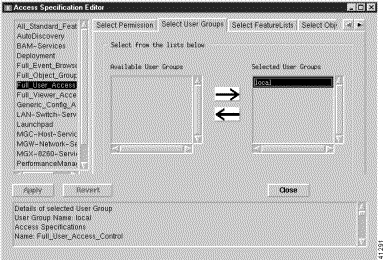
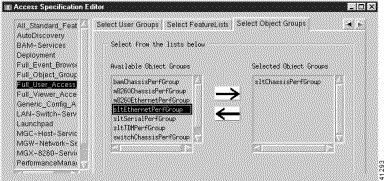
Step 7 Select each object group you want for the new access specification and click the right arrow to move each to the Selected Object Groups list. When you are finished, click Forward.
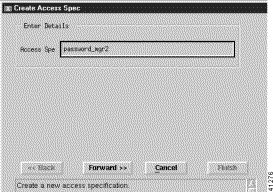
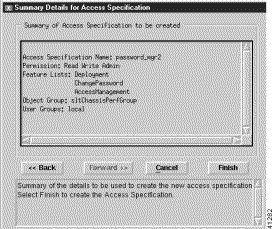
Figure 5-22 Summary Details for Access Specification Screen
Step 8 To make changes, click Back and enter the corrected information. To add the access specification, click Finish.
Creating Typical Types of Users
Table 5-2 summarizes how you would create three typical users.
Table 5-2 Creating Typical Users
To Create This Type of Account:
Peform These Steps:
Administrator
Using the instructions in the "Setting Up New Accounts" section, create a new account and create the user by copying the existing administrator template. The administrator should have all the features labeled with the permissions R, RW, and RWA in Table 5-1.
Operator with read permission that can deploy and launch tools
Using the instructions in the "Creating User Groups" section, create a new user group with the access specification you just created.
Then using the instructions in the "Setting Up New Accounts" section, create a new account, create the user, and assign the user to the group you just created.
Using the instructions in the "Creating User Groups" section, create a new user group with the access specification you just created.
Then using the instructions in the "Setting Up New Accounts" section, create a new account, create the user, and assign the user to the group you just created.
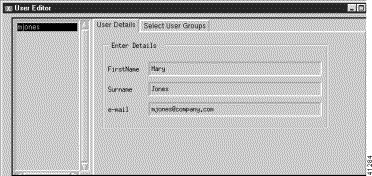
Modifying Users
To modify a user:
Step 1 From the Access Manager screen, select Edit, Modify, then User.
Step 2 Select a user from the list and change any information in the fields. To change the user groups that the user belongs to, click the Select User Groups tab and make any changes.
Step 3 Click Apply. To cancel changes, click Revert.
Modifying User Groups
To modify a user group:
Step 1 From the Access Manager screen, select Edit, Modify, then User Group.