|
|

Table Of Contents
Cisco 600W Redundant Power System
Quick Start Guide with License and Warranty InformationCisco 90-Day Limited Hardware Warranty Terms
Documents, Equipment, and Tools
Connection Options and Requirements
Obtaining Technical Assistance
Obtaining Additional Publications and Information
Quick Start Guide
Cisco 600W Redundant Power System
Quick Start Guide with License and Warranty Information
1 Cisco 90-Day Limited Hardware Warranty Terms
There are special terms applicable to your hardware warranty and various services that you can use during the warranty period. Your formal Warranty Statement, including the warranty applicable to Cisco software, is included on the CD that accompanies your Cisco product. Follow these steps to access and download the Cisco Information Packet and your warranty document from the CD or from Cisco.com.
1.
Launch your browser, and go to this URL:
http://www.cisco.com/univercd/cc/td/doc/es_inpck/cetrans.htm
The Warranties and License Agreements page appears.
2.
a.
b.
c.
The Cisco Limited Warranty and Software License page from the Information Packet appears.
d.
3.
a.
78-5236-01C0
b.
c.
The Cisco warranty page appears.
d.
You can also contact the Cisco service and support website for assistance:
http://www.cisco.com/en/US/support/
Duration of Hardware Warranty
Ninety (90) days.
Replacement, Repair, or Refund Policy for Hardware
Cisco or its service center will use commercially reasonable efforts to ship a replacement part within ten (10) working days after receipt of a Return Materials Authorization (RMA) request. Actual delivery times can vary, depending on the customer location.
Cisco reserves the right to refund the purchase price as its exclusive warranty remedy.
To Receive a Return Materials Authorization (RMA) Number
Contact the company from whom you purchased the product. If you purchased the product directly from Cisco, contact your Cisco Sales and Service Representative.
Complete the information below, and keep it for reference:
Company product purchased from
Company telephone number
Product model number
Product serial number
Maintenance contract number
2 Documents, Equipment, and Tools
User Documentation
The documents described here are available online and on the documentation CD-ROM that you might have received with your router. To be sure of obtaining the latest information, you should access the online documentation.
To print a document in its original page format, access the online document, and click the PDF icon.
For more information about obtaining user documentation, see the "Obtaining Documentation" section.
To access online user documentation on Cisco.com (PDF and HTML formats):
Start on Cisco.com at http://www.cisco.com, and select Products & Services > Accessories > Power Supplies > Instructions and Guides > Document type > Document.
Note
To access user documentation on the Documentation CD-ROM (HTML format only) or on Cisco Connection Online (CCO):
Start at Cisco Product Documentation and navigate to user documents using the paths described below.
Tip
Cisco RPS Documentation
Regulatory Compliance and Safety Information
The regulatory compliance and safety document provides essential safety information applicable to the Cisco RPS. This document contains foreign-language translations of the safety warnings applicable to the Cisco RPS.
You can access this document at Cisco Product Documentation > Access Servers and Access Routers > Cisco 600W Redundant Power System > Regulatory Compliance and Safety Information.
Hardware Installation Guide
A hardware installation guide provides specifications and additional instructions for installing and connecting the Cisco RPS.
You can access this document at Cisco Product Documentation > Access Servers and Access Routers > Cisco 600W Redundant Power System > Cisco RPS Hardware Installation Guide.
Related Hardware Installation
Additional hardware installation documents provide information about installing interconnection adapters in routers and about rack-mounting the Cisco RPS.
You can access these document sat Cisco Product Documentation > Access Servers and Access Routers > Cisco 600W Redundant Power System > Procedures for Spare Parts: Adapter Plates and Rack Brackets.
Release Notes
Release notes for the Cisco RPS provide information about the use of the Cisco RPS with various switches, hubs, and repeaters.
You can access this document at Cisco Product Documentation > Access Servers and Access Routers > Cisco 600W Redundant Power System > Cisco Redundant Power System (RPS) Release Notes.
Items Included with Cisco RPS
The following items are supplied with each Cisco RPS except as noted:
•
•
•
–
–
•
•
Separately Orderable Items
One or more of the following cables are required for use with the Cisco RPS -NCAB model, which ships without DC output cables. See Table 2 for cable usage and ordering information.
•
•
•
The following optional rack-mounting brackets can be ordered separately:
•
•
An RPS adapter module is required for each of the following Cisco devices powered by a Cisco RPS: Cisco 2500 series routers; Cisco 2600 series routers; Cisco 4000 series routers; Cisco 3620, Cisco 3640, and Cisco 3725 routers, and Cisco MC3810 series concentrators. See Table 1 for adapter plate usage and ordering information.
Items Not Included
Individual items in this list may be required for your application:
•
•
•
•
•
3 Install the Chassis
Safety Information
For safety information you need to know before working on your Cisco RPS, see the Regulatory Compliance and Safety Information document that accompanied this device.
Chassis Installation Methods
Warning
You can set the chassis on a desktop or install it in a rack. See the applicable instructions following.
Caution
Installation in a Rack
You can install the Cisco RPS in a 19-inch, 23-inch, or 24-inch rack with the following chassis orientations:
•
–
–
•
–
–
The rack-mounting brackets are shown in Figure 1 and Figure 2.
Figure 1 Brackets for 19-, 23-, and 24-Inch Rack-Mounting
Figure 2 Brackets for Telco Rack-Mounting
Attaching Brackets
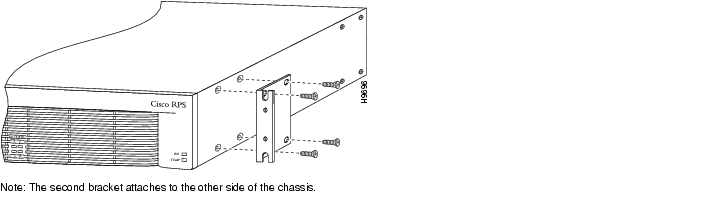
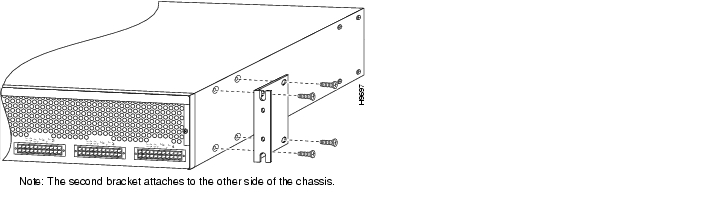
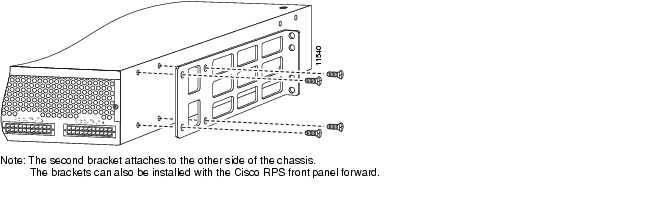
Attach the mounting brackets to the chassis as shown in Figure 3, Figure 4, or Figure 5, using the screws provided in the bracket kit. Use a number 2 Phillips screwdriver to install the bracket screws.
Figure 3 Bracket Attachment for 19-, 23-, or 24-Inch Rack with Front Panel Forward
Figure 4 Bracket Attachment for 19-, 23-, or 24-Inch Rack with Rear Panel Forward
Figure 5 Bracket Attachment for Telco Rack with Rear Panel Forward
Installing the Chassis in a Rack
Install the chassis in the rack. Rack-mounting screws are not provided with the router. Use two screws for each side (supplied with the rack).
Installation on a Desktop
For desktop installation, attach the rubber feet from the accessory kit in the round recesses on the chassis bottom.
Caution
4 Connect Cables
Caution
Connection Options and Requirements
RPS Interface Modules
To connect to a Cisco RPS, Cisco routers and Cisco MC3810 series concentrators must be equipped with an RPS interface module. Interface modules are provided with installation instructions.
The FastHub 400 series hubs, Cisco 1516M hub (HP 10BASE-T Hub-16M), Catalyst 1900 and Catalyst 2820 series switches, and Catalyst 2900 series and Catalyst 3500 series XL switches ship with an RPS connector and do not require an RPS adapter module.
Table 1 summarizes the RPS interface module requirements.
Connection Methods and Cables
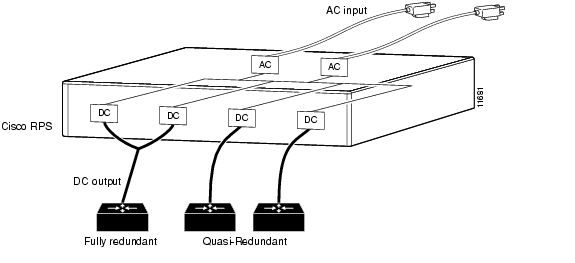
Table 2 summarizes the redundancy options and cable requirements for the various external devices that can be supported by the Cisco RPS.
Table 2 Redundancy Options and Cable Requirements
Quasi-redundant
(Routers, hubs, and switches)
Cisco 1516M hub (HP 10BASE-T Hub-16M)
FastHub 400 series hubs
Catalyst 1900 series, Catalyst 2820 series, Catalyst 2900 series and Catalyst 3500 series XL switches
Cisco 2600 series and Cisco 4000 series routers
Cisco 3620, Cisco 3640, and Cisco 3725 routers
One-to-one cable,
22-pin to 18-pin,
4 ft. (1.22 m)1CAB-RPS-2218=
Cisco 2500 series routers and access servers
Cisco MC3810 multiservice concentrators
One-to-one cable,
22-pin to 8-pin,
4 ft. (1.22 m) 1CAB-RPS-2208=
Fully redundant
(Routers only)
Cisco 2600 series and Cisco 4000 series routers
Cisco 3620, Cisco 3640, and Cisco 3725 routers
Two-to-one cable,
22-pin to 18-pin,
4 ft. (1.22 m) 1CAB-RPSY-2218=
Cisco 2500 series routers and access servers
Cisco MC3810 multiservice concentrators
Two-to-one cable,
22-pin to 8-pin,
4 ft. (1.22 m) 1CAB-RPSY-2208=
Redundant with reboot2
(Hubs and switches only)
FastHub 400 series hubs
Catalyst 1900 series, Catalyst 2820 series, Catalyst 2900 series and Catalyst 3500 series XL switches
One-to-one cable,
22-pin to 18-pin,
4 ft. (1.22 m) 1CAB-RPS-2218=
1 The cables come in only one length. Custom cable-lengths are not available. Excessive voltage drop and marginal or failed operation can occur with cables of different lengths. Use of cables other than the ones listed can cause damage to the Cisco RPS or external device.
2 This configuration is not recommended due to the 30-second reboot and downtime.
The connection options are shown in the following figures:
•
Note
•
Note
•
Note
•
Figure 6 Quasi-Redundant Configuration
Figure 7 Fully Redundant Configuration
Figure 8 Redundant-with-Reboot Configuration
Figure 9 Mixed Configuration
Cable Connection Procedures
Before connecting to external devices, read the power warnings below. Cisco recommends that you disconnect all power before beginning.
Note
Warning
Warning
Warning
Warning
To connect an external hub, switch, router, or concentrator to a Cisco RPS, perform the following steps:
Step 1
Step 2
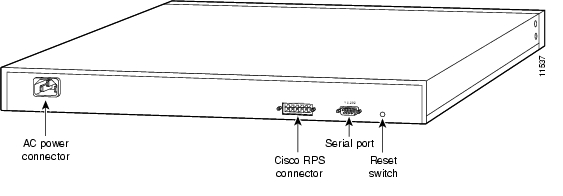
Figure 10 RPS Connector Location on a Cisco Hub (Typical)
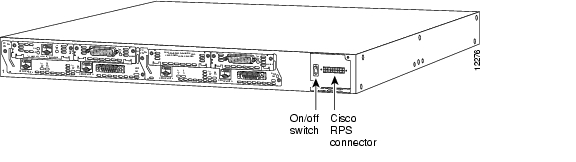
Figure 11 RPS Connector Location on a Cisco Switch (Typical)
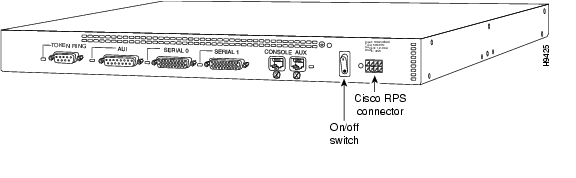
Figure 12 RPS 8-Pin Connector Location on a Cisco Router or Concentrator (Typical)
Figure 13 RPS 18-Pin Connector Location on a Cisco Router (Typical)
Step 3
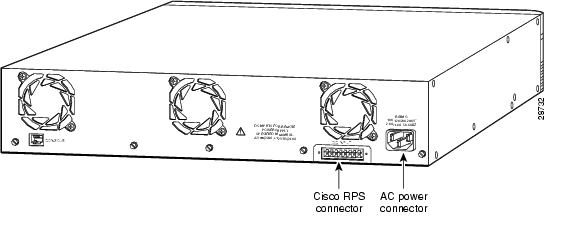
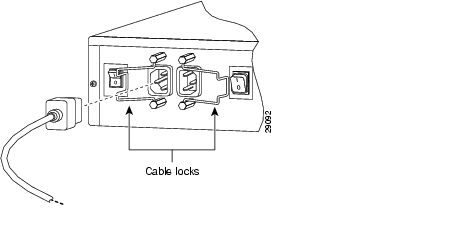
Figure 14 Connecting a One-to-One Cable to a Cisco RPS for Quasi-Redundant Power
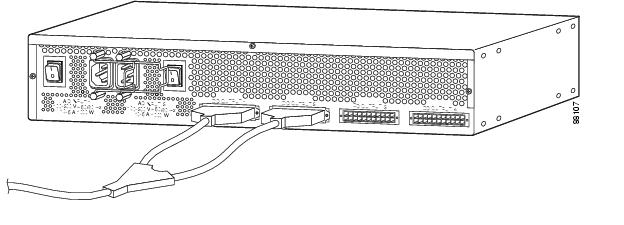
Figure 15 Connecting a Two-to-One Y-Cable to a Cisco RPS for Fully Redundant Power
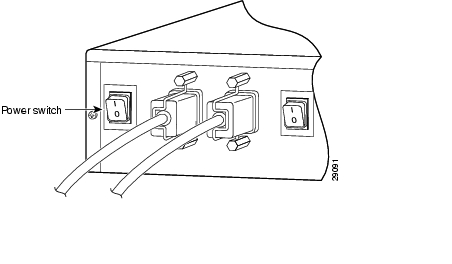
Step 4
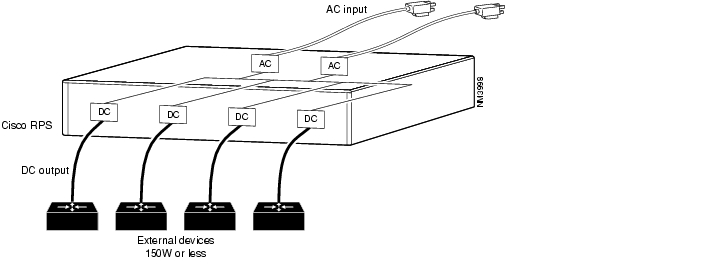
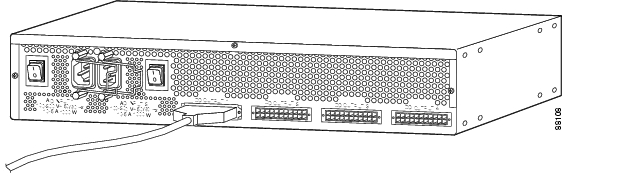
Figure 16 Connecting AC Power Cables to the Cisco RPS
5 Power Up the Equipment
Step 1
Note
Step 2
Step 3
Figure 17 Powering Up the Cisco RPS
The Cisco RPS provides power in 10 to 15 seconds. The Cisco RPS is working properly when all its front-panel LEDs are solid green. If the external device does not power up, refer to troubleshooting section of the Cisco Redundant Power System Hardware Installation Guide on Cisco.com.
6 Obtaining Documentation
Cisco provides several ways to obtain documentation, technical assistance, and other technical resources. These sections explain how to obtain technical information from Cisco Systems.
Cisco.com
You can access the most current Cisco documentation on the World Wide Web at this URL:
http://www.cisco.com/univercd/home/home.htm
You can access the Cisco website at this URL:
International Cisco websites can be accessed from this URL:
http://www.cisco.com/public/countries_languages.shtml
Documentation CD-ROM
Cisco documentation and additional literature are available in a Cisco Documentation CD-ROM package, which may have shipped with your product. The Documentation CD-ROM is updated monthly and may be more current than printed documentation. The CD-ROM package is available as a single unit or through an annual subscription.
Registered Cisco.com users can order the Documentation CD-ROM (product number DOC-CONDOCCD=) through the online Subscription Store:
http://www.cisco.com/go/subscription
Ordering Documentation
You can find instructions for ordering documentation at this URL:
http://www.cisco.com/univercd/cc/td/doc/es_inpck/pdi.htm
You can order Cisco documentation in these ways:
•
http://www.cisco.com/en/US/partner/ordering/index.shtml
•
http://www.cisco.com/go/subscription
•
Documentation Feedback
You can submit comments electronically on Cisco.com. On the Cisco Documentation home page, click Feedback at the top of the page.
You can email your comments to bug-doc@cisco.com.
You can submit your comments by mail by using the response card behind the front cover of your document or by writing to the following address:
Cisco Systems
Attn: Customer Document Ordering
170 West Tasman Drive
San Jose, CA 95134-9883We appreciate your comments.
7 Obtaining Technical Assistance
Cisco provides Cisco.com, which includes the Cisco Technical Assistance Center (TAC) Website, as a starting point for all technical assistance. Customers and partners can obtain online documentation, troubleshooting tips, and sample configurations from the Cisco TAC website. Cisco.com registered users have complete access to the technical support resources on the Cisco TAC website, including TAC tools and utilities.
Cisco.com
Cisco.com offers a suite of interactive, networked services that let you access Cisco information, networking solutions, services, programs, and resources at any time, from anywhere in the world.
Cisco.com provides a broad range of features and services to help you with these tasks:
•
•
•
•
•
To obtain customized information and service, you can self-register on Cisco.com at this URL:
Technical Assistance Center
The Cisco TAC is available to all customers who need technical assistance with a Cisco product, technology, or solution. Two levels of support are available: the Cisco TAC website and the Cisco TAC Escalation Center. The avenue of support that you choose depends on the priority of the problem and the conditions stated in service contracts, when applicable.
We categorize Cisco TAC inquiries according to urgency:
•
•
•
•
Cisco TAC Website
You can use the Cisco TAC website to resolve P3 and P4 issues yourself, saving both cost and time. The site provides around-the-clock access to online tools, knowledge bases, and software. To access the Cisco TAC website, go to this URL:
All customers, partners, and resellers who have a valid Cisco service contract have complete access to the technical support resources on the Cisco TAC website. Some services on the Cisco TAC website require a Cisco.com login ID and password. If you have a valid service contract but do not have a login ID or password, go to this URL to register:
http://tools.cisco.com/RPF/register/register.do
If you are a Cisco.com registered user, and you cannot resolve your technical issues by using the Cisco TAC website, you can open a case online at this URL:
http://www.cisco.com/en/US/support/index.html
If you have Internet access, we recommend that you open P3 and P4 cases through the Cisco TAC website so that you can describe the situation in your own words and attach any necessary files.
Cisco TAC Escalation Center
The Cisco TAC Escalation Center addresses priority level 1 or priority level 2 issues. These classifications are assigned when severe network degradation significantly impacts business operations. When you contact the TAC Escalation Center with a P1 or P2 problem, a Cisco TAC engineer automatically opens a case.
To obtain a directory of toll-free Cisco TAC telephone numbers for your country, go to this URL:
http://www.cisco.com/warp/public/687/Directory/DirTAC.shtml
Before calling, please check with your network operations center to determine the level of Cisco support services to which your company is entitled: for example, SMARTnet, SMARTnet Onsite, or Network Supported Accounts (NSA). When you call the center, please have available your service agreement number and your product serial number.
8 Obtaining Additional Publications and Information
Information about Cisco products, technologies, and network solutions is available from various online and printed sources.
•
http://www.cisco.com/en/US/products/products_catalog_links_launch.html
•
•
http://www.cisco.com/en/US/about/ac123/ac114/about_cisco_packet_magazine.html
•
http://business.cisco.com/prod/tree.taf%3fasset_id=44699&public_view=true&kbns=1.html
•
http://www.cisco.com/en/US/about/ac123/ac147/about_cisco_the_internet_protocol_journal.html
•
http://www.cisco.com/en/US/learning/le31/learning_recommended_training_list.html
![]()
![]()
![]()
![]()
![]()
![]()
![]()
![]()
Posted: Mon Jun 18 19:27:31 PDT 2007
All contents are Copyright © 1992--2007 Cisco Systems, Inc. All rights reserved.
Important Notices and Privacy Statement.