cc/td/doc/product/access/ip_ph/ip_ks/cme32
hometocprevnextglossaryfeedbacksearchhelp
PDF

Table Of Contents

Cisco Unified IP Phone User Guide for Cisco CallManager Express 3.2 and Later

Cisco Unified IP Phone 7902G for Cisco CallManager Express 3.2 and Later

Button Legend

Operating Your Cisco Unified IP Phone

Setting and Adjusting Your Cisco Unified IP Phone

Using Cisco CallManager Express 3.2 and Later Features

Cisco Unified IP Phone 7905G and Cisco Unified IP Phone 7912 for
Cisco CallManager Express 3.2 and Later

Button Legend

Soft Key Legend

Operating Your Cisco Unified IP Phone

Setting and Adjusting Your Cisco Unified IP Phone

Using Cisco CallManager Express 3.2 and Later Features

Cisco Unified IP Phone 7910G for Cisco CallManager Express 3.2 and Later

Button Legend

Settings

Operating Your Cisco Unified IP Phone

Setting and Adjusting Your Cisco Unified IP Phone

Using Cisco CallManager Express 3.2 and Later Features

Cisco Unified IP Phone 7914 Expansion Module for
Cisco CallManager Express 3.2 and Later

Button Legend

Operating Your Cisco Unified IP Phone

Setting and Adjusting Your Cisco Unified IP Phone

Using Cisco CallManager Express 3.2 and Later Features

Cisco Unified IP Phone 7935 Conference Station and Cisco Unified IP Phone 7936 Conference Station for Cisco CallManager Express Services 3.2 and Later

Button Legend

Soft Key Legend

Operating Your Cisco Unified IP Phone

Setting and Adjusting Your Cisco Unified IP Phone

Using Cisco CallManager Express 3.2 and Later Features

Cisco Unified IP Phone 7931G for Cisco Unified CallManager Express

Button Legend

Soft Key Legend

Operating Your Cisco Unified IP Phone

Setting and Adjusting Your Cisco Unified IP Phone

Using Cisco Unified CallManager Express 4.0 Features

Cisco Unified IP Phone 7960G and Cisco Unified IP Phone 7940G for
Cisco CallManager Express 3.2 and Later

Button Legend

Soft Key Legend

Operating Your Cisco Unified IP Phone

Setting and Adjusting Your Cisco Unified IP Phone

Using Cisco CallManager Express 3.2 and Later Features

Cisco CallManager Express Functionality, by Cisco Unified IP Phone Model Number


User Guide

Cisco Unified IP Phone User Guide for Cisco CallManager Express 3.2 and Later


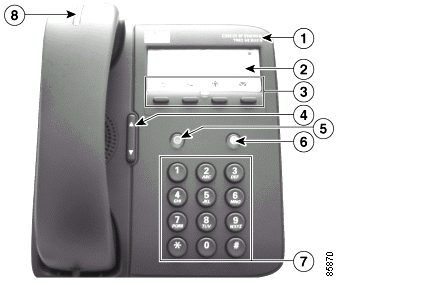
1 Cisco Unified IP Phone 7902G for Cisco CallManager Express 3.2 and Later

Button Legend

 
Feature
Function
1

Cisco Unified IP phone model type

Shows the Cisco Unified IP phone model number.

2

Paper label and plastic cover

Used to display your phone number.

3

Feature buttons:

Redial

Transfer

Conference

Messages

Enables you to engage the Redial, Transfer, Conference, and Messages functions.

4

Volume button

Increases or decreases handset volume. Also controls the on-hook ring volume.

5

Hold button

Places an active call on hold. Resumes a held call.

6

Menu button

Not in use.

7

Keypad

Functions like a traditional telephone keypad.

8

Handset with indicator light

Functions like a traditional handset. The light strip at the top of the handset blinks when the phone rings and remains lit to announce a new voice-mail message. (Functionality will vary depending on your message system.)


Operating Your Cisco Unified IP Phone

Place a Call

Use one of the following methods to place a call:

Lift the handset and dial a number.

Lift the handset and press the Redial button.

Answer a Call

Lift the handset.

End a Call

Hang up the handset.

Redial a Number

To redial the most recently dialed number:

1. Lift the handset.

2. Press the Redial button.

Hold a Call

To place a call on hold:

Press the Hold button.

To retrieve a held call:

Press the Hold button.

Manage Call Waiting

If you are on a call when a second call comes in, you will hear a call-waiting tone or see a flashing indicator light on the handset rest, depending on the configuration of your phone.

To answer the new call:

Press the Hold button. The original call is placed on hold.

To return to the original call:

Press the Hold button again.

You may continue to use the Hold button to switch between the calls.

Retrieve Voice-Mail Messages

Press the Messages button and follow the voice instructions.


Note The light strip at the top of the handset blinks when the phone rings and remains lit to announce arrival of a new voice-mail message. (Functionality will vary depending on your message system.)


Setting and Adjusting Your Cisco Unified IP Phone

Adjust the Volume for the Current Call

Press the Up or Down Volume button while the handset is in use.

Adjust the Ring Volume

Press the Up or Down Volume button while the handset is in its cradle.

Using Cisco CallManager Express 3.2 and Later Features

Transfer a Call

Transfer a selected call to another number in one of two ways:

Blind transfer—Immediately redirects the call without allowing you to speak to the transfer recipient (the person to whom you are transferring the call).

Consult transfer—Redirects the call after first allowing you to speak to the transfer recipient.

To transfer a call, perform the following steps:

1. During a call, press the Transfer button. The call is placed on hold.

2. Dial the number to which you want to transfer the call.

3. To make a blind transfer:

Hang up the handset or press the Transfer button when you hear the line ringing.

To make a consult transfer:

Wait for the call to be answered. Speak to the transfer recipient. Then press the Transfer button or hang up the handset.

To cancel your consult call transfer attempt and reconnect to the original caller, press the Hold button.

Forward All Calls

To forward all of your incoming calls to another number, perform the following steps:

1. Lift the handset and press **1.

You will hear a short confirmation tone.

2. Dial the phone number to which you want to forward your calls. Dial the number exactly as you would if you were placing a call to that number. Remember to include locally required prefix numbers.

3. Hang up the handset.

To cancel call forwarding, perform the following steps:

1. Lift the handset and press **2.

A short confirmation tone means that call forwarding is no longer in effect.

2. Hang up the handset.

Place a Conference Call

To initiate a three-party conference call, perform the following steps:

1. During a call, press the Conference button to open a new line and put the first party on hold.

2. Place a call to another number.

3. When the call connects, press the Conference button again to add the new party to the existing call with the first party.

To establish a conference call between second- and third-party calls to a Cisco Unified IP phone, one active and the other on hold:

Press the Conference button on the Cisco Unified IP phone.

End a Conference Call

To end the conference call, hang up the handset.


Note Once the conference call initiator disconnects, the conference call is terminated.


Alternate Methods to End a Conference Call

Call initiators may use one of the following methods (Functionality will vary according to your system configuration.):

To end the conference but remain connected to the most recent call, press the Conference button. The older call is placed on hold.

To disconnect from the conference, hang up the handset. The other parties will remain on the conference call.

Use Audio Paging

Audio paging provides a one-way voice path to the phones that have been designated to receive paging. It does not have a press-to-answer option.

To use the paging function for paging a group, perform the following steps:

1. Select an available phone line by lifting the handset. Listen for the dial tone.

2. Dial the designated paging group number.

Each idle IP phone that has been configured with the paging number answers automatically using its speakerphone mode, and the phone displays the caller ID.

3. When you finish speaking your message and hang up, the phones are returned to their idle states.

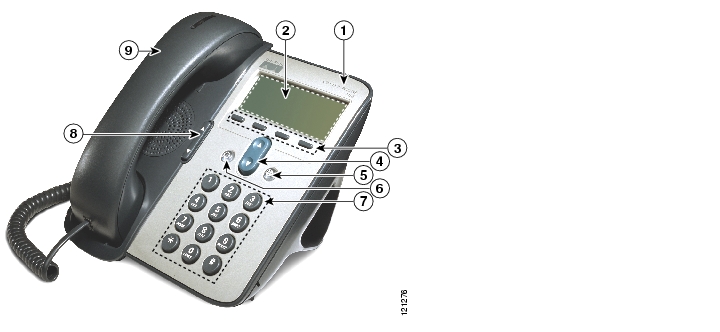
2 Cisco Unified IP Phone 7905G and Cisco Unified IP Phone 7912 for
Cisco CallManager Express 3.2 and Later

Button Legend

 
Feature
Function
1

Cisco Unified IP phone model type

Shows the Cisco Unified IP phone model number.

2

LCD screen

Displays information such as line/call status, phone number, and soft key tabs.

3

Soft keys

Engage the functions displayed on the corresponding LCD tabs.

4

Navigation button

Scrolls through text and selects features that are displayed on the LCD screen. Provides shortcut access to the Speed Dial menu when the phone is idle.

5

Menu button

Provides access to phone services.

6

Hold button

Places an active call on hold. Resumes a held call.

7

Keypad

Functions like a traditional telephone keypad.

8

Volume button

Increases or decreases handset volume and on-hook ring volume.

9

Handset with indicator light

Functions like a traditional handset.


Soft Key Legend

Your Cisco Unified IP phone is equipped with soft keys that point to feature options displayed along the bottom of the LCD screen. Soft keys change according to the state of the phone. Use the soft keys to engage any of the functions displayed on the corresponding LCD tabs.

The following is a comprehensive list of soft keys offered on the Cisco Unified IP Phone 7905G and the Cisco Unified IP Phone 7912G. Functionality will vary according to your system configuration.

Soft Key
Description

<< or >>

Navigates to edit characters. Use the backspace soft key to erase digits that were entered incorrectly.

Acct

Consult your administrator on the use of this soft key.

Callback

Notifies callers that the called line is free.

Cancel

Cancels the last selection.

CFwdALL

Forwards all calls.

Clear

Clears directory history.

Confrn

Connects callers to a conference call.

Delete

Deletes selected number.

Dial

Dials the displayed number.

Directories

Provides access to phone directories.

DND

Activates the Do-Not-Disturb feature.

Down

Decreases the LCD screen contrast.

EditDial

Selects a number and activates the cursor for editing.

EndCall

Ends the current call.

Exit

Exits from the current selection or screen.

Flash

Provides hookflash functionality for three-way calling and call-waiting services provided by the PSTN or Centrex service.

GPickUp

Selectively picks up calls coming into a phone number that is a member of a pickup group.

Login

Provides PIN-controlled access to restricted phone features. Contact your local administrator for additional instructions.

Message

Dials the local voice-mail system.

Monitor

Enables the user to switch from the handset to the speaker to listen to a call hands-free.

Monoff

Enables the user to switch from the speaker to the handset and continue talking on the call.

more

Scrolls through additional soft key options (for example, use the more soft key to locate the DND soft key).

Mute

Toggles muting on and off.

NewCall

Opens a new line on the speakerphone to place a call.

Ok

Confirms the selection.

Park

Forwards calls to a location from which the call can be retrieved by anyone in the system.

PickUp

Selectively picks up calls coming into another extension.

Play

Plays the ring sound sample.

Redial

Redials the last number dialed.

Restore

Consult your administrator on the use of this soft key.

Resume

Returns to an active call.

Save

Saves the last change.

Search

Initiates a search in the local directory.

Select

Selects the highlighted option.

Settings

Provides access to phone settings such as display contrast, ring volume, and
ring type.

Trnsfer

Transfers selected calls to an alternate number.

Up

Increases the LCD screen contrast.


Operating Your Cisco Unified IP Phone

Place a Call

Use one of the following methods to place a call:

Lift the handset and dial a number on the keypad.

Press the NewCall soft key and dial a number on the keypad.

Press the Redial soft key.

Dial the number with the phone on hook. Then press the Dial soft key or lift the handset.


Note Use the backspace (<<) soft key to erase digits that were entered incorrectly.


Answer a Call

Lift the handset.

End a Call

Use one of the following methods to end a call:

Hang up the handset.

Press the EndCall soft key.

Redial a Number

To redial the most recently dialed number, perform the following steps:

1. Lift the handset.

2. Press the Redial soft key.

Hold a Call

To place a call on hold:

Press the Hold button.

To retrieve a held call:

Press the Hold button again.


Note Because the hold feature can generate music or a beeping tone, avoid using hold when dialed into a remote conference system. Simple three-party conferences that are created locally on your phone can safely be placed on hold without introducing music or beeps into the conference.


Mute a Call

To mute an active call so that the other parties cannot hear you speak:

Press the Mute soft key. The Mute soft key automatically lights, indicating that the other party cannot hear you.

To disengage mute and rejoin the call:

Press the Mute soft key again, or lift the handset if you are using mute along with the monitor function.


Note The mute feature does not generate music or a beeping tone.


Manage Call Waiting

If you are on a call when a second call comes in, you will hear a call-waiting tone or see a flashing indicator light on the handset rest, depending on the configuration of your phone.

To answer the new call:

Press the Hold button. The original call is placed on hold.

To return to the original call:

Press the Hold button again.

You may continue to use the Hold button to switch between the calls.

Retrieve Voice-Mail Messages

Press the Message soft key, and follow the voice instructions.

Alternate Method to Retrieve Voice-Mail Messages

To retrieve voice-mail messages, perform the following steps:

1. Select an available Cisco Unified IP phone line by lifting the handset. Listen for the dial tone.

2. Press the Menu button.

3. Press 1 on the keypad, or use the Navigation button to locate Messages in the list of options.

4. Press the Select soft key.

5. Follow the voice instructions, or press the Exit soft key to return to the previous directory menu.


Note The light strip at the top of the handset blinks when the phone rings and remains lit to announce arrival of a new voice-mail message. (Functionality will vary depending on your message system.)


Setting and Adjusting Your Cisco Unified IP Phone

Adjust the Volume for the Current Call

Press the Up or Down Volume button while the handset is in use.

Adjust the Ring Volume

Press the Up or Down Volume button while the handset is in its cradle.

Select the Ring Type

To change the ring type, perform the following steps:

1. Press the Menu button.

2. Press 3 on the keypad, or use the Navigation button to locate Settings and then press the Select soft key.

3. Use the Navigation button to scroll through the options. Use the Select soft key to select ring type.

Use the Navigation button to scroll through the ring types.

Use the Play soft key to play the ring sound sample.

4. When you find the ring you want, press the Select soft key.

5. Press the Ok soft key save your ring selection, or press the Cancel soft key to exit to the previous menu without changing the setting.

6. Press the Exit soft key to return to the previous directory menu.

Adjust the Display Contrast

To adjust the display contrast, perform the following steps:

1. Press the Menu button.

2. Press 3 on the keypad, or use the Navigation button to locate Settings and then press the Select soft key.

3. Use the Navigation button to scroll through the available settings. Locate Contrast and press the Select soft key.

4. Press the Up or Down soft key to increase or decrease the screen contrast.

5. Press the Ok soft key to select your contrast setting.

6. Press the Save soft key to save the setting, or press Cancel to exit to the previous menu without changing the setting.

7. Press the Exit soft key to return to the main directory menu.

Using Cisco CallManager Express 3.2 and Later Features

Divert Incoming Calls

To forward any incoming call to the call-forward destination set on the Cisco Unified IP phone:

Press the DND soft key.


Note If the call-forward destination is not set, pressing the DND soft key will disable the ringer.


Park a Call

Call park allows a phone user to place a call on hold at a designated parking spot from which the call can be retrieved by anyone on the system. To park a call:

Press the Park soft key

The Cisco Unified CallManager Express system will automatically select an available call part slot and display the number on the Cisco Unified IP phone screen.

To park a call to a specific call part slot:

Press the transfer button followed by the call part slot number provided by your local administrator.

To retrieve a parked call, use one of the following methods:

If your phone receives a call park notification, press the PickUp soft key followed by the asterisk (*).

Press the PickUp soft key followed by the call part slot number.


Note Contact your local administrator for your call part slot number.


Call-Blocking (Toll Bar) Override

Call blocking prevents unauthorized use of phones. It is implemented by matching a pattern of specified digits during a specified time of day and day of week or date. The call-blocking override feature allows individual phone users to override the call blocking that has been defined.

To place calls when call-blocking is enabled, perform the following steps:

1. Press the Login soft key on the Cisco Unified IP phone.

2. Enter the PIN that is associated with the phone.


Note Contact your local system administrator for your personal identification number (PIN).


Transfer a Call

Transfer a selected call to another number in one of two ways:

Blind transfer—Immediately redirects the call without allowing you to speak to the transfer recipient (the person to whom you are transferring the call).

Consult transfer—Redirects the call after first allowing you to speak to the transfer recipient.

To transfer a call, perform the following steps:

1. During a call, press the Trnsfer soft key. The call is placed on hold.

2. Dial the number to which you want to transfer the call.

3. To make a blind transfer:

Hang up the handset once you hear the line ringing.

To make a consult transfer:

Wait for the call to be answered. Speak to the transfer recipient. Then press the Trnsfer button or hang up the handset.

To cancel your consult call-transfer attempt:

Press the EndCall soft key.

To reconnect to the original caller:

Press the Hold button.

Forward All Calls

To forward all incoming calls to another number, perform the following steps:

1. Press the CFwdALL soft key. You will hear a confirmation beep.

2. Dial the number to which you want to forward all your calls. Dial the number exactly as you would if you were placing a call to that number. Remember to include locally required prefix numbers.

3. Press the pound key (#).

The phone display will be updated to show that calls are to be forwarded.


Note To forward calls to voice mail, manually enter the voice-mail number, or use the soft key and button sequence of the CFwdALL soft key plus the Messages button, followed by the EndCall soft key.


To cancel call forwarding, use one of the following methods:

Hang up the handset.

Press the CFwdALL soft key.

Pick Up Calls

To pick up a call that is on hold or is ringing at another extension, perform the following steps:

1. Press the PickUp soft key.

2. Dial the extension number of the Cisco Unified IP phone that you want to pick up.

Control of the call will be transferred to your phone.

To selectively pick up a call coming into a number that belongs to a pickup group, use one of the following methods:

Press the GPickUp soft key. If there is only one pickup group defined in the entire Cisco Unified CallManager Express system, control of the call will be transferred to your phone.

If the ringing telephone and your phone are in the same pickup group, press the asterisk (*) to transfer control of the call to your phone.

If the ringing telephone and your phone are in different pickup groups, dial the pickup group number where the phone is ringing to transfer control of the call to your phone.

Place a Conference Call

To initiate a three-party conference call, perform the following steps:

1. During a call, press the Confrn soft key to open a new line and put the first party on hold.

2. Place a call to another number.

3. When the call connects, press the Confrn soft key again to add the new party to the existing call with the first party.

To establish a conference call between second- and third-party calls to a Cisco Unified IP phone, one active and the other on hold:

Press the Confrn soft key on the Cisco Unified IP phone.

End a Conference Call

To end the conference call, hang up the handset, or press the EndCall soft key.


Note Once the conference call initiator disconnects, the conference call is terminated.


Alternate Methods to End a Conference Call

Call initiators may use one of the following methods (Functionality will vary according to your system configuration.):

To end the conference but remain connected to the most recent call, press the Confrn soft key. The older call is placed on hold.

To disconnect from the conference, hang up the handset. The other parties will remain on the conference call.

Program Personal Speed-Dial Buttons

Once an administrator has defined one or more speed-dial instances for a Cisco Unified IP phone, you can reprogram numbers that are not locked or program numbers into an instance that has an empty dial string by following these steps:

1. Select an available phone line by lifting the handset, by pressing the NewCall soft key, or by pressing a line button. Listen for the dial tone.

2. Press the pound key (#).

3. Press the Menu button, press 4 on the keypad for Speed Dial, and use the Navigation button to select the speed-dial button that you want to program. A short beep confirms that you are starting to program this button.

4. Enter the speed-dial number. The digits will appear on the phone display when you are entering speed-dial numbers on a Cisco Unified IP Phone 7905G. Use the backspace (<<) soft key to erase digits that were entered incorrectly.

To remove a speed-dial number without replacing it with a new one, press the pound key (#).

5. Hang up the handset, or press a new speed-dial button and repeat the process.

Place a Call from Your Local Directory

To search your directory by name or phone number, perform the following steps:

1. Press the Menu button.

2. Press 2 on the keypad for Directories, or use the Navigation button to scroll through the menu. Press the Select soft key to make your selection.

3. Press 5 on the keypad for Directory Services, or use the Navigation button to scroll through the menu. Press the Select soft key to make your selection.

4. Press 1 on the keypad for Local Directory or use the Navigation button to scroll through the menu. Press the Select soft key to make your selection.

5. Press the Up or Down scroll button to select a field. Use the keypad to enter the search data, namely, the first name, last name, or number to be searched.

6. Press the Search soft key. The search results will be displayed.

7. Use the Up or Down scroll button to select an entry.

8. Press the Dial soft key to dial the number.

9. To exit the directory, press the Exit button.

Place a Call from Your System Speed-Dial Directory

To search your directory by name or phone number, perform the following steps:

1. Press the Menu button.

2. Press 2 on the keypad for Directories, or use the Navigation button to scroll through the menu. Press the Select soft key to make your selection.

3. Press 5 on the keypad for Directory services, or use the Navigation button to scroll through the menu. Press the Select soft key to make your selection.

4. Use the Navigation button to scroll through the menu. Press the Select soft key to make your selection, or

Press 2 on the keypad for local speed-dial.

Press 3 on the keypad for personal speed-dial. (Consult your administrator on the use of this soft key.)

5. Press the Up or Down scroll button to select a field. Use the keypad to enter the search data, namely, the first name, last name, or number to be searched.

6. Press the Search soft key. The search results will be displayed.

7. Use the Up or Down scroll button to select an entry.

8. Press the Dial soft key to dial the number.

9. To exit the directory, press the Exit button.

View Call History

To access Cisco Unified CallManager Express phone services, including missed, received, or placed calls, perform the following steps:

1. Press the Menu button.

2. Press 2 on the keypad, or use the Navigation button to locate Directory, and press the Select soft key.

3. Use the Navigation button to scroll through the menu. Press the Select soft key to make your selection, or

Press 1 on the keypad for Missed Calls.

Press 2 on the keypad for Received Calls.

Press 3 on the keypad for Placed Calls.

4. Use the Navigation button to scroll through the call list.

5. Use the Select soft key to select a phone number.

6. Press the Dial soft key to place a call, or press the Exit soft key to return to the previous directory menu.

Place a Call from Call History

To place a call to a number in the call history list, perform the following steps:

1. Use the Navigation button to scroll through the call history list.

2. Use the Select soft key to select a phone number. The digits will appear on the phone display.

3. To dial the number as it appears on the phone display:

Press the Dial soft key.

To edit the number on the phone display before dialing, use one of the following options:

Press the EditDial soft key to place the cursor at the beginning of the number on the phone display.

Use the keypad to edit the digits as needed. Use the backspace (<<) soft key to erase digits that were entered incorrectly.

Press the Dial soft key to place the call.

Clear Call History

To clear all the numbers listed in the call history, perform the following steps:

1. Press the Menu button.

2. Press 2 on the keypad, or use the Navigation button to locate the Directory, and then press the Select soft key.

3. Press the Clear soft key.


Note Selective clearing of call history lists is not supported.


Use Audio Paging

Audio paging provides a one-way voice path to the phones that have been designated to receive paging. It does not have a press-to-answer option.

To use the paging function for paging a group, perform the following steps:

1. Select an available phone line by lifting the handset, by pressing the NewCall soft key, or by pressing a button. Listen for the dial tone.

2. Dial the designated paging group number.

Each idle IP phone that has been configured with the paging number automatically answers in speakerphone mode, and the phone displays the caller ID.

3. When you finish speaking your message and hang up, the phones are returned to their idle states.

Activate Do Not Disturb (DND)

For visual call alerting and information without audible ringing, use DND. Calls receive normal call-forward-busy and no-answer treatment.

To activate the Do-Not-Disturb feature, perform the following steps:

1. Press the more soft key to locate the DND soft key.

2. Press the DND soft key. A display text message will indicate that the phone is in Do-Not-Disturb mode.


Note Pressing the DND soft key immediately forwards the call to the call-forward destination set on the phone. If the call-forward destination is not set, pressing the DND soft key will disable the ringer.


To deactivate the Do-Not-Disturb feature, repeat Steps 1 and 2.

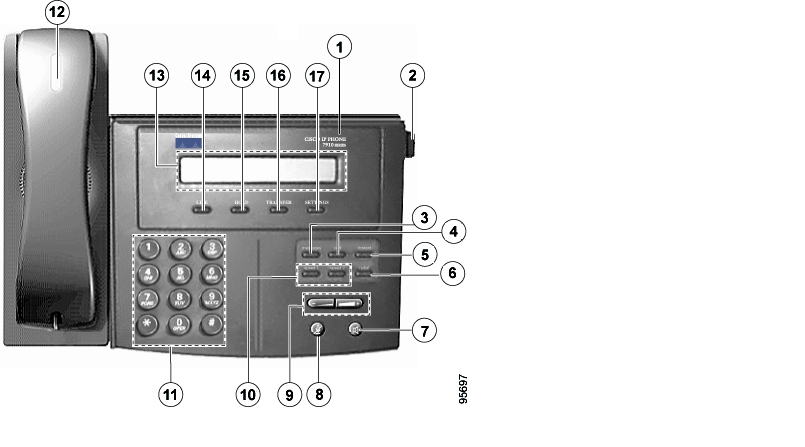
3 Cisco Unified IP Phone 7910G for Cisco CallManager Express 3.2 and Later

Button Legend

 
Feature
Function
1

Cisco Unified IP phone model type

Shows the Cisco Unified IP phone model number.

2

Footstand adjustment

Allows you to adjust the angle of the phone base.

3

Msgs button

Allows you to access voice-mail messages.

4

Conf button

Allows you to initiate a conference call.

5

Forward button

Redirects all calls to another number.

6

Redial button

Automatically redials the last number dialed.

7

Speaker button

Toggles the speaker on and off.

8

Mute button

Toggles the muting on and off.

9

Volume button

Increases or decreases the handset, speaker, or ring volume and adjusts the LCD contrast.

10

Speed buttons

Allows you to call a number quickly.

11

Keypad

Functions like a traditional telephone keypad.

12

Handset with indicator light

Functions like a traditional handset.

13

LCD screen

Displays information such as line/call status, phone number, and soft key tabs.

14

Line button

Opens a new line.

15

Hold button

Places an active call on hold. Resumes a held call.

16

Transfer button

Transfers the current call to a different number.

17

Settings button

Adjusts handset, speaker, and ring volume, ring type, and contrast on the LCD screen.


Settings

To adjust your Cisco Unified IP phone settings menu displayed on the LCD screen, use one of the following methods:

Press the Settings button to access the menu.

Press the Volume button to navigate through the list.

The following is a comprehensive list of settings and associated keypad numbers. Functionality will vary according to your system configuration.

Setting Number
Setting
1

Handset volume

2

Speaker volume

3

Ring volume

4

Model info

5

LCD contrast

6

Network configuration

7

Ring type

8

Timers


Operating Your Cisco Unified IP Phone

Place a Call

Use one of the following methods to place a call:

Lift the handset and dial a number.

Press the Line button and dial a number.

Press the Speaker button and dial a number. The Mute button automatically lights, indicating that the called party cannot hear you.


Note The Cisco Unified IP Phone 7910G does not support two-way speakerphone operation. The Speaker button provides a hands-free listen-only mode that allows you to hear a phone conversation or messages, but does not permit you to be heard. To speak to the other party, you must use the handset. If you are using the handset, the Mute button can be toggled on and off to mute and activate the handset microphone.


Press a Speed button.

Answer a Call

Lift the handset.

End a Call

Use one of the following methods to end a call:

Hang up the handset.

Press the Speaker button (if using the speaker).

Press the Line button.

Redial a Number

To redial the most recently dialed number:

Lift the handset and press the Redial button.

Press the Redial button to dial using the speakerphone. When the party answers, you must lift the handset to talk.

Hold a Call

To place a call on hold:

Press the Hold button.

To retrieve a held call:

Press the Hold button again.


Note Because the hold feature can generate music or a beeping tone, avoid using hold when dialed into a remote conference system. Simple three-party conferences that are created locally on your phone can safely be placed on hold without introducing music or beeps into the conference.


Mute a Call

To mute an active call so that the other parties cannot hear you speak:

Press the Mute button. The Mute button automatically lights, indicating that the other party cannot hear you.

To disengage mute and rejoin the call:

Press the Mute button again. If you are using mute along with speakerphone, lift the handset to speak to the other party.


Note The mute feature does not generate music or a beeping tone.


Manage Call Waiting

To select among calls waiting on the same line, use the Hold button.

Retrieve Voice-Mail Messages

To access voice messages:

Press the Msgs button and follow the voice instructions.

When you have one or more new messages, the message-waiting indicator (MWI) light on your handset is lit if you have MWI configured.

Setting and Adjusting Your Cisco Unified IP Phone

Adjust the Volume for the Current Call

Press the Up or Down Volume button to adjust the volume for the speaker or handset.

Adjust the Call Volume

To adjust the handset volume for all calls, perform the following steps:

1. Press the Settings button.

2. Press 1 on the keypad.

3. Press the Up or Down Volume button to adjust the volume to the desired level.

4. Press the pound key (#) on the keypad to save the change.

5. Press Settings to return to the main display.

Adjust the Speaker Volume

To adjust the speaker volume for all calls, perform the following steps:

1. Press the Settings button.

2. Press 2 on the keypad.

3. Press the Up or Down Volume button to adjust the volume to the desired level.

4. Press the pound key (#) on the keypad to save the change.

5. Press Settings to return to the main display.

Adjust the Ring Volume

To adjust the ring volume for all calls, perform the following steps:

1. Press the Settings button.

2. Press 3 on the keypad.

3. Press the Up or Down Volume button to adjust the volume to the desired level.

4. Press the pound key (#) on the keypad to save the change.

5. Press Settings to return to the main display.

Select the Ring Type

To adjust the ring type, perform the following steps:

1. Press the Settings button.

2. Press 7 on the keypad.

3. Press the Up or Down Volume button to scroll through the list of available ring types.

4. Press the pound key (#) on the keypad to save your selection.

5. Press Settings to return to the main display.

Adjust the Display Contrast

To adjust the display contrast, perform the following steps:

1. Press the Settings button.

2. Press 5 on the keypad.

3. Press the Up or Down Volume button to set the desired contrast of the display.

4. Press the pound key (#) on the keypad to save your selection.

5. Press Settings to exit the main display.

Using Cisco CallManager Express 3.2 and Later Features

Transfer a Call

There are two ways to transfer a selected call to another number:

Blind transfer—Immediately redirects the call without allowing you to speak to the transfer recipient (the person to whom you are transferring the call).

Consult transfer—Redirects the call after first allowing you to speak to the transfer recipient.

To transfer a call, perform the following steps:

1. During a call, press the Transfer button. The call is placed on hold.

2. Place a call to another person by dialing the number. After the party answers, hang up the handset.

To make a blind transfer:

Hang up the handset, or press the Transfer button once you hear the line ringing.

To return to the original call:

Press the Hold button to return to the original call.

Forward All Calls

To forward all incoming calls to another number, perform the following steps:

1. Press the Forward button. You will hear a confirmation beep.

2. Dial the number to which you want to forward all your calls. Dial the number exactly as you would if you were placing a call to that number.

3. Press the Speaker button and hang up the handset. The phone display will be updated to show that the call is being forwarded.

To cancel call forwarding, use one of the following methods:

Hang up the handset.

Press the Forward button.


Note To forward calls to voice mail, manually enter the voice-mail number, or use the command sequence Forward plus Msgs.

The Forward plus Speed1 or Speed2 will forward calls to a speed-dial number.


Place a Conference Call

To initiate a three-party conference call, perform the following steps:

1. During a call, press the Conf button to open a new line, and place a call to another number. This places the first party on hold.

2. When the call connects, press the Conf button again to add the new party to the existing call with the original caller.

To cancel your attempt to add a third party to your original call, perform the following steps:

1. Press the Line button.

2. Press the Hold button to reconnect to the original call.

To establish a conference call between second- and third-party calls to a Cisco Unified IP phone, one active and the other on hold:

Press the Confr button on the Cisco Unified IP phone.

End a Conference Call

To end the conference, call hang up the handset.


Note Once the conference call initiator disconnects, the conference call is terminated.


Alternate Methods to End a Conference Call

Call initiators may use one of the following methods (Functionality will vary according to your system configuration.):

To disconnect from the conference, hand up the handset.

To end the conference but remain connected to the most recent call, press the Confr button. The older call is placed on hold.

Program Speed-Dial Buttons

To program speed-dial buttons, perform the following steps:

1. Select an available IP phone line. Listen for the dial tone.

2. Press the pound key (#).

3. Press the speed-dial button that you want to program. A short beep confirms that you are starting programming for this button.

4. Enter the speed-dial number. The digits will appear on the phone display.

5. Press the pound key (#) and hang up the handset, or press the speed-dial button you are programming a second time to indicate that you have finished entering the speed-dial digits and to store the new speed-dial number.

6. Hang up the handset, or press a new speed-dial button and repeat the process.

Place a Call from Your Speed-Dial Button

To place a call from your speed-dial buttons, perform the following steps:

1. Lift the handset.

2. Press the Speed1 or Speed2 button.

Use Audio Paging

Audio paging provides a one-way voice path to the phones that have been designated to receive paging. It does not have a press-to-answer option.

To use the paging function for paging a group, perform the following steps:

1. Select an available phone line by lifting the handset. Listen for the dial tone.

2. Dial the designated paging group number.

Each idle IP phone that has been configured with the paging number automatically answers using its speakerphone mode, and the phone displays the caller ID.

3. When you finish speaking your message and hang up, the phones are returned to their idle states.

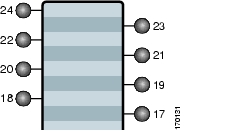
4 Cisco Unified IP Phone 7914 Expansion Module for
Cisco CallManager Express 3.2 and Later

Button Legend

 
Feature
Function
1

Cisco Unified IP phone model type

Shows the Cisco Unified IP phone model number.

2

LCD screen

Displays the phone number, speed-dial number, name, or other text label assigned to each button. Icons indicating line status appear and function the same as those on the Cisco Unified IP Phone 7960G.

3

Fourteen lighted buttons

Each button corresponds to one line. The light beneath each button indicates the state of the corresponding line, as follows:

Flashing amber: line ringing

Flashing green: call on hold

Off: line available

Steady green: line in use by you or call being transferred

Steady red: line in use by someone else


Operating Your Cisco Unified IP Phone

Perform Basic Call Functions

All call functions, such as answering a call, placing a call on hold, transferring a call, call waiting, and so on, are performed from the Cisco Unified IP Phone 7960G. See the, "Cisco Unified IP Phone 7960G and Cisco Unified IP Phone 7940G for Cisco CallManager Express 3.2 and Later" section for instructions for using the Cisco Unified IP phone.

Setting and Adjusting Your Cisco Unified IP Phone

Adjust the Display Contrast

To adjust the contrast on the display of the Cisco Unified IP Phone 7914 Expansion Module, follow these steps:

1. On the Cisco Unified IP Phone 7960G, press the Settings button.

2. Select Contrast, and press the Select soft key.

3. Select Expansion Module(s) from the Contrast menu.

The Expansion Module 1 Contrast screen appears.

4. Press the Up and Down soft keys to obtain the desired contrast on the first Expansion Module.

If you have a second Expansion Module, press Next. The Expansion Module 2 Contrast screen appears. Press the Up and Down soft keys to obtain the desired contrast on the second Expansion Module.

5. Press the Exit soft key to accept your changes and return to the main directory menu.

Using Cisco CallManager Express 3.2 and Later Features

Transfer a Call

To transfer an incoming call, press the Transfer button followed by the Line button of the extension to which you wish to transfer the call. When a transfer is invoked using this mechanism, it will always be invoked as a blind transfer.

Line status is indicated as follows:

An idle line will display an on-hook phone icon.

A line that is in use will display the phone icon with a flashing X.

A line with messages will display with a flashing envelope icon.

Program Personal Speed-Dial Buttons

Once an administrator has defined one or more speed-dial instances for a Cisco Unified IP phone, you can reprogram numbers that are not locked or program numbers into an instance that has an empty dial string by following these steps:

1. Select an available phone line by pressing the NewCall soft key or by pressing a line button. Listen for the dial tone.

2. Press the pound key (#).

3. Press the speed-dial button to program. A short beep confirms that you are starting to program this button.

4. Enter the speed-dial number. The digits will appear on the phone display. When you are entering speed-dial numbers, use the backspace (<<) soft key to erase digits that were entered incorrectly.

To remove a speed-dial number without replacing it with a new one, press the pound key (#).

5. Hang up the handset, or press a new speed-dial button and repeat the process and program additional speed-dial buttons.

5 Cisco Unified IP Phone 7935 Conference Station and Cisco Unified IP Phone 7936 Conference Station for Cisco CallManager Express Services 3.2 and Later

Button Legend

 
Feature
Function
1

Cisco Unified IP phone model type

Shows the Cisco Unified IP phone model number.

2

LEDs

Provide call status indicators:

Green: dial tone On; dialing; connected

Green and blinking: ringing/connecting

Green and blinking with ring: incoming call

Off: call State Off

Red: powering On; hold

Red and blinking: mute

3

LCD screen

Displays information such as line/call status, phone number, and soft key tabs.

4

Scroll buttons

Allow you to scroll through the menus or through an open list on the LCD screen.

5

Select button

Selects the menu option or list item that is highlighted.

6

Soft keys

Engage the functions displayed on the corresponding LCD tabs.

7

Volume buttons

Increase or decrease the volume of the call, speaker, ringer, or dial tone, depending on which sound is currently active.

8

Mute button

Toggles muting on and off.

9

Keypad

Functions like a traditional telephone keypad.

10

Redial button

Automatically redials the last number dialed.

11

Phone button

Allows you to get a dial tone, answer an incoming call, and hang up a call.

12

Exit button

Returns to the main LCD screen from a menu, a list, or the Phone Book.

13

Menu button

Opens and closes the main menu on the Cisco Unified IP Conference Station. The main menu includes the following selections:

Call Functions—opens the call function options, including Pickup, Group Pickup, and Transfer.

Phone Book—opens the Phone Book.

Settings—opens the Settings options, including Contrast and Ringer.

Admin Setup—opens Admin Setup (requires administrator password).

System Information—read-only display showing the system settings.


Soft Key Legend

Your Cisco Unified IP phone is equipped with soft keys that point to feature options displayed along the bottom of the LCD screen. The following is a comprehensive list of soft keys offered. Functionality will vary according to your system configuration.

Soft Key
Function

<< or >>

Navigates to edit characters. Use the backspace soft key to erase digits that were entered incorrectly.

- or +

Increases or decreases the display contrast.

Answer

Answers the incoming call.

Call

Dials the selected phone number.

Cancel

Cancels the last selection.

CFwdALL

Forwards all calls.

Change

Changes a Phone Book entry.

Clr Entry

Clears a Phone Book entry.

Conf

Adds a party to a conference call.

Corp Dir

Displays the local directory.

Dial

Calls the number in the directory.

EndCall

Ends the current call.

Hold

Puts the active call on hold.

New Entry

Adds an entry to the Phone Book.

Ph Book

Displays the Phone Book.

Resume

Returns to the original call.

Save

Saves your entry.

Search

Starts a search in the directory.

Trnsfer

Transfers the current call.

View/Edit

Enables view and edit capabilities.


Operating Your Cisco Unified IP Phone

Place a Call

Use one of the following methods to place a call:

Press the Phone button, and then dial the number.

Dial the number, and then press the Phone button.

Answer a Call

Use one of the following methods to answer a call:

Press the Phone button.

Press the Answer soft key.

End a Call

Use one of the following methods to end a call:

Press the Phone button.

Press the EndCall soft key.

Redial a Number

To redial the most recently dialed number:

Press the Redial button.

Hold a Call

To put a call on hold:

While on a call, press the Hold soft key. The held call appears in the active call list in the LCD display.

To return to the call:

Press the Resume soft key.

If more than one call is on hold, press the Up or Down scroll button to select a call in the active call list in the LCD display and then press the Resume soft key.


Note Because the hold feature can generate music or a beeping tone, avoid using hold when dialed into a remote conference system. Simple three-party conferences that are created locally on your phone can safely be placed on hold without introducing music or beeps into the conference.


Mute a Call

To mute a call:

While on a call, press the Mute button. The LEDs blink red, and a Mute icon appears on the LCD display.

To disengage the mute function:

Press the Mute button again.


Note The Mute feature does not generate music or a beeping tone.


Setting and Adjusting Your Cisco Unified IP Phone

Adjust the Volume for the Current Call

Press the Up or Down Volume button to increase or decrease the volume.

Adjust the Display Contrast

To adjust the LCD display contrast, perform the following steps:

1. Press the Menu button.

2. Press the Up or Down scroll button to select Settings. Press the Select button.

3. Press the Up or Down scroll button to select the contrast entry.

4. Press the - or + soft key to set the desired contrast for the LCD display.

5. Press the Menu button to return to the main menu, or press the Exit button to return to the resting display.

Using Cisco CallManager Express 3.2 and Later Features

Transfer a Call

To transfer a call, perform the following steps:

1. During a call, press the Trnsfer soft key. The call is placed on hold.

2. Dial the number to which you want to transfer the call.

3. As soon as you finish dialing the number, the call is transferred and automatically disconnected from the dialing
Cisco Unified 7935 IP Phone.


Note If the transfer fails, press the Resume soft key to return to the original call.


Forward All Calls

To forward all incoming calls to another number, perform the following steps:

1. Press the CFwdALL soft key. You will hear a confirmation beep.

2. Dial the number to which you want to forward all your calls. Dial the number exactly as you would if you were placing a call to that number. Remember to include locally required prefix numbers.

3. Press the pound key (#).

The phone display will be updated to show that calls are to be forwarded.


Note To forward calls to voice mail, manually enter the voice-mail number, or use the soft key and button sequence of CFwdALL soft key plus the Menu button, and select the Messages menu option followed by the EndCall soft key.


To cancel call forwarding, use one of the following methods:

Hang up the handset.

Press the CFwdALL soft key.

Place a Conference Call

To place a three-party conference call, perform the following steps:

1. Press the Phone button.

2. Dial the number of the party you want to add to the conference call.

3. When the call connects, press the Conf soft key to add the new party to the existing call with the first party.

4. To add parties to a conference call by using the phone book, press the Ph Book soft key and press the Up or Down scroll button to select the entry you want.

To establish a conference call between second- and third-party calls to a Cisco Unified IP phone, one active and the other on hold:

Press the Confr soft key on the Cisco Unified IP phone.

End a Conference Call

To end the conference call press the Phone button.


Note Once the conference call initiator disconnects, the conference call is terminated.


Alternate Methods to End a Conference Call

Call initiators may use one of the following methods (Functionality will vary according to your system configuration.):

To end the conference but remain connected to the most recent call, press the Conf soft key. The older call is placed on hold.

To disconnect from the conference, hang up the handset. The other parties will remain on the conference call.

Use Audio Paging

Audio paging provides a one-way voice path to the phones that have been designated to receive paging. It does not have a press-to-answer option.

To use the paging function for paging a group, perform the following steps:

1. Select an available phone line, listen for the dial tone.

2. Dial the designated paging group number.

Each idle IP phone that has been configured with the paging number answers automatically in speakerphone mode, and the phone displays the caller ID.

3. When you finish speaking your message and hang up, the phones are returned to their idle states.


Note The Cisco Unified IP Phone 7935 Conference Station and the Cisco Unified IP Phone 7936 Conference Station cannot be designated to receive paging.


Place a Call from Your Local Directory

To search your directory by name or phone number, perform the following steps:

1. Press the Corp Dir soft key.

2. Press the Up or Down scroll button to select a field. Use the keypad to enter the search data, namely, the first name, last name, or number to be searched.

3. Press the Search soft key. The search results will be displayed.

4. Use the Up or Down scroll button to select an entry.

5. Press the Dial soft key to dial the number.

6. To exit the directory, press the Exit button.

Use the Personal Phone Book

To use the Phone Book, perform the following steps:

1. Press the Ph Book soft key.

2. To call a number in the phone book, press the Up or Down scroll button to select the entry you want.

3. Press the Call soft key.

Add an Entry to the Personal Phone Book

To add an entry to the Phone Book, perform the following steps:

1. Press the NewEntry soft key.

2. Using the keypad, enter the last name, first name, and phone number for the new entry.

3. Press the Up or Down scroll button to select the Last, First, or Number field.

When entering letters, select the appropriate number key of the letter you want, and press that key the equivalent number of times for the correct letter. For example, to enter a B, press the 2 key two times, and to enter a C, press the 2 key three times.

Use the backspace (<<) soft key to erase characters that were entered incorrectly.

4. Press the Save soft key to save the new entry.


Note You can add a maximum of 20 entries to the phone book.


Edit an Entry in the Personal Phone Book

To edit an entry in the Phone Book, perform the following steps:

1. Press the Up or Down scroll button to select an entry.

2. Press the View/Edit soft key.

3. You can change or clear the selected entry using the Change or Clr Entry soft key. Press the backspace soft key (<<) to erase characters that were entered incorrectly.

4. Press the Save soft key to save your changes. To exit without saving, press the Exit soft key.

5. Press the Menu button to return to the main menu, or press the Exit button to return to the resting display.

6 Cisco Unified IP Phone 7931G for Cisco Unified CallManager Express

Button Legend

The Cisco Unified IP Phone 7931G is a multi-line IP phone which includes 24 buttons that can be assigned to lines and call features. A 3-color LED provides call status information for each line.

 
Feature
Description
1

Line and call feature button

Opens a new line and accesses call features. A 3-color LED provides call status information:

Flashing green: call is placed on hold by you.

Steady green: line is in use by you.

Flashing red: call is placed on hold by the other user on a shared line.

Steady red: line is in use by the other user on a shared line.

Flashing amber: line is ringing.

Off: line is available.

The line buttons are numbered 24-1 from top to bottom. The numbers do not appear on the phone.

2

Paper label

Allows you to identify each button with line or feature information.

3

Soft keys

Engage the functions displayed on the corresponding LCD tabs.

4

Hold button

Places calls on hold. Press the line button, flashing green or red, to retrieve a call on hold.

5

Transfer button

Connects a call to another number.

6

Redial button

Connects to the last dialed number.

7

Keypad

Functions like a traditional telephone keypad.

8

Mute button

Toggles mute on and off.

9

Volume button

Increases or decreases handset, headset, ringer, or speakerphone volume.

10

Speaker button

Toggles the speaker on and off.

11

Handset

Functions like a traditional handset.

12

Handset indicator light

Flashes for an incoming call and remains on when there is a message waiting.

13

LCD screen

Displays information such as line/call status, phone number, and soft key tabs.

14

Cisco Unified IP phone model type

Shows the Cisco Unified IP phone model number.

15

4-way navigation pad and Select button

Scrolls through text and selects features that are displayed on the LCD screen. View directory numbers, lines, and features assigned to each line button. The Select button is at the center of the navigation pad.


Soft Key Legend

Your Cisco Unified IP phone is equipped with soft keys that point to feature options displayed along the bottom of the LCD screen. Soft keys change according to the state of the phone.

The following is a comprehensive list of soft keys offered on the Cisco Unified IP Phone 7931G. Functionality varies according to your system configuration.

Soft Key
Function

<< or >>

Use these soft keys to move the cursor to the left or right. Moving the cursor to the left can erase information that you have entered.

Acct

Consult your administrator on the use of this soft key.

Callback

Notifies callers that the called line is free.

Cancel

Cancels the last selection.

CFwdALL

Forwards all calls.

Clear

Clears directory history.

Confrn

Connects callers to a conference call.

Delete

Deletes current number.

Dial

Dials the displayed number.

Directories

Provides access to phone directories.

DND

Activates the Do-Not-Disturb feature.

Down

Decreases the LCD screen contrast.

EditDial

Selects a number and activates the cursor for editing.

EndCall

Ends the current call.

Exit

Exits from the current selection or screen.

Flash

Provides hookflash functionality for three-way calling and call-waiting services provided by the PSTN or Centrex service.

GPickUp

Selectively picks up calls coming into a phone number that is a member of a pickup group.

Login

Provides PIN-controlled access to restricted phone features. Contact your local administrator for additional instructions.

Message

Dials the local voice-mail system.

more

Scrolls through additional soft key options (for example, use the more soft key to locate the DND soft key).

NewCall

Opens a new line on the speakerphone to place a call.

Ok

Confirms the selection.

Park

Forwards calls to a location from which the call can be retrieved by anyone in the system.

PickUp

Selectively picks up calls coming into another extension.

Play

Plays the ring sound sample.

Redial

Redials the last number dialed.

Restore

Consult your administrator on the use of this soft key.

Resume

Returns to an active call.

Save

Saves the last change.

Search

Initiates a search in the local directory.

Select

Selects the highlighted option.

Settings

Provides access to phone settings such as display contrast, ring volume, and ring type.

Trnsfer

Transfers selected calls to another number.

Up

Increases the LCD screen contrast.


Operating Your Cisco Unified IP Phone

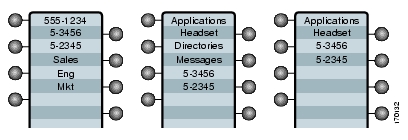
Your Phone can be configured in a variety of ways. A typical line button configuration is Applications on line button 24 and Headset on line button 23. To activate and deactivate the headset, for example, press line button 23.

Obtain Dial Tone and Place a Call

To place a call, first choose a line to get a dial tone. To obtain a dial tone, use one of the following methods:

Lift the handset. If you cannot hear a dial tone, choose an available line by pressing the line key.

Press the speaker key. If you cannot hear a dial tone, choose an available line by pressing the line key.

Press an available idle line key directly enabling speakerphone mode.

Press the new call softkey.

If a headset is connected to the phone, press the headset key.

To place a call, use one of the following methods:

Dial the number on the keypad.

Press Redial softkey.

In speakerphone mode, press a line button.

Press the NewCall soft key and dial a number on the keypad.

Press the Redial soft key.

Dial the number with the phone on hook. Then press the Dial soft key or lift the handset.

If you have selected a number from the directory, press the Dial softkey to place the call.


Note During on-hook dialing, use the backspace (<<) soft key to erase characters that were entered incorrectly. Backspace does not work if you have lifted the handset and dialed a number using the keypad.


Answer a Call

To answer a call, use one of the following methods:

Lift the handset.

If you are using a headset, press the line button to select between incoming calls.

To use the speakerphone, press the line button (flashing amber), the Answer soft key or the Speaker button.

End a Call

To end a call, use one of the following methods:

Hang up the handset.

If you are using a headset, press the EndCall soft key.

If you are using the speakerphone, press the Speaker button or the EndCall soft key.

Redial a Number

To redial the most recently dialed number, use one of the following methods:

Lift the handset and press the Redial button.

Press a line button and then press redial.

Press the Redial button to dial using the speakerphone.

Hold a Call

To place a call on hold while on the call, press the dedicated Hold button. Calls placed on hold by you flash green. Calls placed on hold by others flash red.

To retrieve a held call, press the flashing line button or press the Resume soft key. If multiple calls on multiple lines are on hold, press the line button for the line that you want to pick up. The active call on the other line is automatically put on hold.


Note Because the hold feature can generate music or a beeping tone, avoid using hold when dialed into a remote conference system.


Mute a Call

To mute a call while on a call, press the Mute button. The Mute button lights, indicating that the other party cannot hear you.

To deactivate the mute function, do one of the following:

Press the Mute button again.

Lift the handset if you are using mute along with speakerphone.


Note The Mute feature does not generate music or a beeping tone.


Manage Call Waiting

The 7931G is designed to work as a key system telephone with each button handling one call. Call waiting calls are normally presented on a separate line button. A new call can be answered by pressing the ringing button. The current call is automatically put on hold. You can toggle between callers by pressing the flashing line button; the current call is placed on hold automatically.

If you are on a call when a second call comes in, you hear a call-waiting tone or see a flashing indicator light on the handset rest, depending on the configuration of your phone, and the call appears on a separate line button.

To answer the new call, press the Answer soft key to answer the call. The call on the other line is automatically put on hold.

To return to the original call, press the line button of the original call to reconnect to it.

For calls on a separate line, press the Line button for the incoming call. The call on the other line is automatically put on hold.

To return to the original call, press the Line button associated with the original call.

Retrieve Voice-Mail Messages

To access voice messages, use the following method:

1. Obtain dial tone.

Dial the extension number of the voice mail system.

Press the speed dial button for the voice mail system. The speed dial button may already be programmed for this.

Press line button 21 if configured as Message key.


Note When you have one or more new messages, the message-waiting indicator (MWI) light on your handset is lit and there is a distinctive dial tone if you have MWI configured.


Using the Navigation Pad and Select Button

You use the navigation pad up and down arrows to move the cursor or currently highlighted text. Use the select button, located in the center of the navigation pad, to choose the currently highlighted text. You use the left and right arrows to change the information displayed for line and features buttons from normal to detailed.

The Select button provides additional functionality depending on the context. If you navigate to any line in the LCD (pressing the up and down arrows on the navigation pad) and the corresponding:

Button is mapped as a line button and the line is idle, pressing Select initiates a new call.

Button is mapped as a line button and there is a call on the line, pressing Select changes the display between normal and detailed.

Button is mapped as a line button and there is a call on hold, pressing Select resumes the call.

Button is mapped as a feature, pressing Select invokes the feature.

Setting and Adjusting Your Cisco Unified IP Phone

Adjust the Volume for the Current Call

To adjust the handset, speakerphone, or headset volume for the current call, use the following method:

1. During a call, press the Up or Down Volume button.

2. Press the Save soft key to apply the new volume level to future calls.

Adjust the Ring Volume

To adjust the ring volume, press the Up or Down Volume button while the phone is idle or ringing and the handset is on hook.

Select the Ring Type

To change the ring type, use the following method:

1. Press line button 24 to access the Applications Menu key (default). If you are not sure of which button is configured as the Applications Menu key, use the Navigation button to display all button configurations.

2. Use the Navigation pad to choose Settings, or press keypad digit 3.

3. Press 2 for Ring Type, or use the Navigation pad to access Ring Type and press the Select button.

4. Use the Navigation pad to scroll through the list of ring types. Press the Play soft key to hear samples.

5. Highlight the ring you want, and then press the Select button.

6. Press the Save soft key to save the setting, or press Cancel to exit to the previous menu without changing the setting.

7. Press the Exit soft key to return to the main directory menu.

Adjust the Display Contrast

To adjust the contrast in your LCD Display, use the following method:

1. Press line button 24 to access the Applications Menu key (default). If you are not sure of which button is configured as the Applications Menu key, use the Navigation button to display all button configurations.

2. Use the Navigation pad to choose Settings, or press keypad digit 3.

3. Use the Down or Up soft key to change the contrast.

4. Press the Save or Exit soft key.

5. Press the Ok soft key to select your contrast setting.

6. Press the Save soft key to save the setting, or press Cancel to exit to the previous menu without changing the setting.

7. Press the Exit soft key to return to the main directory menu.

Using Cisco Unified CallManager Express 4.0 Features

I-Hold

The I-Hold feature provides a visual indication of calls on hold on a shared line: a flashing green line-button LED indicates a locally held call and a flashing red line-button LED indicates that the other user has put a call on hold.

Directory Transfer

You can transfer a caller to a selected directory number. To transfer a call directly to a selected directory number, use the following method:

1. Obtain dial tone.

2. Press the Applications line button 24, navigate to Directories, or press keypad digit 2.

Or press line button 22 if it is configured as Directories (default).

1. Search for the requested name.

2. When the requested name is selected in the Directory, press the Dial softkey.

3. Press the Transfer button.

Busy Monitored Line

To transfer a call to a busy monitored line, press the transfer button and then the line button.

Divert Incoming Calls

To forward any incoming call to the call forward destination for each line configured on the phone, for example forward to voice mail, press the DND key.


Note If the call-forward destination is not set, pressing the DND soft key disables the ringer.


Park a Call

Call park allows a phone user to place a call on hold at a designated parking spot from which the call can be retrieved by anyone on the system.

To park a call, press the Park soft key. The Cisco Unified CallManager Express system automatically selects an available call part slot and displays the number on the Cisco Unified IP phone screen.

To park a call to a specific call part slot, press the transfer button followed by the call part slot number provided by your local administrator.

To retrieve a parked call, use one of the following methods:

Dial the call part slot number.

If your phone receives a call park notification, press the PickUp soft key followed by the asterisk (*).

Press the PickUp soft key followed by the call part slot number.


Note Contact your local administrator for available call park directory numbers.


Call-Blocking (Toll Bar) Override

Call blocking prevents unauthorized use of phones. It is implemented by matching a pattern of specified digits during a specified time of day and day of week or date. The call-blocking override feature allows individual phone users to override the call blocking that has been defined.

To place calls when call-blocking is enabled, use the following method:

1. Press the Login soft key on the Cisco Unified IP phone.

2. Enter the PIN that is associated with the phone.


Note Contact your local system administrator for your personal identification number (PIN).


Transfer a Call

To Transfer a selected call to another number, use one of the following methods:

Blind transfer—Immediately redirects the call without allowing you to speak to the transfer recipient (the person to whom you are transferring the call).

Consult transfer—Redirects the call after first allowing you to speak to the transfer recipient.

To transfer a call, perform the following steps:

1. During a call, press the Trnsfer soft key or the Transfer button. The call is placed on hold.

2. Dial the number to which you want to transfer the call.

3. To make a blind transfer, hang up the handset or press the Trnsfer soft key once you hear the line ringing.

4. To make a consult transfer, wait for the call to be answered. Speak to the transfer recipient. Then press the Trnsfer button or hang up the handset.

5. To cancel your consult call-transfer attempt, press the EndCall soft key.

6. If the transfer fails, press the Resume soft key to return to the original call.

7. To reconnect to the original caller, press the Resume soft key.

Forward All Calls

To forward all incoming calls to another number, use the following method:

1. Press the CFwdALL soft key. You hear a confirmation beep.

2. Dial the number to which you want to forward all your calls. Dial the number exactly as you would if you were placing a call to that number. Remember to include locally required prefix numbers.

The phone display is updated to show that calls are to be forwarded.

3. Press the pound key (#) or the EndCall soft key.


Note To forward calls to a speed-dial number, use the soft key and button sequence of the CFwdALL soft key plus a speed-dial button, followed by the EndCall soft key.


To cancel call forwarding, use one of the following methods:

Select the line that has call forwarding set.

Press the CFwdALL soft key then hang-up.

Pick Up Calls

To pick up a call that is on hold or a call that is ringing at another extension, use the following method:

1. Press the PickUp soft key.

2. Dial the extension number of the Cisco Unified IP phone that you want to pick up. Control of the call is transferred to your phone.

To selectively pick up a call coming in to a number that belongs to a pickup group, use one of the following methods:

Press the GPickUp soft key. If there is only one pickup group defined in the entire Cisco Unified CallManager Express system, control of the call is transferred to your phone.

If the ringing telephone and your phone are in the same pickup group, press the asterisk (*) to transfer control of the call to your phone.

If the ringing telephone and your phone are in different pickup groups, dial the pickup group number where the phone is ringing to transfer control of the call to your phone.

Place a Conference Call

To place a conference call, use the following method:

1. During a call, press the More soft key and then the Confrn soft key to open a new line and put the first party on hold.

2. Place a call to another number.

3. When the call connects, press Confrn again to add the new party to the call.

To establish a conference call between second- and third-party calls already present on a phone, using separate line buttons, one active and the other on hold, use the following method:

1. Press the Confrn soft key on the phone.

2. Press the Line button of the call you want to add to the three-party conference.

End a Conference Call

To end the conference call, hang up the handset, or press the EndCall soft key.


Note If configured, once the conference call initiator disconnects, the conference call is terminated.


Alternate Methods to End a Conference Call

Call initiators may use one of the following methods (Functionality varies according to your system configuration.):

To end the conference but remain connected to the most recent call, press the Confrn soft key. The older call is placed on hold.

To disconnect from the conference, hang up the handset. The other parties remain on the conference call.

Place a Call from Your Local Directory

To access the local phone directory established by the system administrator, use the following method:

1. Press Menu, navigate to locate Directories, and then press the Select button.

2. Press 4 on the keypad or navigate to the Local Directory.

3. Use the Navigation pad to select the Last, First, or Number field search option.

4. Use the keypad to enter the last name or first name for the entry.

To enter characters, press the number key of the letter you want until you access that letter. For example, to enter a B, press the 2 key two times, to enter a C, press the 2 key three times. Pressing a key repeatedly cycles through the letters for that key. Use the backspace (<<) soft key to make corrections while entering characters.

5. Press the Search soft key to find your selection.

6. If your search results in multiple listings, use the Navigation pad to hilight the correct number, then press the Select button.

7. Press the Dial soft key to dial the selected number.

Program Personal Speed-Dial Buttons

Your system administrator can assign speed dial numbers to your phone. You may not be able to program every speed dial number.

To program personal speed-dial buttons, use the following method:

1. Select an available phone line by lifting the handset, by pressing the NewCall soft key, or by pressing a line button. Listen for the dial tone.

2. Press the pound key (#).

3. Press the speed-dial button that you want to program. A short beep confirms that you are starting to program this button.

4. Enter the speed-dial number. The digits appear on the phone display. Use the backspace (<<) soft key to erase digits that were entered incorrectly.

To remove a speed-dial number without replacing it with a new one, press the pound key (#).

5. Press the same speed-dial button a second time to indicate that you have finished entering the speed-dial digits and to store the new speed-dial number.

6. To continue, press a new speed-dial button and repeat the process. Hang up the handset to finish.

Place a Call from Your System Speed-Dial Directory

To place a call from your system speed-dial directory, use the following method:

1. Obtain dial tone.

2. Press the Applications line button 24, navigate to Directories, or press keypad digit 2.

Or press line button 22 if it is configured as Directories (default).

3. Use the Navigation pad to scroll through the options. Use the Select button to select speed-dial options.

Press 5 for the Local Speed Dial.

Press 6 for the Personal Speed Dial. (Functionality varies depending on your system configuration.)

4. Use the Navigation pad to scroll through the speed-dial phone list.

5. To dial the selected phone number, press the Select button, or enter the entry number on the keypad.

6. Press the Exit soft key to return to the previous directory menu.

View Call History

To view recent missed, received, or placed calls, use the following method:

1. Press Menu, navigate to locate Directories, and then press the Select button.

2. Use the Navigation pad to scroll and select the desired call list. Press the Select button, or

Press 1 on the keypad for Missed Calls.

Press 2 on the keypad for Received Calls.

Press 3 on the keypad for Placed Calls.

3. Press the Exit soft key to return to the previous directory menu.

Place a Call from Call History

To place a call to a number in the call history list, use the following method:

1. Use the Navigation pad to scroll through the call history list.

2. Use the Select button to select a phone number. The digits appear on the phone display.

3. To dial the number as it appears on the phone display, press the Dial soft key.

To edit the number on the phone display before dialing, use the following method:

1. Press the EditDial soft key to place the cursor at the beginning of the number on the phone display.

2. Use the keypad to edit the digits as needed. Use the backspace (<<) soft key to erase digits that were entered incorrectly.

3. Press the Dial soft key to place the call.

Clear Call History

To clear all numbers in the directory histories, press the Clear soft key.


Note The Clear soft key clears all call history lists. Selective clearing of call history lists is not supported.


Use Audio Paging

Audio paging provides a one-way voice path to the phones that have been designated to receive paging. It does not have a press-to-answer option like the intercom feature.

To use the paging function for paging a group, use the following method:

1. Select an available phone line by lifting the handset. Listen for the dial tone.

2. Dial the designated paging group number.

Each idle IP phone that has been configured with the paging number answers automatically in speakerphone mode, and the phone displays the caller ID.

3. When you finish speaking your message and hang up, the phones are returned to their idle states.

Use the Intercom Feature

Cisco Unified CallManager Express supports intercom functionality for one-way and press-to-answer voice connections using a dedicated pair of intercoms on two phones that speed-dial each other. A line button is assigned for use as the intercom button.

The called IP phone automatically answers the call in speakerphone mode with mute activated. A beep sounds to alert the recipient to the incoming call.

To respond to an intercom call, press the Mute button, or lift the handset.

Activate Do Not Disturb (DND)

For visual call alerting and information without audible ringing, use DND. Calls receive normal call-forward-busy and no-answer treatment.

To activate the Do-Not-Disturb feature, use the following method:

1. Press the more soft key to locate the DND soft key.

2. Press the DND soft key. A display text message indicates that the phone is in Do-Not-Disturb mode.


Note If DND is not set, pressing the DND soft key when a line is ringing forwards the call to the call-forward destination set on the phone for that call only. If the call-forward destination is not set, pressing the DND soft key disables the ringer.


To deactivate the Do-Not-Disturb feature, repeat Steps 1 and 2.

7 Cisco Unified IP Phone 7960G and Cisco Unified IP Phone 7940G for
Cisco CallManager Express 3.2 and Later

Button Legend

The Cisco Unified IP Phone 7960G and the Cisco Unified IP Phone 7940G differ only in the number of available line or speed-dial buttons. The Cisco Unified IP Phone 7940G has two lines, and the 7960G has six lines.

 
Feature
Function
1

Cisco Unified IP phone model type

Shows the Cisco Unified IP phone model number.

2

LCD screen

Displays information such as line/call status, phone number, and soft key tabs.

3

Line or speed-dial button

Opens a new line, speed-dials a phone number, or ends a call. The Cisco Unified IP Phone 7940G has two lines, and the Cisco Unified IP Phone 7960G has six lines.

4

Footstand adjustment

Allows you to adjust the angle of the phone base.

5

Directories button

Provides access to phone directories.

6

Question "?" button

Not in use.

7

Settings button

Provides access to phone settings such as display contrast and ring type.

8

Speaker button

Toggles the speaker on and off.

9

Mute button

Toggles mute on and off.

10

Headset button

Toggles the headset on and off.

11

Volume button

Increases or decreases handset, headset, ringer, or speakerphone volume.

12

Services button

Provides access to phone services.

13

Messages button

Provides access to a message system.

14

Navigation button

Scrolls through text and selects features that are displayed on the LCD screen.

15

Keypad

Functions like a traditional telephone keypad.

16

Soft keys

Engage the functions displayed on the corresponding LCD tabs.

17

Handset with indicator light

Functions like a traditional handset.


Soft Key Legend

Your Cisco Unified IP phone is equipped with soft keys that point to feature options displayed along the bottom of the LCD screen. Soft keys change according to the state of the phone.

The following is a comprehensive list of soft keys offered on the Cisco Unified IP Phone 7940G/7960G. Functionality will vary according to your system configuration.

Soft Key
Function

<< or >>

Navigates to edit characters. Use the backspace soft key to erase digits that were entered incorrectly.

Acct

Consult your administrator on the use of this soft key.

Answer

Answers an incoming call.

Callback

Notifies callers that the called line is free.

Cancel

Cancels the last selection.

CFwdALL

Forwards all calls.

Clear

Clears directory history.

Confrn

Connects callers to a conference call.

Delete

Deletes selected number.

Dial

Dials the displayed number.

DND

Enables the Do-Not-Disturb feature.

Down

Decreases the LCD screen contrast.

EditDial

Selects a number and activates the cursor for editing.

EndCall

Ends the current call.

Exit

Exits from current selection.

Flash

Provides hookflash functionality for three-way calling and call waiting services provided by the PSTN or Centrex service.

GPickUp

Selectively picks up calls coming into a phone number that is a member of a pickup group.

Hold

Places an active call on hold. Resumes a held call.

Login

Provides PIN-controlled access to restricted phone features. Contact your local administrator for additional instructions.

more

Scrolls through additional soft key options (for example, use the more soft key to locate the DND soft key).

NewCall

Opens a new line on the speakerphone to place a call.

Ok

Confirms the selection.

Park

Forwards calls to a location from which the call can be retrieved by anyone in the system.

PickUp

Selectively picks up calls coming into another extension.

Play

Plays the ring sound sample.

Redial

Redials the last number dialed.

Resume

Returns to an active call.

Save

Saves the last change.

Search

Initiates a search in the local directory.

Select

Selects the highlighted option.

Trnsfer

Transfers active calls to another extension.

Up

Increases the LCD screen contrast.


Operating Your Cisco Unified IP Phone

Place a Call

Use one of the following methods to place a call:

Lift the handset and dial the number.

Dial the number, and then lift the handset.

Dial the number, and then press the Dial soft key.

Press the line button for your extension, and then dial.

Press the Speaker button, and then dial.

Press the New Call soft key, and then dial.

If you are using a headset, press the Headset button, and then dial.

Dial the number, and then press the Headset button.

If you have established speed-dial numbers, press a speed-dial button.

If you have selected a number from a directory, press the Dial soft key.

Use the backspace (<<) soft key to erase digits that were entered incorrectly.

Answer a Call

Use one of the following methods to answer a call:

Lift the handset.

If you are using a headset, press the Headset button. If necessary, press the line button to select between incoming call.

To use the speakerphone, press the Answer soft key or the Speaker button.

End a Call

Use one of the following methods to end a call:

Hang up the handset.

If you are using a headset, press the Headset button or the EndCall soft key.

If you are using the speakerphone, press the Speaker button or the EndCall soft key.

Redial a Number

Use one of the following methods to redial the most recently dialed number:

Lift the handset and press the Redial soft key.

Press the Redial soft key to dial using the speakerphone.

Hold a Call

To place a call on hold while on the call:

Press the Hold soft key.

To retrieve a held call:

Press the Resume soft key.

If multiple calls are on hold, use the Navigation button to select the desired call before you press Resume.

If multiple calls on multiple lines are on hold, press the line button for the line that you want to pick up. The active call on the other line will automatically be put on hold.


Note Because the hold feature can generate music or a beeping tone, avoid using hold when dialed into a remote conference system. Simple three-party conferences that are created locally on your phone can safely be placed on hold without introducing music or beeps into the conference.


Mute a Call

To mute a call:

While on a call, press the Mute button. The Mute button lights, indicating that the other party cannot hear you.

To deactivate the mute function, do one of the following:

Press the Mute button again.

Lift the handset if you are using mute along with speakerphone.


Note The Mute feature does not generate music or a beeping tone.


Manage Call Waiting

If you are on a call when a second call comes in, you will hear a call-waiting tone or see a flashing indicator light on the handset rest, depending on the configuration of your phone.

To answer the new call on the same line:

1. Use the Navigation button to select the call

2. Press the Answer soft key to answer the call. The call on the other line will automatically be put on hold.

To return to the original call:

1. Use the Navigation button to reselect the call.

2. Press the Resume soft key to reconnect to the call.

For calls on a separate line:

Press the Line button for the incoming call. The call on the other line will automatically be put on hold.

To return to the original call:

Press the Line button associated with the original call.

Retrieve Voice-Mail Messages

To access voice messages, perform the following steps:

1. Select an available Cisco Unified IP phone line by lifting the handset, by pressing the speakerphone button, or by pressing a line button. Listen for the dial tone.

2. Press the Messages button, and follow the voice instructions.


Note When you have one or more new messages, the message-waiting indicator (MWI) light on your handset is lit if you have MWI configured.


Setting and Adjusting Your Cisco Unified IP Phone

Adjust the Volume for the Current Call

To adjust the handset, speakerphone, or headset volume for the current call, perform the following steps:

1. During a call, press the Up or Down Volume button.

2. Press the Save soft key to apply the new volume level to future calls.

Adjust the Ring Volume

Press the Up or Down Volume button while the handset is in its cradle.

Select the Ring Type

To change the ringer sound, perform the following steps:

1. Press the Settings button.

2. Press 2 for Ring Type, or use the Navigation button to scroll to Ring Type and press the Select soft key.

3. Use the Navigation button to scroll through the list of ring types. Press the Play soft key to hear samples.

4. Highlight the ring you want, and then press the Select soft key.

5. Press the Ok soft key to select your setting.

6. Press the Save soft key to save the setting, or press Cancel to exit to the previous menu without changing the setting.

7. Press the Exit soft key to return to the main directory menu.

Adjust the Display Contrast

To adjust the contrast in your LCD Display, perform the following steps:

1. Press the Settings button.

2. Press 1 for Contrast, or use the Select soft key.

3. Use the Down or Up soft key to change the contrast.

4. Press the Ok soft key

5. Press the Save or Exit soft key.

6. Press the Ok soft key to select your contrast setting.

7. Press the Save soft key to save the setting, or press Cancel to exit to the previous menu without changing the setting.

8. Press the Exit soft key to return to the main directory menu.

Using Cisco CallManager Express 3.2 and Later Features

Divert Incoming Calls

To forward any incoming call to the call-forward destination set on the Cisco Unified IP phone:

Press the DND soft key.


Note If the call-forward destination is not set, pressing the DND soft key will disable the ringer.


Park a Call

Call park allows a phone user to place a call on hold at a designated parking spot from which the call can be retrieved by anyone on the system. To park a call:

Press the Park soft key

The Cisco Unified CallManager Express system will automatically select an available call part slot and display the number on the Cisco Unified IP phone screen.

To park a call to a specific call part slot:

Press the transfer button followed by the call part slot number provided by your local administrator.

To retrieve a parked call, use one of the following methods:

If your phone receives a call park notification, press the PickUp soft key followed by the asterisk (*).

Press the PickUp soft key followed by the call part slot number.


Note Contact your local administrator for your call part slot number.


Call-Blocking (Toll Bar) Override

Call blocking prevents unauthorized use of phones. It is implemented by matching a pattern of specified digits during a specified time of day and day of week or date. The call-blocking override feature allows individual phone users to override the call blocking that has been defined.

To place calls when call-blocking is enabled, perform the following steps:

1. Press the Login soft key on the Cisco Unified IP phone.

2. Enter the PIN that is associated with the phone.


Note Contact your local system administrator for your personal identification number (PIN).


Transfer a Call

Transfer a selected call to another number in one of two ways:

Blind transfer—Immediately redirects the call without allowing you to speak to the transfer recipient (the person to whom you are transferring the call).

Consult transfer—Redirects the call after first allowing you to speak to the transfer recipient.

To transfer a call, perform the following steps:

1. During a call, press the Trnsfer soft key. The call is placed on hold.

2. Dial the number to which you want to transfer the call.

3. To make a blind transfer:

Hang up the handset or press the Trnsfer soft key once you hear the line ringing.

To make a consult transfer:

Wait for the call to be answered. Speak to the transfer recipient. Then press the Trnsfer button or hang up the handset.

If the transfer fails, press the Resume soft key to return to the original call.

To cancel your consult call-transfer attempt:

Press the EndCall soft key.

To reconnect to the original caller:

Press the Resume soft key.

Forward All Calls

To forward all incoming calls to another number, perform the following steps:

1. Press the CFwdALL soft key. You will hear a confirmation beep.

2. Dial the number to which you want to forward all your calls. Dial the number exactly as you would if you were placing a call to that number. Remember to include locally required prefix numbers.

The phone display will be updated to show that calls are to be forwarded.

3. Press the pound key (#) or the EndCall soft key.


Note To forward calls to voice mail, manually enter the voice-mail number, or use the soft key and button sequence of CFwdALL soft key plus the Messages button, followed by the EndCall soft key.

To forward calls to a speed-dial number, use the soft key and button sequence of the CFwdALL soft key plus a speed-dial button, followed by the EndCall soft key.


To cancel call forwarding, use one of the following methods:

Hang up the handset.

Press the CFwdALL soft key.

Pick Up Calls

To pick up a call that is on hold or a call that is ringing at another extension, perform the following steps:

1. Press the PickUp soft key.

2. Dial the extension number of the Cisco Unified IP phone that you want to pick up. Control of the call will be transferred to your phone.

To selectively pick up a call coming in to a number that belongs to a pickup group, use one of the following methods:

Press the GPickUp soft key. If there is only one pickup group defined in the entire Cisco Unified CallManager Express system, control of the call will be transferred to your phone.

If the ringing telephone and your phone are in the same pickup group, press the asterisk (*) to transfer control of the call to your phone.

If the ringing telephone and your phone are in different pickup groups, dial the pickup group number where the phone is ringing to transfer control of the call to your phone.

Place a Conference Call

To place a three-party conference call, perform the following steps:

1. During a call, press the More soft key and then the Confrn soft key to open a new line and put the first party on hold.

2. Place a call to another number.

3. When the call connects, press Confrn again to add the new party to the call.

To establish a conference call between second- and third-party calls to a Cisco Unified IP phone, one active and the other on hold:

Press the Confrn soft key on the Cisco Unified IP phone.

To establish a conference call between second- and third-party calls already present on a Cisco Unified IP phone, using separate line buttons, one active and the other on hold, perform the following steps:

1. Press the Confrn soft key on the Cisco Unified IP phone.

2. Press the Line button of the call you want to add to the three-party conference.

End a Conference Call

To end the conference call hang up the handset, or press the EndCall soft key.


Note Once the conference call initiator disconnects, the conference call is terminated.


Alternate Methods to End a Conference Call

Call initiators may use one of the following methods (Functionality will vary according to your system configuration.):

To end the conference but remain connected to the most recent call, press the Confrn soft key. The older call is placed on hold.

To disconnect from the conference, hang up the handset. The other parties will remain on the conference call.

Place a Call from Your Local Directory

To access the local phone directory established by the system administrator, perform the following steps:

1. Press the Directories button.

2. Press the Navigation Up or Down button or press 4 to select the Local Directory.

3. Press the Navigation Up or Down button to select the Last, First, or Number field search option.

4. Using the keypad, enter the last name or first name for the entry.

When entering letters, select the appropriate number key of the letter you want, and press that key a number of times that equals the position of the target letter. For example, to enter a B, press the 2 key two times, and to enter a C, press the 2 key three times. Use the backspace (<<) soft key to make corrections while entering data.

5. Press the Search soft key to find your selection.

6. If your search results in multiple listings, use the Navigation Up or Down button to select the correct number.

7. Press the Dial soft key to dial the selected number.

Program Personal Speed-Dial Buttons

Once an administrator has defined one or more speed-dial instances for a Cisco Unified IP phone, you can reprogram numbers that are not locked or program numbers into an instance that has an empty dial string by following these steps:

1. Select an available phone line by lifting the handset, by pressing the NewCall soft key, or by pressing a line button. Listen for the dial tone.

2. Press the pound key (#).

3. Press the speed-dial button that you want to program. A short beep confirms that you are starting to program this button.

4. Enter the speed-dial number. The digits will appear on the phone display. When you are entering speed-dial numbers on a Cisco Unified IP Phone 7960G, use the backspace (<<) soft key to erase digits that were entered incorrectly.

To remove a speed-dial number without replacing it with a new one, press the pound key (#).

5. Press the same speed-dial button a second time to indicate that you have finished entering the speed-dial digits and to store the new speed-dial number.

6. Hang up the handset, or press a new speed-dial button and repeat the process.

Place a Call from Your System Speed-Dial Directory

To place a call from your system speed-dial directory, perform the following steps:

1. Select an available IP phone line (off hook or NewCall) and get a dial tone.

2. Press the Directories button, or use the Navigation button to locate Directory and then press the Select soft key.

3. Use the Navigation button to scroll through the options. Use the Select soft key to select speed-dial options.

Press 5 for the Local Speed Dial.

Press 6 for the Personal Speed Dial. (Functionality will vary depending on your system configuration.)

4. Use the Navigation button to scroll through the speed-dial phone list.

5. To dial the selected phone number, press the Select soft key, or enter the entry number on the keypad.

6. Press the Exit soft key to return to the previous directory menu.

View Call History

To view recent missed, received, or placed calls, perform the following steps:

1. Press the Directories button.

2. Use the Navigation button to scroll and select the desired call list. Press the Select soft key, or

Press 1 on the keypad for Missed Calls.

Press 2 on the keypad for Received Calls.

Press 3 on the keypad for Placed Calls.

3. Press the Exit soft key to return to the previous directory menu.

Place a Call from Call History

To place a call to a number in the call history list, perform the following steps:

1. Use the Navigation button to scroll through the call history list.

2. Use the Select soft key to select a phone number. The digits will appear on the phone display.

3. To dial the number as it appears on the phone display:

Press the Dial soft key.

To edit the number on the phone display before dialing:

1. Press the EditDial soft key to place the cursor at the beginning of the number on the phone display.

2. Use the keypad to edit the digits as needed. Use the backspace (<<) soft key to erase digits that were entered incorrectly.

3. Press the Dial soft key to place the call.

Clear Call History

To clear all numbers in the directory histories

Press the Clear soft key.


Note The Clear soft key clears all call history lists. Selective clearing of call history lists is not supported.


Use Audio Paging

Audio paging provides a one-way voice path to the phones that have been designated to receive paging. It does not have a press-to-answer option like the intercom feature.

To use the paging function for paging a group, perform the following steps:

1. Select an available phone line by lifting the handset. Listen for the dial tone.

2. Dial the designated paging group number.

Each idle IP phone that has been configured with the paging number answers automatically in speakerphone mode, and the phone displays the caller ID.

3. When you finish speaking your message and hang up, the phones are returned to their idle states.

Use the Intercom Feature

Cisco Unified CallManager Express supports intercom functionality for one-way and press-to-answer voice connections using a dedicated pair of intercoms on two phones that speed-dial each other.

To use the intercom feature, perform the following steps:

1. Press the Menu button.

2. Use the Navigation button to select Directories.

3. Use the Navigation button to select Speed Dial.

4. Select intercom Speed Dial.

The called IP phone automatically answers the call in speakerphone mode with mute activated. A beep sounds to alert the recipient to the incoming call.

To respond to an intercom call:

Press the Mute button, or lift the handset.

Activate Do Not Disturb (DND)

For visual call alerting and information without audible ringing, use DND. Calls receive normal call-forward-busy and no-answer treatment.

To activate the Do-Not-Disturb feature, perform the following steps:

1. Press the more soft key to locate the DND soft key.

2. Press the DND soft key. A display text message will indicate that the phone is in Do-Not-Disturb mode.


Note Pressing the DND soft key immediately forwards the call to the call-forward destination set on the phone. If the call-forward destination is not set, pressing the DND soft key will disable the ringer.


To deactivate the Do-Not-Disturb feature, repeat Steps 1 and 2.

8 Cisco CallManager Express Functionality, by Cisco Unified IP Phone Model Number

Table 1 provides a quick reference table of the Cisco CallManager Express 3.2 and later functionality by model number to the corresponding page reference.

Table 1 Cisco CallManager Express Functionality, by Cisco Unified IP Phone Model Number 

Section
7902
7905/7912
7910
7914
7931
7935/7936
7940/7960
Activate Do Not Disturb (DND)

15

50

50

Add an Entry to the Personal Phone Book

29

Adjust the Call Volume

19

45

Adjust the Display Contrast

10

19

23

45

27

45

Adjust the Ring Volume

4

10

19

45

45

Adjust the Speaker Volume

19

45

Adjust the Volume for the Current Call

4

10

18

45

27

45

Answer a Call

3

8

17

43

26

43

Busy Monitored Line

35

Call-Blocking (Toll Bar) Override

11

46

46

Clear Call History

14

49

49

Directory Transfer

35

Divert Incoming Calls

10

46

46

Edit an Entry in the Personal Phone Book

29

End a Call

3

8

17

44

26

44

End a Conference Call

5

12

21

48

28

48

Forward All Calls

5

12

20

47

47

Hold a Call

3

9

18

44

26

44

I-Hold

35

Manage Call Waiting

4

9

18

44

44

Mute a Call

9

18

44

27

44

Obtain Dial Tone and Place a Call

32

Park a Call

11

46

46

Perform Basic Call Functions

23

Pick Up Calls

12

47

47

Place a Call

3

8

17

32

26

43

Place a Call from Call History

14

49

49

Place a Call from Your Local Directory

13

48

29

48

Place a Call from Your System Speed-Dial Directory

13

49

49

Place a Conference Call

5

12

20

48

28

48

Program Personal Speed-Dial Buttons

13

23

48

48

Redial a Number

3

8

18

44

26

44

Retrieve Voice-Mail Messages

4

9

18

45

45

Select the Ring Type

10

19

45

45

Transfer a Call

4

11

20

23

46

27

46

Use Audio Paging

5

15

21

50

28

50

Use the Intercom Feature

50

50

Use the Navigation Pad and Select Button

34

Use the Personal Phone Book

29

View Call History

14

50

49


hometocprevnextglossaryfeedbacksearchhelp

Posted: Fri Oct 6 09:42:54 PDT 2006
All contents are Copyright © 1992--2006 Cisco Systems, Inc. All rights reserved.
Important Notices and Privacy Statement.