|
|

| Gather Information |
Gather and record the information specified in this section prior to configuring the Cisco AccessPath-VS3 Packet Telephony Concentrator. Having this information readily available before you begin will expedite the configuration process.
1. Configuration Identification
Example: Cisco. This uniquely identifies the group of AccessPath-VS3 sites you are configuring for Voice over IP (VoIP). 
2. Site Identification
Example: sanjose. This identifies the specific AccessPath-VS3 stack you are configuring. It is used as a prefix appended to each host name in the stack (for example: sanjoseas01). Your configuration files will reside (for 24 hours) in a directory on the web server named after your Configuration-ID in a subdirectory named after the site identification prefix.
3. (Optional) Global Dialplan File
If this is the first of several sites, you need not enter anything. If you have already configured a site or sites, include their dial plan information. Provide the full path for the "global-dialplan" file that should be uploaded and incorporated into the new site's configuration. 
1. Number of VoIP Access Shelves
Refers to the number of VoIP-enabled Cisco AS5300s in the stack. There can be between 1 and 21 VoIP access shelves in a given stack. 
2. Number of Router Shelves
The number of Cisco 7206 Router Shelves in the stack.
| 1 (default) |
| 2 (needed if number of gatekeepers+gateways>11) |
3. Number of Integrated Gatekeepers
If there is another Cisco 3640 Gatekeeper elsewhere in the zone, you may use it for the stack, provided you have the name and IP address for the external gatekeeper, and configure it separately.
| 0 (indicates an external gatekeeper) |
| 1 (indicates a single gatekeeper) |
| 2 (default—indicates two redundant gatekeepers, with no interconnect redundancy) |
4. (Optional) External Gatekeeper Name
Enter the name of the external gatekeeper shelf (if used).
5. (Optional) External Gatekeeper IP Address
Enter the IP address for the external gatekeeper shelf (if used).
| Gather Information (continued) |
6. PRI Density
Select the PRI density for each Cisco AS5300 access server in the system.
| 4 PRI | 2 PRI |
| 4 PRI | 2 PRI |
1 | | | 12 | | |
2 | | | 13 | | |
3 | | | 14 | | |
4 | | | 15 | | |
5 | | | 16 | | |
6 | | | 17 | | |
7 | | | 18 | | |
8 | | | 19 | | |
9 | | | 20 | | |
10 | | | 21 | | |
11 | | |
|
|
|
1. Local Telephone Prefixes
Example:
408.......
415*
These are the telephone area codes or exchanges local to the stack. They allow wildcard expressions where a period (.) represents any single digit, and an asterisk (*) represents any number of digits. Enter each prefix on a new line. For each prefix entered, one dial peer will be created for each voice port. All gateways will be configured identically. 


2. CODEC Type
Specify the voice digitization CODEC, which must be the same for all VoIP network sites:
| g729r8 8 kbps (default) |
| g711alaw 64 kbps with a-law |
| g711ulaw 64 kbps with u-law |
| g723.1 5.3 kbps |
| g723.1 6.3 kbps |
| g726 16 kbps |
| g726 24 kbps |
| g726 32 kbps |
| g728 16 kbps |
| g729ANNEX-A 8kbps |
| GSMFR 13.2 kbps |
3. Voice Activity Detection (VAD)
Enabling VAD increases network efficiency by implementing silence supression.
| Enable (default) |
| Disable |
4. Domain Name of Zone
This is the domain name used for the gatekeeper zone.
Example: Cisco.com 
| Gather Information (continued) |
1. Trunk Type
Select the trunk type used.
| T1 PRI |
| E1 PRI |
| Channelized T1 (CT1) |
| E1 R2 |
2. Framing
For T1, select SF or ESF.
For E1, select CRC4 or no CRC4.
| SF |
| ESF (default) |
| CRC4 |
| no CRC4 |
3. Line Coding
For T1, select B8ZS or AMI.
For E1, select HDB3 or AMI.
| AMI |
| B8ZS (default) |
| HDB3 |
4. ISDN Switch Type
For T1 or E1 PRI, select the ISDN switch type used.
| AT&T 5ess (default) |
| AT&T 4ess |
| NorTel DMS100 |
| NET5 (Europe) |
| NTT (Japan) |
| TS014 (Australia) |
| National ISDN |
5. (For CT1 only) CT1 Signaling Options
Choose the appropriate Channelized T1 signaling type for the incoming lines.
| Foreign Exchange Station—Loop Start (default) |
| Foreign Exchange Station—Ground Start |
| E&M Feature Group B DTMF |
| E&M Feature Group B DTMF DNIS |
| E&M Feature Group B MF |
| E&M Feature Group B MF DNIS |
| E&M Feature Group D DTMF |
| E&M Feature Group D DTMF DNIS |
| E&M Feature Group D MF |
| E&M Feature Group D MF DNIS |
| E&M Immediate Start |
| Specific Attach Station—Ground Start |
| Specific Attach Station—Loop Start |
| Gather Information (continued) |
6. (For E1 R2 only) E1 R2 Signaling Options
Choose the appropriate E1 R2 signaling type for the incoming lines.
| Foreign Exchange Station—Loop Start (default) |
| Foreign Exchange Station—Ground Start |
| E&M Feature Group B DTMF |
| E&M Feature Group B DTMF DNIS |
| E&M Feature Group B MF |
| E&M Feature Group B MF DNIS |
| E&M Feature Group D DTMF |
| E&M Feature Group D DTMF DNIS |
| E&M Feature Group D MF |
| E&M Feature Group D MF ANI-DNIS |
| E&M Immediate Start |
| P7 Switch |
| R2 ITU Q411- R2 analog DTMF |
| R2 ITU Q411- R2 analog compelled ANI |
| R2 ITU Q411- R2 analog non-compelled ANI |
| R2 ITU Q411- R2 analog semi-compelled ANI |
| R2 ITU Q411- R2 digital DTMF |
| R2 ITU Q411- R2 digital compelled ANI |
| R2 ITU Q411- R2 digital non-compelled ANI |
| R2 ITU Q411- R2 digital semi-compelled ANI |
| R2 ITU Supplement 7—Pulse DTMF |
| R2 ITU Supplement 7—Compelled ANI |
| R2 ITU Supplement 7—Non-compelled ANI |
| R2 ITU Supplement 7—Semi-compelled ANI |
| Specific Attach Station—Loop Start |
| Specific Attach Station—Ground Start |
7. (For E1 R2 only) Custom E1 R2 Country
For R2 CAS-custom country options, select the appropriate country. If no country is selected, ITU defaults are assumed.
| ITU (default) |
| Argentina |
| Australia |
| Brazil |
| China |
| Colombia |
| Costa Rica |
| East Europe |
| Ecuador ITU |
| Ecuador LME |
| Greece |
| Guatemala |
| Hong Kong (China variant) |
| Indonesia |
| Israel |
| Korea |
| Malaysia |
| New Zealand |
| Paraguay |
| Peru |
| Phillipines |
| Saudi Arabia |
| Singapore |
| South Africa - Panaftel |
| Telemex - Mexico |
| Telnor - Norway |
| Thailand |
| Uruguay |
| Venezuela |
| Vietnam |
| Gather Information (continued) |
8. PCM Encoding
Define the CPTONE code to set up the country- specific PCM encoding and tones. The PCM encoding type must match the custom country code for E1 R2.
| United States |
| Argentina |
| Australia |
| Austria |
| Belgium |
| Brazil |
| Canada |
| China |
| Colombia |
| Czech Republic |
| Denmark |
| Finland |
| France |
| Germany |
| Greece |
| Hong Kong |
| Hungary |
| Iceland |
| India |
| Indonesia |
| Ireland |
| Israel |
| Italy |
| Japan |
| Korea Republic |
| Luxembourg |
| Malaysia |
| Mexico |
| Netherlands |
| New Zealand |
| Norway |
| Peru |
| Phillipines |
| Poland |
| Portugal |
| Russian Federation |
| Singapore |
| Slovakia |
| Slovenia |
| South Africa |
| Spain |
| Sweden |
| Switzerland |
| Taiwan |
| Thailand |
| Turkey |
| Great Britain |
| Venezuela |
1. Voice Quality of Service
Specify the quality of service to use for VoIP transmission.The selection should be globally consistent with the voice QOS selected at other AccessPath-VS3 sites.
| Default |
| RSVP—resource resvervation protocol |
| WFQ—weighted fair queueing with IP precedence |
2. Open Shortest Path First (OSPF) Process ID
This should be a number from 1 to 65535 and is only locally significant. 
3. OSPF Area Number
This should be a number from 0 to 100000. It is globally significant if your backhaul is also running OSPF.
| Gather Information (continued) |
4. Primary Interfaces IP Addressses
Internally, the AccessPath-VS3 uses Variable Length Subnet Masking (VLSM). Enter the four octets of the 26-bit subnet. Enter the network IP address to use for the primary (Fast Ethernet and Loopback) interfaces in the stack. Although this subnet can be of any size greater than 26-bit, enter it as a 26-bit mask. The fourth octet must be 0, 64, 128, or 192.
5. Secondary Interfaces IP Addresses
Enter the four octets of the 26-bit subnet for the secondary (Ethernet and Loopback) interfaces.
6. (Optional) Default Route
Used to configure a default next hop from the router shelf.
1. SNMP Access
Enable or disable SNMP access and trap logging. If SNMP is disabled, all other options in this section are unnecessary.
| Access Disabled (default) |
| Access Enabled |
2. (Optional) SNMP Server IP Address
Enter the management workstation IP Address in dotted decimal notation. 
3. (Optional) Location
Name the physical location of the stack (no spaces allowed).
4. (Optional) Contact Name
Name the person responsible for the stack (no spaces allowed). Example: sanjose
5. (Optional) Read Only Community String1
A "password" allowing SNMP read only access.
6. (Optional) Write Community String
A "password" allowing SNMP write access.
7. (Optional) Read/Write/All Community String
A "password" allowing all SNMP access. This is only used in the Catalyst 5002 Switch.
| Gather Information (continued) |
1. Message Logging
Enable or disable logging of system error messages to a UNIX-based syslog server. If logging is disabled, all other options are unnecessary.
| Logging Disabled (default) |
| Logging Enabled |
2. (Optional) Syslog Server IP
Specify the IP address of the log server.
3. (Optional) Log Level
Messages at or below the chosen level will be sent to the syslog server.
| Debugging messages (7) |
| Informational messages only (6) (default) |
| Normal but significant condition (5) |
| Warning conditions (4) |
| Error conditions (3) |
| Critical conditions (2) |
| Immediate action needed(1) |
| System unusable (0) |
4. (Optional) Log Facility
Configure the syslog facility in which error messages are sent. The syslog server will send error messages to different files based on the message class and /etc/syslog.conf file. The message class is based on Log Level and Log Facility.
| Authorization system |
| Chron/at facility |
| System daemons |
| Kernel |
| Local Use 0 |
| Local Use 1 |
| Local Use 2 |
| Local Use 3 |
| Local Use 4 |
| Local Use 5 |
| Local Use 7 (default) |
| Line Printer system |
| Mail System |
| Usenet news |
| System Use 9 |
| System Use 10 |
| System Use 11 |
| System Use 12 |
| System Use 13 |
| System Use 14 |
| Syslog |
| User Process |
| UNIX-to-UNIX copy system |
| Gather Information (continued) |
1. Gateway Accounting
Specify the accounting method used by the VoIP access server shelves.
| none |
| RADIUS (security server is mandatory) |
| Syslog (logging is mandatory) |
2. Interactive Voice Response (IVR) The AccessPath-VS3 will support IVR, but IVR requires additional configuration of the AAA server (please refer to the documentation of your AAA server). Audio files also have to be loaded into the Flash memory of the VoIP access shelves in the stack.
| Enable (security server is mandatory) |
| Disable (default) |
3. IVR Script
Determines how users are granted access to the VoIP network (if IVR is enabled).
| ANI/DNIS—Calls authenticated based on ANI and DNIS information only. |
| ANI/NULL—Same as ANI/DNIS, but uses a NULL access password rather than DNIS. |
| ANI/DNIS with ACCOUNT# /PIN—Calls authenticated based on collected ANI and DNIS. If authentication fails, collects the account and password. |
| ANI/NULL with ACCOUNT# /PIN—Same as ANI/DNIS with ACCOUNT# /PIN, but uses a NULL password (does not use DNIS, or collect it). |
4. Security Server Used
Only the RADIUS security server is supported for the AccessPath-VS3.
| none |
| RADIUS |
5. (Optional) Primary AAA Server IP
Enter the IP address for the primary AAA server (if used).
6. (Optional) Secondary AAA Server IP
Enter the IP address for the secondary AAA server (if used).
7. (Optional) Separate Accounting Server
Advanced feature for RADIUS to include one server for Accounting only. Enabling this will force the other AAA servers (configured above) to be used only for Authentication and Authorization.
| Yes |
| No |
8. (Optional) Separate Accounting Server IP
Enter the IP address of the separate accounting server (if used).
9. AAA Server Key
Enter the AAA server key—a "password" needed for access.
| Gather Information (continued) |
1. (Optional) Primary NTP Server IP
Enter the IP address for the primary Network Time Protocol (NTP) server the stack will use.
2. (Optional) Secondary NTP Server
Enter the IP address for the secondary NTP server the stack will use.
3. (Optional) Domain Name Servers
Enter the IP addresses of up to 6 domain name servers for the stack to use.


4. (Optional) Time Zone
Select the Time Zone and the Offset from GMT.
| No Time Zone configured |
| GMT-- U.K., Ireland (+0) |
| UTC -- Iceland, Portugal, West Africa (+0) |
| Middle Europe Time (Spain - Poland) (+1) |
| Mitteleuropaeische Zeit (+1) |
| UTC +1 (+1) |
| Eastern Europe (Athens, Helsinki, Istanbul, Kiev) (+2) |
| Israel (+2) |
| UTC +2 (+2) |
| South Africa (+2) |
| Russia (Moscow) (+3) |
| UTC +3 (Mecca) (+3) |
| UTC +4 (+4) |
| UTC +5 (Pakistan) (+5) |
| India (+5:30) |
| UTC +6 (+6) |
| UTC +7 (Bangkok, Jakarta, Hanoi, Kuala Lumpur) (+7) |
| UTC +8 (Singapore, Manila) (+8) |
| China (Beijing, Hong Kong, Taipei) (+8) |
| Western Australia (+8) |
| Japan (+9) |
| Korea (+9) |
| UTC +9 (+9) |
| Central Australia (+9:30) |
| Eastern Australia (+10) |
| UTC +10 (+10) |
| UTC +11 (+11) |
| New Zealand (+12) |
| UTC +13 (+13) |
| Dateline (-12) |
| Samoa (-11) |
| Hawaii (-10) |
| Alaska (-9) |
| Yukon (-9) |
| Pacific Time (US & Canada), Tijuana (-8) |
| Mountain Time (US & Canada), Mazatlan (-7) |
| Central Time (US & Canada) (-6) |
| UTC -6 (Mexico, Costa Rica) (-6) |
| Eastern Time (US & Canada) (-5) |
| UTC -5 (Columbia, Jamaica, Peru) (-5) |
| Atlantic Time (Canada) (-4) |
| UTC - 4 (Chile, Venezuela) (-4) |
| Newfoundland (-3:30) |
| UTC -3 (Eastern Brazil, Argentina)(-3) |
| UTC -2 (-2) |
| UTC -1 (-1) |
5.
| Gather Information (continued) |
6. (Optional) Daylight Savings
Select the daylight savings zone for the stack's location.
| No Summer Daylight Savings Time Configured |
| British Summer Time |
| Irish Summer Time |
| Middle Europe Summer Time |
| Mitteleuropaeische Sommerzeit |
| Israel Daylight time |
| Central Daylight Time (Australia) |
| Eastern Daylight Time (Australia) |
| New Zealand Daylight time |
| Alaska Daylight Time |
| Pacific Daylight Time |
| Mountain Daylight Time |
| Central Daylight Time (US) |
| Eastern Daylight Time (US) |
| Atlantic Daylight Time |
| Chile Daylight Time |
| UTC+DST (Eurasia: March - October) |
| UTC+DST (Brazil: October- February) |
These are the preselected passwords. You will need to edit the passwords in the configuration files before you load them on the stack shelves to properly secure the stack.
1. (Optional) Cisco IOS Enable Password
| cisco1 |
2. (Optional) Cisco IOS Enable Secret Password
| secret123 |
3. (Optional) Cisco IOS Line Password
(Only used in the System Controller configuration.)
| cisco2 |
If you choose, you can create a custom template for any stack shelf, and use the Configurator to input data into these custom templates. You should first view the default templates, download a tar file of all the default templates, or have the default templates emailed to you.
1. Customized Cisco 7206 Router Template
Specify the customized Cisco 7206 backhaul router template that should be uploaded and used to generate the configurations. 
2. Customized VoIP Access Shelf Template (PRI)
Specify the customized VoIP access shelf (PRI) template that should be uploaded and used to generate the configurations. 
3. Customized VoIP Access Shelf Template (Channelized)
Specify the customized VoIP access shelf (Channelized) template that should be uploaded and used to generate the configurations. 
| Gather Information (continued) |
4. Customized Cisco 3640 Gatekeeper Template
Specify the customized Cisco 3640 gatekeeper template that should be uploaded and used to generate the configurations. 
5. Customized 3640 System Controller Template
Specify the customized Cisco 3640 system controller template that should be uploaded and used to generate the configurations. 
6. Customized Catalyst 5002 Switch Template
Specify the customized Catalyst 5002 switch template that should be uploaded and used to generate the configurations. 
| Create Configuration Files |
The AccessPath-VS3 is shipped with a standard software configuration. Using the information gathered in Section 1 and the AccessPath-VS3 Configurator, create configuration files to apply to your stack.
The Configurator is a Web-based application that creates text files you will later download into your AccessPath-VS3 stack shelves. To use it, you will need a Web browser that supports javascript (Netscape Navigator or Microsoft Internet Explorer are ideal).
http://www.cisco.com/support/toolkit/Accesspath
to use the VS3 Configurator.
 | TimeSaver The navigation toolbar along the left side of the browser screen shows empty check boxes next to configuration screens that have not yet been used, green check marks next to screens that have been validated and accepted as part of the configuration, and red X marks for screens that have been submitted but found to have missing or unusable input. |
Step 2 Enter the Site Information.
Step 3 Enter the General Stack Information.
Step 4 Enter the Dial Plan Information.
Step 5 Enter the Trunking Information.
Step 6 Enter the Routing Information.
Step 7 Enter the SNMP Information.
Step 8 Enter the Logging Information.
Step 9 Enter the AAA Information.
Step 10 Enter the Miscellaneous Information.
Step 11 Enter the Password Information.
After the information has been submitted and verified, the Configurator generates a configuration file for each shelf in the stack, and a Web page that links to ways to download these files. Configurator also generates a global dial plan needed for future sites, in addition to updated dial plan files for previously configured sites in the VoIP network.
The Configurator provides three ways to get the configuration files:
Modify the configuration files before loading them onto the stack shelves. Open each configuration file and look for lines like the following (default items you should change are shown in bold):
enable password cisco1

enable secret secret123


line vty 0 31
 password cisco2
| Connect to the AccessPath-VS3 |
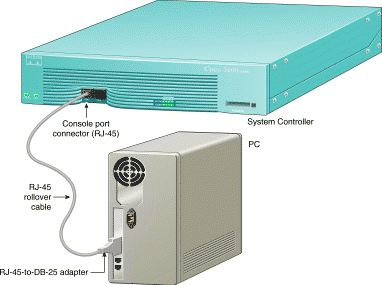
You must establish direct terminal connection to the AccessPath-VS3 to download your new configuration files. Terminal connnection to the AccessPath-VS3 requires the following:
The Cisco 3640 System Controller has a command-line interface (CLI) that provides console management services for each of the AccessPath-VS3 shelves. You will need to establish a direct connection to the System Controller, and from there you can connect to the other shelves in the stack via reverse Telnet.
Take the following steps to connect a local terminal (an ASCII terminal or a PC running terminal emulation software) to the console port on the System Controller:
Step 2 Configure your terminal or PC terminal emulation software for 9600 baud, 8 data bits, no parity, and 1 stop bit.
The terminal should now show the following:
cms01>
| Download Configuration Files |
You can configure stack shelves via TFTP or by copying and pasting configuration file contents to the shelf's CLI. The copy and paste method is preferable for the initial setup, while TFTP is preferable for updating a shelf's configuration.
cms01>enable

Password: secret123

cms01#
Step 2 Copy the contents of the CMS01 configuration file using your text editor, and paste them to the CLI for the System Controller.
Step 3 Enter the following command to save your configuration changes so that they will not be lost if there is a system reload or power outage. For example:
cms01# copy running-config
startup-config

Building configuration...
It might take a minute or two to save the configuration. After the configuration has been saved, the following appears:
[OK]
cms01#
cms01# show running-config
Note the loopback1 IP address for the System Controller.
Step 2 Connect to the other stack shelves in the following order:
1 Switch shelf
2 Router shelves
3 Gatekeeper shelves
4 VoIP access shelves
To connect to other stack shelves, specify the loopback 1 IP address and the port corresponding to each shelf, as shown:
cms01# telnet loopback1_Address Port
Replace loopback1_ Address with the actual loopback1 IP, and Port with the port number for the shelf. Refer to the port mappings table on the following page.
| Download Configuration Files (continued) |
| Port | Shelf | Config. File |
|---|---|---|
2001 | VoIP access shelf 1 | AS01 |
2002 | VoIP access shelf 2 | AS02 |
2003 | VoIP access shelf 3 | AS03 |
2004 | VoIP access shelf 4 | AS04 |
2005 | VoIP access shelf 5 | AS05 |
2006 | VoIP access shelf 6 | AS06 |
2007 | VoIP access shelf 7 | AS07 |
2008 | Router shelf 1 | RS01 |
2009 | Router shelf 2 | RS02 |
2010 | Not used |
|
2011 | Switch shelf | SW01 |
2012-2018 | Not used |
|
2019 | VoIP access shelf 8 | AS08 |
2020 | VoIP access shelf 9 | AS09 |
2021 | Gatekeeper shelf 2 | GK02 |
2022 | Gatekeeper shelf 1 | GK01 |
2023 | VoIP access shelf 10 | AS10 |
2024 | VoIP access shelf 11 | AS11 |
2025 | VoIP access shelf 12 | AS12 |
2026 | VoIP access shelf 13 | AS13 |
2027 | VoIP access shelf 14 | AS14 |
2028 | VoIP access shelf 15 | AS15 |
2029 | VoIP access shelf 16 | AS16 |
2030 | VoIP access shelf 17 | AS17 |
2031 | VoIP access shelf 18 | AS18 |
2032 | VoIP access shelf 19 | AS19 |
Step 3 Copy and paste the appropriate configuration file for the shelf.
Step 4 Save the configuration changes.
Step 5 Repeat this process for all stack shelves, in the proper order (see page 14), until all stack shelves are configured.
If this is the first site in your VoIP network, your configuration is now complete. If you have already configured other sites, you will need to update the dial-plan information for the other sites.This can be done by connecting to the other sites' gatekeeper(s) via telnet and copying the contents of the new dial plan to the CLI.
Should you wish to modify the configurations in more detail than permitted by the Configurator, see http://www.cisco.com/univercd/cc/TD/Doc/product/ access/ap/vs3/sw/config/.
| Download Configuration Files (continued) |
To copy a configuration file from a TFTP server to a stack shelf (the System Controller is shown in this example) while connected to that shelf:
CMS01# copy tftp startup-config
Step 2 Enter or confirm the IP address of the remote TFTP server:
Address of remote host
[255.255.255.255]? 192.168.245.2
Step 3 Specify the source filename. In this example, the UNIX filename cms01-confg is entered to copy the cms01-confg file:
Name of configuration file
[router-confg]? cms01-confg


Configure using cms01-confg from
192.168.245.2? [confirm] y

Loading cms01-confg from
192.168.245.2 (via Ethernet1/0): !
[OK - 3147/128975 bytes]
[OK]
CMS01#
%SYS-5-CONFIG_NV: Non-volatile store
configured from cms01-confg by
console
tftp from 192.168.245.2
Step 4 Review the configuration to confirm it is really what you want to load:
CMS01# show startup-config
The System Controller displays the configuration loaded from the TFTP server.
Step 5 Reload the System Controller, as follows:
CMS01# reload

Proceed with reload? [confirm] y

*Feb 28 16:00:46.507 PST:
%SYS-5-RELOAD: Reload requested
The System Controller displays the reload messages. Watch for error messages during the configuration load. The reload is done over a copy to prevent the configurations from merging. This ensures a clean reload and configuration.
Step 6 Repeat this process for all stack shelves, in the proper order (see page 14), until all stack shelves are configured.
![]()
![]()
![]()
![]()
![]()
![]()
![]()
![]()
Posted: Wed Jul 17 05:29:52 PDT 2002
All contents are Copyright © 1992--2002 Cisco Systems, Inc. All rights reserved.
Important Notices and Privacy Statement.


