|
|

Before you configure the CiscoSecure ACS for the first time, make sure you have the required settings for the configuration you want. This chapter outlines the necessary settings for the following sample configurations:
1. Dialup Using the Windows NT User Database with TACACS+
2. Dialup Using the CiscoSecure ACS User Database with TACACS+
3. Dialup Using SDI Token-Card Server with TACACS+
4. Dialup Using NDS with TACACS+
5. ../../../../../../../../home/home.htm
6. Dialup Using the CiscoSecure ACS User Database with Cisco RADIUS
7. Dialup for an ARAP Client Using the CiscoSecure ACS User Database with TACACS+
8. Router Management Using the CiscoSecure ACS User Database with TACACS+
9. PIX Firewall Authentication/Authorization Using the Windows NT User Database with TACACS+
10. VPDN Using the CiscoSecure ACS User Database with TACACS+
11. Virtual Profiles Using the CiscoSecure ACS User Database with TACACS+
Select the configuration that most closely meets your needs.
Note If you are viewing this as a link from the CiscoSecure ACS Welcome window, click Online Documentation: Sample Configurations to return to this section.
For additional information, click Online Documentation and select an item in the table of contents. You must configure four components to successfully initiate connectivity and start the CiscoSecure ACS for Windows NT services:
This is a typical configuration that can be used in a Windows NT network using only the Windows NT User Database to maintain access. This configuration is usually used in businesses with significant or strategic investment in Windows NT. This configuration makes the following possible:
This option requires significant configurations in the Windows NT server environment because it depends heavily on Windows NT management functions. Configure these items in the User Manager on your Windows NT server that is running the CiscoSecure ACS. Ensure the following:
Configure these items in the CiscoSecure ACS.
Note If the first NAS to which clients dial in was set up during the installation of the CiscoSecure ACS, all of the configurations in this section should already be complete.
Configure these items in the Network Configuration window:
Step 2 Enter the name of the NAS.
Step 3 Enter the IP address of the NAS.
Step 4 Enter the shared secret (key) of the NAS and the CiscoSecure ACS.
Step 5 Select TACACS+ (Cisco) as the security control protocol.
Step 6 If CiscoSecure ACS is configured on the NAS, select single TCP connection to configure it to use this feature.
If CiscoSecure ACS was initially installed to authenticate usernames against only the CiscoSecure ACS database, you must add a new configuration to allow it to also authenticate against the Windows NT database.
Step 2 Click Create a new configuration.
Step 3 Click Submit to accept the default name.
Step 4 Click Configure to allow the additional capability to Grant dialin permission to user. The CiscoSecure ACS verifies that dialup permission is granted for the user in the Windows NT User Database. Authentication for users without dialup permission on the Windows NT server fails, even if they use the correct password. If this feature is not desired, clear the checkbox and click Submit.
Step 5 The Unknown User Policy window controls how the CiscoSecure ACS handles usernames that are not found in the CiscoSecure ACS User Database. Configure this option to ensure that all authentications without usernames in the CiscoSecure ACS User Database are checked against the Windows NT database.
If this authentication succeeds, a record is automatically generated in the CiscoSecure ACS Database indicating to also use the Windows NT database for password authentication. User records added to the database in this way automatically become members of the selected group.
Configure these items in the Interface Configuration window:
Note When you select any PPP protocol, you must also enable PPP LCP.
Step 2 To define additional control for dial-in access, enable the applicable features by clicking Interface Configuration: Advanced Options to display the options in the user interface. You can select the various features in this section to reduce the level of complexity or enhance the granularity of your access security.
Configure these items in Group Setup for the Default Group:
Step 2 To permit or deny users to call only from a particular location, enter the applicable information in the Network Access Restrictions field. If this parameter is not displayed, enable it in the Interface Configuration: Advanced Options window.
Step 3 To control the number of simultaneous sessions allowed to a group, and to specify the number of sessions allowed to users in the groups, enter the appropriate number in the Max Sessions fields. If this parameter is not displayed, enable it in the Interface Configuration: Advanced Options window.
Note The Max Sessions count defined in the User Setup window will override the Max Sessions per user count in the Group Setup window.
Step 4 To allow the NAS to support dialup clients running IP over a PPP (async or ISDN) connection, enable PPP-IP. If this parameter does not display, configure it in the Interface Configuration: TACACS+ (Cisco) window.
Step 5 Enable IP Pool and enter the IP Pool name defined on the NAS. If the default pool is used, or if the pool name is defined at the client, leave the field blank.
Step 6 To allow the NAS to support dialup clients running IPX over a PPP (async or ISDN) connection, enable PPP-IPX. If this parameter does not display, configure it in the Interface Configuration: TACACS+ (Cisco) window.
Step 7 To allow Telnet sessions to be run by the client or to allow the CiscoSecure ACS to also be used for router management, enable Shell (Exec). If this parameter does not display, configure it in the Interface Configuration: TACACS+ (Cisco) window.
User Setup is not necessary; users who successfully authenticate against the Windows NT User Database are added to the CiscoSecure ACS User Database as members of Default Group, Windows NT Users. You can reassign them to another group later.
The Cisco IOS configuration for the NAS depends on the network protocol, routing, IP address definition, access control list definition, and so on. The following sample configuration shows the minimum requirements for a Cisco 2509 access server using TACACS+. PAP can be used because the CiscoSecure ACS User Database is being used.
aaa authentication login default tacacs+
aaa authentication ppp default tacacs+
aaa authorization exec tacacs+
aaa authorization network tacacs+
aaa accounting network start-stop tacacs+
aaa accounting exec start-stop tacacs+
tacacs-server host <ip_address> single
aaa authentication login no_tacacs enable
login authentication no_tacacs
Enter the following command under each interface used for dial-in access:
The client can be an async or ISDN client. For an ISDN client, be sure it is configured to use PAP.
Configure these items in the Dial-Up Networking area of Windows 95 by following these steps:
Step 2 Right-click the Connection icon and select Properties.
Step 3 Click Server Type.
Step 4 For the Type of Dial-Up Server, click PPP.
Step 5 Under Advance options, check Log on to Network.
Step 6 Clear the require encrypted password check box.
Step 7 In Server Types: allowed network protocols, click IP and/or IPX.
Step 8 If using an IP pool on the NAS (not assigning the IP address at the client), set TCP/IP settings to server assigned IP Address and server assigned name.
Note The NAS must support IP Pools.
Step 9 To set up single login, install the Client for Microsoft Networks under the Network Configuration, and set the Primary Network Logon to Windows Logon.
Step 10 For single login, in the properties for Client for Microsoft Networks, leave Log on to Windows NT Domain disabled, but enter the desired domain in the Windows NT Domain field
Step 11 When making a connection, enter the same username and password being used for the user account in the Windows NT User Database.
Step 12 For single login, in the Connect to dialog box, click save password. Make sure you have the Windows 95 service pack installed so the password is saved.
This sample configuration can be used to set a higher level of authentication security, such as CHAP, or increased authentication/authorization processing speed. This method can be used by service providers when transaction speed is critical. It can also be used in corporations in which the administrator would rather allow a single login to a Windows NT domain than have the added level of security of one-time passwords (OTPs) with CHAP.
No Windows NT Server configuration is required; users do not need to exist in the Windows NT User Database unless they need to log into the Windows NT network after accessing the IP network.
Configure these items in the CiscoSecure ACS.
Note If the first NAS into which clients dial was set up during the installation of the CiscoSecure ACS, all of the configurations in this section should already be complete.
Configure these items in the Network configuration window:
Step 2 Enter the name of the NAS.
Step 3 Enter the IP address of the NAS.
Step 4 Enter the shared secret (key) of the NAS and the CiscoSecure ACS.
Step 5 Select the TACACS+ protocol.
Step 6 To allow the Service/Protocol to be configurable for a group, in the Protocol Configuration Options window, click TACACS+ (Cisco).
Note When you select any PPP protocol, you must also enable PPP LCP.
Configure these items in the External User Databases window:
Step 2 Select the Fail the attempt check box.
This sets up the CiscoSecure ACS to deny authentication unless the user has an active account in the CiscoSecure ACS database.
Configure these items in the Interface Configuration window:
Note When you select any PPP protocol, you must also enable PPP LCP.
Step 2 To define additional control for dial-in access, enable the applicable features in Interface Configuration: Advanced Options to display the options in the user interface. You can select the various features in this area to reduce the level of complexity or enhance the granularity of your access security.
Configure these items in Group Setup for the Default Group:
Step 2 To permit or deny users to call only from a particular location, enter the applicable information in the Network Access Restrictions field. If this parameter is not displayed, enable it in the Interface Configuration: Advanced Options window.
Step 3 To control the number of simultaneous sessions allowed to a group, and to specify the number of sessions allowed to users in the groups, enter the appropriate number in the Max Sessions fields. If this parameter is not displayed, enable it in the Interface Configuration: Advanced Options window.
Note The Max Sessions count defined in the User Setup window will override the Max Sessions per user count in the Group Setup window.
Step 4 To allow the NAS to support dialup clients running IP over a PPP (async or ISDN) connection, enable PPP-IP. If this parameter does not display, configure it in the Interface Configuration: TACACS+ (Cisco) window.
Step 5 Enable IP Pool and enter the IP Pool name defined on the NAS. If the default pool is used, or if the pool name is defined at the client, leave the field blank.
Step 6 To allow the NAS to support dialup clients running IPX over a PPP (async or ISDN) connection, enable PPP-IPX. If this parameter does not display, configure it in the Interface Configuration: TACACS+ (Cisco) window.
Step 7 To allow Telnet sessions to be run by the client or to allow the CiscoSecure ACS to also be used for router management, enable Shell (Exec). If this parameter does not display, configure it in the Interface Configuration: TACACS+ (Cisco) window.
Configure these items in the User Setup window:
Step 2 Select CiscoSecure Database as the method for password authentication, and enter and reconfirm the password in the first set of the CiscoSecure ACS User Database password fields.
Step 3 Assign the user to a group. You can use Default Group, but it is better to use a different group, such as Group 1.
Note All groups can be renamed, but the CiscoSecure ACS tracks all groups by their original number.
Step 4 To permit or deny users to call only from a particular location, enter the applicable information in the Network Access Restrictions field. If this parameter is not displayed, enable it in the Interface Configuration: Advanced Options window.
Step 5 If a particular IP address is to be assigned to the user, enter it in the Static IP Address field.
Step 6 To set expiration conditions for the user, select the applicable parameters.
The Cisco IOS configuration for the NAS depends on the network protocol, routing, IP address definition, access control list definition, and so on. The following sample configuration shows the minimum requirements for a Cisco 2509 access server using TACACS+. CHAP can be used because the CiscoSecure ACS User Database is being used.
aaa authentication login default tacacs+
aaa authentication ppp default tacacs+
aaa authorization exec tacacs+
aaa authorization network tacacs+
aaa accounting network start-stop tacacs+
aaa accounting exec start-stop tacacs+
tacacs-server host <ip_address> single
aaa authentication login no_tacacs enable
login authentication no_tacacs
To allow dial-in access, enter the following commands for each interface:
The client can be an async or ISDN client.
Configure these items in the Dial-Up Networking section of Windows 95:
Step 2 Right-click the Connection icon and select Properties.
Step 3 Click Server Type and select PPP for the Type of Dial-Up Server.
Step 4 Under Advanced Options, check Log on to Network.
Step 5 Clear the require encrypted password check box.
Step 6 Under Server Types: allowed network protocols, check IP and/or IPX.
Step 7 If the NAS is using an IP pool rather than assigning the IP address at the client, set TCP/IP settings to server assigned IP Address and server assigned name.
Step 8 When making a connection, enter the CiscoSecure ACS User Database username and password.
Using an SDI Ace server for authentication allows you to increase the level of security while still allowing the CiscoSecure ACS to authorize the services after a successful authentication.
Configure these items in the Windows NT Server. Ensure the following:
Configure these items in the CiscoSecure ACS.
Note If the first NAS to which clients dial in was set up during the installation of the CiscoSecure ACS, all of the configurations in this section should already be complete.
Configure these items from the Network Configuration window:
Step 2 Enter the name of the NAS.
Step 3 Enter the IP address of the NAS.
Step 4 Enter the shared secret (key) of the NAS and the CiscoSecure ACS.
Step 5 Select TACACS+ (Cisco) as the security control protocol.
Step 6 Select single TCP connection to configure CiscoSecure ACS to use this feature if it is configured on the NAS.
To add a new configuration for the external user database, follow these steps:
Step 2 Click Database Configuration.
Step 3 Click SDI SecurID Token Card.
Step 4 Click Create New Configuration. Click Submit to accept the default name.
Step 5 Click Configure to configure and enable CiscoSecure ACS to use the external user database to authenticate users.
Configure these items in the Interface Configuration window:
Note When you select any PPP protocol, you must also enable PPP LCP.
Step 2 To define additional control for dial-in access, enable the applicable features in Interface Configuration: Advanced Options to display the options in the user interface. You can select the various features in this section to reduce the level of complexity or enhance the granularity of your access security.
Configure these items in Group Setup for the Default Group:
Step 2 To permit or deny users to call only from a particular location, enter the applicable information in the Network Access Restrictions field. If this parameter is not displayed, enable it in the Interface Configuration: Advanced Options window.
Step 3 To control the number of simultaneous sessions allowed to a group, and to specify the number of sessions allowed to users in the groups, enter the appropriate number in the Max Sessions fields. If this parameter is not displayed, enable it in the Interface Configuration: Advanced Options window.
Note The Max Sessions count defined in the User Setup window will override the Max Sessions per user count in the Group Setup window.
Step 4 The CiscoSecure ACS can store ISDN passwords to authenticate the second B channel when it is brought into service. Select one of these token caching methods:
Step 5 To allow the NAS to support dialup clients running IP over a PPP (async or ISDN) connection, enable PPP-IP. If this parameter does not display, configure it in the Interface Configuration: TACACS+ (Cisco) window.
Step 6 Enable IP Pool, and enter the IP Pool name defined on the NAS. If the default pool is used or if the pool name is defined at the client, leave the field blank.
Step 7 To allow the NAS to support dialup clients running IPX over a PPP (async or ISDN) connection, enable PPP-IPX. If this parameter does not display, configure it in the Interface Configuration: TACACS+ (Cisco) window.
Note To allow Telnet sessions to be run by the client or to allow the CiscoSecure ACS to also be used for router management, enable Shell (Exec). If this parameter does not display, configure it in the Interface Configuration: TACACS+ (Cisco) window.
Configure these items in the User Setup window:
Step 2 Select SDI SecurID Token Card as the method for password authentication, and enter and reconfirm the password in the first set of the CiscoSecure ACS User Database password fields.
Step 3 Assign the user to a group. You can use Default Group, but it is better to use a different group, such as Group 1.
Note All groups can be renamed, but the CiscoSecure ACS tracks all groups by their original number.
Step 4 To permit or deny users to call only from a particular location, enter the applicable information in the Network Access Restrictions field. If this parameter is not displayed, enable it in the Interface Configuration: Advanced Options window.
Step 5 If a particular IP address is to be assigned to the user, enter it in the Static IP Address field.
Step 6 To set conditions for expiration for the user, select the applicable parameters.
The Cisco IOS configuration for the NAS depends on the network protocol, routing, IP address definition, access control list definition, and so on. The following sample configuration shows the minimum requirements for a Cisco 2509 access server using TACACS+. CHAP can be used because the CiscoSecure ACS User Database is being used.
aaa authentication login default tacacs+
aaa authentication ppp default tacacs+
aaa authorization exec tacacs+
aaa authorization network tacacs+
aaa accounting network start-stop tacacs+
aaa accounting exec start-stop tacacs+
tacacs-server host <ip_address> single
aaa authentication login no_tacacs enable
login authentication no_tacacs
Enter the one of the following commands under each interface used for dial-in access:
The client can be an async or ISDN client.
Configure these items in the Dial-Up Networking section of Windows 95:
Step 2 Right-click the Connection icon and select Properties.
Step 3 Click Server Type and select PPP for the Type of Dial-Up Server.
Step 4 Under Advanced Options, check Log on to Network.
Step 5 Clear require encrypted password.
Step 6 Under Server Types: allowed network protocols, check IP and/or IPX.
Step 7 If the NAS is using an IP pool rather than assigning the IP address at the client, set TCP/IP settings to server assigned IP Address and server assigned name server address.
Step 8 When making a connection, enter the username and the token OTP using the correct convention to authenticate successfully.
This configuration presents examples of the information you need to use the CiscoSecure ACS with Novell Directory Services (NDS). You can increase the level of security by using NDS for authentication while still allowing the CiscoSecure ACS to authorize the services after a successful authentication. This section includes examples for a TACACS+ NAS; however, the protocol is transparent to NDS.
Configure these items on the Windows NT Server:
Configure these items in the CiscoSecure ACS.
Note If the first NAS to which clients dial in was set up during the installation of the CiscoSecure ACS, all of the configurations in this section should already be complete.
Configure these items in the Network Configuration window:
Step 2 Enter the name of the NAS.
Step 3 Enter the IP address of the NAS.
Step 4 Enter the shared secret (key) of the NAS and the CiscoSecure ACS.
Step 5 Select TACACS+ (Cisco) as the security control protocol.
Step 6 If CiscoSecure ACS is configured on the NAS, select single TCP connection to configure it to use this feature.
To add a new configuration for the external user database:
Step 2 Click Database Configuration.
Step 3 Click NDS Database.
Step 4 Click Create New Configuration. Click Submit to accept the default name.
Step 5 Click Configure to configure and enable CiscoSecure ACS to use the external user database to authenticate users.
Step 6 (Optional) If this is a first-time configuration, click Initial NDS Configuration and enter the following information:
See your Novell documentation for more information on trees and contexts.
Step 7 Click OK.
Configure these items in the Interface Configuration window:
Note When you select any PPP protocol, you must also enable PPP LCP.
Step 2 To define additional control for dial-in access, enable the applicable features in Interface Configuration: Advanced Options to display the options in the user interface. You can select the various features in this section to reduce the level of complexity or enhance the granularity of your access security.
Configure these items in Group Setup for the Default Group:
Step 2 To permit or deny users to call only from a particular location, enter the applicable information in the Network Access Restrictions field. If this parameter is not displayed, enable it in the Interface Configuration: Advanced Options window.
Step 3 To control the number of simultaneous sessions allowed to a group, and to specify the number of sessions allowed to users in the groups, enter the appropriate number in the Max Sessions fields. If this parameter is not displayed, enable it in the Interface Configuration: Advanced Options window.
Note The Max Sessions count defined in the User Setup window will override the Max Sessions per user count in the Group Setup window.
Step 4 To allow the NAS to support dialup clients running IP over a PPP (async or ISDN) connection, enable PPP-IP. If this parameter does not display, configure it in the Interface Configuration: TACACS+ (Cisco) window.
Step 5 Enable IP Pool, and enter the IP Pool name defined on the NAS. If the default pool is used or if the pool name is defined at the client, leave the field blank.
Step 6 To allow the NAS to support dialup clients running IPX over a PPP (async or ISDN) connection, enable PPP-IPX. If this parameter does not display, configure it in the Interface Configuration: TACACS+ (Cisco) window.
Note To allow Telnet sessions to be run by the client or to allow the CiscoSecure ACS to also be used for router management, enable Shell (Exec). If this parameter does not display, configure it in the Interface Configuration: TACACS+ (Cisco) window.
Configure these items in the User Setup window:
Step 2 Select NDS Database as the method for password authentication, and enter and reconfirm the password in the first set of the CiscoSecure ACS User Database password fields.
Step 3 Assign the user to a group. You can use Default Group, but it is better to use a different group, such as Group 1.
Note All groups can be renamed, but the CiscoSecure ACS tracks all groups by their original number.
Step 4 To permit or deny users to call only from a particular location, enter the applicable information in the Network Access Restrictions field. If this parameter is not displayed, enable it in the Interface Configuration: Advanced Options window.
Step 5 If a particular IP address is to be assigned to the user, enter it in the Static IP Address field.
Step 6 To set conditions for expiration for the user, select the applicable parameters.
The Cisco IOS configuration for the NAS depends on the network protocol, routing, IP address definition, access control list definition, and so on. The following sample configuration shows the minimum requirements for a Cisco 2509 access server using TACACS+. CHAP can be used because the CiscoSecure ACS User Database is being used:
aaa authentication login default tacacs+
aaa authentication ppp default tacacs+
aaa authorization exec tacacs+
aaa authorization network tacacs+
aaa accounting network start-stop tacacs+
aaa accounting exec start-stop tacacs+
tacacs-server host <ip_address> single
aaa authentication login no_tacacs enable
login authentication no_tacacs
Enter the following command under each interface used for dial-in access:
The client can be an async or ISDN client.
Configure these items in the Dial-Up Networking section of Windows 95. Create and configure a connection with the dial number to the NAS. When created, right-click the Connection icon and select Properties.
Click Server Type and select the following:
This configuration outlines the ability to implement the CiscoSecure ACS with the CRYPTOCard token-card server. Administrators who want to increase the level of security by using a token card can do so with the CRYPTOCard server for authentication while still allowing the CiscoSecure ACS to authorize the services after a successful authentication.
Configure these items in the Windows NT Server:
Note If the first NAS to which clients dial in was set up during the installation of the CiscoSecure ACS, all of the configurations in this section should already be complete.
Configure these items from the Network Configuration window:
Step 2 Enter the name of the NAS.
Step 3 Enter the IP address of the NAS.
Step 4 Enter the shared secret (key) of the NAS and the CiscoSecure ACS.
Step 5 Select TACACS+ (Cisco) as the security control protocol.
Step 6 If it is configured on the NAS, select single TCP connection to configure CiscoSecure ACS to use this feature.
To add a new configuration for the external user database:
Step 2 Click Database Configuration.
Step 3 Click CRYPTOCard Token Card Configuration to allow CiscoSecure ACS to support the CRYPTOCard token card. Enter CRYPTOCard directly into the correct form field.
Step 4 In the CRYPTOCard Directory field, enter the full directory path in which the CRYPTOCard files are located. The directory must contain the CRYPTOCards and CCSecret files; otherwise, a configuration error will occur. Click Submit. A window opens to allow you to test your CRYPTOCard token server configuration.
Step 5 (Optional) To verify the configuration of your CRYPTOCard token server, click Test.
Configure these items in the Interface Configuration window:
Note When you select any PPP protocol, you must also enable PPP LCP.
Step 2 To define additional control for dial-in access, enable the applicable features in Interface Configuration: Advanced Options to display the options in the user interface. You can select the various features in this section to reduce the level of complexity or enhance the granularity of your access security.
Configure these items in Group Setup for the Default Group:
Step 2 To permit or deny users to call only from a particular location, enter the applicable information in the Network Access Restrictions field. If this parameter is not displayed, enable it in the Interface Configuration: Advanced Options window.
Step 3 To control the number of simultaneous sessions allowed to a group, and to specify the number of sessions allowed to users in the groups, enter the appropriate number in the Max Sessions fields. If this parameter is not displayed, enable it in the Interface Configuration: Advanced Options window.
Note The Max Sessions count defined in the User Setup window will override the Max Sessions per user count in the Group Setup window.
Step 4 The CiscoSecure ACS can store ISDN passwords to authenticate the second B channel when it is brought into service. Select one of these token caching methods:
Step 5 To allow the NAS to support dialup clients running IP over a PPP (async or ISDN) connection, enable PPP-IP. If this parameter does not display, configure it in the Interface Configuration: TACACS+ (Cisco) window.
Step 6 Enable IP Pool and enter the IP Pool name defined on the NAS. If the default pool is used or if the pool name is defined at the client, leave the field blank.
Step 7 To allow the NAS to support dialup clients running IPX over a PPP (async or ISDN) connection, enable PPP-IPX. If this parameter does not display, configure it in the Interface Configuration: TACACS+ (Cisco) window.
Note To allow Telnet sessions to be run by the client or to allow the CiscoSecure ACS to also be used for router management, enable Shell (Exec). If this parameter does not display, configure it in the Interface Configuration: TACACS+ (Cisco) window.
Configure these items in the User Setup window:
Step 2 Select CRYPTOCard Token Card as the method for password authentication, and enter and reconfirm the password in the first set of the CiscoSecure ACS User Database password fields.
Step 3 Assign the user to a group. You can use Default Group, but it is better to use a different group, such as Group 1.
Note All groups can be renamed, but the CiscoSecure ACS tracks all groups by their original number.
Step 4 To permit or deny users to call only from a particular location, enter the applicable information in the Network Access Restrictions field. If this parameter is not displayed, enable it in the Interface Configuration: Advanced Options window.
Step 5 If a particular IP address is to be assigned to the user, enter it in the Static IP Address field.
Step 6 To set conditions for expiration for the user, select the applicable parameters.
The Cisco IOS configuration for the NAS depends on the network protocol, routing, IP address definition, access control list definition, and so on. The following sample configuration shows the minimum requirements for a Cisco 2509 access server using TACACS+. CHAP can be used because the CiscoSecure ACS User Database is being used:
aaa authentication login default tacacs+
aaa authentication ppp default tacacs+
aaa authorization exec tacacs+
aaa authorization network tacacs+
aaa accounting network start-stop tacacs+
aaa accounting exec start-stop tacacs+
tacacs-server host <ip_address> single
aaa authentication login no_tacacs enable
login authentication no_tacacs
Enter the follwing command under each interface used for dial-in access:
The client can be an async or ISDN client.
Configure these items in the Dial-Up Networking section of Windows 95:
Step 2 Right-click the Connection icon and select Properties.
Step 3 Click Server Type and select PPP for the Type of Dial-Up Server.
Step 4 Under Advanced Options, check Log on to Network.
Step 5 Clear the require encrypted password check box.
Step 6 Under Server Types: allowed network protocols, check IP and/or IPX.
Step 7 If the NAS is using an IP pool rather than assigning the IP address at the client, set TCP/IP settings to server assigned IP Address and server assigned name server address.
Step 8 When making a connection, you must enter the username and the token OTP password using the correct convention to authenticate successfully.
Step 9 When making a connection, enter the username and the token OTP using the correct convention to authenticate successfully:
This dialup configuration would be used by administrators who want to use RADIUS authentication/authorization processing. Administrators who need to support non-Cisco equipment might use RADIUS. The CiscoSecure ACS supports IETF, Cisco, and Ascend RADIUS attributes.
No Windows NT server Configuration is required; users do not need to exist in the Windows NT database unless they need to log in to the Windows NT network.
The following information represents the parameters that are configured from within the CiscoSecure ACS HTML interface.
Note If the first NAS into which clients dial was set up during the installation of the CiscoSecure ACS, all of the configurations in this section should already be complete.
Configure these items from the Network Configuration window:
Step 2 Enter the name of the NAS.
Step 3 Enter the IP address of the NAS.
Step 4 Enter the shared secret (key) of the NAS and the CiscoSecure ACS.
Step 5 Select RADIUS (Cisco) as the security control protocol.
Step 6 Click RADIUS (Cisco) under the Protocol Configuration Options and verify the vendor-specific attribute (26) is selected.
Step 7 Click RADIUS (IETF) under the Protocol Configuration Options to select the Protocol to be configurable for a group.
Configure these items in the External User Databases window:
Step 2 Select the Fail the attempt check box.
This sets up the CiscoSecure ACS to deny authentication unless the user has an active account in the CiscoSecure ACS database.
Configure these items from the Interface Configuration window:
Step 2 To define additional controls for dial-in access, enable the applicable features in Interface Configuration: Advanced Options to display the options in the user interface. You can select the various features in this section to reduce the level of complexity or enhance the granularity of your access security.
Configure the following parameters in the Group Setup window for the desired group:
Configure these items in User Setup in the CiscoSecure ACS:
Step 2 Select the CiscoSecure ACS User Database as the method for Password authentication, and enter/reconfirm a password in the first set CiscoSecure ACS User Database password fields.
Step 3 Assign the user to a group. You can use Default Group, but it is better to use a different group, such as Group 1.
Step 4 To set expiration conditions for the user, configure them by selecting the appropriate parameters.
Step 5 If a particular IP address is to be assigned to the user, enter it in the Static IP Address field.
The Cisco IOS configuration for the NAS depends on the network protocol, routing, IP address definition, access control list definition, and so on. The following sample configuration shows the minimum requirements for a Cisco 2509 access server using RADIUS. CHAP can be used because the CiscoSecure ACS User Database is being used:
aaa authentication login default radius
aaa authentication ppp default radius
aaa authorization network radius
aaa accounting network start-stop radius
aaa accounting exec start-stop radius
radius-server host <ip_address>
aaa authentication login no_radius enable
login authentication no_radius
Enter one of the following commands under each interface used for dial-in access:
The client can be an async or ISDN client.
Configure these items in the Dial-Up Networking section of Windows 95.
Step 2 Click Server Type and select PPP as the Type of Dial-Up Server.
Step 3 Under Advanced options, check Log on to Network.
Step 4 Clear the require encrypted password check box.
Step 5 Under Server Types: allowed network protocols, check IP.
Step 6 If you use an IP pool rather than assigning the IP address at the client, set TCP/IP settings to server assigned IP Address and server assigned name.
Step 7 When you make a connection, enter the username and password entered in the CiscoSecure ACS User Database.
This section provides instructions for configuring a client using ARAP with TACACS+. The necessary [non-AAA] ARAP configuration parameters must already be configured on the NAS.
Configure these items in the CiscoSecure ACS.
Note If the first NAS to which clients dial in was set up during the installation of the CiscoSecure ACS, all of the configurations in this section should already be complete.
Configure these items in the Network configuration window:
Step 2 Enter the name of the NAS.
Step 3 Enter the IP address of the NAS.
Step 4 Enter the shared secret (key) of the NAS and the CiscoSecure ACS.
Step 5 Select TACACS+ (Cisco) as the security control protocol.
Step 6 Click TACACS+ (Cisco) under the Protocol Configuration Options and select the ARAP Protocol.
Step 7 If it is configured on the NAS, select single TCP connection to configure CiscoSecure ACS to use this feature.
Configure these items in the External User Databases window:
Step 2 Select the Fail the attempt check box.
This sets up the CiscoSecure ACS to deny authentication unless the user has an active account in the CiscoSecure ACS database.
Configure these items from the Interface Configuration window:
Note When you select any PPP protocol, you must also enable PPP LCP.
Step 2 To define additional control for dial-in access, enable the applicable features in Interface Configuration: Advanced Options to display the options in the user interface. You can select the various features in this section to reduce the level of complexity or enhance the granularity of your access security.
Configure these items in Group Setup for the Default Group:
Step 2 To permit or deny users to call only from a particular location, enter the applicable information in the Network Access Restrictions field. If this parameter is not displayed, enable it in the Interface Configuration: Advanced Options window.
Step 3 To control the number of simultaneous sessions allowed to a group, and to specify the number of sessions allowed to users in the groups, enter the appropriate number in the Max Sessions fields. If this parameter is not displayed, enable it in the Interface Configuration: Advanced Options window.
Note The Max Sessions count defined in the User Setup window will override the Max Sessions per user count in the Group Setup window.
Step 4 To allow the NAS to support dialup clients running IP over a PPP (async or ISDN) connection, enable PPP-IP. If this parameter does not display, configure it in the Interface Configuration: TACACS+ (Cisco) window.
Step 5 Enable IP Pool, and enter the IP Pool name defined on the NAS. If the default pool is used or if the pool name is defined at the client, leave the field blank.
Step 6 To allow the NAS to support dialup clients, enable ARAP.
Step 7 To allow Telnet sessions to be run by the client or to allow the CiscoSecure ACS to also be used for router management, enable Shell (Exec). If this parameter does not display, configure it in the Interface Configuration: TACACS+ (Cisco) window.
Configure these items in the CiscoSecure ACS from User Setup:
Step 2 Select the CiscoSecure ACS User Database as the method for Password authentication, and enter/reconfirm a password in the first set CiscoSecure ACS User Database password fields.
Step 3 Assign the user to a group. You can use Default Group, but it is better to use a different group, such as Group 1.
Step 4 If conditions for expiration should be set for the user, configure them here.
The Cisco IOS configuration for the NAS depends on the network protocol, routing, IP address definition, access control list definition, and so on. The following sample configuration shows the minimum requirements for a Cisco 2509 access server using TACACS+ and ARAP:
aaa authentication arap default tacacs+
aaa authorization network tacacs+
aaa accounting network start-stop tacacs+
tacacs-server host <ip_address> single
aaa authentication login no_tacacs enable
login authentication no_tacacs
Enter the following commands under each line used for dial-in access with ARAP:
The client configured in this example is an Apple Macintosh Power PC running MAC/OS 7.5.5 and using AppleTalk Remote Access V.2.1 software.
Step 2 Configure these items in the Connect As section:
Step 3 Click Connect to initiate a call.
This section outlines how to enhance security when accessing the router or NAS configuration. Using command authorizations and administrative privilege levels can further secure access to the router's configuration. IS managers can use this method to control and monitor the administration activity of their routers and NASes.
No Windows NT server Configuration is required; users do not need to exist in the Windows NT database unless they need to log in to the Windows NT network.
Configure these items in the CiscoSecure ACS.
Note If the first NAS to which clients dial in was set up during the installation of the CiscoSecure ACS, all of the configurations in this section should already be complete.
Configure these items in the Network Configuration window:
Step 2 Enter the name of the NAS.
Step 3 Enter the IP address of the NAS.
Step 4 Enter the shared secret (key) of the NAS and the CiscoSecure ACS.
Step 5 Select TACACS+ (Cisco) as the security control protocol.
Step 6 If CiscoSecure ACS is configured on the NAS, select single TCP connection to configure it to use this feature.
Configure these items in the External User Databases window:
Step 2 Select the Fail the attempt check box.
This sets up the CiscoSecure ACS to deny authentication unless the user has an active account in the CiscoSecure ACS database.
Configure these items from the Interface Configuration window:
Note When you select any PPP protocol, you must also enable PPP LCP.
Step 2 To define additional control for dial-in access, enable the applicable features in Interface Configuration: Advanced Options to display the options in the user interface. You can select the various features in this section to reduce the level of complexity or enhance the granularity of your access security.
Configure these items in Group Setup for the Default Group:
Step 2 To permit or deny users to call only from a particular location, enter the applicable information in the Network Access Restrictions field. If this parameter is not displayed, enable it in the Interface Configuration: Advanced Options window.
Step 3 To control the number of simultaneous sessions allowed to a group, and to specify the number of sessions allowed to users in the groups, enter the appropriate number in the Max Sessions fields. If this parameter is not displayed, enable it in the Interface Configuration: Advanced Options window.
Note The Max Sessions count defined in the User Setup window will override the Max Sessions per user count in the Group Setup window.
Step 4 To allow the NAS to support dialup clients running IP over a PPP (async or ISDN) connection, enable PPP-IP. If this parameter does not display, configure it in the Interface Configuration: TACACS+ (Cisco) window.
Step 5 Enable IP Pool and enter the IP Pool name defined on the NAS. If the default pool is used, or if the pool name is defined at the client, leave the field blank.
Step 6 To allow the NAS to support dialup clients running IPX over a PPP (async or ISDN) connection, enable PPP-IPX. If this parameter does not display, configure it in the Interface Configuration: TACACS+ (Cisco) window.
Note To allow Telnet sessions to be run by the client or to allow the CiscoSecure ACS to also be used for router management, enable Shell (Exec). If this parameter does not display, configure it in the Interface Configuration: TACACS+ (Cisco) window.
Step 7 Assign the authorization privilege level for the Group in the Shell (exec) section.
Step 8 To permit or deny Cisco IOS commands in the CiscoSecure ACS Group Setup, make sure the proper command authorization has been configured on the router or NAS. (See the section "Router/NAS Configuration.")
Step 9 To permit or deny authorization of any command not specified for the group, click the Permit/Deny radio button on the Unmatched Cisco IOS Commands section.
Step 10 Select the Command check box and enter the command to authorize in the dialog box. Add the argument(s) of the command to be permitted or denied. For example, for the command show, enter:
Step 11 Click the radio button to permit or deny all unlisted arguments for the command being configured.
Step 12 To enter another command, click Submit, then click Edit Group Settings. Scroll down and configure another command for authorization until you have entered all your commands. To activate the changes immediately, click Submit and Restart.
Configure these items in the CiscoSecure ACS User Setup window:
Step 2 Select CiscoSecure ACS User Database as the method for password authentication.
Step 3 Enter and confirm a password in the first set CiscoSecure ACS User Database password fields.
Step 4 Assign the user to a group. You can use Default Group, but it is better to use a different group, such as Group 1.
Step 5 To permit or deny users to call only from a particular location, enter the applicable information in the Network Access Restrictions field. User definition overrides group definition.
Step 6 To assign a particular IP address to the user, enter it in the Static IP Address field.
Step 7 To set conditions for expiration for the user, select the applicable parameters.
Step 8 To authenticate the user by privilege level, in the Advanced TACACS+ Settings window, enable the TACACS+ Enable Control. Enter and confirm the password to be used when accessing enable mode on the router or NAS.
No token-server configuration is required; token card servers are not used in this configuration.
The Cisco IOS configuration for the NAS depends on the network protocol, routing, IP address definition, access control list definition, and so on. The following sample configuration shows the minimum requirements for a Cisco 2509 access server using TACACS+ that can authorize NAS commands and grant privilege-level authentication. CHAP can be used because the CiscoSecure ACS User Database is being used:
aaa authentication login default tacacs+
aaa authentication ppp default tacacs+
aaa authentication enable default tacacs+
aaa authorization exec tacacs+
aaa authorization network tacacs+
aaa authorization commands <0-15> tacacs+
aaa accounting network start-stop tacacs+
aaa accounting exec start-stop tacacs+
aaa accounting commands start-stop tacacs+
tacacs-server host <ip_address> single
aaa authentication login no_tacacs enable
login authentication no_tacacs
Enter one of the following commands under each interface used for dial-in access:
The client can be an async or ISDN client or reside on the network.
Configure these items in the Dial-Up Networking section of Windows 95.
Step 2 Right-click the Connection icon and select Properties.
Step 3 Click Server Type and select PPP as the Type of Dial-Up Server.
Step 4 In the Advanced Options window, check Log on to Network.
Step 5 Clear the require encrypted password check box.
Step 6 For Server Types: allowed network protocols, check IP and/or IPX.
Step 7 If you use an IP pool on the NAS (not assigning the IP address at the client), set TCP/IP settings to server assigned IP Address and server assigned name.
Step 8 When the connection comes up, enter the username and password entered in the CiscoSecure ACS User Database.
This is a typical configuration that you can use in a Windows NT network residing behind a PIX firewall using only the Windows NT user database to maintain authentication information. Businesses with a significant investment or strategic direction based on Windows NT can use this configuration to control connectivity through a PIX firewall using Windows NT for authentication and the CiscoSecure ACS for authorization.
This configuration requires significant configurations of the Windows NT server environment because of the high level of dependency on Windows NT management functions.
Configure these items in the User Manager on your Windows NT server running the CiscoSecure ACS:
Configure these items in the CiscoSecure ACS.
Note Administration through a firewall is not supported. The CiscoSecure ACS can only be managed from the same side of the firewall.
Note If the first PIX that clients use was set up during the installation of the CiscoSecure ACS, all of the configurations in this section should already be complete.
Configure these items in the Network Configuration window:
Step 2 Enter the name of the PIX (NAS).
Step 3 Enter the IP address of the PIX (NAS).
Step 4 Enter the shared secret (key) between the PIX (NAS) and the CiscoSecure ACS.
Step 5 Select TACACS+ (Cisco) as the security control protocol.
If CiscoSecure ACS was initially installed so that it did not authenticate usernames against the Windows NT database, you must add a new configuration to allow this function.
Step 2 Click Create a new configuration.
Step 3 Click Submit to accept the default name.
Step 4 Click Configure to allow the additional capability to Grant dialin permission to user. The CiscoSecure ACS verifies that dialup permission is granted for this user in the Windows NT User Database. Authentication for users without dialup permission on the Windows NT server fails even if they use the correct password. If this feature is not desired, clear the checkbox and click Submit.
Step 5 The Unknown User Policy window controls how the CiscoSecure ACS handles the situation when a username is not found in the CiscoSecure ACS User Database. Configure this option to ensure that all authentications without matching usernames in the CiscoSecure ACS User Database are checked against the Windows NT database. If this authentication succeeds, a record is automatically generated in the CiscoSecure ACS Database indicating the database to use for password authentication. User records added to the database this way automatically become members of the selected group.
Configure these items from the Interface Configuration window:
Note When you select any PPP protocol, you must also enable PPP LCP.
Step 2 To define additional control for dial-in access, enable the applicable features in Interface Configuration: Advanced Options to display the options in the user interface. You can select the various features in this section to reduce the level of complexity or enhance the granularity of your access security.
Configure these items in Group Setup for the Windows NT Users group:
Step 2 Enable Shell (Exec) to allow Telnet sessions to be run by the client for FTP and HTTP.
User setup is not required; users successfully authenticated against the Windows NT User Database are automatically added to the CiscoSecure ACS User Database so they can be reassigned to groups with different authorization levels later.
This sample configuration for a Cisco PIX firewall allows any inbound traffic (HTTP, FTP, or Telnet) as long as the user is authenticated and authorized. Notations have been added to this configuration to allow variations to be configured to deny authentication and/or authorization:
No other client configuration is necessary for this application; however, you might need to enable authentication forwarding support on your browser.
All of the benefits of the Windows NT operating system such as PDC/BDC database replication and distribution can be leveraged.
Use this configuration to create secure connections over a public infrastructure. You can use the CiscoSecure ACS to provide authentication, authorization, and accounting for Virtual Private Dialup Networks (VPDNs) using the L2F tunneling protocol. Service providers can use this method to create the service and procure it by the corporate customers. This configuration requires both types of users to have an ACS at both the NAS and Home Gateway locations.
The CiscoSecure ACS is used at the originating end of the VPDN tunnel (into which the site the VPDN user dials, often called the ISP NAS) and at the end of the tunnel (the private network that terminates the VPDN tunnel, often called the Home Gateway (HG)).
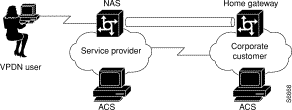
Note VPDN terminology commonly uses domain to represent the corporate home gateway; this is not associated with the Windows NT domain. In the following example, the VPDN domain is referred to as VPDN domain to prevent confusion.
The creation of a tunnel can be described in two major steps that take place after the client dials in:
2. Client Authentication and Authorization
Step 2 The ISP NAS then uses the information (Tunnel ID) to request authentication for the tunnel from the NAS/router (Home Gateway).
Step 3 The NAS/router forwards the information (Tunnel ID) to the ACS (Home Gateway) to authenticate the request.
Step 4 When the information (Tunnel ID) is validated, the tunnel has been created.
Step 2 The ACS (Home Gateway) returns authentication and authorization responses to the ISP NAS.
Step 3 After validation, the client has a secure connection through the tunnel with permissions assigned by the ACS at the corporate site (Home Gateway).
No Windows NT server configuration is required; users do not need to exist in the Windows NT database unless they need to log in to the Windows NT network.
Configure these items in the CiscoSecure ACS HTML interface for Windows NT at the ISP end of the VPDN connection.
Note If the first ISP NAS into which the clients dial was set up during the installation of the CiscoSecure ACS, all of the NAS configurations in this section should already be complete.
Configure these items in the Network Configuration section:
Step 2 Enter the name of the NAS (this is only for identification by the administrator).
Step 3 Enter the IP address of the NAS.
Step 4 Enter the shared secret (key) of the NAS and the CiscoSecure ACS.
Step 5 If it is configured on the NAS, select single TCP connection to configure CiscoSecure ACS to use this feature.
Configure these items from the Interface Configuration window:
Note When you select any PPP protocol, you must also enable PPP LCP.
Step 2 Click PPP-VPDN and click Submit. This displays the PPP-VPDN option under Group Setup when it is time to configure that section.
Configure these items in Group Setup for Group 1:
Step 2 Enter the Tunnel ID, which is the username, CISCO_TUNNEL.
Step 3 Enter the IP address of the Home Gateway NAS/router.
Configure these items in User Setup:
Step 2 Assign the user to Group 1.
Step 3 Add a second user to the CiscoSecure ACS User Database for authentication. This username is the name of the Tunnel ID. For this example use cisco_tunnel. A legitimate password is needed for this entry. Enter cisco for this example. Do not configure any other parameters.
Step 4 Assign the second user to Group 1.
The Cisco IOS configuration for the NAS depends on the network protocol, routing, IP address definition, access control list definition, and so on. The following sample configuration shows the minimum requirements for a Cisco 2509 access server using TACACS+ on a virtual private dialup network (VPDN):
aaa authentication login default tacacs+
aaa authentication ppp default tacacs+
aaa authorization exec tacacs+
aaa authorization network tacacs+
aaa accounting network start-stop tacacs+
aaa accounting exec start-stop tacacs+
tacacs-server host <ip_address> single
aaa authentication login no_tacacs enable
login authentication no_tacacs
Enter the following command under each interface used for dial-in access:
No Windows NT server configuration is required; users do not need to exist in the Windows NT database unless they need to log in to the Windows NT network.
Configure these items in the CiscoSecure ACS HTML interface for Windows NT at the Home Gateway of the VPDN connection.
Note If the first Home Gateway NAS/router into which clients dial was set up during the installation of the CiscoSecure ACS, all of the NAS configurations in this section should already be complete.
Configure these items in the Network Configuration section:
Step 2 Enter the name of the NAS (this is only for identification by the administrator).
Step 3 Enter the IP address of the NAS.
Step 4 Enter the shared secret (key) of the NAS and the CiscoSecure ACS.
Step 5 Select TACACS+ as the security control protocol.
Step 6 Select single TCP connection to configure CiscoSecure ACS to use this feature if it is configured on the NAS.
Configure these items from the Interface Configuration window:
Note When you select any PPP protocol, you must also enable PPP LCP.
Step 2 To define additional control for dial-in access, enable the applicable features in Interface Configuration: Advanced Options to display the options in the user interface. You can select the various features in this section to reduce the level of complexity or enhance the granularity of your access security.
Step 2 To permit or deny users to call only from a particular location, enter the applicable information in the Network Access Restrictions field. If this parameter is not displayed, enable it in the Interface Configuration: Advanced Options window.
Step 3 To allow the NAS to support dialup clients running IP over a PPP (async or ISDN) connection, enable PPP-IP. If this parameter does not display, configure it in the Interface Configuration: TACACS+ (Cisco) window.
Step 4 Enable IP Pool and enter the IP Pool name defined on the NAS. If the default pool is used or if the pool name is defined at the client, leave the field blank.
Step 5 To allow the NAS to support dialup clients running IPX over a PPP (async or ISDN) connection, enable PPP-IPX. If this parameter does not display, configure it in the Interface Configuration: TACACS+ (Cisco) window.
Step 6 To allow Telnet sessions to be run by the client or to allow the CiscoSecure ACS to also be used for router management, enable Shell (Exec). If this parameter does not display, configure it in the Interface Configuration: TACACS+ (Cisco) window.
Configure these items in User Setup:
Step 2 Assign the username@CISCO to a group. Windows NT Users could be used, but we recommend you use a different group such as Group 2.
Step 3 To permit or deny users to call only from a particular location, enter the applicable information in the Network Access Restrictions field. If this parameter is not displayed, enable it in the Interface Configuration: Advanced Options window.
Step 4 If a particular IP address is to be assigned to the user, enter it in the Static IP Address field.
Step 5 To set expiration conditions for the user, configure them here.
Step 6 Add a second user to the CiscoSecure ACS User Database for authentication. This username is actually the same name used at the ISP as the Tunnel ID. For this example, use cisco_tunnel. The same legitimate password is needed for this entry. For this example, enter cisco. Do not configure any other parameters.
Step 7 Assign the second user to Group 1.
To enable the ability to configure the CiscoSecure ACS from another workstation, either on the LAN or from a dial-in client, the user must be registered as an administrator. In the Administration Control window, enter the administrator's username and password. This username and password have no association with the dialup authentication username and password.
The Cisco IOS configuration for the NAS depends on the network protocol, routing, IP address definition, access control list definition, and so on. The following sample configuration shows the minimum requirements for a Cisco 2509 access server using TACACS+ on a VPDN:
aaa authentication login default tacacs+
aaa authentication ppp default tacacs+
aaa authorization exec tacacs+
aaa authorization network tacacs+
aaa accounting network start-stop tacacs+
aaa accounting exec start-stop tacacs+
vpdn incoming <isp hostname> <home-gw hostname> virtual-template 1
tacacs-server host <ip_address> single
aaa authentication login no_tacacs enable
login authentication no_tacacs
Enter the following command under each interface used for dial-in access:
The client can be an async or ISDN client.
The client must dial into the ISP NAS with the name defined at the Home Gateway ACS (for example, username@corporation).
Configure these items in the Dial-Up Networking section of Windows 95:
Step 2 Right-click the Connection icon and select Properties.
Step 3 Click Server Type and select PPP as the Type of Dial-Up Server.
Step 4 Under Advanced Options, click Log on to Network.
Step 5 Clear require encrypted password.
Step 6 For Server Types: allowed network protocols, check IP and/or IPX.
Step 7 If you use an IP pool on the NAS rather than defining the IP address at the client, set TCP/IP settings to server assigned IP Address and server assigned name.
Step 8 When you make a connection, enter the same username and password for the user account in the Windows NT User Database.
This section outlines how Virtual Profiles allow for greater flexibility in the support of access security by defining specific access profiles in CiscoSecure ACS. The advantages are simpler router configurations, centralized management of network access, and a method of applying security based on user profiles instead of configuring the physical interface of the access device.
The virtual profile concept is the ability to apply specific Cisco IOS WAN interface commands that are configured in CiscoSecure ACS onto a virtual interface that is created on the NAS when a user dials in to the network.
In this example, an access list will be applied to a user's dial-in connections. When the user dials in and authenticates, a virtual profile is created and the access list is applied.
No Windows NT server configuration is required; users do not need to exist in the Windows NT database unless they need to log in to the Windows NT network.
Configure these items in the CiscoSecure ACS.
Note If the first Home Gateway NAS/router into which clients dial was set up during the installation of the CiscoSecure ACS, all of the NAS configurations in this section should already be complete.
Configure these items in the Network Configuration section:
Step 2 Enter the name of the NAS (this is only for identification by the administrator).
Step 3 Enter the IP address of the NAS.
Step 4 Enter the shared secret (key) of the NAS and the CiscoSecure ACS.
Step 5 Select TACACS+ as the security control protocol.
Step 6 Select single TCP connection to configure CiscoSecure ACS to use this feature if it is configured on the NAS.
Configure these items in the External User Databases window:
Step 2 Click Database Configuration.
Step 3 Click Windows NT.
Step 4 Clear the Grant dialin permission to user checkbox.
This sets up the CiscoSecure ACS to deny authentication unless the user has an active account in the CiscoSecure ACS database.
Configure these items from the Interface Configuration window:
Note When you select any PPP protocol, you must also enable PPP LCP.
Step 2 Click Display a window for each service selected in which you can enter customized TACACS+ attributes in the TACACS+(Cisco) window.
Step 3 To define additional control for dial in access, features in Advanced Options can be enabled to be displayed in the User Interface. You can select the various features in this section to reduce the level of complexity or enhance the granularity of your access security.
Configure these items in Group Setup for the Default Group:
Step 2 To permit or deny users to call only from a particular location, enter the applicable information in the Network Access Restrictions field. If this parameter is not displayed, enable it in the Interface Configuration: Advanced Options window.
Step 3 To control the number of simultaneous sessions allowed to a group, and to specify the number of sessions allowed to users in the groups, enter the appropriate number in the Max Sessions fields. If this parameter is not displayed, enable it in the Interface Configuration: Advanced Options window.
Note The Max Sessions count defined in the User Setup window will override the Max Sessions per user count in the Group Setup window.
Step 4 The CiscoSecure ACS can store ISDN passwords to authenticate the second B channel when it is brought into service. Select one of these token caching methods:
Step 5 Enable IP and then click the Custom Attributes check box. In the text window enter the following:
Step 6 To allow the NAS to support dialup clients running IP over a PPP (async or ISDN) connection, enable PPP-IP. If this parameter does not display, configure it in the Interface Configuration: TACACS+ (Cisco) window.
Step 7 Enable LCP and then click the Custom Attributes check box. In that text window enter the following:
interface-config=ip unnumbered e0\nno ip route-cache
Configure these items in the User Setup window:
Step 2 Select CiscoSecure Database as the method for password authentication, and enter and reconfirm the password in the first set of the CiscoSecure ACS User Database password fields.
Step 3 Assign the user to a group. You can use Default Group, but it is better to use a different group, such as Group 1.
Note All groups can be renamed, but the CiscoSecure ACS tracks all groups by their original number.
Step 4 To permit or deny users to call only from a particular location, enter the applicable information in the Network Access Restrictions field. If this parameter is not displayed, enable it in the Interface Configuration: Advanced Options window.
Step 5 If a particular IP address is to be assigned to the user, enter it in the Static IP Address field.
Step 6 To set conditions for expiration for the user, select the applicable parameters.
The Cisco IOS configuration for the NAS depends on the network protocol, routing, IP address definition, access control list definition, and so on. The following sample configuration shows the minimum requirements for a Cisco 2509 access server using TACACS+ that can authorize NAS commands and grant privilege-level authentication. CHAP can be used because the CiscoSecure ACS User Database is being used:
virtual-profile virtual-template1
aaa authentication login default tacacs+
aaa authentication ppp default tacacs+
aaa authentication enable default tacacs+
aaa authorization exec tacacs+
aaa authorization network tacacs+
aaa accounting network start-stop tacacs+
aaa accounting exec start-stop tacacs+
tacacs-server host <ip_address> single
aaa authentication login no_tacacs enable
login authentication no_tacacs
Enter one of the following commands under each interface used for dial-in access:
The client can be an async or ISDN client or reside on the network.
Configure these items in the Dial-Up Networking section of Windows 95.
Configure these items in the Dial-Up Networking section of Windows 95:
Step 2 Right-click the Connection icon and select Properties.
Step 3 Click Server Type and select PPP for the Type of Dial-Up Server.
Step 4 Under Advanced Options, check Log on to Network.
Step 5 Clear the require encrypted password check box.
Step 6 Under Server Types: allowed network protocols, check IP and/or IPX.
Step 7 If the NAS is using an IP pool rather than assigning the IP address at the client, set TCP/IP settings to server assigned IP Address and server assigned name.
Step 8 When making a connection, enter the CiscoSecure ACS User Database username and password.
Because the CiscoSecure ACS user database can store PAP and CHAP passwords, this configuration supports PAP or CHAP as the authentication protocol. To use PAP authentication, substitute the word PAP in place of CHAP in the NAS configuration example earlier in this section.
![]()
![]()
![]()
![]()
![]()
![]()
![]()
![]()
Posted: Tue Jan 21 03:48:57 PST 2003
All contents are Copyright © 1992--2002 Cisco Systems, Inc. All rights reserved.
Important Notices and Privacy Statement.