|
|

This chapter describes the basic operation of each of the configuration areas of CiscoSecure ACS 2.0 for Windows NT. It also provides additional information about each function or attribute.
Note Your browser must be running either Microsoft Internet Explorer 3.02 or Netscape Navigator 3.0. Java functions, both Enable Java and Java Script, must be enabled.
Before completing any of the tasks in this chapter you must have:
Each of the eight buttons on the navigational bar represents a particular area or function that you can configure. Depending on you configuration, you may not need to configure all of the eight areas. This chapter has a section for each of the areas of configuration or operation with step by step details of the general operation. Click one of these buttons to begin configuring:
The pervious bulleted list follows the order of the buttons in the navigational bar. The order to follow for configuration depends on you preferences and needs. One typical order of configuration is listed below.
1. Administration Control—Configure access for remote administrators.
2. NAS Configuration—Configure and verify connectivity to a NAS.
3. Group Setup—Configure available options and parameters for specific groups. All users must be long to a group.
4. User Setup—Add users to a group that is configured.
Select on the navigational bar to perform the following tasks:
The Select and Help windows appear.
Note The only CiscoSecure account limit is that usernames must be 1 to 32 characters in length.
Step 2 Enter a name in the User field. User account names can be up to 32 characters in length. They must not contain any of the following special characters:
Step 3 Click Add/Edit.
The Edit form appears in the left window. The username being added or edited appears at the top of the window.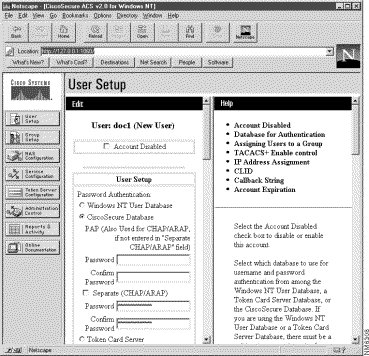
Note You can select Account Disabled to deny access for this user. You must click Submit to have this action take affect.
Step 4 Select the Password Authentication type and supply password as required.
Note The Password and Password Confirm fields are required for all authentication methods except the Windows NT User Database.
Step 5 Select a User Group the group list box—Represents a set of attributes and operations that are applied to all users assigned to the group. The default group is Windows NT Users. Its group number is zero (0).
Step 6 Enter a Static IP Address—An IP address assigned to this specific user. Leave this field blank if the user's IP address is dynamically assigned from an address pool.
Step 7 Enter a CLID address for Authenticate by CLI—An ISDN number, IP address or X121 address can be used to identify a user calling into a NAS. This allows users to be identified by this number instead of a username. Entering an address in this field overrides other caller identification settings when a username is not configured.
Step 8 Enter the address for Remote Address Filter—An address or partial address that is matched against and individual user. This can be different types of addresses such as IP address or telephone number. You can also enter a comma separated list with wildcards. An asterisk (*) matches any string of characters and a question mark (?) matches any single character.
Step 9 Enter a Callback String—A string, either a number or command string, sent back to a modem to call back a specific user.
Note The dial-up user must be configured with a service that supports callback.
Step 10 Enter the expiration information for this user account.
Date exceeds—A specific date set to some time in the future.
Failed attempts exceed—Number of unsuccessful attempts to log in to this user's account.
Reset current failed attempts count on submit—Resets the number of failed login attempts to zero for this user. You must reset the failed attempts counter anytime you want it to start tracking failed logins from zero.
Step 11 Select TACACS+ Enable Control to use TACACS+ features. This option must be enabled when CiscoSecure is used to manage routers.
Note This setting is TACACS+ specific. It may not be visible to users that are not running TACACS+.
Step 12 Select Max Privilege—A level of access given that authorizes a user to access specific services. Zero (0) is the default privilege and allows view only privilege.
Note This setting is TACACS+ specific. It may not be visible to users that are not running TACACS+.
Step 13 TACACS+ Outbound Password—Enter an password to be used by device such as routers that request services from the CiscoSecure ACS. This is an advanced feature and should be used only if you are knowledgeable about how TACACS+ uses this function.
Step 14 Click Submit. You are returned to the Select window.
Step 15 Verify that the user was added by entering the username in the User field and clicking Find. The User List should appear with the entry you just submitted.
Note To change a username in the CiscoSecure ACS, you must first delete the user and then add the renamed user.
To delete a user account from the CiscoSecure Database:
The Select and Help windows appear.
Step 2 Enter the full name to be deleted in the User field.
Step 3 Click Add/Edit.
Step 4 At the bottom of the Edit window, Click Delete.
Note If you are authenticating against the Windows NT User Database, you must also delete the user account from the Windows NT User Database. This prevents the username from being automatically re-added to the CiscoSecure User Database the next time the user tries to log in.
Select Group Setup on the navigational bar to perform the following tasks:
To list all users in a specified group:
Step 2 Select a group from the Group pulldown list.
Step 3 Click Users in Group.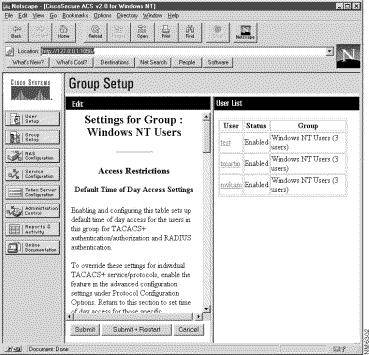
The User List appears in the window to the right. The Edit window appears in the left with the user's account information after you select a user. You can view, modify, or delete a user by clicking on the user's name in the list.
To assign or edit a group's authorization and authentication settings, follow these steps:
Note A user is assigned to the default group, Windows NT Users, until the user has been reassigned to another group under User Setup.
Step 2 Select a group from the pulldown list.
Step 3 Click Edit Settings. The Edit window appears.
Step 4 Complete the Group Setup section.
Before you configure Group Setup it is important to understand how this window functions. Group Setup is dynamically built depending on the configuration of your NAS and the security protocols being used. There are six basic sections to Group Setup:
The General Information and Token Card Information is always be displayed. TACACS+ and RADIUS sections are displayed depending on the configuration of your access device. If one NAS has been configured within CiscoSecure and it is running TACACS+, the only sub-sections displayed are:
If a second NAS was added that used RADIUS (IETF), these sub-sections are displayed:
Note When RADIUS (Cisco) or RADIUS (Ascend) are selected for a NAS, RADIUS (IETF) attributes are available because they are the base set of attributes used to configure the first 74 attributes of all RADIUS vendors.
The content of each of these sub-sections is dynamic. Only those attributes that are selected from the NAS Configuration under the Protocol Configuration Options section are displayed. This allows you to select and display only those attributes that you want. You can change what is displayed in each of the subsections by selecting a security protocol from the Protocol Configuration Options in the NAS Configuration window.
This information is applied to all members of a group:
(a). Select Default Time of Day Access Settings—Defines the default time of day you want to allow user access for this group. Select Setup Default to activate the time grid (if not enabled, 24hour / 7 day a week access is permitted). Click Clear All to clear all the times, or click Set All to enable all the times. Using the arrow and left mouse button, highlight the areas with green for the time of day access should be permitted. These settings apply to both TACACS+ and RADIUS.
(b). Select Force Remote Address Filtering—Switches on or off the enforcement an administrator security policy that requires a string to be entered for every user in the Group. This prevents users from accidentally being entered without a filter which helps prevent breaches in security policy. The Filter may be defined at the Group or User level. A popular application for the remote address filter is for use with ISDN. Using it requires a user to call from a specific or group of CLID's. This means the user must pass normal username and password authentication, and must be calling from a pre-determined location. This elevates the need to define the CLID's on the NAS itself.
Note Select Force Remote Address Filtering and leave the Group Remote Address Filter field blank to force the use of a CLI filter for each user in the group. You would set this CLI filter from User Setup.
(c). Default Remote Address Filter—Defines the strings used as filters. If a match is found, the user's authorizations will be processed. Filters are defined here for entire groups. A user level filter can be defined under User Setup and overrides the Group setting. The wildcard asterisk (*) is supported at any point in the string (1234*, *1234, 12*34). Furthermore, multiple strings maybe entered and separated by a comma making it possible to define an entire group of CLID's to be used, eliminating the requirement to enter them for each user.
(d). Token Card Caching—When using a Security Dynamics Token Card Server and Terminal Adapters, it is possible to cache the token to support the use of a second `b' channel without a second token OTP. It can be configured on a per session basis or with a specified duration for which the token is cached.
Note Be sure to understand security ramifications before implementing token caching. This is discussed in some detail in the Overview chapter.
These parameters will only be displayed if a NAS has been configured to use TACACS+. The default service-protocol settings displayed for TACACS+ are:
To display or hide additional services or protocols, see NAS Configuration - Protocol Configuration Options.
(e). Select which services-protocols that should be authorized for the Group by checking the box next to the protocol-service. Below each service-protocol, select the attributes to further define the authorization for that protocol-service. In the case of access control lists (ACLs) and IP Address Pools, the name of the ACL or Pool as defined on the NAS should be entered. (An ACL is a list of Cisco IOS commands used to restrict access to or from other devices and users on the network.) Leave blank if the default (as defined on the NAS) should be used. Information about attributes can be found in the Appendix of these documents, or within the NAS documentation.
Note It is possible to define and download an ACL. Go to the NAS Configuration - Protocol Configuration Options and enable Custom Commands. A field entry box will appear under each service-protocol and an Access Control List can be defined.
When configuring Shell (Exec), it is possible to define which Cisco IOS commands and arguments that should be permitted or denied. Click the box to enable the command, enter the name of the command, define its arguments using standard permit or deny syntax and define if Unlisted Arguments should be permitted or denied. CiscoSecure will support any number of commands to be entered. To add additional entry fields, simply submit the changes for the first commands and re-enter the Group Setup. The submitted commands will appear and additional field entry boxes will become available.
These parameters are displayed only when a NAS has been configured to use RADIUS (IETF). The default attribute settings that displayed for RADIUS are:
Note RADIUS attributes are sent as a profile for each user from the CiscoSecure ACS to the requesting NAS.
(f). Select which attributes that should be authorized for the Group by checking the box next to the attribute. Be sure to further define the authorization for that attribute in the field entry field next to it. Information about attributes can be found in the appendices of this document, or within the NAS documentation.
The RADIUS (IETF) and RADIUS (Cisco) parameters will only be displayed if a NAS has been configured to use RADIUS (Cisco). RADIUS (Cisco) represents the Cisco Vendor Specific Attribute (VSA) IETF #26. Therefore, when configuring RADIUS (Cisco), both IETF and Cisco VSA apply.
The default attribute settings displayed for RADIUS (Cisco) are:
Note To display additional, or hide any of these IETF attributes, see NAS Configuration.
(g). For the IETF attributes, select which attributes that should be authorized for the Group by checking the box next to the attribute. Be sure to further define the authorization for that attribute in the field entry field next to it. Information about attributes can be found in the Appendix of these documents, or within the NAS documentation.
(h). For the Cisco VSA, enter the commands (such as TACACS+ commands) that should be packed as a RADIUS VSA.
Note The RADIUS (IETF) attributes are shared among the different RADIUS vendors. You must configure the first 74 RADIUS attributes using the RADIUS (IETF) dictionary.
The RADIUS (IETF) and RADIUS (Ascend) parameters will only be displayed if a NAS has been configured to use RADIUS (Ascend). RADIUS (Ascend) represents the Ascend proprietary attributes. Therefore, when configuring RADIUS (Ascend), both IETF and Ascend apply (proprietary attributes override IETF when conflicting).
The default attribute settings displayed for RADIUS is:
To display additional, or hide any l of these RADIUS (IETF) attributes, see NAS Configuration.
(i). For the IETF attributes, select which attributes that should be authorized for the Group by checking the box next to the attribute. Be sure to further define the authorization for that attribute in the field entry field next to it. Information about attributes can be found in the Appendix of these documents, or within the NAS documentation.
(j). For the Ascend attributes, select which attributes that should be authorized for the Group by checking the box next to the attribute. Be sure to further define the authorization for that attribute in the field entry field next to it. Information about attributes can be found in the Appendix of these documents, or within the NAS documentation.
Note The RADIUS (IETF) attributes are shared among the different RADIUS vendors. You must configure the first 74 RADIUS attributes using the RADIUS (IETF) dictionary.
Step 5 Click Submit + Restart. The group attributes are applied and services are restarted. The Edit window appears. (Click Submit if you want to save your changes and apply them later by restarting the services.)
Note Restarting the service clears the Logged-in User Report and temporarily interrupts all of the CiscoSecure ACS services.
Step 6 Verify that your changes were applied by selecting the group and click Edit Settings. View the settings.
To rename a group, follow these steps:
Step 2 Select a group from the pulldown list.
Step 3 Click Rename Group.
Step 4 Enter the new name in the Group field.
Step 5 Click Rename Group. The Select window appears with the new group name selected.
Note The group remains in the same position in the list box. The number value of the group is still associated with this group name. Some utilities such as the database import utility use the numeric value associated with the group.
The NAS you use with the CiscoSecure ACS must be configured and active on the network.
Step 2 Click the Add New Access Server button. The following window appears.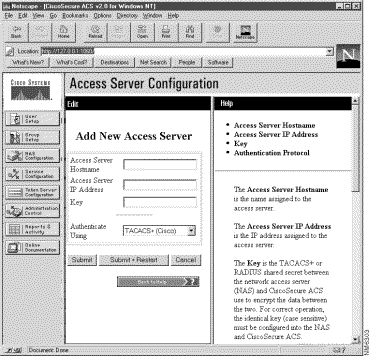
Step 3 Provide the following information:
(a). Enter the Access Server Hostname.
(b). Enter the Access Server IP address.
(c). Enter the Key value (this is the secret value shared between the NAS and the CiscoSecure ACS).
(d). Select a security protocol from the Authenticate Using list box.
You can also configure specific security protocol attributes to be used by CiscoSecure. Click on the button for the specific protocol you want to configure. A list of attributes is appeared.
Attributes marked with an asterisk are configured on the NAS and can not be changed from the CiscoSecure user interface. Attributes with a checkbox to the left can be activated by checking the box or deactivated by deselecting or unchecking the box.
Note You must select attributes from these lists before they are available for use in User Setup or Group Setup. The RADIUS (IETF) attributes are shared among all the RADIUS vendors. You must configure the first 74 RADIUS attributes from RADIUS (IETF).
You can edit the configuration of a NAS that is listed in the Select window after clicking NAS Configuration.
Existing NASes are listed under Access Server Setup.
Step 2 Click on the name of the NAS you want to edit. The Edit window appears.
Step 3 You can change any of the following information:
Access Server IP Address—IP address of the NAS configured to work with the CiscoSecure ACS.
Key—A shared secret between the NAS and the CiscoSecure ACS for either TACACS+ or RADIUS. The shared secret is case sensitive.
Authenticate Using—Defines the type of security control protocol that is used for communication between the CiscoSecure ACS and NAS.
Step 4 Click Submit + Restart to immediately apply the changes, or click Submit if you want to restart the services and apply the changes later.
To edit your current CiscoSecure service configuration, click Service Configuration.
Note When you installed CiscoSecure, you were asked the following questions: if the service should be started, which database to use for authentication, and your network access server configuration. Administration Control should be the only parameter left to set up.
Token Card Configuration allows you to specify the type of token card server to be used. From the User Setup you must also specify that a Token Card Server is to be used.
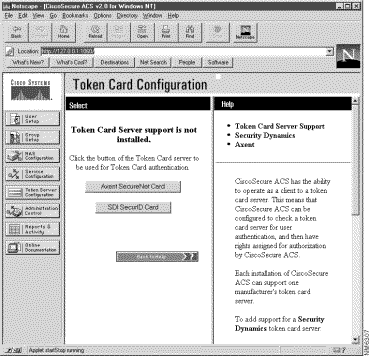
Step 2 Click on the button for one of the installed token card servers.
A confirmation window appears.
Note If token card support is disabled, you will need to restart the CSAdmin service to reload the token card DLL.
Step 2 Open an FTP session with the machine that has the ACE server installed.
Step 3 Locate the ACE Server data directory, for example /sdi/ace/data.
Step 4 Get the file named sdconf.rec and place it in your Windows NT directory %SystemRoot%\system32, for example \winnt\system32.
Step 5 Make sure the ACE server host machine name is in the Windows NT local hosts file, \winnt\system32\drivers\etc\hosts.
Step 6 Restart your Windows NT server.
Step 7 Verify connectivity by running the Test Authentication function of your ACE client application. You can run this from the Control Panel.
You should get a challenge when you run the Test Authentication function. You should now be able to use the ACS for Windows NT with SDI.
You can administer CiscoSecure from any workstation in the network as long as the workstation is running either Microsoft Internet Explorer 3.02 or Netscape Navigator 3.0. The address to enter in the remote administrator's browser is: http://<<Windows NT Server ip-address>>:2002. The port number, 2002, is changed after the initial login of a remote administrator.
Remote administrators can use a firewall protected dialin connection, but this is not recommended or supported. Leaving a port open for remote administration could compromise network security.
Note Browser Configuration—You must enable Java function on your browser. You should have No Proxies enabled.
To enable remote administration from a workstation or remote client:
Step 2 Click Add new administrator.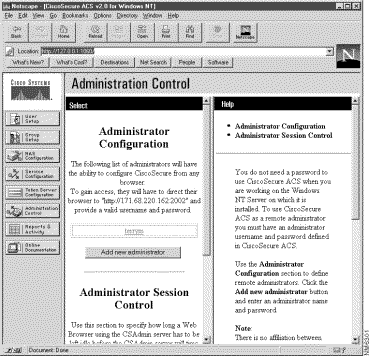
Step 3 Fill in the following fields:
Note This password is for a remote administrator to access the CiscoSecure interface. It has no connection with the user passwords for authentication, authorization, and accounting (AAA) services.
Step 4 Click Submit to save these changes and stop and start the appropriate services.
An administrative login can be terminated by setting the idle timeout. This parameter applies to the browser session only. It does not apply to the dial-in session. The browser connection with CiscoSecure is terminated if there is no activity for the specified period of time.
Step 2 Click Submit Timeout Value—Updates the idle timeout value set in the Session idle timeout field.
You can change an administrator's password or delete an existing administrator.
Step 2 Click an existing administrator name in the list. The Edit window appears.
Step 3 Enter a new password for the selected administrator. You must enter the password twice for confirmation.
Step 4 Click Submit to update the password now.
Step 2 Click an existing administrator name in the list. The Edit window appears.
Step 3 Click Delete. A delete confirmation window appears.
Step 4 Click OK to delete the selected administrator.
Click Reports & Activity in the navigational bar to view the following information:
You can import these files into most database and spreadsheet applications.
The online documentation provides more detailed information about the configuration, operation, and concepts of CiscoSecure. To view it:
The Table of Contents appears in the left window.
Step 2 Click the topic that you want to appear.
The online documentation appears in the right window.
Step 3 To print the online documentation, click in the right window, then click Print in your browser's navigational bar.
![]()
![]()
![]()
![]()
![]()
![]()
![]()
![]()
Posted: Tue Jan 21 04:01:27 PST 2003
All contents are Copyright © 1992--2002 Cisco Systems, Inc. All rights reserved.
Important Notices and Privacy Statement.