|
|

December 19, 1995
This release note documents the improvements to and modifications of CiscoRemote Release 1.0, and includes the following sections:
CiscoRemote 1.0 is supported on the following operating systems:
 Caution You must quit all applications running within Windows before installing CiscoRemote; otherwise, the installation may fail.
This section discusses installation improvements for CiscoRemote 1.0.
To install the CD-ROM version of CiscoRemote, follow these steps:
Step 1 Load the CiscoRemote CD into your CD-ROM drive. From the File menu in the Windows Program Manager, select Run.
Step 2 Click Browse from the Run dialog box.
Step 3 Select the drive that contains the CiscoRemote CD-ROM.
Step 4 Open the directory called ciscormt.
Step 5 Open the file called INSTALL.EXE
Step 6 Click OK from the Run dialog box.
If you intend to use CiscoRemote with Windows for Workgroups or Novell NetWare, you should have these networks installed and running before installing CiscoRemote. In some cases, you may need to set up the network after installing CiscoRemote.
CiscoRemote includes the Novell NetWare 4.01 client software. If you want to run Novell NetWare 3.11 or earlier, which is not included in CiscoRemote, NetWare must be running during the CiscoRemote installation.
To install NetWare version 3.11 or earlier, you must manually configure the NetWare installation. The CiscoRemote installation creates and modifies the configuration and batch files necessary for the Novell NetWare installation, but it does not copy the NetWare client executable files (for example, NETX.EXE and LSL.COM) onto the hard disk. To complete the Novell NetWare installation, follow these steps:
Step 1 Copy the Novell client files into the directory containing NET.CFG.
Refer to the Novell NetWare documentation for related information.
Step 2 Move STARTNET.BAT, which the CiscoRemote installer added to the end of AUTOEXEC.BAT, to a location where it will be invoked at boot up time.
For example, if your AUTOEXEC.BAT starts up WIN, make sure STARTNET precedes WIN.
CiscoRemote automatically configures your network set up files. However, you may need to manually add a CiscoRemote adapter and protocol if you alter other network connections (for example, changing an IP address or subnet). To add the CiscoRemote PPP/SLIP protocol driver to a Windows network, follow these steps:
Step 1 From a PC that has Windows for Workgroups already installed and running, install CiscoRemote on your system.
Step 2 Click on the Windows Setup icon.
Step 3 From the Options menu in the Network Setup dialog box, select Change Network Settings.
Step 4 Click Networks to ensure that Install Microsoft Windows Network is selected in the Network screen. Click OK.
Step 5 Click Drivers in the Network Setup dialog box.
Step 6 Click Add Adapter in the Network Drivers dialog box.
Step 7 Select CiscoRemote PPP/SLIP Driver in the Add Network Adapter dialog box and click OK.
To add the CiscoRemote VxD driver for remote access, follow these steps:
Step 1 Select the CiscoRemote PPP/SLIP driver from the Network Drivers dialog box and click Add Protocol.
Step 2 Select CiscoRemote VxD (remote) from the Add Network Protocol dialog box and click OK. CiscoRemote VxD must be the default protocol for its adapter. If it isn't, select it and click Set As Default Protocol, then close the dialog box.
Step 3 Click OK in the Network Setup dialog box. If the Setup Microsoft Network Names appears, set up the names as instructed. CiscoRemote is fully installed once you reboot.
The Protocols Installation dialog box in Release 1.0 is replaced by Figure 1 in Release 1.0 (2).
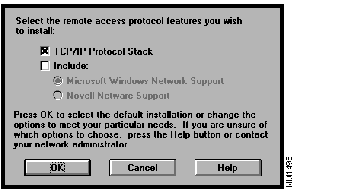
You can select the Transmission Control Protocol/Internet Protocol (TCP/IP) stack and include support for the network environment that you are using. Support for Windows and NetWare networking cannot be simultaneously selected. Refer to Table 1 for assistance on deciding which protocol features to install.
| If Your Networking Environment Needs | Check this Protocol Feature |
|---|---|
| Support for TCP/IP with Winsock only. | TCP/IP Protocol Stack only. |
| Support for Windows networking using NetBIOS over TCP/IP. | TCP/IP Protocol Stack and include Microsoft Windows Network Support. |
| Support for Novell networking. | Novell NetWare Support only. |
| Support for the CiscoRemote applications but not the TCP/IP Protocol Stack. | Select only CiscoRemote applications; don't select the TCP/IP Protocol Stack or support for an operating system. |
The CiscoRemote 1.0 Netscape installation conflicts with .DLL files in some PC systems. For example, in some cases the installation program will hang or execute a continuous loop after you select Continue in the Applications Choices dialog box. Follow these steps to solve this problem:
Step 1 Exit the installation program by pressing F3 or Alt+Esc.
Step 2 Restart the CiscoRemote installation process.
Step 3 Install your preferred applications from the Applications Choices dialog box, except for Netscape.
Some modems are not identified by the Discover feature in the Modem Port Setup dialog box. For example, the installation program may hang when an unrecognized modem is attached to the PC, such as the US Robotics Courier and Sportster modems. To work around this problem, manually select your modem from the drop-down modem window and click OK. This problem is resolved in CiscoRemote 1.0 (2).
The chapter "Getting Started with PPP/SLIP Connect" is updated in CiscoRemote 1.0 (2). Within this chapter, establishing connections to remote networks through your PC's COM port and modem is explained and new functionality is documented. Refer to the section "Updates to CiscoRemote Documentation," in this release note, for more information.
Each of the following documents are located on the CiscoRemote CD-ROM:
To view the documents from the CiscoRemote CD-ROM, load the CD-ROM in your system's CD-ROM drive and follow this procedure:
Step 1 Open the Netscape browser.
Step 2 From the File menu, choose Open File.
Step 3 Select the drive containing the CiscoRemote CD.
Step 4 From the CD-ROM's root directory, open the file CONTENTS.HTM, which is the CiscoRemote CD-ROM directory.
Step 5 Select the manual that you want to view. You can browse through the documentation using the scroll bar, hypertext links, and the Back and Forward features in the Netscape toolbar.
You can also access CiscoRemote technical documentation on the World Wide Web: http://www.cisco.com.
The following two chapters have been updated in the CiscoRemote 1.0 documentation:
Within the chapter "Getting Started with PPP/SLIP Connect," the process of establishing connections to remote networks through your PC's COM port and modem is explained and new functionality is documented. The chapter "Eudora Light Electronic Mail Client" contains additional information on configuring Eudora Light and sending a message.
Through two 14.4k V.32bis lines, you can test CiscoRemote by verifying asynchronous connections to network hosts and Powerburst agents through a Cisco access server, which provides an EXEC prompt and support for the following protocols:
The following three network hosts and two Powerburst agents are available in the testbed:
The modems can be reached by calling +1 408 526 8928, which is a telephone rotary group of two modems. The lines are configured to autoselect PPP and ARAP, which means you can start transmitting PPP or ARAP immediately. The login for the access server is username cisco with password cisco. The lines are configured for PPP/PAP authentication. You can use autoselect+PAP, or you can log in manually though the username and password prompts and start PPP or SLIP.
If your PPP client supports PAP, use the username cisco and the password cisco. Otherwise, skip through the username and password prompts by entering the return key (CR) and issue the command ppp default for PPP or slip default for SLIP at the command prompt (>).
If you are testing the Powerburst remote node accelerator, set your Powerburst agent name to CISCO_AGENT under the Advanced Options menu in the Powerburst control panel.
Depending on which protocols you are running inside CiscoRemote, you have access to servers in the testbed. Log in to each server with the username cisco and the password cisco. Refer to Table 2 for a list of available server connections.
| Protocols Running in CiscoRemote | Available Servers in Testbed |
|---|---|
| IPX | You can access the server called CISCO-RULES. |
| IP | You can Telnet, FTP1, or TFTP2 to 172.16.24.117, which is a LINUX machine called publinux. |
| NetBIOS over IP | Point your WINS server to 172.16.24.118. This will enable you to mount the machine DIALIN-TEST in domain WORKGROUP. You can connect a network drive to \\DIALIN-TEST. Browsing will not work, unless you statically configure your browse master as "DIALIN-TEST." |
| NetBIOS over IPX | The Windows NT server is configured to bidirectionally forward IPX broadcasts. |
| NetBIOS over NetBEUI, Xremote, LAT3 amd TN3270 | These protocols are not supported in the testbed. |
Use the following sample configuration of a Cisco 2500 access server to help you configure your access server or router. The exclamation points (!) at the beginning of a line indicate a comment line.
!For Appletalk (over PPP only, not ARAP)
appletalk client-mode
!For ARAP
arap network 668 NeverNeverLand
!For IPX
ipx routing
!Create a loopback interface if you want all IPX users on a single net
interface Loopback0
no ip address
ipx network CF
!interface Ethernet0
!For IP
ip address 172.16.24.116 255.255.255.0
!For appletalk
appletalk cable-range 660-660
appletalk zone NeverNeverLand
!For IPX
ipx network CE
!For NETBIOS over IPX only
ipx type-20-propagation
!interface Group-Async1
!In General
encapsulation ppp
no keepalive
async mode interactive
!Select a range of lines
group-range 1 16
!For IP:  Use addresses from the ethernet interface network.
ip unnumbered Ethernet0
ip tcp header-compression passive
!For IPX only:  Assign all dialin IPX to the network on loop 0 (CF)
ipx ppp-client Loopback0
!For NETBIOS over IPX only
ipx type-20-propagation
!For IP.  Pick IP addresses for the remote caller from this local pool.
peer default ip address pool default
!For all.  Demand a password by PAP if not logged in
ppp authentication pap if-needed
!PAP password table
username cisco password cisco
!set a range of addresses from the ETHERNET not in use
ip local pool default 172.16.24.125 172.16.24.141
line 1 16
!Time out if idle for 20 minutes
session-timeout 20
!Present a username prompt if they don't speak PPP right away.
login local
!Modem signal handling for CD and DTR
modem InOut
!Autoselect:  Detect ARAP and PPP packets at the Username: prompt.
autoselect arap
autoselect during-login
autoselect ppp
!For Appletalk (ARAP).
arap enable
arap noguest
!Disallow reverse connection (add only after modems are configured)
transport input none
!Set to maximum DTE speed of modem (typically 115200 for V.34)
rxspeed 115200
txspeed 115200
!Use RTS/CTS for flowcontrol
flowcontrol hardware
The following example displays dial-in IP and IPX users on their own subnet.
!Create a loopback interface representing the "dial in network."
interface Loopback0
ip address 172.16.25.1 255.255.255.0
ipx network CF
!interface Ethernet0
!For IP
ip address 172.16.24.116 255.255.255.0
!For appletalk
appletalk cable-range 660-660
appletalk zone NeverNeverLand
!For IPX
ipx network CE
!For NETBIOS over IPX only
ipx type-20-propagation
!interface Group-Async1
!In General
encapsulation ppp
no keepalive
async mode interactive
!Select a range of lines
group-range 1 16
!For IP:  Use addresses from the loopback interface network.
ip unnumbered Loopback0
ip tcp header-compression passive
!For IPX only:  Assign all dialin IPX to the network on loop 0 (CF)
ipx ppp-client Loopback0
!For NETBIOS over IPX only
ipx type-20-propagation
!For IP.  Pick IP addresses for the remote caller from this local pool.
peer default ip address pool default
!For all.  Demand a password by PAP if not logged in
ppp authentication pap if-needed
!PAP password table
username cisco password cisco
!set a range of addresses from the loopback interface range.
ip local pool default 172.16.25.2 172.16.25.18
You can access additional technical documentation on CiscoRemote from Cisco Information Online, which is Cisco Systems' primary, real-time support channel. Available 24 hours a day, 7 days a week, CIO provides a wealth of standard and value-added services to Cisco's customers and business partners. CIO services include product information, software updates, release notes, technical tips, the Bug Navigator, configuration notes, brochures, descriptions of service offerings, and download access to public and authorized files.
CIO serves a wide variety of users through two interfaces that are updated and enhanced simultaneously--a character-based version and a multimedia version that resides on the World Wide Web (WWW). The character-based CIO (called "CIO Classic") supports Zmodem, Kermit, Xmodem, FTP, Internet e-mail, and fax download options, and is excellent for quick access to information over lower bandwidths. The WWW version of CIO provides richly formatted documents with photographs, figures, graphics, and video, as well as hyperlinks to related information.
You can access CIO in the following ways:
http://www.cisco.com.
cio.cisco.com.
For a copy of CIO's Frequently Asked Questions (FAQ), contact cio-help@cisco.com. For additional information, contact cio-team@cisco.com.
tac@cisco.com. To obtain general information about Cisco Systems, Cisco products, or upgrades, contact 800 553-6387, cs-rep@cisco.com.
|
|