|
|

You can use the FarSite application to hold conferences between computer users at different locations. Using FarSite, you can have all meeting participants link their computers and view and work with the same documents on their computer screens at the same time, and discuss and annotate documents as the meeting progresses. You can also set up a conference call so that participants can discuss the documents viewed on screen. People can join the document conference by connecting over a network or via a modem.
When you use FarSite, you record the information you want presented during a conference in a workbook. A FarSite workbook consists of pages of text, charts, and graphics to be viewed. During the document conference, the person hosting the meeting shares the workbook with the group. Each participant can then display or alter workbook pages, mark up images, or highlight important items. Participants can also open other applications on their computers and share these documents as well. Even though participants may be many miles apart, everyone attending the electronic meeting can see what's being presented on screen and participate in discussing and revising it.
To hold a FarSite document conference, you must make the following preparations:
This chapter briefly introduces the basics of setting up FarSite and outlines how to make workbooks and hold a conference. For more information about FarSite, see the online help or refer to the document CiscoRemote Plus Administrator Guide, which is available on the CiscoRemote Plus CD.
You can configure FarSite to work from a remote location, connecting to a network via a modem. You can also configure the application to run over a network.
Take the following steps to configure FarSite for use with a modem:
Step 2 Select Communications Setup from the Conference menu.
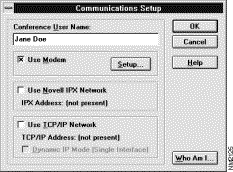
The Communications Setup window opens. (See Figure 8-1.)
Step 3 Click on the Use Modem checkbox to select it (an X should appear).
Step 4 Click on the Setup button.
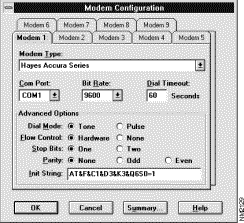
The Modem Configuration window opens. (See Figure 8-2.)
Only one modem setup is required, but you can set up different configurations for up to nine modems.
Step 5 Click on the Modem 1 tab, if necessary.
Step 6 Click on the arrow in the Modem Type field to see a list of modems. Select the name of your modem from the list.
Step 7 Select the communication port to which your modem is connected in the Com Port option.
Step 8 Select the speed at which your computer and modem communicate in the Bit Rate field, if necessary.
Step 9 Click OK.
Step 10 Click OK.
A message appears asking you to exit FarSite and restart your computer.
Step 11 Click OK.
Step 12 Restart your computer.
FarSite is now set up to communicate using your modem.
You can configure FarSite to work with Novell IPX and TCP/IP networks. See your network administrator for information about what kind of network you have.
Take the following steps to configure FarSite for use on a network:
Step 2 Select Communications Setup from the Conference menu.
The Communications Setup window opens. (See Figure 8-3.)
Step 3 Take one of the following steps to configure your connection:
Step 4 Click OK.
A message appears asking you to exit FarSite and restart your computer.
Step 5 Click OK.
Step 6 Restart your computer.
FarSite is now set up to communicate using a network.
When you open FarSite, a window with toolbars opens and you can create the pages of a workbook. A standard toolbar at the top of the window allows you to open, save, and print workbooks. You can also work with pages, capture screens and images, zoom in and out, and set up a document conference. A navigation toolbar allows you to flip from page to page in a workbook. A drawing toolbar provides the drawing and text tools you need to create text and images.
Take the following steps to create a FarSite workbook:
The FarSite window opens. (See Figure 8-4.)
Step 2 Create the information you want in the workbook.
Step 3 When you have created your workbook, select Save from the File menu to save it.
Holding a FarSite conference is similar to calling a meeting in a conference room. To call a conference, you create or arrange the meeting and invite others using the Create and Invite commands. When you have created a workbook, you become the conference provider; documents and modifications pass through your PC and can be viewed by all participants. The provider's computer must be connected during the conference for the conference to continue (other users may leave, if necessary).
There are several ways to establish a conference. You can hold a conference by calling a data conference service. At a prearranged time, all conference participants start up FarSite and select the name of the conference service provider from an address book. Once connected, the service provides both the data and audio portions of the conference.
You can give a data conferencing service the names and modem phone numbers of all conference participants. The service then calls and connects with participants' computers at the prearranged time.
You can establish a direct connection with other computers over phone lines and hold a FarSite conference with remote users. The computer that is the conference provider must have a modem for each remote computer to join the conference. You can configure FarSite to work with up to nine modems.
Take the following steps to create a conference:
Step 2 Click on the Create Conference button in the FarSite window or select Create from the Conference menu.
The Create Conference window opens.
Step 3 Enter a conference name in the Conference Name field.
Step 4 Click on the Password button and enter a password if you want participants to enter a password before being able to participate in the conference.
Step 5 Click OK.
Next you invite the participants of the conference. The Address Book window opens.
Step 6 Select a name from the address book and click on Invite.
Step 7 Repeat Step 6 for each participant in the conference.
Step 8 Click OK.
An invitation to join the conference is sent to each invitee. Network users are contacted via the network, and remote users are contacted via modem.
Step 9 Click on the Participants tab to see when participants have joined the conference.
A checkmark appears beside the names of participants when they have joined.
Step 10 When all invitees have joined the conference, click on the Close button.
Step 11 The conference begins.
If you are not the conference provider, you can join a conference when you are invited.
Take the following steps to join a conference:
Step 2 When you have joined the conference, click on Close and proceed with the conference.
When you are participating in a conference, you open a workbook and share it with other participants. Participants can only see the pages in a workbook that are designated as shared.
Take the following steps to open and share a workbook:
Step 2 Select the workbook and click OK.
The Share Workbook Now window opens.
Step 3 Click on the Share button.
Step 4 Click OK.
You can now navigate the pages of the workbook using the navigation toolbar, and annotate and point to different items using the tools and pointer in the drawing toolbar.
When you are participating in a conference, you can open an application and share its documents with other participants.
Take the following steps to open and share an application:
The Application Sharing message window opens.
Step 2 Click OK.
Step 3 Start the application you want to share.
If the application is already running, click on the application window to activate it.
A message appears asking if you want to share the application.
Step 4 Click on Yes.
The application appears on the other participants' screens. To stop sharing an application and close it, select Exit from the File menu in the application. To stop sharing the application but keep it open, click on the indicator button in the title bar. A sharing message box appears asking if you would like to end the application sharing session. Click on Yes.
Any participant, except the conference provider, can leave a conference at any time and the conference continues. When the conference provider leaves the conference, the conference ends for all participants.
Take the following steps to leave a conference:
A message appears asking you to confirm that you want to leave the conference.
Step 2 Click on Yes to leave the conference.
A message appears asking if you want to retain a copy of the shared workbook.
Step 3 Click on Yes to keep a copy of the workbook; click on No to leave the conference without a copy.
For more information about the many other features of FarSite, refer to the document CiscoRemote Plus Administrator Guide, which is available on the CiscoRemote Plus CD. FarSite's additional features allow you to do the following:
![]()
![]()
![]()
![]()
![]()
![]()
![]()
![]()
Posted: Sat Jan 18 23:50:19 PST 2003
All contents are Copyright © 1992--2002 Cisco Systems, Inc. All rights reserved.
Important Notices and Privacy Statement.