Installing the ASM-CS
This chapter provides the following instructions:
- Rack-mount installation
- General installation
- External connections
 | Caution Before installing the chassis in a rack or wiring closet, read the "General Site Requirements" section in Chapter 2, to familiarize yourself with the proper site and environmental conditions. Failure to read and follow these guidelines could lead to an unsuccessful installation and possible damage to the ASM-CS power supply and components. |
Rack-Mount Installation
Following is the procedure for attaching the rack-mount kit and installing the ASM-CS in a rack or wiring closet. This procedure may require more than one person to complete.
Note If no rack or closet mounting is required, proceed to the section, "General Installation."
Step 1: Place the chassis on a stable surface with the front panel facing you.
Step 2: Attach one flange to each side of the chassis with the screws provided.
Step 3: Using the screws provided, mount the chassis in the rack or wiring closet following the site requirements Chapter 2.
 | Caution A number of chassis can be rack mounted with tops and bottoms flush with each other; however, they should not be mounted side by side because one chassis will blow exhaust into the fan intake of another, causing cooling problems. |
Step 4: Proceed to the section "Making External Connections" to attach external interface cables to chassis back panel.
General Installation
The installation of the ASM-CS is greatly simplified if no rack or wiring closet mounting is required. Read the following guidelines for this general installation:
- Choose a suitable location to eliminate the possibility of blocking the ASM-CS intake and exhaust vents.
- The ASM-CS can be stacked on other equipment providing that this stacking meets or exceeds the ventilation and placement recommendations made in the previous chapter.
 | Caution Do not place an ASM-CS next to another ASM-CS (or other piece of equipment) if the intake or exhaust vents on the ASM-CS are blocked because the exhaust of one chassis will be pulled in by the intake of another. |
- After you select the space, the installation is simply a matter of positioning the ASM-CS and connecting the external network cables to the appropriate appliques located on the rear panel.
- After you correctly position the chassis, proceed to the section "Making External Connections" to attach external interface cables to the chassis rear panel.
Making External Connections
The following sections discuss the basic cable requirements for installing the ASM-CS. After ensuring these basic cable requirements are met, refer to Appendix A, "Cabling Specifications" for the cabling descriptions that apply to your configuration.
Console Terminal Cable
The console port cable is used to connect the ASM-CS to the terminal you will be using. The external port for this cable is located on the rear panel of the ASM-CS in the upper left corner (with the chassis rear facing you).
Before connecting the console port, check your terminal's documentation to determine the baud rate of the terminal you will be using. The baud rate of the terminal must match the default baud rate (9600 baud, 8 data bits, no parity, 2 stop bits) of the ASM-CS.
External Cabling Guidelines
The following general guidelines will assist you in properly connecting the external network cables to your ASM-CS:
- Make certain you connect the correct interface types.
- The different interfaces used with the ASM-CS have unique connectors, so it will be physically impossible to improperly connect them; however, exercise caution when connecting the cables to avoid potential problems. Refer to the following section "Interface Connectors" to verify your cable configurations.
- Verify the terminal-port numbering on the cables you connect.
- Each terminal port should have uniquely numbered labels on each installed communication server applique. This numbering is important to maintain the correct order of terminal ports based upon how the system assigns terminal-port numbers.
- Avoid crossing high-power cables with interface cables.
- Crossing high-power cables with interface cables can cause interference in some interface types. It will not always be possible to avoid this, but try to prevent it whenever possible.
- Do not defeat cable strain relief systems.
- Most interfaces provide some type of strain relief to prevent the cables from being accidentally disconnected. Among these types of strain relief are the slide-fasteners on Ethernet cables and the screw-type fasteners on serial cables. Use any and all strain-relief devices provided to prevent potential problems caused by inadvertent cable disconnection.
- Verify proper interface cabling before starting the system.
- Before applying power to the system, prevent unnecessary problems or component damage by double-checking your cabling.
- Verify all cabling limitations before applying power to the system.
- When setting up your system, you must consider a number of factors related to the cabling required for your connections. For example, when using RS-232 connections, be aware of the distance electromagnetic interference limitations for signaling. Each of these cabling considerations is described in Appendix A, "Cabling Specifications."
- Connect the power cord to the proper receptacle.
- The chassis power supply is factory-configured for either 110-volt or 240-volt operation (240 volts in the U.K.). All units include a 6-foot electrical power cord. A label near the power input indicates the correct voltage for your unit.
 | Warning A voltage mismatch can cause equipment damage and may pose a fire hazard. If the voltage indicated on the label is different from the power outlet voltage, do not connect the chassis to that receptacle. Contact your service representative for information on how to proceed. |
Note After installing all of the rear panel cables, you can begin the configuration of the ASM-CS by using the companion publication,
Communication Server Getting Started Guide.
 | Caution If the ASM-CS fails to operate in the manner specified in the Getting Started Guide, refer to Chapter 4 of this publication, "Troubleshooting the ASM-CS," to help isolate the problem, and then notify your service representative. |
Interface Connectors
This section includes illustrations of the interface connectors used with the ASM-CS. Use these illustrations to correctly identify the connections you will make to the rear panel appliques on the ASM-CS. The connectors illustrated include the following:
- Ethernet connectors (for thicknet cable)
- RS-232 cable
- X.21 cable
- RS-449 cable
- HD V.35 cable
- Token Ring connectors
Ethernet Connectors
Figure 3-1 shows both ends of the Ethernet thicknet cable.
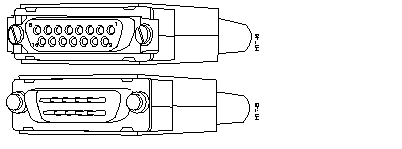
Figure 3-1: Ethernet Network Connector and Chassis Connector
RS-232 Connectors
Figure 3-2 shows both ends of the RS-232 cable.

Figure 3-2: RS-232 DCE and DTE Connectors
Note The DTE (female) connector of the RS-232 cable is also used for the
auxiliary port on the chassis (if installed), while the DCE (male) connector is used for the console port of the chassis.
 | Warning To prevent damage to the RS-232 non-return to zero insertion (NRZI) applique, do not connect the internal ribbon cable to the NRZI applique with the power on to the chassis. Typically, it will not be necessary to disconnect this ribbon cable; however, turn off power to the chassis before connecting the ribbon cable to the NRZI applique. |
X.21 Connectors
Figure 3-3 shows both ends of the X.21 cable.
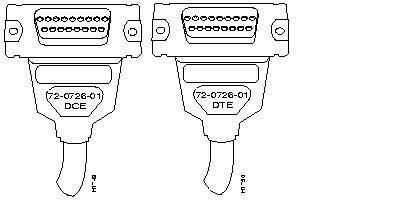
Figure 3-3: X.21 DCE and DTE Connectors
Note Both ends of the X.21 cable are female, so each is labeled with the appropriate DCE and DTE designations.
RS-449 Connectors
Figure 3-4 shows both ends of the RS-449 cable.

Figure 3-4: RS-449 DCE and DTE Connectors
HD V.35 Connectors
Figure 3-5 shows the male chassis connector and the two DCE/DTE network connectors associated with the high-density (HD) V.35 cable.
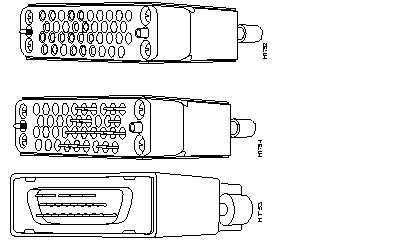
Figure 3-5: HD V.35 Chassis Connector and Male and Female Network Connectors
Note The
HD V.35 cable is available in four models: DTE male-to-male, DTE male-to-female, DCE male-to-male, and DCE male-to-female. The chassis connector (shown at the top of
Figure 3-5) is always male, while the network connectors can be male or female.
Token Ring Connectors
Following are illustrations of the connectors typically used in Token Ring applications.
Figure 3-6 shows the network and chassis connectors using the modular RJ-11 plug for the network connection.
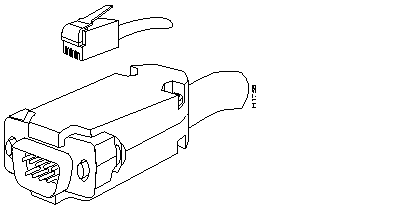
Figure 3-6: Token Ring Network (RJ-11) Connector and Chassis Connector
Token Ring: with MAU Connector
Figure 3-7 shows the chassis and network connectors using the media access unit (MAU) plug for the network connection.
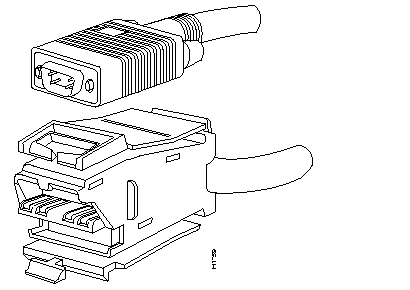
Figure 3-7: Token Ring Chassis Connector and Network (MAU) Connector


