|
|

This chapter explains how to power on the Cisco AS5800 and confirm normal system startup LED readings, and then confirm that the proper software is running on the router shelf and dial shelf.
After you have installed your dial shelf and router shelf and connected the cables, you are ready to start up the system by powering on the following components:
Before you power on the Cisco AS5800, you might want to prepare a terminal connection to view the software startup sequence. See the "Connecting to the Router Shelf Console and Auxiliary Ports" section for details on setting up a terminal connection. You should also confirm the LED indications as shown in the "Observing Access Server LEDs" section.
To power on the system, follow these steps:
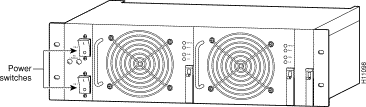
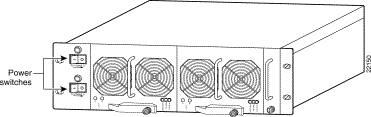
Step 2 If you are using the AC-input power shelf, power ON ( | ) the two power switches located on the AC-input power shelf front panel. (See Figure 4-1, or Figure 4-2 for the enhanced power supply.) Four green power OK LEDS should light.
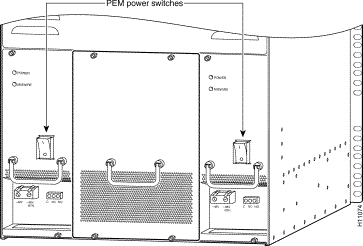
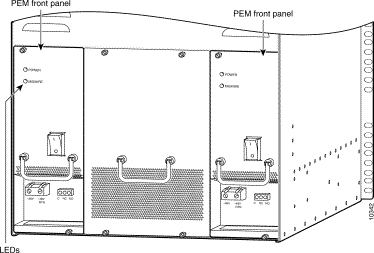
Step 3 Power ON ( | ) the power switches located on each dial shelf PEM front panel. (See Figure 4-3.) A green power LED on each PEM should light.
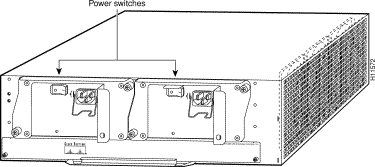
Step 4 Power ON ( | ) the two power switches located on the rear of the router shelf. (See Figure 4-4.) Both green power supply OK LEDs should light.
Step 5 Listen for fans in both the router shelf and the dial shelf. You should hear them operating immediately.
During the boot process, the LEDs on most of the port adapters in the router shelf and on the dial shelf cards and dial shelf controller cards light on and off in irregular sequence while the system is running initial self-diagnostic tests. On the router shelf I/O controller, the I/O power OK LED comes on immediately.
For a description of normal dial shelf LED states, proceed to the "Observing Access Server LEDs" section. Normal router shelf startup is discussed in the "Starting the Cisco 7206" section. If everything seems to be normal, complete the startup check with a console connection as described in the "Viewing Your System Configuration" section.
This section describes the normal LED states for the following components:
Table 4-1 provides a quick reference for nominal LED readings for Cisco AS5800 components. If LED readings vary from those listed, refer to the relevant sections for more details.
LEDs for the individual CT1/CE1 trunk cards, DMM modem cards, and Voice over IP (VoIP) cards are described in the Cisco AS5800 Universal Access Server Dial Shelf Card Guide. Nominal LED readings are briefly listed in Table 4-2.
The PEMs contain two LEDs on the front panel—POWER and MISWIRE. (See Figure 4-5.)
If either of these LEDs functions abnormally, proceed to "Hardware Troubleshooting."
Figure 4-5 shows the location of the PEM LEDs.
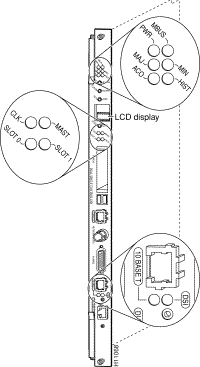
The dial shelf controller card front panel contains several LEDs. Unlike the other dial shelf cards installed in the Cisco 5814 dial shelf, the dial shelf controller card has two power LEDs, one for the dial shelf controller card power and the other for the system MBus power.
Figure 4-6 shows the dial shelf controller card front panel LEDs, and Table 4-3 describes the LED functions.
If the dial shelf controller card LEDs function abnormally, proceed to "Hardware Troubleshooting."
| 1A major alarm condition includes router shelf failure, backplane interconnect failure, two-fan failure, power supply failure, dial shelf card failure, or conditional environmental thresholds.
2A minor alarm condition includes modem SIMM failure, HDLC controller failure, trunk line failure, or conditional environmental thresholds. |
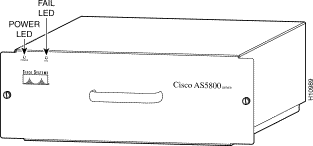
Two LEDs—Power and Fault—are mounted on the blower assembly front panel (see Figure 4-7) and function as described in Table 4-4.
If you detect a problem with the blower assembly LEDs, proceed to "Hardware Troubleshooting."
After installing your Cisco 7206 and connecting the cables, start each router as follows:
Step 2 At the rear of the router, place the power switch on the power supply in the ON (|) position. Repeat this if a second power supply is installed. The green OK LED on the power supply goes on.
Step 3 Listen for the fans; you should immediately hear them operating. If not, immediately place the power switch on the power supply in the OFF (0) position and proceed to the "Troubleshooting the Router Installation" section.
Step 4 During the boot process, observe the system LEDs. The LEDs on most of the port adapters go on and off in irregular sequence. Some may go on, go out, and go on again for a short time. On the I/O controller, the IO power OK LED comes on immediately.
Step 5 Observe the initialization process. When the system boot is complete (in a few seconds), the network processing engine begins to initialize the port adapters and the I/O controller. During this initialization, the LEDs on each port adapter behave differently (most flash on and off). The enabled LED on each port adapter goes on when initialization is completed, and the console screen displays a script and system banner similar to the following:
Note If the system does not complete each of the steps in the startup procedure, proceed to the "Troubleshooting the Router Installation" section for troubleshooting recommendations and procedures.
Step 6 When you start up the Cisco 7206 for the first time, the system automatically enters the setup command facility, which determines which port adapters are installed and prompts you for configuration information for each one. On the console terminal, after the system displays the system banner and hardware configuration, you will see the following System Configuration Dialog prompt:
You have the option of proceeding with the setup command facility to configure the interfaces, or exiting from setup and using configuration commands to configure global (system-wide) and interface-specific parameters. You do not have to configure the interfaces immediately; however, you cannot enable the interfaces or connect them to any networks until you have configured them.
Many of the port adapter LEDs will not go on until you have configured the interfaces. To verify correct operation of each interface, complete the first-time startup procedures and configuration, then refer to the configuration note for each port adapter for LED descriptions and to check the status of the interfaces.
The router shelf port adapters contain enabled LEDs, which must be on for the system to be operational. Refer to the Cisco 7206 Installation and Configuration Guide for a description of router shelf port adapter LEDs.
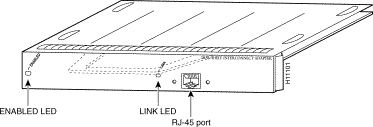
Unique to the Cisco AS5800 is the interconnect port adapter that installs in the router shelf. The dial shelf interconnect contains two LEDs: an enabled LED and a link status LED, shown in Figure 4-8. After system initialization, the enabled LED lights to indicate that the dial shelf interconnect has been enabled for operation.
The following conditions must be met before the router shelf port adapters and the dial shelf interconnect are enabled:
If any of the above conditions are not met, or initialization fails for other reasons, the enabled LED will remain off. Refer to the chapter "Hardware Troubleshooting," later in this publication, for router shelf LED troubleshooting tips.
When you start up your access server for the first time, the router shelf console displays the Cisco IOS software information that is loaded on your system if you have connected a terminal as described in the "Connecting to the Router Shelf Console and Auxiliary Ports" section. From this startup software banner (see the following example), you can identify the Cisco IOS software release version, other platform images that support system component functionality, and installed internal hardware components.
Your Cisco AS5800 should be running the following software:
If you find you have a different Cisco IOS software release on the router shelf or dial shelf, reload the correct software version. If you need to reload the software, refer to the Cisco AS5800 Software Installation and Configuration Guide that shipped with your Cisco AS5800. The Cisco AS5800 Universal Access Server Software Installation and Configuration Guide will be replaced by the Cisco AS5800 Universal Access Server Operation, Administration, Maintenance, and Provisioning Guide, available later this year.
If you established a terminal connection after initial startup, you can verify that the correct software is loaded by issuing the following commands at the terminal:
Step 2 Enter enable mode:
Step 3 View the router Cisco IOS release, dial shelf controller image, and boot image:
Step 4 View the dial shelf controller image (must match the one listed on the router).
Refer to the Cisco AS5800 Universal Access Server Software Installation and Configuration Guide that shipped with your system for additional software configuration information. The Cisco AS5800 Universal Access Server Software Installation and Configuration Guide will be replaced by the Cisco AS5800 Universal Access Server Operation, Administration, Maintenance, and Provisioning Guide, available later this year.
Your access server is now installed, and all components are operative. When you power ON the access server for the first time, messages appear on your console screen. When the initialization process is complete, the console screen displays a script and system banner. At this point, you can begin to configure the software. The software configuration information is contained in the Cisco AS5800 Universal Access Server Software Installation and Configuration Guide. Proceed to this publication for information on how to run the initial setup script and create a basic configuration.The Cisco AS5800 Universal Access Server Software Installation and Configuration Guide will be replaced by the Cisco AS5800 Universal Access Server Operation, Administration, Maintenance, and Provisioning Guide, available later this year. The Cisco AS5800 Universal Access Server Operations, Administration, Maintenance, and Provisioning Guide provides information needed for ongoing hardware and software maintenance and operation tasks.
The remainder of this document includes reference material for troubleshooting your system and Cisco AS5800 specifications.
![]()
![]()
![]()
![]()
![]()
![]()
![]()
![]()
Posted: Sun Jan 19 11:03:19 PST 2003
All contents are Copyright © 1992--2002 Cisco Systems, Inc. All rights reserved.
Important Notices and Privacy Statement.