|
|

To install and configure the Cisco 6510 Service Selection Gateway (Cisco 6510) hardware, you need an ASCII terminal or a computer with serial communications software installed and running.
Note Read the document Regulatory Compliance and Safety Information for the
Cisco 6510 Service Selection Gateway before installing. Even though you probably read
safety guidelines for the other products in your network, studying the material in this guide
and the brief section that follows can help keep you safe and focused as you continue
preparing your Cisco 6510 for service.
Follow these guidelines to ensure general safety:
For instructions on installing the Cisco 6510 software, refer to the Cisco 6510 Service Selection Gateway Software Installation and Configuration Guide.
Warning Do not work on the system or connect or disconnect cables during periods of lightning activity.
Warning Do not touch the power supply when the power cord is connected. For systems with a power switch, line voltages are present within the power supply even when the power switch is off and the power cord is connected. For systems without a power switch, line voltages are present within the power supply when the power cord is connected.
Warning Read the installation instructions before you connect the system to its power source.
Warning This equipment is intended to be grounded. Ensure that the host is connected to earth ground during normal use.
Warning Ultimate disposal of this product should be handled according to all national laws and regulations.
Warning Before working on equipment that is connected to power lines, remove jewelry (including rings, necklaces, and watches). Metal objects will heat up when connected to power and ground and can cause serious burns or weld the metal object to the terminals.
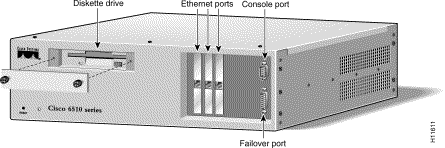
Figure 1-1 and Figure 1-2 show the front and back of the Cisco 6510.
Install the AC model of the Cisco 6510 as follows:
Step 2 Connect the power cord to the Cisco 6510 and plug it in.
Step 3 Continue to the "Cisco 6510 Installation (All Models)" section.
This section describes how to install the DC model of the Cisco 6510.
Warning A readily accessible two-poled disconnect device must be incorporated in the fixed wiring.
The following tools and equipment are needed for this procedure:
Step 2 Unpack the Cisco 6510 and place it in your equipment rack or on a level surface.
Step 3 Assure the Cisco 6510 is turned OFF.
Step 4 Assure the 48 VDC power can supply 15A of current.
Step 5 Assure the power is supplied through a 15A circuit breaker and that the circuit breaker is turned OFF.
Step 6 Assure an earth ground is available.
Step 7 Assure that the power cable has three 10 to 14 AWG wires for making positive, negative, and ground connections.
Step 8 Determine a path from the circuit breaker to the 48 VDC connector on the Cisco 6510, and then measure and record the path distance.
Step 9 Determine a path from the earth ground supplied by your facility to the back panel on the Cisco 6510, and then measure and record the path distance.
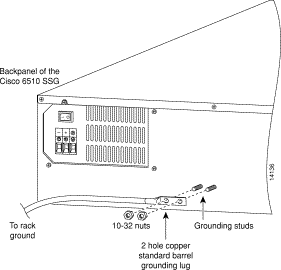
Step 2 Using a connection approved by the National Electric Code, attach one end of the ground cable to your facility's earth ground.
Step 3 Using the path determined for your ground cable, thread the other end of the cable to the back panel of the Cisco 6510.
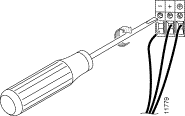
Step 4 Attach the 2-hole copper barrel lug to the end of the ground cable, then use two 10/32-inch nuts to connect the lug to the back of the Cisco 6510 as shown in Figure 1-3.
Step 5 Cut the power cable to the length required.
Step 6 From one end of the power cable, appropriately strip 3/8 of an inch of insulation from the wires.
Step 7 Connect the power cable to the Cisco 6510 by fastening the stripped end to the 48 VDC connector as shown in Figure 1-4.
Caution Note the wire colors used for making the positive, negative, and ground connections. Use the same color assignment for the connection at the circuit breaker. |
Step 8 Using the path determined for your power cable, thread the other end of the cable to the 15A circuit breaker.
Step 9 Appropriately dress the end of the power cable so that it can be connected to the 15A circuit breaker.
Step 10 Make sure the circuit breaker is in the OFF position.
Step 11 Connect the dressed end of the power cable to the circuit breaker.
Caution Make sure the wire colors used for making the positive, negative, and ground connections are the same color assignments used on the Cisco 6510's 48 VDC connector. |
Step 12 Switch the circuit breaker to the ON position.
Warning After wiring the DC power supply, remove the tape from the circuit breaker switch handle and reinstate power by moving the handle of the circuit breaker to the ON position. |
Step 13 Continue to the "Cisco 6510 Installation (All Models)" section.
After connecting power to the Cisco 6510, complete the following steps:
The console cable consists of three components:
Step 2 Connect one end of the console cable to the Cisco 6510 DB-9 console port.
Step 3 Connect the other end of the Cisco 6510 console cable to the DB-25 or DB-9 connector on your ASCII terminal or computer. Use a gender adapter if necessary (gender adapter not provided).
Figure 1-5 shows the serial cables provided with the Cisco 6510.
Step 4 Configure the serial port in your computer or terminal with these settings: 9600 baud, 8 data bits, no parity, and 1 stop bit; that is, set 9600, 8-N-1. Make sure that your communications software is running.
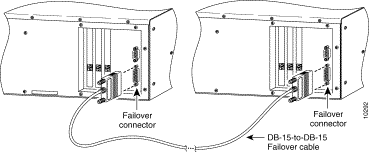
Step 5 If you are configuring the Cisco 6510 for failover, obtain a DB-15-to-DB-15 failover cable from Cisco.
The order number for the failover cable is CAB-FO-SSG6510=.
Connect the end of the cable labeled Primary to the failover port at the lower right of the active unit's front panel and the end of the cable labeled Secondary to the failover port of the standby unit.
Figure 1-6 shows two Cisco 6510s connected with a failover cable.
Step 6 Turn ON the power switch (see Figure 1-2). Because the Cisco 6510 ships with its software already in Flash memory, the Cisco 6510 can boot without a system disk.
As the Cisco 6510 boots, messages similar to the following appear on your computer or terminal:
Step 7 Connect the network cable from the hub or switch connected to the host network to the network interface connections for interface card 0 (the far left card) on the front of the Cisco 6510.
Note As you connect the Cisco 6510 network interface cards to network
communications equipment, make a note of which interface card port is
connected to each piece of equipment. You will need this information later when
you configure the Cisco 6510 software.
From left to right, the Cisco 6510 software addresses the interface cards as
interface card 0 (FEI0), interface card 1 (FEI1), and interface card 2 (FEI2).
Step 8 Connect the network cable from the router on the remainder of your network to interface card 2 on the front of the Cisco 6510 (the far right card).
Caution The Cisco 6510 must see all network traffic to make sure that the translation of IP headers occurs in both directions. You cannot allow any traffic to bypass the Cisco 6510. |
Step 9 Connect the network cable from the router or network jack that is connected to the system running the Cisco User Control Point (UCP) or another authentication, authorization, and accounting (AAA) server to interface card 1 on the front of the Cisco 6510 (the middle card).
You are ready to configure the Cisco 6510 as described in Chapter 2 of the Cisco 6510 Service Selection Gateway Software Installation and Configuration Guide, "Installing and Configuring the Cisco 6510 Software."
![]()
![]()
![]()
![]()
![]()
![]()
![]()
![]()
Posted: Sat Jan 18 23:59:47 PST 2003
All contents are Copyright © 1992--2002 Cisco Systems, Inc. All rights reserved.
Important Notices and Privacy Statement.