|
|

This document describes how to replace the internal AC or DC power supply in the Cisco AS5300 series and Cisco AS5400 series universal gateways, and includes the following sections:
Follow these guidelines to ensure general safety:
Safety warnings appear throughout this publication in procedures that, if performed incorrectly, may harm you. A warning symbol precedes each safety warning.
 |
Warning Ultimate disposal of this product should be handled according to all national laws and regulations. To see translations of the warnings that appear in this publication, refer to the Regulatory Compliance and Safety Information document that accompanied this device. |
|
Warning Read the installation instructions before you connect the system to its power source. To see translations of the warnings that appear in this publication, refer to the Regulatory Compliance and Safety Information document that accompanied this device. |
|
Warning Only trained and qualified personnel should be allowed to install or replace this equipment. To see translations of the warnings that appear in this publication, refer to the Regulatory Compliance and Safety Information document that accompanied this device. |
|
Warning Before working on a chassis or working near power supplies, unplug the power cord on AC units; disconnect the power at the circuit breaker on DC units. To see translations of the warnings that appear in this publication, refer to the Regulatory Compliance and Safety Information document that accompanied this device. |
|
Warning Before working on equipment that is connected to power lines, remove jewelry (including rings, necklaces, and watches). Metal objects will heat up when connected to power and ground and can cause serious burns or weld the metal object to the terminals. To see translations of the warnings that appear in this publication, refer to the Regulatory Compliance and Safety Information document that accompanied this device. |
Follow these guidelines when working on equipment powered by electricity:
Electrostatic discharge (ESD) can damage equipment and impair electrical circuitry. ESD occurs when electronic printed circuit cards are improperly handled, and can result in complete or intermittent failures. Always follow ESD prevention procedures when removing and replacing cards. Ensure that the chassis is electrically connected to earth ground. Wear an ESD-preventive wrist strap, ensuring that it makes good skin contact. Connect the clip to an unpainted surface of the chassis frame to safely channel unwanted ESD voltages to ground. To properly guard against ESD damage and shocks, the wrist strap and cord must operate effectively. If no wrist strap is available, ground yourself by touching the metal part of the chassis.
 |
Caution For safety, periodically check the resistance value of the antistatic strap, which should be between 1 and 10 megohms (Mohm). |
This document is to be used with the following documents:
To replace the power supply, you will need:
The following sections describe how to remove and install the Cisco AS5300 power supply:
 |
Note For information on removing and installing the redundant power supply for the Cisco AS5300, see the guide, Installing a Redundant Power Supply in Cisco AS5300 Universal Access Servers, that comes with your power supply. |
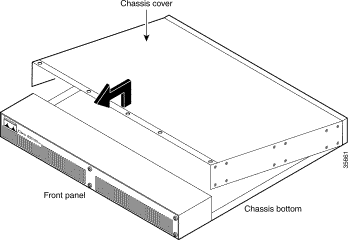
This section describes how to access the internal components by removing the chassis cover.
|
Warning Do not touch the power supply when the power cord is connected. For systems with a power switch, line voltages are present within the power supply even when the power switch is off and the power cord is connected. For systems without a power switch, line voltages are present within the power supply when the power cord is connected. To see translations of the warnings that appear in this publication, refer to the Regulatory Compliance and Safety Information document that accompanied this device. |
|
Warning Before working on a chassis or working near power supplies, unplug the power cord on AC units; disconnect the power at the circuit breaker on DC units. To see translations of the warnings that appear in this publication, refer to the Regulatory Compliance and Safety Information document that accompanied this device. |
|
Warning Before opening the chassis, disconnect the telephone-network cables to avoid contact with telephone-network voltages. To see translations of the warnings that appear in this publication, refer to the Regulatory Compliance and Safety Information document that accompanied this device. |
|
Warning Do not work on the system or connect or disconnect cables during periods of lightning activity. To see translations of the warnings that appear in this publication, refer to the Regulatory Compliance and Safety Information document that accompanied this device. |
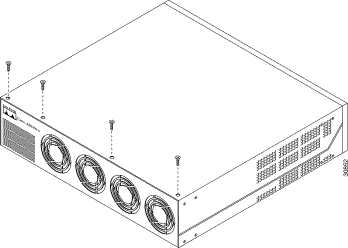
To remove the chassis cover, follow these steps:
Step 2 Remove all interface cables from the rear panel of the chassis.
Step 3 Place the chassis so that the front panel is facing you.
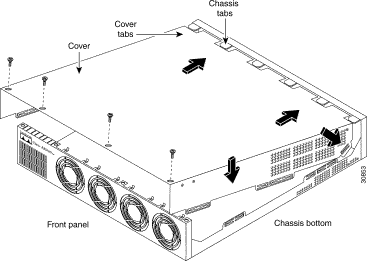
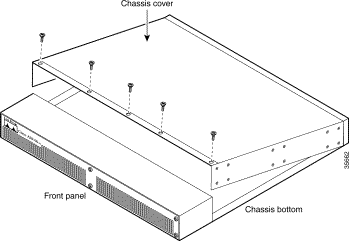
Step 4 Remove the four screws on the chassis cover. (See Figure 1.)
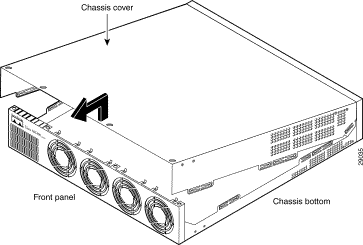
Step 5 Lift the chassis cover upward and pull it away from the tabs on the rear of the chassis. (See Figure 2.)
This section describes how to remove the power supply. Note the following safety warnings before you remove the power supply:
|
Warning Ultimate disposal of this product should be handled according to all national laws and regulations. To see translations of the warnings that appear in this publication, refer to the Regulatory Compliance and Safety Information document that accompanied this device. |
|
Warning Only trained and qualified personnel should be allowed to install or replace this equipment. To see translations of the warnings that appear in this publication, refer to the Regulatory Compliance and Safety Information document that accompanied this device. |
|
Warning Read the installation instructions before you connect the system to its power source. To see translations of the warnings that appear in this publication, refer to the Regulatory Compliance and Safety Information document that accompanied this device. |
|
Warning Before working on a chassis or working near power supplies, unplug the power cord on AC units; disconnect the power at the circuit breaker on DC units. To see translations of the warnings that appear in this publication, refer to the Regulatory Compliance and Safety Information document that accompanied this device. |
|
Warning Before working on equipment that is connected to power lines, remove jewelry (including rings, necklaces, and watches). Metal objects will heat up when connected to power and ground and can cause serious burns or weld the metal object to the terminals. To see translations of the warnings that appear in this publication, refer to the Regulatory Compliance and Safety Information document that accompanied this device. |
To remove the power supply, follow these steps:
|
Note Although the following illustrations show only the AC power supply, the procedures are the same for the DC power supply. |
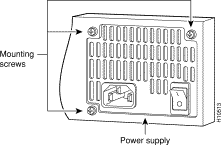
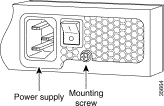
Step 2 Remove the three mounting screws that secure the power supply to the chassis and set them aside. (See Figure 3.)
Step 3 Turn the chassis so that the front panel is facing you.
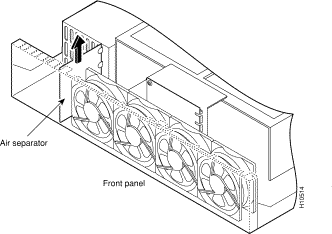
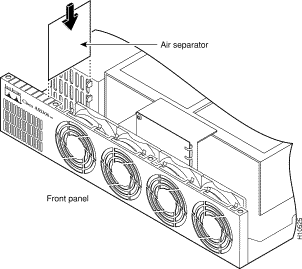
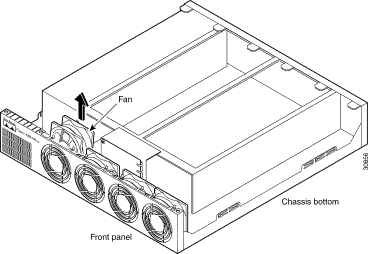
Step 4 Lift the air separator out of the chassis. (See Figure 4.)
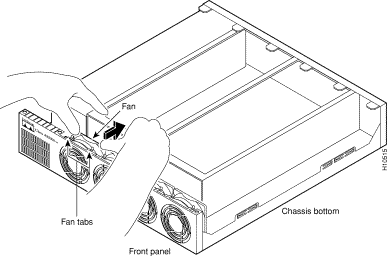
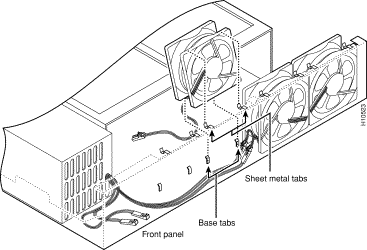
Step 5 Pull the fan closest to the power supply away from the sheet metal tabs. (See Figure 5.)
Step 6 Lift the fan from the chassis and set the fan on top of the power supply. (See Figure 6.)
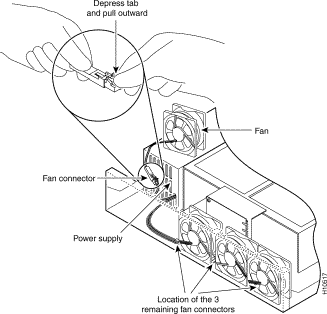
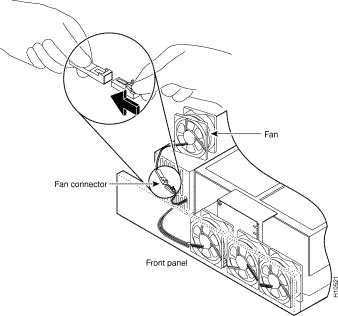
Step 7 Disconnect the fan cable. (See Figure 7.)
|
Caution Do not attempt to remove the fan cables without first depressing the tab as shown in Figure 7. You can damage the fan cables by applying stress if the connector is not removed properly. |
Step 8 Remove the next fan and disconnect its cable. You can disconnect the cables for the two remaining fans without removing the fans.
|
Note There are three different lengths of 2 wire +/- 12 VDC power cables. The two shortest cables go
to the two fans that were removed in
Step 6 through
Step 8. The two longer cables go to
the two remaining fans. The single medium-length cable goes to the power connector on the
backplane. If you use an incorrect cable to connect a fan or the backplane, then you are unable to make one of the other connections. |
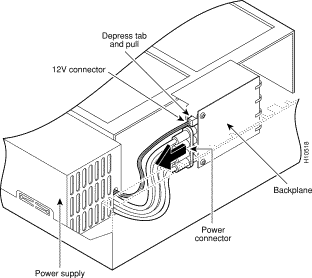
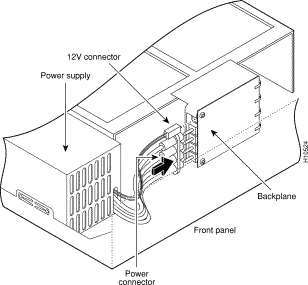
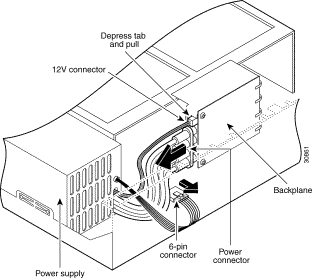
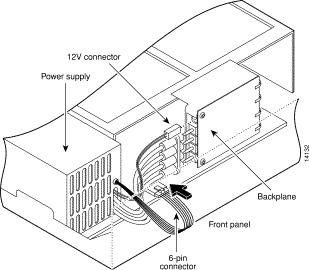
Step 9 Disconnect the power connectors from the backplane. First disconnect the 2-pin 12V connector and then disconnect the 4-jack harness. (See Figure 8.)
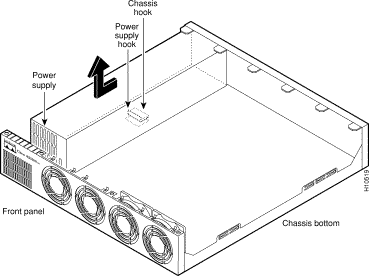
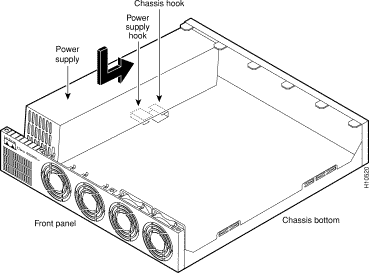
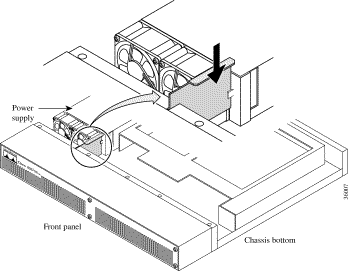
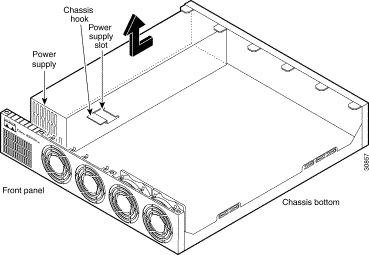
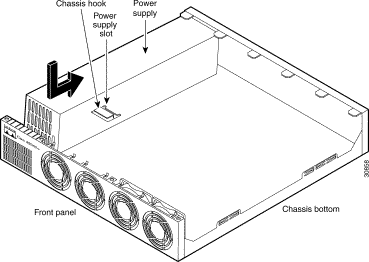
Step 10 Slide the power supply toward the front panel to disengage the power supply from the chassis hook. Remove the power supply from the chassis. (See Figure 9.)
|
Warning Ultimate disposal of this product should be handled according to all national laws and regulations. To see translations of the warnings that appear in this publication, refer to the Regulatory Compliance and Safety Information document that accompanied this device. |
To install the new power supply, follow these steps:
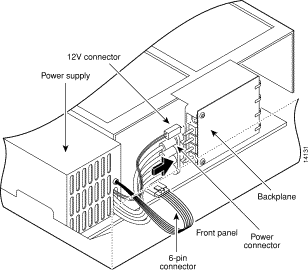
Step 2 First reconnect the 4-jack harness and then reconnect the 2-pin 12V connector, as shown in Figure 11.
|
Caution Observe the proper keying of the DC output connector to the back panel connector. Never force the connector, because you could damage your Cisco AS5300. |
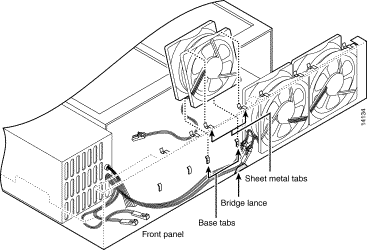
Step 3 Route the fan cables exactly as shown in Figure 12.
|
Note The two longest cables are connected to the two installed fans on the right. The connectors to these two fans fit into the space between the second and third fans. |
Step 4 Insert the second fan, making sure that the fan cable feeds to your left. Position the cables to the two installed fans so that they fit under the first and second fans. Press the fan into place between the four sheet metal tabs. (See Figure 12.)
Step 5 Reconnect the two 2-pin fan cables. (See Figure 13.)
Step 6 Reinstall the remaining fan. Make sure that you orient the fan so that the cables feed to the right (toward the second fan). Then route the cable completely under the fan before you reconnect it. This takes up the extra length of fan cable and keeps it out of the way. (See Figure 14.)
Step 7 Replace the air separator, holding all cables to the right of the separator as you slip it into the chassis. (See Figure 15.)
Step 8 Turn the chassis so that you face the rear panel and reinstall the three mounting screws. (See Figure 16.)
Step 9 If you installed a different type of power supply (AC or DC) than was originally installed in the access server, place one of the power ratings labels that came in the plastic bag with the documentation directly over the power ratings information on the rear panel. For example, if the original chassis came with an AC power supply and you replaced it with a DC power supply, place the DC power ratings label over the ratings stamped on the rear panel of the chassis. This ensures that the correct power ratings information appears on the rear panel. (See Figure 17 and Figure 18<Xref_Color>.)
Step 10 Replace the chassis cover as described in the next section, "Replacing the Chassis Cover."
To replace the chassis cover, follow these steps:
Step 2 Hold the chassis cover over the chassis bottom, and align each of the cover tabs with the chassis tabs at the top rear of the chassis. (See Figure 19.)
Step 3 Lower the front of the chassis cover to close the chassis, and ensure the following:
When the chassis cover is properly assembled, no tabs are visible. (See Figure 20.)
Step 4 Secure the chassis cover with four screws.
Step 5 Reinstall the chassis on a rack, desktop, or table.
Step 6 Reinstall all interface cables.
Step 7 Reconnect the AC power cord or rewire the DC power supply.
|
Warning After wiring the DC power supply, remove the tape from the circuit breaker switch handle and reinstate power by moving the handle of the circuit breaker to the ON position. To see translations of the warnings that appear in this publication, refer to the Regulatory Compliance and Safety Information document that accompanied this device. |
Step 8 Power on the access server.
The internal power supply fan should power on.
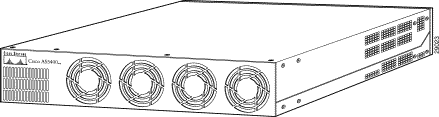
The Cisco AS5350 universal gateway supports a single power supply or a redundant power supply. A redundant power supply has two power connections and provides higher reliability and load balancing. You can use the redundant power supply to:
The following sections describe how to remove and install the Cisco AS5350 power supply:
You must open the universal gateway chassis to gain access to its interior components.
To open the chassis, follow these steps:
|
Note If you are using a DC-powered unit, refer to Figure 21 or Figure 22 and complete Step a through Step d. |
|
Warning Before performing any of the following procedures, ensure that power is removed from the DC circuit. To ensure that all power is OFF, locate the circuit breaker on the panel board that services the DC circuit, switch the circuit breaker to the OFF position, and tape the switch handle of the circuit breaker in the OFF position. To see translations of the warnings that appear in this publication, refer to the Regulatory Compliance and Safety Information document that accompanied this device. |
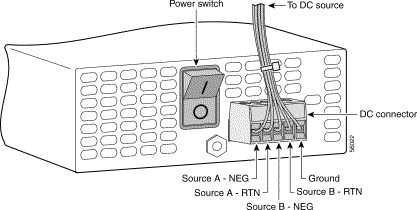
a. Loosen the five locking screws for the negative, return, and ground connectors on the DC connectors.
b. Remove the -48 VDC wires from the DC connector negative connectors (-).
c. Remove the 48 VDC wires from the DC connector positive connectors (+).
d. Remove the safety ground (green wires) from the DC connector ground connectors.
Step 2 Remove all interface cables from the rear panel of the universal gateway.
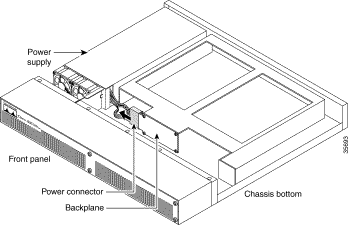
Step 3 Place the universal gateway so that the front panel is facing you.
Step 4 Remove the five screws on the chassis cover. (See Figure 23.)
Step 5 Gently pry the cover off with a flat-blade screwdriver. Lift the chassis cover upward, as shown in Figure 24, and pull it away from the tabs on the rear of the chassis.
Step 6 Continue with the "Removing the Power Supply" section.
This section describes how to remove the power supply. Note the following safety warnings before you remove the power supply:
|
Warning Ultimate disposal of this product should be handled according to all national laws and regulations. To see translations of the warnings that appear in this publication, refer to the Regulatory Compliance and Safety Information document that accompanied this device. |
|
Warning Only trained and qualified personnel should be allowed to install or replace this equipment. To see translations of the warnings that appear in this publication, refer to the Regulatory Compliance and Safety Information document that accompanied this device. |
|
Warning Read the installation instructions before you connect the system to its power source. To see translations of the warnings that appear in this publication, refer to the Regulatory Compliance and Safety Information document that accompanied this device. |
|
Warning Before working on a system that has an on/off switch, turn OFF the power and unplug the power cord. To see translations of the warnings that appear in this publication, refer to the Regulatory Compliance and Safety Information document that accompanied this device. |
|
Warning Before working on equipment that is connected to power lines, remove jewelry (including rings, necklaces, and watches). Metal objects will heat up when connected to power and ground and can cause serious burns or weld the metal object to the terminals. To see translations of the warnings that appear in this publication, refer to the Regulatory Compliance and Safety Information document that accompanied this device. |
To remove the power supply, follow this procedure:
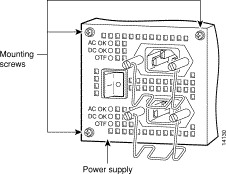
Step 2 Remove the mounting screw that secures the power supply to the chassis and set it aside. (See Figure 25 or Figure 26.)
|
Note Although the following illustrations show only the AC power supply, the procedures are the same for the DC power supply. |
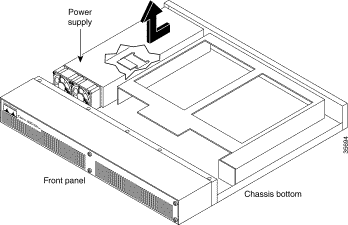
Step 3 Turn the universal gateway so that the front panel is facing you.
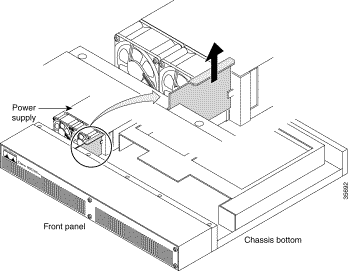
Step 4 Lift the air separator out of the chassis. (See Figure 27.)
|
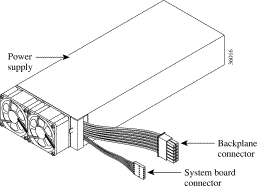
Note There are two power connectors on the power supply. One connects to the backplane and the other to the system board. (See Figure 28.) |
Step 5 Disconnect both power supply connectors. Disconnect the backplane connector first, followed by the system board connector. (See Figure 29.)
|
Note The system board connector is located on the system board, below and left of the backplane connector. |
Step 6 Slide the power supply toward the front panel to disengage the power supply from the chassis hooks (See Figure 30) and remove the power supply from the chassis.
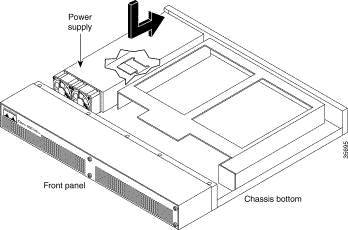
To install the power supply, follow this procedure:
Step 2 Connect the two power connectors to the system board and backplane. (See Figure 28.) Connect the system board connector first, followed by the backplane connector. (See Figure 32.)
|
Note The system board connector is located on the system board, below and left of the backplane connector. |
Step 3 Replace the air separator, holding all cables to the right of the separator as you slip it into the chassis. (See Figure 33.)
Step 4 Reinstall the power supply mounting screw.
Step 5 Replace the chassis cover using the procedures in the "Replacing the Chassis Cover" section.
To replace the chassis cover, follow this procedure:
Step 2 Hold the chassis cover over the chassis bottom, and align each of the cover tabs with the chassis tabs at the top rear of the chassis, as shown in Figure 34.
Step 3 Lower the front of the top cover to close the chassis, and ensure the following:
When the chassis cover is properly assembled, no tabs are visible.
Step 4 Secure the chassis cover with five screws.
Step 5 If you installed a different type of power supply (AC or DC) than was originally installed in the universal gateway, place one of the power ratings labels that came in the plastic bag with the documentation directly over the power ratings information on the rear panel. For example, if the original chassis came with an AC power supply and you replaced it with a DC power supply, place the DC power ratings label over the ratings stamped on the rear panel of the chassis. This ensures that the correct power ratings information appears on the rear panel. (See Figure 35 and Figure 36<Xref_Color><Xref_Color>.)
Step 6 Reinstall the chassis on a rack, desktop, or table.
Step 7 Reinstall all interface cables.
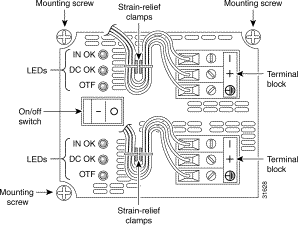
Step 8 Reconnect the AC power cords. Or, if you are using a DC-powered unit, refer to Figure 37 and Figure 38, and complete Step a through Step e.
|
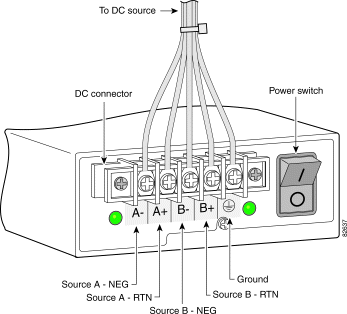
Warning The illustration shows the DC power supply terminal block. Wire the DC power supply using the appropriate wire terminations at the wiring end, as illustrated. The proper wiring sequence is ground to ground, return to return, and negative to negative. Note that the ground wire should always be connected first and disconnected last. To see translations of the warnings that appear in this publication, refer to the Regulatory Compliance and Safety Information document that accompanied this device. |
|
Caution Do not overtorque the terminal block contact screws. The recommended torque is 4.5 lb-in. (0.50 N-m). |
|
Note This product is intended for installation in restricted access areas and is approved for connection using 12 or 14 AWG copper conductors only. The installation must comply with all applicable codes. |
a. Strip off a quarter of an inch (1/4 in. [0.625 cm]) of insulation on the safety ground, +48 VDC, and -48 VDC input wires.
|
Note For central office installations, it is recommended to use a 6 AWG green ground wire with one end connected to reliable earth. The other end of the wire should be crimped onto the double-hole lug provided in the installation pack. The lug should be secured to the mating holes on the side of the chassis with the two screws included in the accessory pack. |
|
Note If you are installing a redundant power supply, you should attach appropriate sized spade terminals to the stripped ends of the ground and input wires. |
b. Insert the safety ground (green wires) into the DC connector ground connectors and tighten the locking screws. Ensure that no bare wire is exposed.
c. Insert the 48 VDC Return wires into the DC connector positive connectors (+) and tighten the locking screws. Ensure that no bare wire is exposed.
d. Insert the -48 VDC wires into the DC connector negative connectors (-) and tighten the locking screws. Ensure that no bare wire is exposed.
e. Make sure that the power supply wires are secured to cable strain-relief clamps with cable ties.
|
Warning After wiring the DC power supply, remove the tape from the circuit breaker switch handle and reinstate power by moving the handle of the circuit breaker to the ON position. To see translations of the warnings that appear in this publication, refer to the Regulatory Compliance and Safety Information document that accompanied this device. |
Step 9 Power on the universal gateway.
The internal power supply fan should power on.
The Cisco AS5400 universal gateway has a redundant power supply. A redundant power supply has two power cords to provide higher reliability and load balancing. You can use the redundant power supply to:
The following sections describe how to remove and install the Cisco AS5400 power supply:
You must open the universal gateway chassis to gain access to its interior components.
To remove the chassis cover, follow these steps:
Step 2 If you are using a DC-powered unit, refer to Figure 39 and complete steps a through d.
|
Warning Before performing any of the following procedures, ensure that power is removed from the DC circuit. To ensure that all power is OFF, locate the circuit breaker on the panel board that services the DC circuit, switch the circuit breaker to the OFF position, and tape the switch handle of the circuit breaker in the OFF position. To see translations of the warnings that appear in this publication, refer to the Regulatory Compliance and Safety Information document that accompanied this device. |
a. Loosen the six locking screws for the negative, return, and ground connectors on the DC power supply terminal blocks.
b. Remove the -48 VDC wires from the terminal block negative connectors (-).
c. Remove the 48 VDC wires from the terminal block positive connectors (+).
d. Remove the safety ground (green wires) from the terminal block ground connectors.
|
Caution Do not connect the 48 VDC wire to the chassis. A single point ground is recommended at the power distribution rack. |
Step 3 Remove all interface cables from the rear panel of the chassis.
Step 4 Place the chassis so that the front panel is facing you.
Step 5 Remove the four screws on the chassis cover. (See Figure 40.)
Step 6 Gently pry the cover off with a flat-blade screwdriver. Lift the chassis cover upward, and pull it away from the tabs on the rear of the chassis. (See Figure 41.)
Step 7 Continue with the following section, "Removing the Power Supply."
This section describes how to remove the power supply. Note the following safety warnings before you remove the power supply:
|
Warning Ultimate disposal of this product should be handled according to all national laws and regulations. To see translations of the warnings that appear in this publication, refer to the Regulatory Compliance and Safety Information document that accompanied this device. |
|
Warning Only trained and qualified personnel should be allowed to install or replace this equipment. To see translations of the warnings that appear in this publication, refer to the Regulatory Compliance and Safety Information document that accompanied this device. |
|
Warning Read the installation instructions before you connect the system to its power source. To see translations of the warnings that appear in this publication, refer to the Regulatory Compliance and Safety Information document that accompanied this device. |
|
Warning Before working on a system that has an on/off switch, turn OFF the power and unplug the power cord. To see translations of the warnings that appear in this publication, refer to the Regulatory Compliance and Safety Information document that accompanied this device. |
|
Warning Before working on equipment that is connected to power lines, remove jewelry (including rings, necklaces, and watches). Metal objects will heat up when connected to power and ground and can cause serious burns or weld the metal object to the terminals. To see translations of the warnings that appear in this publication, refer to the Regulatory Compliance and Safety Information document that accompanied this device. |
To remove the power supply, follow these steps:
Step 2 Remove the three mounting screws that secure the power supply to the chassis and set them aside. (See Figure 42.)
|
Note Although the following illustrations show only the AC power supply, the procedures are the same for the DC power supply. |
Step 3 Turn the chassis so that the front panel is facing you.
Step 4 Lift the air separator out of the chassis. (See Figure 43.)
Step 5 Pull the fan closest to the power supply away from the sheet metal tabs. (See Figure 44.)
Step 6 Lift the fan out of the chassis, and set the fan on top of the power supply. (See Figure 45.)
Step 7 Disconnect the fan cable, and set the fan aside. (See Figure 46.)
|
Caution Do not attempt to remove the fan cables without first depressing the tab as shown in Figure 46. You can damage the fan cables by applying stress if the connector is not removed properly. |
Step 8 Remove the next fan and disconnect its cable.
Step 9 Remove the cables for the two remaining fans. You can disconnect these cables without removing the fans.
|
Note There are three different lengths of 2 wire, 12 VDC power cables. The two shortest cables go to
the fan that you removed in Step 6.
The two longer cables go to the three remaining fans removed in
Step 8 and
Step 9
. The remaining cable goes
to the power connector on the backplane. These cables are color-coded. If you use an incorrect cable to connect a fan or the backplane, then you are unable to make one of the other connections. To help with reconnecting the cables, write down which colored cable goes to each fan. |
Step 10 Disconnect the power connectors from the backplane by disconnecting the 2-pin 12V connector, and disconnecting the power connector's 4-jack harness. (See Figure 47.)
Step 11 Disconnect the 6-pin connector from the motherboard. (See Figure 47.)
Step 12 Slide the power supply toward the front panel to disengage the power supply hook from the chassis hook, and remove the power supply from the chassis. (See Figure 48.)
To install the power supply, follow these steps:
Step 2 Connect the 6-pin connector to the motherboard. (See Figure 50.)
Step 3 Reconnect the power connector's 4-jack harness, and reconnect the 2-pin 12V connector. (See Figure 51.)
Step 4 Route the fan cables as shown in Figure 52.
|
Note The two longest cables are connected to the two installed fans on the right. The connectors to these two fans fit into the space between the second and third fans. |
|
Caution Route the fan cables carefully to avoid pinching the cables near the bridge lance. (See Figure 52.) |
Step 5 Insert the second fan and press the fan into place between the sheet metal tabs. (See Figure 52.)
|
Note Make sure that the fan cable feeds to your left, and position the cables to the two installed fans so that they fit under the first and second fans. |
Step 6 Reconnect the two 2-pin fan cables to the remaining fan. (See Figure 53.)
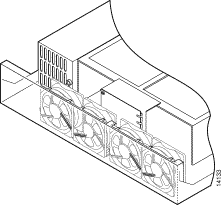
Step 7 Reinstall the remaining fan. When correctly assembled, the cables appear as shown in Figure 54.
|
Note Make sure that you orient the fan so that the cables feed to the right (toward the second fan). Then route the cable completely under the fan before you reconnect it. This takes up the extra length of fan cable and keeps it out of the way. |
Step 8 Replace the air separator, holding all cables to the right of the separator as you slip it into the chassis. (See Figure 55.)
Step 9 Turn the chassis so that you face the rear panel, and reinstall the three mounting screws. (See Figure 56.)
Step 10 Replace the chassis cover using the procedures in the following section, "Replacing the Chassis Cover."
To replace the chassis cover, follow these steps:
Step 2 Hold the chassis cover over the chassis bottom, and align each of the cover tabs with the chassis tabs at the top rear of the chassis. (See Figure 57.)
Step 3 Lower the front of the top cover to close the chassis, and ensure the following:
When the chassis cover is properly assembled, no tabs are visible, as shown in Figure 58.
Step 4 Secure the chassis cover with four screws. (See Figure 57.)
Step 5 Reinstall the chassis on a rack, desktop, or table.
Step 6 Reinstall all interface cables.
Step 7 Reconnect the AC power cords. Or, if you are using a DC-powered unit, refer to Figure 59, and complete Steps a through d.
|
Warning The illustration shows the DC power supply terminal block. Wire the DC power supply using the appropriate wire terminations at the wiring end, as illustrated. The proper wiring sequence is ground to ground, return to return, and negative to negative. Note that the ground wire should always be connected first and disconnected last. To see translations of the warnings that appear in this publication, refer to the Regulatory Compliance and Safety Information document that accompanied this device. |
|
Caution Do not over torque the terminal block contact screws. The recommended torque is 5.0 in.-lb (0.56 N-m). |
a. Insert the safety ground (green wires) into the terminal block ground connectors and tighten the locking screws. Ensure that no bare wire is exposed.
b. Insert the 48 VDC Return wires into the terminal block positive connectors (+) and tighten the locking screws. Ensure that no bare wire is exposed.
c. Insert the -48 VDC wires into the terminal block negative connectors (-) and tighten the locking screws. Ensure that no bare wire is exposed.
d. Make sure that the power supply cords are secured to the cable strain-relief clamps on the DC power supply with cable ties.
|
Warning After wiring the DC power supply, remove the tape from the circuit breaker switch handle and reinstate power by moving the handle of the circuit breaker to the ON position. To see translations of the warnings that appear in this publication, refer to the Regulatory Compliance and Safety Information document that accompanied this device. |
|
Note You can order a Y-connector (CAB-AC-Y) to plug into both power connectors in the power supply. If you use this Y-connector, you will remove the backup feature of this power supply by eliminating redundant operations and reducing reliability. Cisco highly recommends that you use both power cords whenever possible. |
Step 8 Power ON the universal gateway.
The internal power supply fan should power on. If you are using a redundant power supply, the six green LEDs on the front of the power supply should light. If one LED is not lit, consult the appropriate redundant power supply software message to determine where the problem is located.
To display the current status of the Redundant Power Supply unit, enter the show environment command.
You can configure the Cisco IOS software to poll every second to detect the failure of the redundant power supply. By default, the facility alarm is off. To begin monitoring the redundant power supply, enter the facility-alarm detect command. To disable the alarm, enter the no version of the command.
To configure alarm support for the redundant power supply, follow these steps:
| Command | Purpose | |
|---|---|---|
| Step 1 | Enter enable mode and enter the password. You have entered enable mode when the prompt changes to Router#. |
|
| Step 2 | ||
| Step 3 | Turns on alarm when a redundant power supply failure is detected. Any of the following failures turn on the alarm: |
To verify the status of the alarm configuration, enter the show facility-alarm command:
|
Note For information on connecting alarm devices to the alarm port on the Cisco AS5400, refer to the Cisco AS5400 Universal Gateway Chassis Installation Guide. |
These sections explain how to obtain documentation from Cisco Systems.
You can access the most current Cisco documentation on the World Wide Web at this URL:
Translated documentation is available at this URL:
http://www.cisco.com/public/countries_languages.shtml
Cisco documentation and additional literature are available in a Cisco Documentation CD-ROM package, which is shipped with your product. The Documentation CD-ROM is updated monthly and may be more current than printed documentation. The CD-ROM package is available as a single unit or through an annual subscription.
You can order Cisco documentation in these ways:
http://www.cisco.com/cgi-bin/order/order_root.pl
http://www.cisco.com/go/subscription
You can submit comments electronically on Cisco.com. In the Cisco Documentation home page, click the Fax or Email option in the "Leave Feedback" section at the bottom of the page.
You can e-mail your comments to bug-doc@cisco.com.
You can submit your comments by mail by using the response card behind the front cover of your document or by writing to the following address:
Cisco Systems
Attn: Document Resource Connection
170 West Tasman Drive
San Jose, CA 95134-9883
Cisco provides Cisco.com as a starting point for all technical assistance. Customers and partners can obtain online documentation, troubleshooting tips, and sample configurations from online tools by using the Cisco Technical Assistance Center (TAC) Web Site. Cisco.com registered users have complete access to the technical support resources on the Cisco TAC Web Site.
Cisco.com is the foundation of a suite of interactive, networked services that provides immediate, open access to Cisco information, networking solutions, services, programs, and resources at any time, from anywhere in the world.
Cisco.com is a highly integrated Internet application and a powerful, easy-to-use tool that provides a broad range of features and services to help you with these tasks:
If you want to obtain customized information and service, you can self-register on Cisco.com. To access Cisco.com, go to this URL:
The Cisco Technical Assistance Center (TAC) is available to all customers who need technical assistance with a Cisco product, technology, or solution. Two levels of support are available: the Cisco TAC Web Site and the Cisco TAC Escalation Center.
Cisco TAC inquiries are categorized according to the urgency of the issue:
The Cisco TAC resource that you choose is based on the priority of the problem and the conditions of service contracts, when applicable.
You can use the Cisco TAC Web Site to resolve P3 and P4 issues yourself, saving both cost and time. The site provides around-the-clock access to online tools, knowledge bases, and software. To access the Cisco TAC Web Site, go to this URL:
All customers, partners, and resellers who have a valid Cisco service contract have complete access to the technical support resources on the Cisco TAC Web Site. The Cisco TAC Web Site requires a Cisco.com login ID and password. If you have a valid service contract but do not have a login ID or password, go to this URL to register:
http://www.cisco.com/register/
If you are a Cisco.com registered user, and you cannot resolve your technical issues by using the Cisco TAC Web Site, you can open a case online by using the TAC Case Open tool at this URL:
http://www.cisco.com/tac/caseopen
If you have Internet access, we recommend that you open P3 and P4 cases through the Cisco TAC Web Site.
The Cisco TAC Escalation Center addresses priority level 1 or priority level 2 issues. These classifications are assigned when severe network degradation significantly impacts business operations. When you contact the TAC Escalation Center with a P1 or P2 problem, a Cisco TAC engineer automatically opens a case.
To obtain a directory of toll-free Cisco TAC telephone numbers for your country, go to this URL:
http://www.cisco.com/warp/public/687/Directory/DirTAC.shtml
Before calling, please check with your network operations center to determine the level of Cisco support services to which your company is entitled: for example, SMARTnet, SMARTnet Onsite, or Network Supported Accounts (NSA). When you call the center, please have available your service agreement number and your product serial number
.
![]()
![]()
![]()
![]()
![]()
![]()
![]()
![]()
Posted: Wed Jun 25 22:35:29 PDT 2003
All contents are Copyright © 1992--2003 Cisco Systems, Inc. All rights reserved.
Important Notices and Privacy Statement.