|
|

The Cisco AS5300 universal access servers support MICA or Microcom modem carrier cards. For details on the carrier cards, refer to the Cisco AS5300 Universal Access Server Hardware Installation Guide. For new Cisco IOS modem commands, refer to the New and Changed Cisco IOS Commands for the Cisco AS5300 publication, which ships with your access server.
You can manage your modems using monitoring, polling, and troubleshooting commands. For both For both Microcom and MICA modems, most of the modem management functions are identical. This appendix discusses procedures and commands common to both types of modems as well as procedures and commands that apply to only one type of modem. Sections or commands that apply to only one type of modem are clearly indicated.
This appendix includes the following sections:
This section describes how to send AT commands to MICA and Microcom modems.
For a list and description of AT commands, refer to the AT Command Set and Register Summary for MICA Six-Port Modules or AT Command Set and Register Summary for V.34 and 56K 12-Port Modules publications. For new Cisco IOS commands, refer to the New and Changed Cisco IOS Commands for the Cisco AS5300 publication, which ships with your access server.
To monitor Microcom (V.34 and 56K) modems you must perform two main configuration tasks:
Table A-1 describes all the steps necessary to enter AT command mode on the access server.
| Step | Command | Purpose |
|---|---|---|
| 1 | 5300> enable
| Enter enable mode.
Enter the password. You have entered enable mode when the |
| 2 | 5300# configure terminal
| Enter global configuration mode.You have entered global configuration mode when the 5300(config)# prompt appears.
|
| 3 | 5300(config)# line 1
| Enter line configuration mode. In this example, line 1 is specified. You have entered line configuration mode when the 5300(config-line)# prompt appears.
|
| 4 | 5300(config-line)# modem at-mode-permit
| Configure a Microcom modem to permit a direct-connect session. |
| 5 | 5300(config-if)# end
| Return to privileged EXEC mode.
This message is normal and does not indicate an error. |
| 6 | 5300# modem at-mode 1/1
| Enter a direct-connect session with a TA1. In this example, a direct connect session is established with the TA in slot 1, port 1. Enter the TA slot number first, followed by the TA port number. Now you are in AT command mode and can enter the AT commands described in this document. |
| 7 | Ctrl-C
| When done entering AT commands, press Ctrl-C to return to enable mode. |
To send AT commands to a MICA modem involves a reverse Telnet procedure. Table A-2 shows how to enter AT command mode from EXEC mode using reverse Telnet.
| Step | Command | Purpose |
| 1 | 5300> telnet ip-address line#
| Open a reverse Telnet connection to the modem. In the command shown here, ip-address is the IP address of the access server and line# is the two-digit line number of the modem, prefixed by 20. (For example, enter telnet 172.0.0.1 2001 if the IP address is 172.0.0.1 and the modem line number is 1.)
If you do not know which line number to use, enter the show line command and check the resulting display for tty numbers that have The Telnet connection is open when the word |
| 2 | at
| There is no command prompt in AT command mode. To confirm that you are able to enter AT commands, type at and press Return. If you are in AT command mode, the modem returns OK.
|
| 3 | Ctrl-Shift-6 X
| To exit AT command mode and return to privileged EXEC mode, enter Ctrl-Sh-6 X (hold down the Control and Shift keys and press 6, then release everything and press X). Enter disconnect to end the Telnet connection.
|
You can view modem statistics and configure modem events using the Cisco IOS software with the Cisco AS5300 access server. To view performance statistics for the Microcom and MICA modems, enter one or more of the following commands in enable mode (the prompt is displayed as 5300#):
To view additional performance statistics for MICA modems only, enter one or more of the following commands in EXEC mode:
This section describes how to manage modems by checking the type of modem connected to the access server, removing inoperable modems from service, disabling a modem from dial-up service, and setting modem recovery times and event buffers. For details on disabling a modem from dial-up services, see the section, "Troubleshooting Modems," later in this chapter.
To check the type of modem connected to the access server and to configure the modem automatically, enter the following command in global configuration mode [the prompt is displayed as 5300(config)#]:
The modem is identified each time the line is reset. If a modem cannot be detected, the line continues retrying for 10 seconds. When the modem type is determined, this information remains stored until the modem is recycled or disconnected. Discovery mode is much slower than configuring a line directly.
Each time the modem is reset (every time a chat reset script is executed), a string of commands is sent to the modem, the first one being "return to factory-defaults."
This section applies to Microcom modems only. To configure the size of the history event queue buffer for manageable modems in the access server, enter the following command in global configuration mode [the prompt is displayed as 5300(config)#]:
This section applies to Microcom modems only. To set the maximum time of time the call-switching module waits for a local modem to respond to a request before it is considered locked in a suspended state, enter the following command in global configuration mode [the prompt is displayed as 5300(config)#]:
To remove modems from service and indicate them as suspected or proven to be inoperable, enter the following command in line configuration mode [the prompt is displayed as 5300(config-line)#]:
If you mark a single modem as inoperable using this command, it appears as Bad--without the asterisk (*)--in the Status column of the show modem command's output for that particular modem. A modem marked inoperable by the modem startup-test command appears as Bad* in the show modem command output for that particular modem. Use the no modem bad command to unmark a modem as Bad* or Bad and restore it for dial-up connection services.
This section describes polling modems for statistics, including setting the time interval between polls and the maximum number of polling attempts.
To set the maximum number of polling attempts used to retrieve a local modem's status or statistics, enter the following command in global configuration mode [the prompt is displayed as 5300(config)#]:
If the number of attempts to retrieve modem status or statistics exceeds the number you define, the out-of-band port is removed from operation. In this case, you must reset the modem hardware using the clear modem command.
To set the time interval between the polls that are sent to the local modems for reporting modem status and statistics, enter the following command in global configuration mode [the prompt is displayed as 5300(config)#]:
To poll for a modem's status and statistics through its out-of-band port, enter the following command in line configuration mode [the prompt is displayed as 5300(config-line)#]:
The no modem status-poll command disables status polling through the out-of-band port for a specified modem.
This section describes how to perform diagnostic testing on installed modems, test two modems back-to-back, disable modems from service, reset a modem, and debug a modem.
To perform diagnostic testing on all the installed modems during the system's initial startup or rebooting process, enter the following command in global configuration mode [the prompt is displayed as 5300(config)#]:
The results of the modem startup test are displayed in the Status column of the show modem command's output. Modems that pass the diagnostic test are marked as Idle, Busy, Downloading, and Reset. Modems that fail the diagnostic test are marked as Bad*. These modems cannot be used for call connections. Depending on how many modems are installed, this diagnostic test may take from 5 to 15 minutes to complete. Perform additional testing on an inoperative modem by executing the test modem back-to-back command. The no modem startup-test command disables startup testing.
Perform additional testing on a modem suspected of being inoperable by conducting a series of internal back-to-back connections and data transfers between two modems. All modem test connections occur inside the access server. For example, if mobile users cannot dial into modem 2/5 (which is the sixth modem port on the modem board in the second chassis slot), attempt a back-to-back test with modem 2/5 and a known-functioning modem such as modem 2/6.
Enter the following command in enable mode (the prompt is displayed as 5300#) to perform internal back-to-back modem tests between two modems:
You might need to enable this command on several different combinations of modems to determine which one is not functioning properly. A pair of operable modems successfully connect and complete transmitting data in both directions. An operable modem and an inoperable modem do not successfully connect with each other.
This section applies to Microcom modems only. To reset and isolate the modem hardware for extensive troubleshooting, enter the following command in line configuration mode [the prompt is displayed as 5300(config-line)#]:
Use this command if you are experiencing extreme modem behavior (for example, if the modem is uncontrollably dialing into the network). This command prevents the modem from establishing software relationships such as those created by the test back-to-back modem command and the modem startup-test command. The modem is unusable while the modem hold-reset command is configured.
This command is also used to reset a modem that is frozen in a suspended state. Disable the suspended modem with the modem hold-reset command, and then restart hardware initialization with the no modem hold-reset command. A modem decommissioned by the modem hold-reset command does not accept modem firmware upgrades using the copy modem command.
To disable modems from dialing or answering calls, enter one of the following commands in line configuration mode [the prompt is displayed as 5300(config-line)#]:
The modem busyout command is not executed until the active modem is idle. No active connections are interrupted when you use this command. In contrast, the modem shutdown command immediately terminates all active connections on the specified modem. The resulting modem status for both these commands is the same. Enable the no form of these commands to restore a modem for dial-up services.
You can still configure the following commands on a disabled modem:
To debug a modem or group of modems, enter the following commands in enable mode (the prompt is displayed as 5300#):
Modem code is a generic term applied to a modem code file, which is also called modem code for MICA modems and firmware for Microcom modems.
With new systems, Cisco loads a Cisco IOS software-compatible version of modem code and copies the version to the installed modem modules. A map of the version(s) of modem code copied to the modem RAM for each modem module is stored in nonvolatile random access memory (NVRAM) so that it is retained over power cycles.
You can acquire new modem code in several ways:
This section describes how to upgrade modem code on your access server modems by:
 | Caution Cisco ships the access server with the latest version of modem code installed in the system Flash memory and mapped to the modems. If you choose to use the modem code bundled with your installed Cisco IOS software, you could be reverting to a previous version of modem code. Also note that once you map the bundled modem code (using the copy-ios bundled modem command) to your modems, each time you upgrade the Cisco IOS software, the new bundled modem code is automatically mapped to your modems. See "Displaying Modem Code Versions," later in this appendix, for details on displaying mode code versions mapped to modems, installed in system Flash memory, and bundled with the Cisco IOS software on your access server. |
You can obtain modem code in one of two ways:
There are several commands you use to upgrade modem code. For examples on using the commands, see "Upgrading Modem Code from the Cisco CCO TFTP Server," "Upgrading Modem Code from Diskettes," and "Using the Modem Code Bundled with Cisco IOS Software," later in this appendix for details.
Because of multiple versions of modem code and the way Cisco IOS software processes these versions, Cisco suggests that you choose one of the following two strategies:
| Caution Cisco ships the access server with the latest version of modem code installed in the system Flash memory and mapped to the modems. If you choose to use the modem code bundled with your installed Cisco IOS software, you could be reverting to a previous version of modem code. Also note that once you map the bundled modem code (using the copy-ios bundled modem command) to your modems, each time you upgrade the Cisco IOS software, the new bundled modem code is automatically mapped to your modems. See "Displaying Modem Code Versions," later in this appendix, for details on displaying mode code versions mapped to modems, installed in system Flash memory, and bundled with the Cisco IOS software on your access server. |
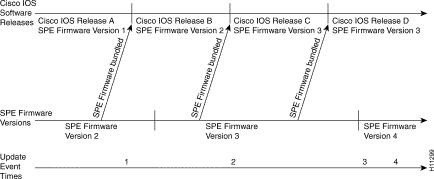
To help with the decision, Figure A-1 shows a hypothetical release process. Using the modem code bundled with Cisco IOS software is the easier strategy and enables you to take advantage of new modem code whenever you upgrade your Cisco IOS software. You can control the modem code by using the copy command as discussed later.

Table A-3 provides scenarios that can occur when you upgrade Cisco IOS software or modem code.
| No. | Scenario | Update Process |
|---|---|---|
| 1 | You receive a new access server from the Cisco factory. |
|
|
2 | You update Cisco IOS software, and you decide to use the version of modem code selected by Cisco IOS software. |
|
|
3 | You update Cisco IOS software, and you decide not to use the modem code selected by Cisco IOS software. |
|
|
4 | The modems are running a version of modem code from system Flash memory that is different than the version bundled with Cisco IOS software. You decide to revert to the bundled version. |
|
|
5 | Cisco releases new modem code, which is a later version than the version currently running on the modems. You decide to use Cisco's newest modem code.3 |
|
Figure A-2 shows a location on the release timeline where updates might take place, and Table A-4 explains the resulting versions of Cisco IOS software and modem code.
| Update Event Time | Update Event | Resulting Version of Cisco IOS Software and Modem Code |
|---|---|---|
| 1 | You upgrade Cisco IOS software to Release B.
|
|
|
2 | You upgrade Cisco IOS software to Release C. (Cisco IOS software uses mapping from last copy command at Time 1).1 | Cisco IOS Release C Modem Code Version 1 |
| You enter copy ios-bundled modem command. | Cisco IOS Release C Modem Code Version 3 | |
| 3 | New Modem Code Version 4 is released, you copy the file to system Flash memory, enter copy flash modem and specify Modem Code Version 4. | Cisco IOS Release C Modem Code Version 4 |
4 | You upgrade Cisco IOS software to Release D. | Cisco IOS Release D Modem Code Version 4 |
| You enter the copy ios-bundled modem command. | Cisco IOS Release D Modem Code Version 3 |
Table A-5 provides a list of terms and commands and a description of how they are used in the modem code update process.
| Terms | Description |
|---|---|
| Modem Code | Modem code on the MICA modems resides in and runs out of modem RAM. Cisco IOS software transfers a version of modem code to modem RAM on each reboot and reload.
System Flash memory can contain several versions of modem code: a version bundled with Cisco IOS software and multiple versions that resulted from previous copy tftp flash commands. |
| copy ios-bundled command | This command transfers the version of modem code bundled with Cisco IOS software to the modem RAM and maps that version to the modem modules specified by the modem range.
This command does not affect any existing versions of modem code that reside in system Flash memory. After one copy ios-bundled modem command, future Cisco IOS upgrades will potentially result in the downloading of new Cisco IOS bundled firmware to the modems. (If the new Cisco IOS image contains the same modem code as the old one, no new code will be downloaded to the modems.) |
| copy tftp flash filename command | Places a copy of the modem code in system Flash memory. |
| copy flash modem command | This command transfers the version of modem code in system Flash memory to the modem RAM and maps that version to the modem modules specified by the modem range. |
| Mapping commands | The copy commands map a specific version of modem code to a group of modem slots/ports. The copy ios-bundled modem command maps the slots/ports to the bundled version, and the copy flash modem command maps the slots/ports to the system Flash version.
Cisco IOS software uses the mapping to determine which version of modem code should be downloaded to the modems. If Cisco IOS software finds no mapping or invalid mapping, it downloads the bundled version. Although modem ranges are specified on as slot/port, the modem code is downloaded on a per module basis. The show modem mapping command lists all versions of modem code running on the modem modules, residing in system Flash, and bundled with Cisco IOS software. This will help you decide if you need to update your modem code files.1 |
Use the show modem mapping command to list the versions of modem code running on the modem modules, residing in system Flash, and bundled with Cisco IOS software. This will help you decide if you need to change the version running on the modems.
5300# show modem mapping

Slot 1 has Mica Carrier card.


        Modem      Firmware   Firmware
Module  Numbers    Rev        Filename
  0   1/0  - 1/5   2.2.3.0    flash:mica-modem-portware.2.2.3.0.bin
  1   1/6  - 1/11  2.2.3.0    mica-modem-portware.2.2.3.0.bin
  2   1/12 - 1/17  2.2.3.0    mica-modem-portware.2.2.3.0.bin
  3   1/18 - 1/23  2.2.3.0    mica-modem-portware.2.2.3.0.bin
  4   1/24 - 1/29  2.2.3.0    mica-modem-portware.2.2.3.0.bin

Slot 2 has Mica Carrier card.


        Modem      Firmware   Firmware
Module  Numbers    Rev        Filename
  0   2/0  - 2/5   2.2.3.0    flash:1:mica-modem-portware.2.2.3.0.bin
  1   2/6  - 2/11  2.2.3.0    mica-modem-portware.2.2.3.0.bin
  2   2/12 - 2/17  2.2.3.0    mica-modem-portware.2.2.3.0.bin
  4   2/24 - 2/29  2.2.3.0    mica-modem-portware.2.2.3.0.bin

IOS Bundled Firmware Information:

Mica Boardware Version : 1.0.0.0
Mica Portware Version : 2.0.1.7
Microcom Firmware Version : 3.1.30
Microcom DSP Software Version : 1.01


Firmware files on System Flash:

Firmware-file                              Version  Firmware-Type
=============                              =======  =============
flash:1:mica-modem-portware.2.2.3.0.bin    2.3.0    Mica Portware
flash:2:mcom-modem-firmware.3.1.30.bin     3.1.30   Microcom Firmware
Upgrading modem code from the Cisco CCO TFTP server is a two-step process:
You can download software from the Cisco Systems CCO TFTP server using an Internet browser or using an FTP application. Both procedures are described below.
Step 1 Launch an Internet browser.
Step 2 Bring up Cisco's Software Center home page at following URL (this is subject to change without notice):
http://www.cisco.com/kobayashi/sw-center/
Step 3 Click Access Products (under Cisco Software Products) to open the Access Products window.
Step 4 Click Cisco AS5300 Series Software.
Step 5 Click the modem code you want and download it to your workstation or PC. For example, to download modem code for the Microcom modems, click Download Microcom V.34 Modem Firmware or Download Microcom 56K Modem Firmware under the respective sections. To download modem code for MICA modems, click Download Modem Portware Images.
Step 6 Click the modem code file you want to download, and then follow the remaining download instructions. If you are downloading the modem code file to a PC, make sure you download it to the c:\tftpboot directory; otherwise, the download process will not work.
Step 7 When the modem code is downloaded to your workstation, transfer the file to a TFTP server in your LAN using a terminal emulation software application.
Step 8 When the modem code is downloaded to your workstation, transfer the file to a TFTP server somewhere in your LAN using a terminal emulation software application.
Step 1 Log in to the Cisco CCO FTP server, called cco.cisco.com:
ftp cco.cisco.com
Step 2 Enter your CCO registered username and password (for example, harry and letmein):
harry
letmein
Step 3 Specify the directory path that holds the modem firmware you want to download. For example, the directory path for the Cisco AS5300 modem code is /cisco/access/5300:
cd /cisco/access/5300
Step 4 View the contents of the directory with the ls command:
ls
Step 5 Specify a binary image transfer:
binary
Step 6 Copy the modem firmware files from the access server to your local environment with the get command.
The following example downloads a Microcom modem firmware file:
get mcom-modem-code.x.x.x.bin
Step 7 Quit your terminal session:
quit
Step 8 Verify you successfully transferred the files to your local directory:
ls -al
pwd
Step 9 Transfer these files to a local TFTP or RCP server that your access server or router can access.
The procedure for copying the modem code file from your local TFTP server to the modems is a two-step process. First, transfer the modem code to the access server's Flash memory. Then, transfer the modem code to the modems.
These two steps are performed only once. After you copy the modem code file into Flash memory for the first time, you should not have to perform these steps again. Because the modem code runs from the modems themselves, the Cisco IOS software automatically copies the modem code to each modem each time the access server power cycles.
Depending on the type of modems that you have installed in your system, the download instructions will vary. Refer to the instructions that best describe your scenario:
Downloading modem code to MICA modems is a four-step process:
Step 1 Establish an xterm session to the access server if using a UNIX workstation, or a HyperTerminal session to the access server if using a PC. For details on establishing a HyperTerminal session, see "Upgrading Modem Code from Diskettes," later in this appendix for details.
Step 2 Enter the access server enable mode (the prompt is displayed as 5300#):
Step 3 Check the files in the access server system Flash memory:
Step 4 Download the modem code file from TFTP server into the access server Flash memory using the copy tftp flash command. After you enter the command, you are prompted for the download destination and the remote host name as requested by the system software.
Step 5 Verify the file has been copied into the access server system Flash memory:
Step 6 Copy the modem code file from the access server system Flash memory to the modems by entering the copy flash modem command:
For additional information about downloading modem code to modems, refer to the following publications, which are available on the Documentation CD and the Web at http:\\www.cisco.com:
Downloading modem code to 56K Microcom modems is a four-step process:
Step 1 Enter the access server enable mode (the prompt is displayed as 5300#):
Step 2 Check the image in the access server system Flash memory:
Step 3 Download the modem code file from TFTP server into the access server system Flash memory using the copy tftp flash command. After you enter the command, you are prompted for the download destination and the remote host name as requested by the system software.
Step 4 Verify the file has been copied into the access server Flash memory:
Step 5 Copy the modem code file from the access server system Flash memory to the modems by entering the copy flash modem command.
This section describes how to copy modem code from diskettes to your hard disk in a PC environment, and then upload the modem code to the modems. The steps are similar if you are using a Macintosh or UNIX workstation.
This section describes how to copy the modem code file to your hard disk in a PC environment. The steps are similar if you are using a Macintosh or a UNIX workstation.
Step 1 Insert the modem code diskette into the diskette drive.
Step 2 Use Microsoft Windows 95 Explorer to create a folder named tftpboot at your hard disk root c:.
Step 3 Use the Microsoft Windows 95 Explorer to copy the modem code file into the c:/tftpboot folder.
If you are using a PC running Microsoft Windows 95, upgrading modem code from a hard drive onto a Cisco AS5300 involves installing a TFTP application on your PC, connecting your PC and the access server, establishing a HyperTerminal session on your PC, pinging the PC and access server to make sure they are talking to each other, and finally, copying the modem code from the PC to the access server. See the following sections for details.
Step 1 Install the TFTP application on the PC.
Step 2 Launch the TFTP application. You commonly do this by double-clicking the application icon or its filename.
Step 3 Set your TFTP server root directory:
| Caution If you do not select the c:\tftpboot directory as your TFTP server directory, you will not be able to perform the copy procedure. This also applies if you are using RCP on your system. |
Step 1 Use straight-through cables to connect the PC and access via a 10BaseT hub, as shown in Figure A-3. Also note that both Ethernet ports must have the same baseband.
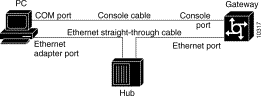
Step 2 Connect your PC COM port to the Cisco AS5300 console port, as shown in Figure A-3.
Step 3 Make sure your PC and access server are powered on.
Use the steps in this section to establish a HyperTerminal session from your local PC to the Cisco AS5300. You will use the HyperTerminal session to talk to the access server.
Step 1 In Microsoft Windows 95 on your PC, choose Start/Programs/Accessories/HyperTerminal.
Step 2 Double-click Hypertrm.exe to display the Connection Description dialog box.
Step 3 Enter a name for your connection, for example, Console and then click OK. HyperTerminal displays the Phone number dialog box.
Step 4 Choose the COM port connecting the PC and the access server in the Connect Using list box. You have options to connect directly to one of four COM ports.
Step 5 Click OK. HyperTerminal displays the COM Properties dialog box.
Step 6 Choose these options in the COM Properties dialog box:
Step 7 Click OK. The HyperTerminal dialog box appears.
Step 8 Press Enter to display the 5300# prompt.
Ping the access server and the PC to make sure they are talking to each other and there are no configuration problems on your access server.
Step 1 Choose the correct Ethernet adapter connecting to the access server and note the PC's IP address:
(a) Choose Start/Run to display the Run dialog.
(b) Enter winipcfg and click OK to display the IP Configuration dialog box.
(c) Choose the PC Ethernet adapter connector used for the connection to the access server if you have more than one Ethernet adapter connector installed on your PC.
(d) Make a note of the PC IP address, and then click OK.
Step 2 In the HyperTerminal dialog box (see the previous section "Establish a HyperTerminal Session," for details), enter the access server enable mode (the prompt is displayed as 5300#):
Step 3 Enter the ping command with your PC's IP address.
5300# ping 172.16.1.1
The access server displays five exclamation points (!) if everything is working and it displays five dots (.) if there is a problem. In the latter case, check the cabling between the router and the PC and check the access server configuration
The procedure for copying the modem code file from your PC set up as a local TFTP server to the access server system Flash memory is a two-step process:
Perform these two steps only once. After you copy the modem code file into system Flash memory for the first time, you should not have to perform these steps again. Because the code runs from modem RAM, the Cisco IOS software must automatically copy the modem code to each modem each time the access server power cycles.
The following code examples show a download to MICA modems. Use the same steps to download to Microcom modems.
Step 1 Check the image in the access server Flash memory:
Step 2 Enter the copy tftp flash command to download the code file from the TFTP server into the access server Flash memory. You are prompted for the download destination and the remote host name.
Step 3 Verify the file has been copied into the access server Flash memory:
Step 4 Copy the modem code file from the access server Flash memory to the modems by entering the copy flash modem command:
Use this procedure to update modem code on the modems in your access server if you decide to use the version of modem code bundled with Cisco IOS software instead of the version already mapped to your modems.
| Caution Cisco ships the access server with the latest version of modem code installed in the system Flash memory and mapped to the modems. If you choose to use the modem code bundled with your installed Cisco IOS software, you could be reverting to a previous version of modem code. Also note that once you map the bundled modem code (using the copy-ios bundled modem command) to your modems, each time you upgrade the Cisco IOS software, the new bundled modem code is automatically mapped to your modems. See "Displaying Modem Code Versions," later in this appendix, for details on displaying mode code versions mapped to modems, installed in system Flash memory, and bundled with the Cisco IOS software on your access server. |
To set the modem code mapping to the modem code version bundled with Cisco IOS software, enter the following command:
Step 1 Enter the access server enable mode (the prompt is displayed as 5300#):
Step 2 Enter the copy ios-bundled modem command:
        5300# copy ios-bundled modem
        Modem Numbers (<slot/<port | group <number | all)? all
        Type of service [busyout/reboot] busyout
        Copy bundled firmware from IOS image to modems? [yes/no] yes
        5300#
        *Dec  1 00:12:02.835: %MODEM-5-DL_START: Modem (1/6) started firmware download
        *Dec  1 00:12:02.839: %MODEM-5-DL_START: Modem (1/7) started firmware download
        *Dec  1 00:12:02.839: %MODEM-5-DL_START: Modem (1/8) started firmware download
        *Dec  1 00:12:02.843: %MODEM-5-DL_START: Modem (1/9) started firmware download
        *Dec  1 00:12:02.843: %MODEM-5-DL_START: Modem (1/10) started firmware download
        *Dec  1 00:12:02.847: %MODEM-5-DL_START: Modem (1/11) started firmware download
        *Dec  1 00:12:13.643: %MODEM-5-DL_GOOD: Modem (1/6) completed firmware
         download:
        *Dec  1 00:12:13.647: %MODEM-5-DL_GOOD: Modem (1/7) completed firmware
         download:
        *Dec  1 00:12:13.651: %MODEM-5-DL_GOOD: Modem (1/8) completed firmware
         download:
        *Dec  1 00:12:13.651: %MODEM-5-DL_GOOD: Modem (1/9) completed firmware
         download:
        *Dec  1 00:12:13.655: %MODEM-5-DL_GOOD: Modem (1/10) completed firmware
         download:
        *Dec  1 00:12:13.659: %MODEM-5-DL_GOOD: Modem (1/11) completed firmware
         download:
This command does not affect any existing modem code that resides in system Flash memory in case you later want to revert to it. If you decide to delete the code from system Flash memory, remember that all files in system Flash memory will be deleted, therefore save and restore any important files (for example, the Cisco IOS software image).
|
|