|
|

Appendix A describes the IGS/TR hardware and software configuration registers, the factory default settings of each, and the procedures for changing those settings.
The hardware configuration register is an 8-bit mechanical switch located on the IGS/TR back panel. The 16-bit software configuration register resides in nonvolatile memory. The hardware configuration register setting has priority, and will override software configuration register settings if a conflict arises. To avoid such conflicts, only the software register settings that cannot be set by the hardware register are described in this appendix.
Use the processor configuration register information contained in this appendix to do the following:
Figure A-1 shows the top side of the IGS/TR processor card as viewed with the chassis front facing you. The location of the hardware configuration register is shown at the upper left side of Figure A-1.
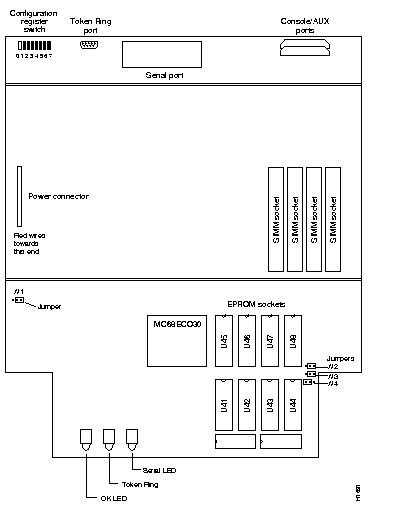
In the back of the chassis under the power switch is an 8-bit switch, the hardware configuration register (as shown in Figure A-1). The least significant bit of the configuration register is the one labeled "0" in Figure A-2.
Bit Number Meaning
00-03 Power-up default action *
04-05 Console line speed
06 Watchdog timer disabled
07 Run diagnostic tests and ignore NVM contents
* Action might be modified by the boot system command.
Figure A-2 shows the hardware configuration register factory settings.
To set a bit to 1 (on), push the switch down. To clear a bit to 0 (off), push the switch up.

To change configuration register settings, turn off the server, set or clear the bits, and restart the server. Configuration register changes only take effect when the server restarts; that is, when you switch the power off and on or when you issue a reload command from the console.
The lowest four bits of the hardware configuration register (bits 3, 2, 1, and 0) form the boot field. The boot field specifies a number in binary. If you set the boot field value to 0, you must boot the operating system manually by giving a b command to the system bootstrap program. If you set the boot field value to 1 (the factory default), the server boots using the default ROM software. If you set the boot field to any other bit pattern, the server uses the resulting number to form a boot file name for netbooting.
The server creates a boot file name as part of the automatic configuration processes. To form the boot file name, the server starts with Cisco, and links the octal equivalent of the boot field number, a dash and the processor type name. Table A-2 lists the default boot file names or actions for the IGS/TR processor.
| Action/File Name | Bit 3 | Bit 2 | Bit 1 | Bit 0 |
|---|---|---|---|---|
| bootstrap mode | 0 | 0 | 0 | 0 |
| ROM software* | 0 | 0 | 0 | 1 |
| cisco2-igs | 0 | 0 | 1 | 0 |
| cisco3-igs | 0 | 0 | 1 | 1 |
| cisco4-igs | 0 | 1 | 0 | 0 |
| cisco5-igs | 0 | 1 | 0 | 1 |
| cisco6-igs | 0 | 1 | 1 | 0 |
| cisco7-igs | 0 | 1 | 1 | 1 |
| cisco10-igs | 1 | 0 | 0 | 0 |
| cisco11-igs | 1 | 0 | 0 | 1 |
| cisco12-igs | 1 | 0 | 1 | 0 |
| cisco13-igs | 1 | 0 | 1 | 1 |
| cisco14-igs | 1 | 1 | 0 | 0 |
| cisco15-igs | 1 | 1 | 0 | 1 |
| cisco16-igs | 1 | 1 | 1 | 0 |
| cisco17-igs | 1 | 1 | 1 | 1 |
* This is the default boot configuration.
Bit 4 and bit 5 in the hardware configuration register determine the baud rate of the console terminal. Table A-3 shows the bit settings for the four available baud rates. The factory default is 9600 baud.
| Baud | Bit 5 | Bit 4 |
|---|---|---|
| 9600 | 0 | 0 |
| 4800 | 0 | 1 |
| 2400 | 1 | 1 |
| 1200 | 1 | 0 |
Bit 6 disables the hardware watchdog timer, in case a hardware problem causes the watchdog timer to be dysfunctional, which can prevent the unit from initializing. By factory default, bit 6 is cleared to 0.
Bit 7 enables the factory diagnostic mode in the server. Setting this bit causes the server to produce detailed CPU self-check messages, automatically prompt for interface addresses, not read configuration files or nonvolatile memory, and automatically enable all diagnostic tracing modes. Clearing this bit (the factory default) causes the server to operate normally.
The IGS/TR has a 16-bit software register which is written into the nonvolatile memory.
Table A-4 indicates the meaning of each of the bits.
| Bit Number | Meaning |
|---|---|
| 00 | Boot from ROM* |
| 01-03 | Name of file for Netbooting* |
| 06 | Watchdog timer disabled* |
| 07 | OEM bit enabled |
| 08 | Break Disabled |
| 10 | IP broadcast with all zeros |
| 11-12 | Console line speed* |
| 13 | Boot default ROM software if network boot fails |
| 14 | IP broadcasts do not have net numbers |
| 15 | Run diagnostic tests and ignore NVM contents* |
* These bits are controlled by the hardware configuration register.
To change configuration register settings, use the config-register command documented below, and restart the server. Configuration register changes only take effect when the server restarts; that is, when you switch the power off and on or when you issue a reload command from the console.
In order to issue the configure or reload commands, you must first enable the privileged mode of operation. At the "GS>" prompt, type "enable." The system will prompt you for the privileged password. After the password has been correctly entered, the prompt will change to a pound sign (#). When you wish to exit the privileged mode, type "disable" at the prompt.
Use the config-register value configuration command to set the contents of the software configuration register. Value is a hexadecimal number preceded by "0x." The software configuration register is stored in nonvolatile memory, as there are no hardware jumpers available. For example, the default switch register contents can be set with the command config-register 0x1. The new setting does not take effect until the IGS/TR software is reloaded. The show hardware command will display the configuration register value stored for the next reload, as well as the value currently in effect.
Bit 8 controls the console Break key. Setting bit 8 (the factory default) causes the processor to ignore the console Break key. Clearing bit 8 causes the processor to interpret Break as a command to force the system into the bootstrap monitor, halting normal operation.
Bit 10 controls the host portion of the Internet broadcast address. Setting bit 10 causes the processor to use all zeros; clearing bit 10 (the factory default) causes the processor to use all ones. Bit 10 interacts with bit 14, which controls the network and subnet portions of the broadcast address. Table A-5 shows the combined effect of bits 10 and 14.
| Bit 14 | Bit 10 | Address (<net> <host>) |
|---|---|---|
| off | off | <ones> <ones> |
| off | on | <zeros> <zeros> |
| on | on | <net> <zeros> |
| on | off | <net> <ones> |
Bit 13 determines the server response to a bootload failure. Setting bit 13 causes the server to load operating software from ROM after five unsuccessful attempts to load a boot file from the network. Clearing bit 13 causes the server to continue attempting to load a boot file from the network indefinitely. By factory default, bit 13 is cleared to 0.
The following tests are performed automatically each time the IGS/TR is turned on or reinitialized.
Step 1: Reset the network A and B interfaces.
Step 2: Update the 16-bit software configuration register from the 8-bit hardware configuration register.
Step 3: Initialize the Universal Asynchronous Receiver Transmitter (UARTs).
Step 4: Print the sign-on message; for example:
System Bootstrap, Version 4.2(06)Step 5: Exit boot state. While in boot state, reads to low memory get mapped to reads in ROM address space.
Step 6: Set and verify the bus error vector (this is the first time main memory is accessed).
Step 7: Fill low RAM from 0x10 to 0x1000 with 0x00000000.
Step 8: Verify that low RAM from 0x10 to 0x1000 is 0x00000000. Fill low RAM from 0x10 to 0x1000 with 0xFFFFFFFF.
Step 9: Verify that low RAM from 0x10 to 0x1000 is 0xFFFFFFFF.
Step 10: Fill low RAM from 0x10 to 0x1000 with address+1.
Step 11: Verify that low RAM has address+1 (assures unique addressability).
Step 12: Size memory by detecting bus errors and wraparound.
Step 13: Initialize the rest of RAM space.
Step 14: Copy EC68030 CPU exception vectors from ROM to RAM.
Step 15: Start the realtime clock.
Step 16: Perform the go/nogo test of realtime clock by ensuring that clock increments.
Step 17: Start watchdog timer (the card resets if the watchdog expires).
Step 18: Determine NVRAM size (there are versions of the IGS family with 16 kilobytes and 32 kilobytes of NVRAM).
Step 19: Search for a system image in ROM address space.
Step 20: Initialize ROM monitor variables.
Step 21: Read the hardware revision register to identify our hardware revision level for the system software show version display.
Step 22: Save boots/reboot information for show hardware and show stacks.
Step 23: Light the OK LED.
Step 24: Return to the monitor routine which will boot a system image or start up the ROM monitor command interpreter.
If you set the DIAG bit in the hardware configuration register, the console terminal displays:
System Bootstrap, Version 4.3(4.2)
Copyright (c) 1986-1991 by cisco Systems
Exiting boot state - setting bus error vector...[OK]
Sizing RAM and ROM...32 bit wide EPROM...1 Mbit EPROMs...32 bit wide CPU RAM...Found 1 MB CPU RAM...
Testing low memory...0's...1's...address+1...[OK]
Sizing memory...writing...reading...4608 pages...[OK]
Setting memory to all ones...[OK]
Setting up exception vectors...[OK]
Enabling processor caches...set CACR to 0x101...[OK]
Processor type is: Merlot[OK]
Enabling timers...[OK]
Enabling Watchdog timer...[OK]
Sizing NVRAM...found 32K bytes of NVRAM[OK]
Searching for system code...[OK]
Setting up monitor variables...[OK]
Reading hardware revision register...
Merlot processor, hardware revision = 0
Exiting to monitor command level
Merlot processor with 4608 Kbytes of memory
>
|
|