|
|

Table Of Contents
Cisco 820 Series and SOHO Series Routers Cabling and Setup
Cisco One-Year Limited Hardware Warranty Terms
Streamline Installation: Try These Steps First!
Connect the Router to a Hub (Optional)
Connect a Digital Subscriber Line
Connect a Cisco 827-4V Router to a Phone or Fax
Connect the Power and Turn On the Router
Configure the Router with Cisco Router Web Setup
Cisco Product Security Overview
Reporting Security Problems in Cisco Products
Obtaining Technical Assistance
Cisco Technical Support Website
Definitions of Service Request Severity
Obtaining Additional Publications and Information
Cisco 820 Series and SOHO Series Routers Cabling and Setup
•
Cisco One-Year Limited Hardware Warranty Terms
•
•
•
•
•
•
•
•
•
•
•
Cisco One-Year Limited Hardware Warranty Terms
There are special terms applicable to your hardware warranty and various services that you can use during the warranty period. Your formal Warranty Statement, including the warranties and license agreements applicable to Cisco software, is available on Cisco.com. Follow these steps to access and download the Cisco Information Packet and your warranty and license agreements from Cisco.com.
1.
http://www.cisco.com/univercd/cc/td/doc/es_inpck/cetrans.htm
The Warranties and License Agreements page appears.
2.
a.
b.
c.
The Cisco Limited Warranty and Software License page from the Information Packet appears.
d.
Note
3.
a.
78-10747-01C0
b.
c.
The Cisco warranty page appears.
d.
You can also contact the Cisco service and support website for assistance:
http://www.cisco.com/public/Support_root.shtml.
Duration of Hardware Warranty
One (1) Year
Replacement, Repair, or Refund Policy for Hardware
Cisco or its service center will use commercially reasonable efforts to ship a replacement part within ten (10) working days after receipt of a Return Materials Authorization (RMA) request. Actual delivery times can vary, depending on the customer location.
Cisco reserves the right to refund the purchase price as its exclusive warranty remedy.
To Receive a Return Materials Authorization (RMA) Number
Contact the company from whom you purchased the product. If you purchased the product directly from Cisco, contact your Cisco Sales and Service Representative.
Complete the information below, and keep it for reference.
Company product purchased from
Company telephone number
Product model number
Product serial number
Maintenance contract number
Streamline Installation: Try These Steps First!
This router is configured for the most common type of installation. To set up the router quickly, try performing the following steps. If you cannot complete a step, or if you want more information at any point, skip to the "Connect the Router to a PC" section, and complete the steps described in the other sections of this Quick Start Guide.
Step 1
Step 2
Step 3
Step 4
Step 5
Step 6
Step 7
Step 8
Step 9
Step 10
Overview
This document describes the basic process of cabling and configuring the Cisco 827 series, and Cisco 828 routers, the SOHO 77 series, and the SOHO 78 routers.
You can access the most current Cisco documentation on the World Wide Web at the following sites:
Parts List
The shipment of your router includes the following items:
•
•
•
•
•
•
•
If any of the items is missing or damaged, contact your customer service representative.
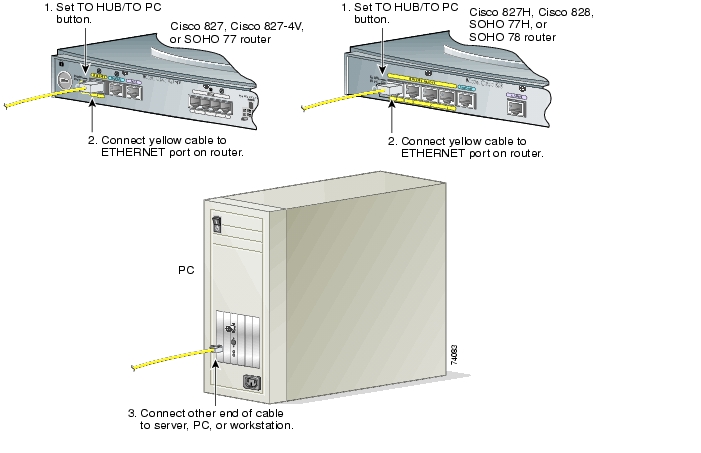
Connect the Router to a PC
Follow the steps shown in Figure 1-1 to connect the router to a PC with an Ethernet network interface card (NIC) installed. Figure 1-1 shows portions of two router back panels. Refer to the back panel that is similar to the back panel of the router that you are installing.
Note
To connect additional computers to Cisco 827H, Cisco 828, or SOHO 78 routers, obtain standard Ethernet cables, and attach them to the router via Ethernet ports 1, 2, and 3.
Figure 1-1 Connecting the Router to a PC
See the "Connect a Digital Subscriber Line" section to complete the next step.
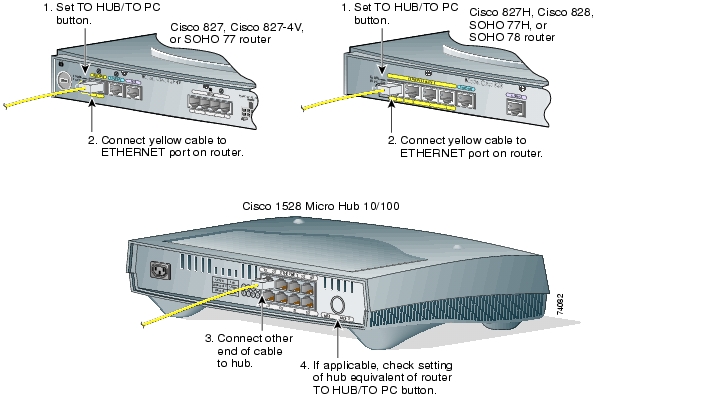
Connect the Router to a Hub (Optional)
If you have PCs connected to a hub, follow the steps shown in Figure 1-2 to connect the router to a hub. Figure 1-2 shows portions of two router back panels. Refer to the back panel that is similar to the back panel of the router that you are installing.
Figure 1-2 Connecting the Router to a Hub
Verify that the TO HUB/TO PC switch on the left side of the back panel has been set to the TO HUB position (in). If the button is out, press it to set it to the in position. You will know that the position is correct if the LED for this port on the front of the router lights after the router and the PCs have been turned on.
Note
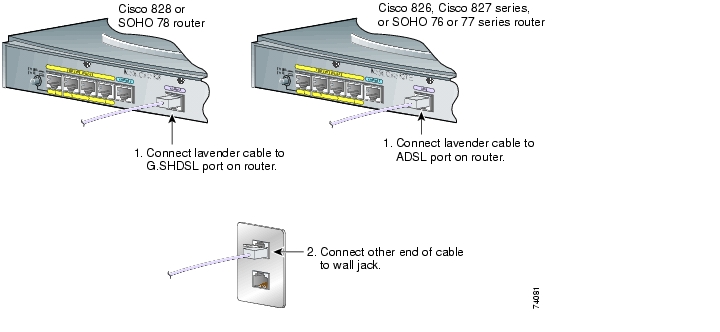
Connect a Digital Subscriber Line
Follow the steps in Figure 1-3 to connect an asymmetric digital subscriber line (ADSL) or G.SHDSL line to the xDSL port on your router. Figure 1-3 shows back panels for ADSL and for G.SHDSL routers. Refer to the back panel that is similar to the back panel of the router that you are installing.
Note
Figure 1-3 Connecting the Router to an xDSL Line
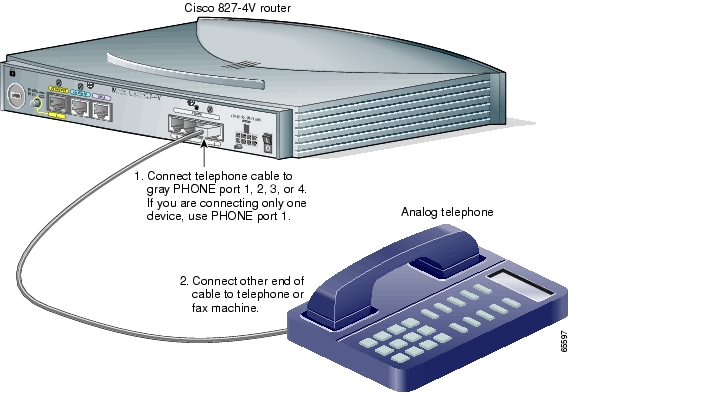
Connect a Cisco 827-4V Router to a Phone or Fax
If you have a Cisco 827-4V router, you can connect analog telephones or fax machines to your router. Use the cables provided with these devices.
The gray PHONE 1, 2, 3, and 4 ports are RJ-11 connectors. If you are outside North America, you must buy and attach adapters that allow telephones or faxes to be connected to the RJ-11 connectors. In some countries, these adapters need additional electronics to convert the telephones or faxes to work properly with the router phone ports. For example, in the United Kingdom, you must buy an adapter that also provides a master socket, which causes incoming calls to ring the connected devices. For information on recommended master sockets, see the Cisco 827 and SOHO 77 Routers Hardware Installation Guide.
Follow the steps in Figure 1-4 to connect a telephone or a fax machine to a Cisco 827-4V router.
Caution
Figure 1-4 Connecting a Telephone to a Cisco 827-4V Router
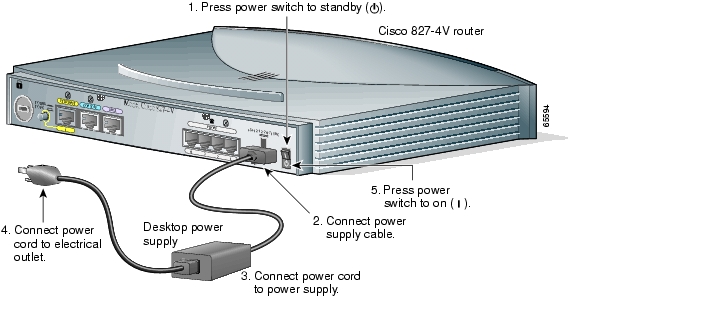
Connect the Power and Turn On the Router
Follow the steps in Figure 1-5 to connect an AC adapter to the Cisco router and turn it on. ( Figure 1-5 shows a Cisco 827-4V router, but the process applies to all Cisco 820-series and SOHO routers.)
Caution
After you turn on the router, the OK LED on the front will turn on. After a minute or two, the xDSL CD LED will turn on. The Ethernet LEDs for the Ethernet ports to which you have connected PCs or hubs will turn on a minute or two after you have turned on the PCs.
Figure 1-5 Connecting the Power to the Router
Check the PC Configuration
Each PC that is connected to the router must be configured to use the Transmission Control Protocol/Internet Protocol (TCP/IP) and to obtain its IP address automatically. Follow these steps to configure each PC that is running Microsoft Windows NT or Microsoft Windows 95 or 98. If the PC is running a different version of Microsoft Windows, refer to the documentation that came with the PC.
Step 1
Step 2
Step 3
Step 4
Step 5
Step 6
For more information on how to configure TCP/IP, refer to the Cisco Router Web Setup Troubleshooting Guide, which is available on Cisco.com.
Configure the Router with Cisco Router Web Setup
The Cisco Router Web Setup (CRWS) software is loaded on the router and should be used to configure it to connect to the Internet. The CRWS software runs on Netscape version 3.0 to 4.7, and on Internet Explorer version 4.0 or later. Follow these steps to start the CRWS software and configure the router:
Step 1
Step 2
•
•
Step 3
http://10.10.10.1The home page of the router should appear after one or two minutes.
If the CRWS home page does not appear when you enter the URL http://10.10.10.1, test the connection between the PC and the router by doing the following:
•
•
•
•
Step 4
Step 5
Step 6
Step 7
Step 8
Alternatively, open a DOS window, and enter ipconfig /release to release the PC's IP address.Then enter ipconfig /renew to renew the IP address of the PC.
Step 9
Congratulations! You're Done!
If you were able to connect to a website, you have completed the cabling and setup of your router, and you can continue to use it to access the Internet.
If you need to configure more features, click the CRWS link for the feature you need to configure, and enter configuration values for the router.
Related Documentation
For more information, refer to the following publications:
•
•
•
•
•
•
These documents are available on the World Wide Web. You can access the most current Cisco documentation on the World Wide Web at the following sites:
Obtaining Documentation
Cisco documentation and additional literature are available on Cisco.com. Cisco also provides several ways to obtain technical assistance and other technical resources. These sections explain how to obtain technical information from Cisco Systems.
Cisco.com
You can access the most current Cisco documentation at this URL:
http://www.cisco.com/univercd/home/home.htm
You can access the Cisco website at this URL:
You can access international Cisco websites at this URL:
http://www.cisco.com/public/countries_languages.shtml
Documentation DVD
Cisco documentation and additional literature are available in a Documentation DVD package, which may have shipped with your product. The Documentation DVD is updated regularly and may be more current than printed documentation. The Documentation DVD package is available as a single unit.
Registered Cisco.com users (Cisco direct customers) can order a Cisco Documentation DVD (product number DOC-DOCDVD=) from the Ordering tool or Cisco Marketplace.
Cisco Ordering tool:
http://www.cisco.com/en/US/partner/ordering/
Cisco Marketplace:
http://www.cisco.com/go/marketplace/
Ordering Documentation
You can find instructions for ordering documentation at this URL:
http://www.cisco.com/univercd/cc/td/doc/es_inpck/pdi.htm
You can order Cisco documentation in these ways:
•
http://www.cisco.com/en/US/partner/ordering/
•
Documentation Feedback
You can send comments about technical documentation to bug-doc@cisco.com.
You can submit comments by using the response card (if present) behind the front cover of your document or by writing to the following address:
Cisco Systems
Attn: Customer Document Ordering
170 West Tasman Drive
San Jose, CA 95134-9883We appreciate your comments.
Cisco Product Security Overview
Cisco provides a free online Security Vulnerability Policy portal at this URL:
http://www.cisco.com/en/US/products/products_security_vulnerability_policy.html
From this site, you can perform these tasks:
•
•
•
A current list of security advisories and notices for Cisco products is available at this URL:
If you prefer to see advisories and notices as they are updated in real time, you can access a Product Security Incident Response Team Really Simple Syndication (PSIRT RSS) feed from this URL:
http://www.cisco.com/en/US/products/products_psirt_rss_feed.html
Reporting Security Problems in Cisco Products
Cisco is committed to delivering secure products. We test our products internally before we release them, and we strive to correct all vulnerabilities quickly. If you think that you might have identified a vulnerability in a Cisco product, contact PSIRT:
•
•
Tip
Never use a revoked or an expired encryption key. The correct public key to use in your correspondence with PSIRT is the one that has the most recent creation date in this public key server list:
http://pgp.mit.edu:11371/pks/lookup?search=psirt%40cisco.com&op=index&exact=on
In an emergency, you can also reach PSIRT by telephone:
•
•
Obtaining Technical Assistance
For all customers, partners, resellers, and distributors who hold valid Cisco service contracts, Cisco Technical Support provides 24-hour-a-day, award-winning technical assistance. The Cisco Technical Support Website on Cisco.com features extensive online support resources. In addition, Cisco Technical Assistance Center (TAC) engineers provide telephone support. If you do not hold a valid Cisco service contract, contact your reseller.
Cisco Technical Support Website
The Cisco Technical Support Website provides online documents and tools for troubleshooting and resolving technical issues with Cisco products and technologies. The website is available 24 hours a day, 365 days a year, at this URL:
http://www.cisco.com/techsupport
Access to all tools on the Cisco Technical Support Website requires a Cisco.com user ID and password. If you have a valid service contract but do not have a user ID or password, you can register at this URL:
http://tools.cisco.com/RPF/register/register.do
Note
Submitting a Service Request
Using the online TAC Service Request Tool is the fastest way to open S3 and S4 service requests. (S3 and S4 service requests are those in which your network is minimally impaired or for which you require product information.) After you describe your situation, the TAC Service Request Tool provides recommended solutions. If your issue is not resolved using the recommended resources, your service request is assigned to a Cisco TAC engineer. The TAC Service Request Tool is located at this URL:
http://www.cisco.com/techsupport/servicerequest
For S1 or S2 service requests or if you do not have Internet access, contact the Cisco TAC by telephone. (S1 or S2 service requests are those in which your production network is down or severely degraded.) Cisco TAC engineers are assigned immediately to S1 and S2 service requests to help keep your business operations running smoothly.
To open a service request by telephone, use one of the following numbers:
Asia-Pacific: +61 2 8446 7411 (Australia: 1 800 805 227)
EMEA: +32 2 704 55 55
USA: 1 800 553-2447For a complete list of Cisco TAC contacts, go to this URL:
http://www.cisco.com/techsupport/contacts
Definitions of Service Request Severity
To ensure that all service requests are reported in a standard format, Cisco has established severity definitions.
Severity 1 (S1)—Your network is "down," or there is a critical impact to your business operations. You and Cisco will commit all necessary resources around the clock to resolve the situation.
Severity 2 (S2)—Operation of an existing network is severely degraded, or significant aspects of your business operation are negatively affected by inadequate performance of Cisco products. You and Cisco will commit full-time resources during normal business hours to resolve the situation.
Severity 3 (S3)—Operational performance of your network is impaired, but most business operations remain functional. You and Cisco will commit resources during normal business hours to restore service to satisfactory levels.
Severity 4 (S4)—You require information or assistance with Cisco product capabilities, installation, or configuration. There is little or no effect on your business operations.
Obtaining Additional Publications and Information
Information about Cisco products, technologies, and network solutions is available from various online and printed sources.
•
http://www.cisco.com/go/marketplace/
•
•
•
http://www.cisco.com/go/iqmagazine
•
•
![]()
![]()
![]()
![]()
![]()
![]()
![]()
![]()
Posted: Mon May 2 17:49:46 PDT 2005
All contents are Copyright © 1992--2005 Cisco Systems, Inc. All rights reserved.
Important Notices and Privacy Statement.