This chapter provides information on installing and configuring the Cisco 200 for Windows 95 software using the Cisco 200 for Windows 95 Setup program. This chapter contains the following sections:
Configure and install your Cisco 200 for Windows 95 Integrated Services Digital Network (ISDN) Adapter according to the instructions provided in your hardware installation guide and quick reference card.
Install Windows 95 with support for one or both of the following network protocols:
Transmission Control Protocol/Internet Protocol (TCP/IP)
Make a working copy of the Cisco 200 for Windows 95 disks and store the originals.
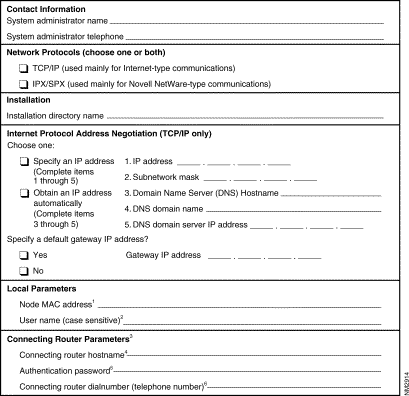
Cisco 200 for Windows 95 Software Installation Worksheet
The worksheet in Table 1-1 lists the information needed to install the Cisco 200 software. Have your system administrator fill out the worksheet with the appropriate information for your installation. Place the completed worksheet in your Site Log.
Table 1-1: Cisco 200 for Windows 95 Software Installation Worksheet
1. A node MAC address, assigned to the Cisco 200 ISDN Adapter, is required for the Cisco 200 software to function. Addresses must be no more than 12 hexadecimal characters. They can include a combination of numbers (1-9, 0) and letters (A-F). Each node MAC address must be unique. The first two characters should be 00 to avoid confusion with a broadcast address. 2. This is the name of your Cisco 200 for Windows 95 workstation. If connected to a router using authentication, this name must be identical to the "username" configured on the router. 3. Duplicate this page if you have two or more connecting routers. Specify the information for each connecting router. 4. If connected to a router using authentication, the Cisco 200 for Windows 95 connecting router hostname must be identical to the hostname configured on that router. 5. The authentication password must be identical to the password entered on the router after the username. 6. Be sure to include all digits necessary to connect to the router (country code, area code, international access, long distance access, public access, etc.) 7. The D-channel protocol configuration should be provided by your ISDN service provider (telephone company). 8. The second SPID and directory are optional unless you are using PPP multilink on the NI1 protocol that will run on a DMS100 switch. In this case, the second SPID and directory are required.
Running the Cisco 200 for Windows 95 Setup Program
The Cisco 200 for Windows 95 Setup utility installs the Cisco 200 for Windows 95 software. The installation involves these tasks:
To begin the installation, use the following procedure:
Step 1 While Windows 95 is running, insert the working copy of the Cisco 200 for Windows 95 Setup #1 disk into the disk drive of your PC.
Note If there are other Windows applications running, close them before running Setup.
Unless otherwise specified, the Back button will take you back through the Cisco 200 for Windows 95 Setup dialog boxes one by one.
Step 2 Run Setup. You can run the Cisco 200 for Windows 95 Setup program in one of two ways:
Using the Windows 95 Run Utility—Select Start, then Run. In the Run dialog box, enter or (if you have previously entered it) select:
A:\SETUP
Where A is the disk drive in which you placed the disk that contains the Cisco 200 for Windows 95 Setup program.
Using the Windows 95 Explorer—Select Start, then Programs, then Windows Explorer. Select the disk drive in which you placed the disk that contains the Cisco 200 for Windows 95 Setup program. Double-click setup.exe.
The Cisco 200 for Windows 95 Setup Screen will appear while Cisco 200 Setup prepares for the installation. The Welcome dialog box will appear.
Step 3 Read the text in the Welcome dialog box, then click Next. The Select Network Protocols dialog box displays.
Step 4 Select the desktop protocol(s) you will be using. Click the boxes to choose one or both of:
TCP/IP (Transmission Control Protocol/Internet Protocol)—This is used mainly for Internet-type communications.
IPX/SPX (Internetwork Packet Exchange/Sequenced Packet Exchange)— This is used mainly for Novell NetWare-type communications.
Click Next.
NoteIf you select a protocol that is not installed on your system, the Protocol Installation Hints dialog box will appear. Read the information in this box, and click Next. The Cisco 200 for Windows 95 Setup program will copy the hardware driver onto your hard disk, start the Windows 95 network configuration utility, and exit. You must now install the network protocol(s) you had selected.
Because the setup is not complete, a Microsoft information message will appear before the Microsoft Network Control Panel comes up. Answer Yes and continue with the setup of the Microsoft TCP/IP and/or IPX/SPX protocols and any desired Microsoft Clients.
To install TCP/IP—Select the Cisco 200 ISDN Adapter, then click Add. Select Protocol, then click Add. Select Microsoft, then select TCP/IP. Click OK.
To install IPX/SPX—Select the Cisco 200 ISDN Adapter, then click Add. Select Protocol, then click Add. Select Microsoft, then select "IPX/SPX-compatible Protocol."
If you want to automatically connect to Microsoft Windows NT or Novell NetWare networks, you will need to install the appropriate Microsoft Client.
To install the Client for Microsoft Networks (for use with Microsoft Windows NT networks)—Click Add, then select Client and click Add. Select Microsoft, then Client for Microsoft Networks. Click Add.
To install the Client for NetWare Networks (for use with Novell NetWare networks)—Click Add, then select Client and click Add. Select Microsoft, then Client for NetWare Networks. Click Add.
When you finish configuring Windows 95 for your network, click OK. You will receive a prompt to reboot your computer. Click No. You will reboot your computer at the end of the Cisco 200 Setup process.
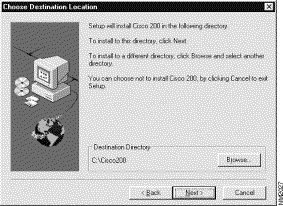
Step 5 The Choose Destination Location dialog box appears. See Figure 1-1.
Figure 1-1: The Choose Destination Location Dialog Box
To select the default directory, click Next. Cisco 200 for Windows 95 Setup will install the Cisco 200 for Windows 95 software in the directory indicated in the Destination Directory box at the bottom of the dialog box.
To select a directory other than the default directory, click Browse. A list of available directories appears. Highlight the desired directory for the Cisco 200 for Windows 95 software and click OK, then Next.
Configuring the TCP/IP Network Protocol
If you selected TCP/IP as one of your networking protocols, complete this section.
Step 1 If you selected TCP/IP, you must choose an Internet Protocol (IP) addressing scheme. The Microsoft TCP/IP Parameter Configuration dialog box displays. Select one of the following:
Specify an IP address—This allows you to specify an IP address, dedicated to the PC in which you have installed the Cisco 200. If you have been assigned an IP address, select this option.
Obtain an IP address automatically—This will set up the Cisco 200 to obtain an IP address when it connects to the network. If your connecting router has been configured to provide IP addresses automatically, select this option.
Step 2 Specify the IP address and/or Domain Name Service (DNS) information for the PC in which you have installed the Cisco 200. For a list of the required information, see Table 1-2.
Table 1-2: IP Address or DNS Configuration
Specify IP Address
Obtain IP Address Automatically
IP address
DNS hostname
Subnetwork mask
DNS domain name
DNS hostname
DNS server IP address
DNS domain name
DNS server IP address
When you have entered the requested IP address or DNS information, click Next.
Step 3 You can now specify a default gateway IP address. This is the IP address of the ISDN port of your connecting router.
If you want to specify a default gateway IP address, click the Specify Default Gateway IP Address box and click Next. Then enter the gateway IP address and click Next.
If you do not want to specify a default gateway IP address, leave the Specify Default Gateway IP Address box empty and click Next.
Configuring the Local System and the Connecting Router
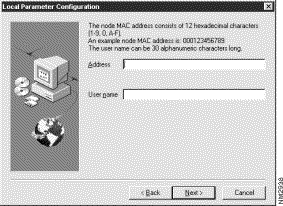
Step 1 The Local Parameter Configuration dialog box appears, as shown in Figure 1-2.
Figure 1-2: The Local Parameter Configuration Dialog Box
Enter the following:
The node MAC address assigned to your Cisco 200 ISDN Adapter— Consists of 12 hexadecimal characters (1-9, 0, A-F). It must be a unique address. If you are not sure what your node MAC address is, consult your system administrator. In this chapter, we will use "000123456789" as the example node MAC address.
The user name assigned to the local system (the PC in which you have installed the Cisco 200)—Consists of up to 30 alphanumeric characters. It is case sensitive. In this chapter, we will use "MyHomeOffice" as the example user name.
Click Next. The Configuration Hints for Connecting Router Parameters screen appears.
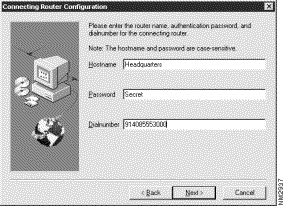
Step 2 Read this dialog box for important information on authentication. Then click Next.The Connecting Router Configuration dialog box displays. See Figure 1-3.
Step 3 Enter the hostname, password, and dialnumber of the connecting router. (Use the Tab key or the mouse to move from one field to another.) Click Next when you have entered the connecting router configuration information. For procedures and guidelines regarding this information, see Table 1-3.
Table 1-3: Connecting Router Configuration
Item
Procedure
Guidelines
Hostname
Enter the hostname of the connecting router, that is the router to which you will be sending and from which you will be receiving data.
The connecting router hostname is case-sensitive and can include up to 12 characters in any combination of numbers (1-9, 0) and letters (A-Z, a-z). It cannot include underscores (_), hyphens (-), asterisks (*), or spaces. In this document, we will use "Headquarters" as an example connecting router hostname.
Password
Enter the authentication password you will use to connect to the router.
The authentication password is case sensitive and must match exactly the password on the connecting router. Otherwise, authentication will fail. In this document, we will use "Secret" as an example authentication password.
Dialnumber
Enter the telephone number of the connecting router.
The number should include in a single string all numbers necessary to dial the connecting router. Do not separate the numbers with spaces, hyphens, or any non-numeric character. In this document, we will use "914085553000" as an example connecting router telephone number.
Procedures and Guidelines
Configuring ISDN Service, PPP Parameters, and ISDN Adapter
In this part of the Cisco 200 for Windows 95 Setup, you will configure the ISDN service, Point-to-Point Protocol (PPP) parameters, and ISDN Adapter.
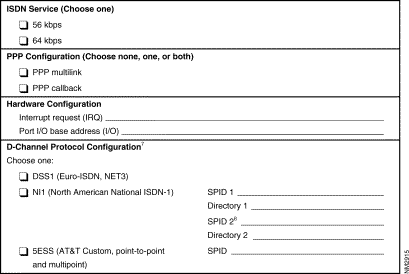
Step 1 When the Select ISDN Service dialog box appears, select the appropriate data transfer rate for your ISDN connection. Click one of the following:
Data rate 56 kbps (per B channel)
Data rate 64 kbps (per B channel)
Click Next. The PPP Configuration dialog box appears.
Step 2 Select PPP multilink and/or PPP callback to use these features:
PPP Multilink—Dynamically adds the second B channel when necessary. This increases ISDN bandwidth, but can result in increased line charges.
PPP Callback—Configures the Cisco 200 to be called back from the connecting router.
Click Next.
Step 3 An ISDN Adapter Resource Configuration dialog box appears. Select the interrupt request (IRQ) for which the ISDN Adapter was configured. Choices include the following:
11 (default)
10
5
2/9
Click Next.
Step 4 Another ISDN Adapter Resource Configuration dialog box appears. Select the port I/O base address for which the ISDN Adapter was configured. Choices include the following:
390 (default)
398
3A0
3A8
Click Next. The Select D-Channel Protocol dialog box appears.
Configuring the D-Channel Protocol
Using information provided by your ISDN service provider (telephone company), configure the Cisco 200 for Windows 95 software for your D-channel protocol.
Step 1 Select the appropriate D-channel protocol for your ISDN connection. Click one of the following:
DSS1 (Euro-ISDN, NET3)
NI1 (North American National ISDN-1)
5ESS (AT&T Custom—both point-to-point and multipoint)
Step 2 Enter Service Profile Identifiers (SPIDs) and Directories (telephone numbers) as requested. For information on SPID and Directory requirements for the D-channel protocols, see Table 1-4 and consult your ISDN service provider (telephone company).
Table 1-4: SPID and Directory Requirements for D-Channel Protocols
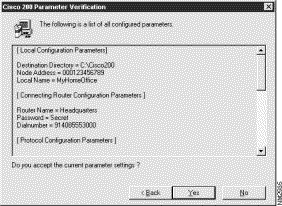
Click Yes to accept the current parameter settings as outlined in this dialog box. Click Back to make modifications to these parameters. The Back button will take you to the beginning of the installation, but will not erase any of the information you have already entered.
Step 2 The Copying Program Files Progress dialog box displays while the Cisco 200 for Windows 95 Setup program copies all necessary files into the designated directory.
When you are asked for the next disk, replace the Cisco 200 for Windows 95 Setup Disk #1 with the Cisco 200 for Windows 95 Setup Disk #2, then specify the correct path to the disk (usually a:\) and click Next.
Step 3 When the Setup Complete dialog box appears, select one of the following:
Yes, I want to restart my computer now. Restarting the computer is required for Cisco 200 for Windows 95 to become operational. (Be sure to remove any disks from removable media drives in preparation for the reboot.)
No, I will restart my computer later. Be sure to restart your computer before trying to use Cisco 200 for Windows 95.
Click Finish. The setup of Cisco 200 for Windows 95 software is complete.
What to Do Next
You have now completed installing the Cisco 200 for Windows 95 software. Further steps to configure your network as well as information on use, troubleshooting, and reference for the Cisco 200 are available as follows:
If you have not already installed a Microsoft Client and you want to automatically connect to Microsoft Windows NT or Novell NetWare networks, you will need to install the appropriate Microsoft Client.
To install the Microsoft Client—Click Add, then select Client and click Add. Select Microsoft, then either Client for Microsoft Networks or Client for NetWare Networks. Click Add. To install another Microsoft Client, repeat these steps. For more information, refer to the Microsoft documentation.
For information on using the Cisco 200 for Windows 95 software, refer to the Cisco 200 for Windows 95 Software User Guide.
For reference and troubleshooting information on the Cisco 200 for Windows 95, refer to the Cisco 200 for Windows 95 Reference Guide. This document is only available electronically, either on the CD-ROM called Cisco Connection Documentation, Enterprise Series or on Cisco's World Wide Web site at URL http://www.cisco.com.