
 |  |
10.2. Installation
In other chapters, installation instructions generally involved pointing you at a web site where you could obtain a distribution of the software and letting you add the included jar file to your classpath. Installing a framework such as Cocoon is not quite as simple, and the procedures are documented here. Additionally, Cocoon has instructions online for various other servlet engines; check these out at http://xml.apache.org/cocoon/install.html.
10.2.1. Source Code or Binaries
The first thing you need to do is decide if you want the source code or binaries for Cocoon. This decision actually can be boiled down even further: do you want the very latest features, or the most reliable build? If you are a hardcore developer who wants to dig into Cocoon, you should get a copy of CVS and pull the latest Cocoon source code from the xml.apache.org CVS repository. Rather than detail this process, as it probably involves the minority of you, I'll simply refer you to the CVS Pocket Reference by Gregor Purdy (O'Reilly). This will get you set up, in concert with the instructions online at http://xml.apache.org/cvs.html.
For those interested in trying Cocoon out or actually running it in production, download the latest Cocoon binary from http://xml.apache.org/cocoon/dist. As I write, the latest version, 1.8.2, is available for Windows (Cocoon-1.8.2.zip) and Linux/Unix (Cocoon-1.8.2.tar.gz). Once you download the archive, expand it to a temporary directory that you can work with. The most important thing to note here is the lib/ directory that's created. This directory includes all of the libraries needed to run Cocoon using your servlet engine.
NOTE: If you don't have a lib/ directory, or if it doesn't contain several jar files within it, you may have an older version of Cocoon. It's only in the newer releases (1.8 and up) that the download contains these libraries (which make life significantly easier, by the way!).
10.2.2. Configuring the Servlet Engine
Once you have built Cocoon, configure your servlet engine to use Cocoon and tell it which requests Cocoon should handle. I'll look at setting up Cocoon to work with the Jakarta Tomcat servlet engine here; as this is the reference implementation for the Java Servlet API (Version 2.2), you should be able to mimic these steps for your own servlet engine if you are not using the Tomcat implementation.
The first step is to copy all of the libraries needed for Cocoon at runtime into Tomcat's library directory. This is located at TOMCAT_HOME/lib, where TOMCAT_HOME is the directory of your Tomcat installation. On my Windows machine, this is c:\java\jakarta-tomcat, and on Linux it's /usr/local/jakarta-tomcat. However, this does not mean simply copy everything in Cocoon's lib/ directory over (unless you want to); the required jar files needed at runtime are:
-
bsfengines.jar (Bean Scripting Framework)
-
bsf.jar (Bean Scripting Framework)
-
fop_0_15_0.jar (FOP)
-
sax-bugfix.jar (SAX fixes to error handling)
-
turbine-pool.jar (Turbine)
-
w3c.jar (W3C)
-
xalan_1_2_D02.jar (Xalan)
-
xerces_1_2.jar (Xerces)
Additionally, copy Cocoon's bin/cocoon.jar file into this same directory (TOMCAT_HOME/lib). At that point, you'll have all the libraries needed to run Cocoon.
The latest versions of Tomcat (I'm using 3.2.1) automatically load all libraries in the Tomcat lib/ directory, which means you don't have to mess with the classpath. If you are using a servlet engine that doesn't support this automatic loading, add each jar to the servlet engine's classpath.
Once the required libraries are in place, let the servlet engine know which context to run Cocoon under. This essentially tells the servlet engine where to look for files requested through the Cocoon engine. This is handled by modifying the server.xml file, located in Tomcat's conf/ directory. Add the following directive in at the end of the file, within the ContextManager element:
<Server>
  <!-- Other Server elements -->

  <ContextManager>
    <!-- Other Context directives -->

    <Context path="/cocoon"
             docBase="webapps/cocoon"
             debug="0"
             reloadable="true" >
    </Context>
  </ContextManager>
</Server>
In other words, requests based on the URI /cocoon (such as /cocoon/index.xml) should be mapped to the context within the specified directory (webapps/cocoon). Of course, you'll need to create the directories for the context you've just defined. So add a cocoon and cocoon/WEB-INF directory to Tomcat's webapps directory. You should have a directory structure similar to Figure 10-1.
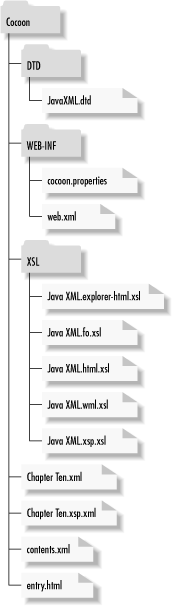
Figure 10-1. Cocoon context directory structure
With this setup, you'll need to copy a few files from the Cocoon distribution into the context. Copy Cocoon's conf/cocoon.properties and src/WEB-INF/web.xml files into the TOMCAT_HOME/webapps/cocoon/WEB-INF/ directory. Once this is in place, you only need to modify the web.xml file that you just copied. Change the reference in it to point to the cocoon.properties file you just copied over:
<web-app>
 <servlet>
  <servlet-name>org.apache.cocoon.Cocoon</servlet-name>
  <servlet-class>org.apache.cocoon.Cocoon</servlet-class>
  <init-param>
   <param-name>properties</param-name>
   <param-value>WEB-INF/cocoon.properties</param-value>
  </init-param>
 </servlet>

 <servlet-mapping>
  <servlet-name>org.apache.cocoon.Cocoon</servlet-name>
  <url-pattern>*.xml</url-pattern>
 </servlet-mapping>
</web-app>
At this point, you have one last, rather annoying, step to perform. Tomcat automatically loads all the jar files in its lib/ directory, and it does it alphabetically, according to the name of the jar file. The problem is that Cocoon requires a DOM Level 2 implementation (such as the one in Xerces, included with Cocoon in xerces_1_2.jar); however, Tomcat uses a DOM Level 1 implementation, included in parser.jar. Of course, because of the alphabetical listing, parser.jar gets loaded before xerces_1_2.jar, and Cocoon bombs out. To solve this, rename your parser.jar archive something that will get loaded after Xerces; I used z_parser.jar. This step ensures that the classes are still available to Tomcat, but that the DOM Level 2 classes are loaded first and used by Cocoon.
Once you complete these steps, test Cocoon by loading up the Cocoon information URI, which reports details about Cocoon's installation. Access http://[hostname:port]/cocoon/Cocoon.xml. In a default installation, this would be http://localhost:8080/cocoon/Cocoon.xml. Your browser should give you results similar to those in Figure 10-2.
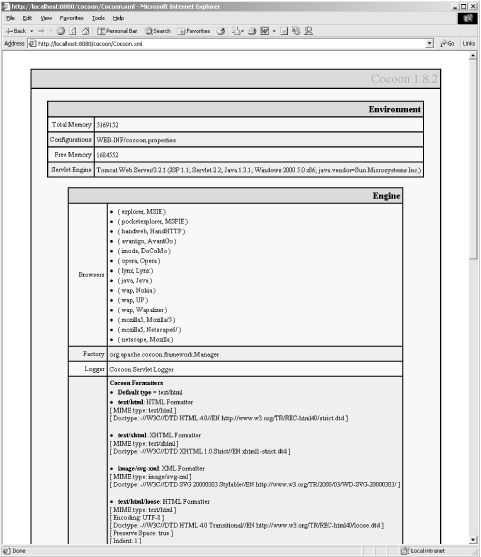
Figure 10-2. Checking the Cocoon installation
Once this is set up, you're ready to put some real content into place. With the setup you already have, all requests that end in .xml and are within the defined Cocoon context will be handled by the Cocoon servlet.
|  | |
| 10. Web Publishing Frameworks |  | 10.3. Using a Publishing Framework |

Copyright © 2002 O'Reilly & Associates. All rights reserved.