
 |  |
7.4. Processing Forms
It's easy to process forms with PHP, as the form parameters are available in the $_GET and $_POST arrays. There are many tricks and techniques for working with forms, though, which are described in this section.
7.4.1. Methods
As we already discussed, there are two HTTP methods that a client can use to pass form data to the server: GET and POST. The method that a particular form uses is specified with the method attribute to the form tag. In theory methods are case-insensitive in the HTML, but in practice some broken browsers require the method name to be in all uppercase.
A GET request encodes the form parameters in the URL, in what is called a query string:
/path/to/chunkify.php?word=despicable&length=3
A POST request passes the form parameters in the body of the HTTP request, leaving the URL untouched.
The most visible difference between GET and POST is the URL line. Because all of a form's parameters are encoded in the URL with a GET request, users can bookmark GET queries. They cannot do this with POST requests, however.
The biggest difference between GET and POST requests, however, is far more subtle. The HTTP specification says that GET requests are idempotent—that is, one GET request for a particular URL, including form parameters, is the same as two or more requests for that URL. Thus, web browsers can cache the response pages for GET requests, because the response page doesn't change regardless of how many times the page is loaded. Because of idempotence, GET requests should be used only for queries such as splitting a word into smaller chunks or multiplying numbers, where the response page is never going to change.
POST requests are not idempotent. This means that they cannot be cached, and the server is recontacted every time the page is displayed. You've probably seen your web browser prompt you with "Repost form data?" before displaying or reloading certain pages. This makes POST requests the appropriate choice for queries whose response pages may change over time—for example, displaying the contents of a shopping cart or the current messages in a bulletin board.
That said, idempotence is often ignored in the real world. Browser caches are generally so poorly implemented, and the Reload button is so easy to hit, that programmers tend to use GET and POST simply based on whether they want the query parameters shown in the URL or not. What you need to remember is that GET requests should not be used for any actions that cause a change in the server, like placing an order or updating a database.
The type of method that was used to request a PHP page is available through $_SERVER['REQUEST_METHOD']. For example:
if ($_SERVER['REQUEST_METHOD'] == 'GET') {
  // handle a GET request
} else {
  die("You may only GET this page.");
}
7.4.2. Parameters
Use the $_POST , $_GET, and $_FILES arrays to access form parameters from your PHP code. The keys are the parameter names, and the values are the values of those parameters. Because periods are legal in HTML field names, but not in PHP variable names, periods in field names are converted to underscores (_) in the array.
Example 7-1 shows an HTML form that chunkifies a string supplied by the user. The form contains two fields: one for the string (parameter name "word") and one for the size of chunks to produce (parameter name "number").
Example 7-1. The chunkify form (chunkify.html)
<html>
<head><title>Chunkify Form</title></head>
<body>
<form action="chunkify.php" method="POST">
Enter a word: <input type="text" name="word" /><br />
How long should the chunks be?
<input type="text" name="number" /><br />
<input type="submit" value="Chunkify!">
</form>
</body>
</html>
Example 7-2 lists the PHP script, chunkify.php, to which the form in Example 7-1 submits. The script copies the parameter values into variables and uses them. Although the register_globals option in php.ini would automatically create variables from the parameter values, we don't use it because it complicates writing secure PHP programs.
Example 7-2. The chunkify script (chunkify.php)
<html>
<head><title>Chunked Word</title></head>
<body>

<?php
 $word   = $_POST['word'];
 $number = $_POST['number'];

 $chunks = ceil(strlen($word)/$number);

 echo "The $number-letter chunks of '$word' are:<br />\n";

 for ($i=0; $i < $chunks; $i++) {
   $chunk = substr($word, $i*3, 3);
   printf("%d: %s<br />\n", $i+1, $chunk);
 }
?>

</body>
</html>
Figure 7-1 shows the both the chunkify form and the resulting output.
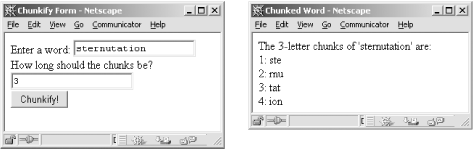
Figure 7-1. The chunkify form and its output
7.4.3. Automatic Quoting of Parameters
PHP ships with the magic_quotes_gpc option enabled in php.ini. This option instructs PHP to automatically call addslashes( ) on all cookie data and GET and POST parameters. This makes it easy to use form parameters in database queries, as we'll see in Chapter 8, but can cause trouble with form parameters not used in database queries as all single quotes, double quotes, backslashes, and NUL-bytes are escaped with backslash characters.
For instance, if you enter the word "O'Reilly" in the form in Figure 7-1 and hit the Chunkify button, you'll see that the word that's actually chunked is "O\'Reilly". That's magic_quotes_gpc at work.
To work with the strings as typed by the user, you can either disable magic_quotes_gpc in php.ini or use the stripslashes( ) function on the values in $_GET , $_POST, and $_COOKIES. The correct way to work with a string is as follows:
$value = ini_get('magic_quotes_gpc')
       ? stripslashes($_GET['word'])
       : $_GET['word'];
If you plan to work with lots of string values, it's wise to define a function to handle this for you:
function raw_param ($name) {
  return ini_get('magic_quotes_gpc')
         ? stripslashes($_GET[$name])
         : $_GET[$name];
}
You call the function like this:
$value = raw_param('word');For the remaining examples in this chapter, we'll assume that you have magic_quotes_gpc disabled in php.ini. If you don't, you'll need to change the examples to call stripslashes( ) on all the parameters.
7.4.4. Self-Processing Pages
One PHP page can be used to both generate a form and process it. If the page shown in Example 7-3 is requested with the GET method, it prints a form that accepts a Fahrenheit temperature. If called with the POST method, however, the page calculates and displays the corresponding Celsius temperature.
Example 7-3. A self-processing temperature-conversion page (temp.php)
<html>
<head><title>Temperature Conversion</title></head>
<body>

<?php
 if ($_SERVER['REQUEST_METHOD'] == 'GET') {
?>

<form action="<?php echo $_SERVER['PHP_SELF'] ?>" method="POST">
Fahrenheit temperature:
<input type="text" name="fahrenheit" /> <br />
<input type="submit" name="Convert to Celsius!" />
</form>

<?php
 } elseif ($_SERVER['REQUEST_METHOD'] == 'POST') {
   $fahr = $_POST['fahrenheit'];
   $celsius = ($fahr - 32) * 5/9;
   printf("%.2fF is %.2fC", $fahr, $celsius);
 } else {
   die("This script only works with GET and POST requests.");
 }
?>

</body>
</html>
Figure 7-2 shows the temperature-conversion page and the resulting output.
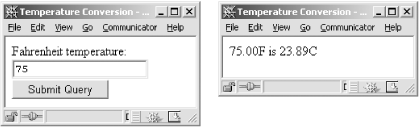
Figure 7-2. The temperature-conversion page and its output
Another way for a script to decide whether to display a form or process it is to see whether or not one of the parameters has been supplied. This lets you write a self-processing page that uses the GET method to submit values. Example 7-4 shows a new version of the temperature-conversion page that submits parameters using a GET request. This page uses the presence or absence of parameters to determine what to do.
Example 7-4. Temperature conversion using the GET method
<html>
<head><title>Temperature Conversion</title></head>
<body>

<?php
 $fahr = $_GET['fahrenheit'];
 if (is_null($fahr)) {
?>

<form action="<?php echo $_SERVER['PHP_SELF'] ?>" method="GET">
Fahrenheit temperature:
<input type="text" name="fahrenheit" /> <br />
<input type="submit" name="Convert to Celsius!" />
</form>

<?php
 } else {
   $celsius = ($fahr - 32) * 5/9;
   printf("%.2fF is %.2fC", $fahr, $celsius);
 }
?>

</body>
</html>
In Example 7-4, we copy the form parameter value into $fahr. If we weren't given that parameter, $fahr contains NULL, so we can use is_null( ) to test whether we should display the form or process the form data.
7.4.5. Sticky Forms
Many web sites use a technique known as sticky forms, in which the results of a query are accompanied by a search form whose default values are those of the previous query. For instance, if you search Google (http://www.google.com) for "Programming PHP", the top of the results page contains another search box, which already contains "Programming PHP". To refine your search to "Programming PHP from O'Reilly", you can simply add the extra keywords.
This sticky behavior is easy to implement. Example 7-5 shows our temperature-conversion script from Example 7-4, with the form made sticky. The basic technique is to use the submitted form value as the default value when creating the HTML field.
Example 7-5. Temperature conversion with a sticky form
<html>
<head><title>Temperature Conversion</title></head>
<body>

<?php
 $fahr = $_GET['fahrenheit'];
?>

<form action="<?php echo $_SERVER['PHP_SELF'] ?>" method="GET">
Fahrenheit temperature:
<input type="text" name="fahrenheit" value="<?php echo $fahr ?>" />
<br />
<input type="submit" name="Convert to Celsius!" />
</form>

<?php
 if (! is_null($fahr)) {
   $celsius = ($fahr - 32) * 5/9;
   printf("%.2fF is %.2fC", $fahr, $celsius);
 }
?>

</body>
</html>
7.4.6. Multivalued Parameters
HTML selection lists, created with the select tag, can allow multiple selections. To ensure that PHP recognizes the multiple values that the browser passes to a form-processing script, you need to make the name of the field in the HTML form end with []. For example:
<select name="languages[]">
  <input name="c">C</input>
  <input name="c++">C++</input>
  <input name="php">PHP</input>
  <input name="perl">Perl</input>
</select>
Now, when the user submits the form, $_GET['languages'] contains an array instead of a simple string. This array contains the values that were selected by the user.
Example 7-6 illustrates multiple selection. The form provides the user with a set of personality attributes. When the user submits the form, he gets a (not very interesting) description of his personality.
Example 7-6. Multiple selection values with a select box
<html>
<head><title>Personality</title></head>
<body>

<form action="<?php echo $_SERVER['PHP_SELF'] ?>" method="GET">
Select your personality attributes:<br />
<select name="attributes[]" multiple>
<option value="perky">Perky</option>
<option value="morose">Morose</option>
<option value="thinking">Thinking</option>
<option value="feeling">Feeling</option>
<option value="thrifty">Spend-thrift</option>
<option value="prodigal">Shopper</option>
</select>
<br>
<input type="submit" name="s" value="Record my personality!" />
</form>

<?php
 if (array_key_exists('s', $_GET)) {
   $description = join (" ", $_GET['attributes']);
   echo "You have a $description personality.";
 }
?>

</body>
</html>
In Example 7-6, the submit button has a name, "s". We check for the presence of this parameter value to see whether we have to produce a personality description. Figure 7-3 shows the multiple selection page and the resulting output.

Figure 7-3. Multiple selection and its output
The same technique applies for any form field where multiple values can be returned. Example 7-7 shows a revised version of our personality form that is rewritten to use checkboxes instead of a select box. Notice that only the HTML has changed—the code to process the form doesn't need to know whether the multiple values came from checkboxes or a select box.
Example 7-7. Multiple selection values in checkboxes
<html>
<head><title>Personality</title></head>
<body>

<form action="<?php $_SERVER['PHP_SELF'] ?>" method="GET">
Select your personality attributes:<br />
Perky <input type="checkbox" name="attributes[]" value="perky" /><br />
Morose <input type="checkbox" name="attributes[]" value="morose" /><br />
Thinking <input type="checkbox" name="attributes[]" value="feeling" /><br />
Feeling <input type="checkbox" name="attributes[]" value="feeling" /><br />
Spend-thrift <input type="checkbox" name="attributes[]" value="thrifty" /><br />
Shopper <input type="checkbox" name="attributes[]" value="thrifty" /><br />
<br />
<input type="submit" name="s" value="Record my personality!" />
</form>

<?php
 if (array_key_exists('s', $_GET)) {
   $description = join (" ", $_GET['attributes']);
   echo "You have a $description personality.";
 }
?>

</body>
</html>
7.4.7. Sticky Multivalued Parameters
So now you're wondering, can I make multiple selection form elements sticky? You can, but it isn't easy. You'll need to check to see whether each possible value in the form was one of the submitted values. For example:
Perky: <input type="checkbox" name="attributes[]" value="perky"
<?= if (is_array($_GET['attributes']) and
        in_array('perky', $_GET['attributes'])) {
       "checked";
     }
?> /><br />
You could use this technique for each checkbox, but that's repetitive and error-prone. At this point, it's easier to write a function to generate the HTML for the possible values and work from a copy of the submitted parameters. Example 7-8 shows a new version of the multiple selection checkboxes, with the form made sticky. Although this form looks just like the one in Example 7-7, behind the scenes, there are substantial changes to the way the form is generated.
Example 7-8. Sticky multivalued checkboxes
<html>
<head><title>Personality</title></head>
<body>

<?php
 // fetch form values, if any
 $attrs = $_GET['attributes'];
 if (! is_array($attrs)) { $attrs = array( ); }

 // create HTML for identically-named checkboxes

 function make_checkboxes ($name, $query, $options) {
   foreach ($options as $value => $label) {
     printf('%s <input type="checkbox" name="%s[]" value="%s" ',
             $label, $name, $value);
     if (in_array($value, $query)) { echo "checked "; }
     echo "/><br />\n";
   }
 }

 // the list of values and labels for the checkboxes
 $personality_attributes = array(
   'perky'    => 'Perky',
   'morose'   => 'Morose',
   'thinking' => 'Thinking',
   'feeling'  => 'Feeling',
   'thrifty'  => 'Spend-thrift',
   'prodigal' => 'Shopper'
 );
?>

<form action="<?php $_SERVER['PHP_SELF'] ?>" method="GET">
Select your personality attributes:<br />
<?php make_checkboxes('attributes', $attrs, $personality_attributes); ?>
<br />
<input type="submit" name="s" value="Record my personality!" />
</form>

<?php
 if (array_key_exists('s', $_GET)) {
   $description = join (" ", $_GET['attributes']);
   echo "You have a $description personality.";
 }
?>

</body>
</html>
The heart of this code is the make_checkboxes( ) subroutine. It takes three arguments: the name for the group of checkboxes, the array of on-by-default values, and the array mapping values to descriptions. The list of options for the checkboxes is in the $personality_attributes array.
7.4.8. File Uploads
To handle file uploads (supported in most modern browsers), use the $_FILES array. Using the various authentication and file upload functions, you can control who is allowed to upload files and what to do with those files once they're on your system. Security concerns to take note of are described in Chapter 12.
The following code displays a form that allows file uploads to the same page:
<form enctype="multipart/form-data" action="<?= $PHP_SELF ?>" method="POST">
  <input type="hidden" name="MAX_FILE_SIZE" value="10240">
  File name: <input name="toProcess" type="file">
  <input type="submit" value="Upload">
</form>
The biggest problem with file uploads is the risk of getting a file that is too large to process. PHP has two ways of preventing this: a hard limit and a soft limit. The upload_max_filesize option in php.ini gives a hard upper limit on the size of uploaded files (it is set to 2 MB by default). If your form submits a parameter called MAX_FILE_SIZE before any file field parameters, PHP uses that value as the soft upper limit. For instance, in the previous example, the upper limit is set to 10 KB. PHP ignores attempts to set MAX_FILE_SIZE to a value larger than upload_max_filesize.
Each element in $_FILES is itself an array, giving information about the uploaded file. The keys are:
- name
- The name of the file, as supplied by the browser. It's difficult to make meaningful use of this, as the client machine may have different filename conventions than the web server (e.g., if the client is a Windows machine that tells you the file is D:\PHOTOS\ME.JPG, while the web server runs Unix, to which that path is meaningless).
- type
- The MIME type of the uploaded file, as guessed at by the client.
- size
- The size of the uploaded file (in bytes). If the user attempted to upload a file that was too large, the size is reported as 0.
- tmp_name
- The name of the temporary file on the server that holds the uploaded file. If the user attempted to upload a file that was too large, the name is reported as "none".
The correct way to test whether a file was successfully uploaded is to use the function is_uploaded_file( ), as follows:
if (is_uploaded_file($_FILES['toProcess']['tmp_name']) {
  // successfully uploaded
}
Files are stored in the server's default temporary files directory, which is specified in php.ini with the upload_tmp_dir option. To move a file, use the move_uploaded_file( ) function:
move_uploaded_file($_FILES['toProcess']['tmp_name'], "path/to/put/file/$file);
The call to move_uploaded_file( ) automatically checks whether it was an uploaded file. When a script finishes, any files uploaded to that script are deleted from the temporary directory.
7.4.9. Form Validation
When you allow users to input data, you typically need to validate that data before using it or storing it for later use. There are several strategies available for validating data. The first is JavaScript on the client side. However, since the user can choose to turn JavaScript off, or may even be using a browser that doesn't support it, this cannot be the only validation you do.
A more secure choice is to use PHP itself to do the validation. Example 7-9 shows a self-processing page with a form. The page allows the user to input a media item; three of the form elements—the name, media type, and filename—are required. If the user neglects to give a value to any of them, the page is presented anew with a message detailing what's wrong. Any form fields the user already filled out are set to the values she entered. Finally, as an additional clue to the user, the text of the submit button changes from "Create" to "Continue" when the user is correcting the form.
Example 7-9. Form validation
<?php
 $name = $_POST['name'];
 $media_type = $_POST['media_type'];
 $filename = $_POST['filename'];
 $caption = $_POST['caption'];

 $tried = ($_POST['tried'] == 'yes');

 if ($tried) {
   $validated = (!empty($name) && !empty($media_type) && !empty($filename));

   if (!$validated) {
?>
<p>
  The name, media type, and filename are required fields. Please fill
  them out to continue.
</p>
<?php
   }
 }

 if ($tried && $validated) {
   echo '<p>The item has been created.</p>';
 }

 // was this type of media selected? print "selected" if so
 function media_selected ($type) {
   global $media_type;
   if ($media_type == $type) { echo "selected"; }
 }
?>

<form action="<?= $PHP_SELF ?>" method="POST">
  Name: <input type=text name="name" value="<?= $name ?>" /><br />
  Status: <input type="checkbox" name="status" value="active"
  <?php if($status == 'active') { echo 'checked'; } ?> /> Active<br />
  Media: <select name="media_type">
    <option value="">Choose one</option>
    <option value="picture" <?php media_selected('picture') ?> />Picture</option>
    <option value="audio" <?php media_selected('audio') ?> />Audio</option>
    <option value="movie" <?php media_selected('movie') ?> />Movie</option>
  </select><br />

  File: <input type="text" name="filename" value="<?= $filename ?>" /><br />
  Caption: <textarea name="caption"><?= $caption ?></textarea><br />

  <input type="hidden" name="tried" value="yes" />
  <input type="submit"
         value="<?php echo $tried ? 'Continue' : 'Create'; ?>" />
</form>
In this case, the validation is simply a check that a value was supplied. We set $validated to be true only if $name, $type, and $filename are all nonempty. Other possible validations include checking that an email address is valid or checking that the supplied filename is local and exists.
For example, to validate an age field to ensure that it contains a nonnegative integer, use this code:
$age = $_POST['age'];
$valid_age = strspn($age, "1234567890") == strlen($age);
The call to strspn( ) finds the number of digits at the start of the string. In a nonnegative integer, the whole string should be comprised of digits, so it's a valid age if the entire string is made of digits. We could also have done this check with a regular expression:
$valid_age = preg_match('/^\d+$/', $age);Validating email addresses is a nigh-impossible task. There's no way to take a string and see whether it corresponds to a valid email address. However, you can catch typos by requiring the user to enter the email address twice (into two different fields). You can also prevent people from entering email addresses like "me" or "me@aol" by requiring an at sign (@) and a period after it, and for bonus points you can check for domains to which you don't want to send mail (e.g., whitehouse.gov, or a competitor). For example:
$email1 = strtolower($_POST['email1']);
$email2 = strtolower($_POST['email2']);
if ($email1 !== $email2) {
  die("The email addresses didn't match");
}
if (! preg_match('/@.+\..+$/, $email1)) {
  die("The email address is invalid");
}
if (strpos($email1, "whitehouse.gov")) {
  die("I will not send mail to the White House");
}
Field validation is basically string manipulation. In this example, we've used regular expressions and string functions to ensure that the string provided by the user is the type of string we expect.
|  | |
| 7.3. Server Information |  | 7.5. Setting Response Headers |

Copyright © 2003 O'Reilly & Associates. All rights reserved.