
 |  |
17.2. Using the Core DOM API
Now that we've studied the tree structure of documents and seen how the tree is composed of Node objects, we can move on to study the Node object and document trees in more detail. As I noted previously, the core DOM API is not terribly complex. The following sections contain examples that demonstrate how you can use it to accomplish common tasks.
17.2.1. Traversing a Document
As we've already discussed, the DOM represents an HTML document as a tree of Node objects. With any tree structure, one of the most common things to do is traverse the tree, examining each node of the tree in turn. Example 17-1 shows one way to do this. It is a JavaScript function that recursively examines a node and all its children, adding up the number of HTML tags (i.e., Element nodes) it encounters in the course of the traversal. Note the use of the childNodes property of a node. The value of this property is a NodeList object, which behaves (in JavaScript) like an array of Node objects. Thus, the function can enumerate all the children of a given node by looping through the elements of the childNodes[] array. By recursing, the function enumerates not just all children of a given node, but all nodes in the tree of nodes. Note that this function also demonstrates the use of the nodeType property to determine the type of each node.
Example 17-1. Traversing the nodes of a document
<head>
<script>
// This function is passed a DOM Node object and checks to see if that node
// represents an HTML tag; i.e., if the node is an Element object. It
// recursively calls itself on each of the children of the node, testing
// them in the same way. It returns the total number of Element objects
// it encounters. If you invoke this function by passing it the
// Document object, it traverses the entire DOM tree.
function countTags(n) {                         // n is a Node
    var numtags = 0;                            // Initialize the tag counter
    if (n.nodeType == 1 /*Node.ELEMENT_NODE*/)  // Check if n is an Element
        numtags++;                              // Increment the counter if so
    var children = n.childNodes;                // Now get all children of n
    for(var i=0; i < children.length; i++) {    // Loop through the children
        numtags += countTags(children[i]);      // Recurse on each one
    }
    return numtags;                             // Return the total number of tags
}
</script>
</head>
<!-- Here's an example of how the countTags( ) function might be used -->
<body onload="alert('This document has ' + countTags(document) + ' tags')">
This is a <i>sample</i> document.
</body>
Another point to notice about Example 17-1 is that the countTags( ) function it defines is invoked from the onload event handler, so that it is not called until the document is completely loaded. This is a general requirement when working with the DOM: you cannot traverse or manipulate the document tree until the document has been fully loaded.
In addition to the childNodes property, the Node interface defines a few other useful properties. firstChild and lastChild refer to the first and last children of a node, and nextSibling and previousSibling refer to adjacent siblings of a node. (Two nodes are siblings if they have the same parent node.) These properties provide another way to loop through the children of a node, demonstrated in Example 17-2. This example counts the number of characters in all the Text nodes within the <body> of the document. Notice the way the countCharacters( ) function uses the firstChild and nextSibling properties to loop through the children of a node.
Example 17-2. Another way to traverse a document
<head>
<script>
// This function is passed a DOM Node object and checks to see if that node
// represents a string of text; i.e., if the node is a Text object. If
// so, it returns the length of the string. If not, it recursively calls
// itself on each of the children of the node and adds up the total length
// of the text it finds. Note that it enumerates the children of a node
// using the firstChild and nextSibling properties. Note also that the
// function does not recurse when it finds a Text node, because Text nodes
// never have children.
function countCharacters(n) {                // n is a Node
    if (n.nodeType == 3 /*Node.TEXT_NODE*/)  // Check if n is a Text object
        return n.length;                     // If so, return its length
    // Otherwise, n may have children whose characters we need to count
    var numchars = 0;  // Used to hold total characters of the children
    // Instead of using the childNodes property, this loop examines the
    // children of n using the firstChild and nextSibling properties.
    for(var m = n.firstChild; m != null; m = m.nextSibling) {
        numchars += countCharacters(m);  // Add up total characters found
    }
    return numchars;                     // Return total characters
}
</script>
</head>
<!--
  The onload event handler is an example of how the countCharacters( )
  function might be used. Note that we want to count only the characters
  in the <body> of the document, so we pass document.body to the function.
-->
<body onload="alert('Document length: ' + countCharacters(document.body))">
This is a sample document.<p>How long is it?
</body>
17.2.2. Finding Specific Elements in a Document
The ability to traverse all nodes in a document tree gives us the power to find specific nodes. When programming with the DOM API, it is quite common to need a particular node within the document or a list of nodes of a specific type within the document. Fortunately, the DOM API provides functions that make this easy for us.
In Example 17-2, we referred to the <body> element of an HTML document with the JavaScript expression document.body. The body property of the Document object is a convenient special-case property and is the preferred way to refer to the <body> tag of an HTML document. If this convenience property did not exist, however, we could also refer to the <body> tag like this:
document.getElementsByTagName("body")[0] This expression calls the Document object's getElementsByTagName( ) method and selects the first element of the returned array. The call to getElementsByTagName( ) returns an array of all <body> elements within the document. Since HTML documents can have only one <body>, we know that we're interested in the first element of the returned array.[59]
[59]Technically, the DOM API specifies that getElementsByTagName( ) returns a NodeList object. In the JavaScript binding of the DOM, NodeList objects behave like arrays and are typically used that way.
You can use getElementsByTagName( ) to obtain a list of any type of HTML element. For example, to find all the tables within a document, you'd do this:
var tables = document.getElementsByTagName("table");
alert("This document contains " + tables.length + " tables");
Note that since HTML tags are not case-sensitive, the strings passed to getElementsByTagName( ) are also not case-sensitive. That is, the previous code finds <table> tags even if they are coded as <TABLE>. getElementsByTagName( ) returns elements in the order in which they appear in the document. Finally, if you pass the special string "*" to getElementsByTagName( ), it returns a list of all the elements in the document, in the order in which they appear. (This special usage is not supported in IE 5 and IE 5.5. See instead the IE-specific Document.all[] array in the client-side reference section.)
Sometimes you don't want a list of elements but instead want to operate on a single specific element of a document. If you know a lot about the structure of the document, you may be able to use getElementsByTagName( ). For example, if you want to do something to the fourth paragraph in a document, you might use this code:
var myParagraph = document.getElementsByTagName("p")[3]; This typically is not the best (nor the most efficient) technique, however, because it depends so heavily on the structure of the document; a new paragraph inserted at the beginning of the document would break the code. Instead, when you need to manipulate specific elements of a document, it is best to give those elements an id attribute that specifies a unique (within the document) name for the element. Then you can look up your desired element by its ID. For example, you might code the special fourth paragraph of your document with a tag like this:
<p id="specialParagraph">
You can then look up the node for that paragraph with JavaScript code like this:
var myParagraph = document.getElementById("specialParagraph"); Note that the getElementById( ) method does not return an array of elements like getElementsByTagName( ) does. Because the value of every id attribute is (or is supposed to be) unique, getElementById( ) returns only the single element with the matching id attribute. getElementById( ) is an important method, and its use is quite common in DOM programming.
getElementById( ) and getElementsByTagName( ) are both methods of the Document object. Element objects also define a getElementsByTagName( ) method, however. This method of the Element object behaves just like the method of the Document object, except that it returns only elements that are descendants of the element on which it is invoked. Instead of searching the entire document for elements of a specific type, it searches only within the given element. This makes it possible, for example, to use getElementById( ) to find a specific element and then to use getElementsByTagName( ) to find all descendants of a given type within that specific tag. For example:
// Find a specific Table element within a document and count its rows
var tableOfContents = document.getElementById("TOC");
var rows = tableOfContents.getElementsByTagName("tr");
var numrows = rows.length;
Finally, note that for HTML documents, the HTMLDocument object also defines a getElementsByName( ) method. This method is like getElementById( ), but it looks at the name attribute of elements rather than the id attribute. Also, because the name attribute is not expected to be unique within a document (for example, radio buttons within HTML forms usually have the same name), getElementsByName( ) returns an array of elements rather than a single element. For example:
// Find <a name="top">
var link = document.getElementsByName("top")[0];
// Find all <input type="radio" name="shippingMethod"> elements
var choices = document.getElementsByName("shippingMethod");
17.2.3. Modifying a Document
Traversing the nodes of a document can be useful, but the real power of the core DOM API lies in the features that allow you to use JavaScript to dynamically modify documents. The following examples demonstrate the basic techniques of modifying documents and illustrate some of the possibilities.
Example 17-3 includes a JavaScript function named reverse( ), a sample document, and an HTML button that, when pressed, calls the reverse( ) function, passing it the node that represents the <body> element of the document. (Note the use of getElementsByTagName( ) within the button's event handler to find the <body> element.) The reverse( ) function loops backward through the children of the supplied node and uses the removeChild( ) and appendChild( ) methods of the Node object to reverse the order of those children.
Example 17-3. Reversing the nodes of a document
<head><title>Reverse</title>
<script>
function reverse(n) {           // Reverse the order of the children of Node n
    var kids = n.childNodes;    // Get the list of children
    var numkids = kids.length;  // Figure out how many children there are
    for(var i = numkids-1; i >= 0; i--) {  // Loop backward through the children
        var c = n.removeChild(kids[i]);    // Remove a child
        n.appendChild(c);                  // Put it back at its new position
    }
}
</script>
</head>
<body>
<p>paragraph #1<p>paragraph #2<p>paragraph #3  <!-- A sample document -->
<p>                                    <!-- A button to call reverse( )-->
<button onclick="reverse(document.body);"
>Click Me to Reverse</button>
</body>
The result of Example 17-3, illustrated in Figure 17-3, is that when the user clicks the button, the order of the paragraphs and of the button are reversed.
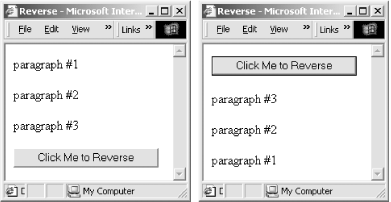
Figure 17-3. A document before and after being reversed
There are a couple of points worth noting about Example 17-3. First, if you pass a node that is already part of the document to appendChild( ) it first removes it, so we could have simplified our code by omitting the call to removeChild( ). Second, keep in mind that the childNodes property (like all NodeList objects) is "live": when the document is modified, the modifications are immediately visible through the NodeList. This is an important features of the NodeList interface, but it can actually make some code trickier to write. A call to removeChild( ), for example, changes the index of all the siblings that follow that child, so if you want to iterate through a NodeList and delete some of the nodes, you must write your looping code carefully.
Example 17-4 shows a variation on the reverse( ) function of the previous example. This one uses recursion to reverse not only the children of a specified node, but also all the node's descendants. In addition, when it encounters a Text node, it reverses the order of the characters within that node. Example 17-4 shows only the JavaScript code for this new reverse( ) function. It could easily be used in an HTML document like the one shown in Example 17-3, however.
Example 17-4. A recursive node-reversal function
// Recursively reverse all nodes beneath Node n and reverse Text nodes
function reverse(n) {
    if (n.nodeType == 3 /*Node.TEXT_NODE*/) {    // Reverse Text nodes
        var text = n.data;                       // Get content of node
        var reversed = "";
        for(var i = text.length-1; i >= 0; i--)  // Reverse it
            reversed += text.charAt(i);
        n.data = reversed;                       // Store reversed text
    }
    else {  // For non-Text nodes, recursively reverse the order of the children
        var kids = n.childNodes;
        var numkids = kids.length;
        for(var i = numkids-1; i >= 0; i--) {       // Loop through kids
            reverse(kids[i]);                       // Recurse to reverse kid
            n.appendChild(n.removeChild(kids[i]));  // Move kid to new position
        }
    }
}
Example 17-4 shows one way to change the text displayed in a document: simply set the data field of the appropriate Text node. Example 17-5 shows another way. This example defines a function, uppercase( ), that recursively traverses the children of a given node. When it finds a Text node, the function replaces that node with a new Text node containing the text of the original node, converted to uppercase. Note the use of the document.createTextNode( ) method to create the new Text node and the use of Node's replaceChild( ) method to replace the original Text node with the newly created one. Note also that replaceChild( ) is invoked on the parent of the node to be replaced, not on the node itself. The uppercase( ) function uses Node's parentNode property to determine the parent of the Text node it replaces.
In addition to defining the uppercase( ) function, Example 17-5 includes two HTML paragraphs and a button. When the user clicks the button, one of the paragraphs is converted to uppercase. Each paragraph is identified with a unique name, specified with the id attribute of the <p> tag. The event handler on the button uses the getElementById( ) method to get the Element object that represents the desired paragraph.
Example 17-5. Replacing nodes with their uppercase equivalents
<script>
// This function recursively looks at Node n and its descendants,
// replacing all Text nodes with their uppercase equivalents.
function uppercase(n) {
    if (n.nodeType == 3 /*Node.TEXT_NODE*/) {
        // If the node is a Text node, create a new Text node that
        // holds the uppercase version of the node's text, and use the
        // replaceChild( ) method of the parent node to replace the
        // original node with the new uppercase node.
        var newNode = document.createTextNode(n.data.toUpperCase( ));
        var parent = n.parentNode;
        parent.replaceChild(newNode, n);
    }
    else {
        // If the node is not a Text node, loop through its children
        // and recursively call this function on each child.
        var kids = n.childNodes;
        for(var i = 0; i < kids.length; i++) uppercase(kids[i]);
    }
}
</script>

<!-- Here is some sample text. Note that the <p> tags have id attributes. -->
<p id="p1">This <i>is</i> paragraph 1.</p>
<p id="p2">This <i>is</i> paragraph 2.</p>

<!-- Here is a button that invokes the uppercase( ) function defined above. -->
<!-- Note the call to document.getElementById( ) to find the desired node. -->
<button onclick="uppercase(document.getElementById('p1'));">Click Me</button>
The previous two examples show how to modify document content by replacing the text contained within a Text node and by replacing one Text node with an entirely new Text node. It is also possible to append, insert, delete, or replace text within a Text node with the appendData( ) , insertData( ), deleteData( ), and replaceData( ) methods. These methods are not directly defined by the Text interface, but instead are inherited by Text from CharacterData. You can find more information about them under "CharacterData" in the DOM reference section.
In the node-reversal examples, we saw how we could use the removeChild( ) and appendChild( ) methods to reorder the children of a Node. Note, however, that we are not restricted to changing the order of nodes within their parent node; the DOM API allows nodes in the document tree to be moved freely within the tree (only within the same document, however). Example 17-6 demonstrates this by defining a function named embolden( ) that replaces a specified node with a new element (created with the createElement( ) method of the Document object) that represents an HTML <b> tag and "reparents" the original node as a child of the new <b> node. In an HTML document, this causes any text within the node or its descendants to be displayed in boldface.
Example 17-6. Reparenting a node to a <b> element
<script>
// This function takes a Node n, replaces it in the tree with an Element node
// that represents an HTML <b> tag, and then makes the original node the
// child of the new <b> element.
function embolden(node) {
    var bold = document.createElement("b");  // Create a new <b> element
    var parent = node.parentNode;            // Get the parent of the node
    parent.replaceChild(bold, node);         // Replace the node with the <b> tag
    bold.appendChild(node);                  // Make the node a child of the <b> tag
}
</script>

<!-- A couple of sample paragraphs -->
<p id="p1">This <i>is</i> paragraph #1.</p>
<p id="p2">This <i>is</i> paragraph #2.</p>

<!-- A button that invokes the embolden( ) function on the first paragraph -->
<button onclick="embolden(document.getElementById('p1'));">Embolden</button>
In addition to modifying documents by inserting, deleting, reparenting, and otherwise rearranging nodes, it is also possible to make substantial changes to a document simply by setting attribute values on document elements. One way to do this is with the element.setAttribute( ) method. For example:
var headline = document.getElementById("headline");  // Find named element
headline.setAttribute("align", "center");            // Set align='center'
The DOM elements that represent HTML attributes define JavaScript properties that correspond to each of their standard attributes (even deprecated attributes such as align), so you can also achieve the same effect with this code:
var headline = document.getElementById("headline");
headline.align = "center";  // Set alignment attribute.
17.2.4. Adding Content to a Document
The previous two examples showed how the contents of a Text node can be changed to uppercase and how a node can be reparented to be a child of a newly created <b> node. The embolden( ) function showed that it is possible to create new nodes and add them to a document. You can add arbitrary content to a document by creating the necessary Element nodes and Text nodes with document.createElement( ) and document.createTextNode( ) and by adding them appropriately to the document. This is demonstrated in Example 17-7, which defines a function named debug( ). This function provides a convenient way to insert debugging messages into a program, and it serves as a useful alternative to using the built-in alert( ) function. A sample use of this debug( ) function is illustrated in Figure 17-4.
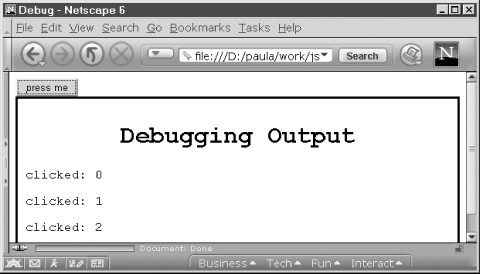
Figure 17-4. Output of the debug( ) function
The first time debug( ) is called, it uses the DOM API to create a <div> element and insert it at the end of the document. The debugging messages passed to debug( ) on this first call and all subsequent calls are then inserted into this <div> element. Each debugging message is displayed by creating a Text node within a <p> element and inserting that <p> element at the end of the <div> element.
Example 17-7 also demonstrates a convenient but nonstandard way to add new content to a document. The <div> element that contains the debugging messages displays a large, centered title. This title could be created and added to the document in the way that other content is, but in this example we instead use the innerHTML property of the <div> element. Setting this property of any element to a string of HTML text causes that HTML to be parsed and inserted as the content of the element. Although this property is not part of the DOM API, it is a useful shortcut that is supported by Internet Explorer 4 and later and Netscape 6. Although it is not standard, it is in common use and is included in this example for completeness.[60]
[60]The innerHTML property is particularly useful when you want to insert large or complex chunks of HTML text into a document. For simple fragments of HTML, using DOM methods is more efficient because no HTML parser is required. Note that appending bits of text to the innerHTML property with the += operator is usually not efficient.
Example 17-7. Adding debugging output to a document
/**
 * This debug function displays plain-text debugging messages in a
 * special box at the end of a document. It is a useful alternative
 * to using alert( ) to display debugging messages.
 **/
function debug(msg) {
    // If we haven't already created a box within which to display
    // our debugging messages, then do so now. Note that to avoid
    // using another global variable, we store the box node as
    // a proprty of this function.
    if (!debug.box) {
        // Create a new <div> element
        debug.box = document.createElement("div");
        // Specify what it looks like using CSS style attributes
        debug.box.setAttribute("style",
                               "background-color: white; " +
                               "font-family: monospace; " +
                               "border: solid black 3px; " +
                               "padding: 10px;");

        // Append our new <div> element to the end of the document
        document.body.appendChild(debug.box);

        // Now add a title to our <div>. Note that the innerHTML property is
        // used to parse a fragment of HTML and insert it into the document.
        // innerHTML is not part of the W3C DOM standard, but it is supported
        // by Netscape 6 and Internet Explorer 4 and later. We can avoid
        // the use of innerHTML by explicitly creating the <h1> element,
        // setting its style attribute, adding a Text node to it, and
        // inserting it into the document, but this is a nice shortcut.
        debug.box.innerHTML = "<h1 style='text-align:center'>Debugging Output</h1>";
    }

    // When we get here, debug.box refers to a <div> element into which
    // we can insert our debugging message.
    // First create a <p> node to hold the message.
    var p = document.createElement("p");
    // Now create a text node containing the message, and add it to the <p>
    p.appendChild(document.createTextNode(msg));
    // And append the <p> node to the <div> that holds the debugging output
    debug.box.appendChild(p);
}
The debug( ) method listed in Example 17-7 can be used in HTML documents like the following, which is the document that was used to generate Figure 17-4:
<script src="Debug.js"></script>  <!-- Include the debug( ) function -->
<script>var numtimes=0;</script>  <!-- Define a global variable -->
<!-- Now use the debug( ) function in an event handler -->
<button onclick="debug('clicked: ' + numtimes++);">press me</button>
17.2.5. Working with Document Fragments
The core DOM API defines the DocumentFragment object as a convenient way of working with groups of Document nodes. A DocumentFragment is a special type of node that does not appear in a document itself but serves as a temporary container for a sequential collection of nodes and allows those nodes to be manipulated as a single object. When a DocumentFragment is inserted into a document (using any of the appendChild( ) , insertBefore( ), or replaceChild( ) methods of the Node object), it is not the DocumentFragment itself that is inserted, but each of its children.
As an example, you can use a DocumentFragment to rewrite the reverse( ) method of Example 17-3 like this:
function reverse(n) {  // Reverses the order of the children of Node n
    var f = document.createDocumentFragment( );  // Get an empty DocumentFragment
    while(n.lastChild)                 // Loop backward through the children,
          f.appendChild(n.lastChild);  // moving each one to the DocumentFragment
    n.appendChild(f);                  // Then move them back (in their new order)
}
Once you have created a DocumentFragment, you can use it with code like this:
document.getElementsByTagName("p")[0].appendChild(fragment); Note that when you insert a DocumentFragment into a document, the child nodes of the fragment are moved from the fragment into the document. After the insertion, the fragment is empty and cannot be reused unless you first add new children to it. We'll see the DocumentFragment object again later in this chapter, when we examine the DOM Range API.
17.2.6. Example: A Dynamically Created Table of Contents
The previous sections showed how you can use the core DOM API to traverse, modify, and add content to a document. Example 17-8, at the end of this section, puts all these pieces together into a single longer example. The example defines a single method, maketoc( ), which expects a Document node as its single argument. maketoc( ) traverses the document, creates a table of contents (TOC) for it, and replaces the specified node with the newly created TOC. The TOC is generated by looking for <h1>, <h2>, <h3>, <h4>, <h5>, and <h6> tags within the document and assuming that these tags mark the beginnings of important sections within the document. In addition to creating a TOC, the maketoc( ) function inserts named anchors (<a> elements with the name attribute set instead of the href attribute) before each section heading so that the TOC can link directly to each section. Finally, maketoc( ) also inserts links at the beginning of each section back to the TOC; when the reader reaches a new section, she can either read that section or follow the link back to the TOC and choose a new section. Figure 17-5 shows what a TOC generated by the maketoc( ) function looks like.
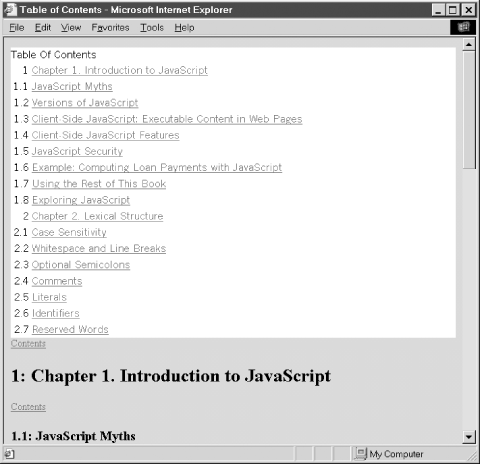
Figure 17-5. A dynamically created table of contents
If you maintain and revise long documents that are broken into sections with <h1>, <h2>, and related tags, the maketoc( ) function may be of interest to you. TOCs are quite useful in long documents, but when you frequently revise a document it can be difficult to keep the TOC in sync with the document itself. The TOC for this book was automatically created by postprocessing the content of the book. maketoc( ) allows you to do something similar for your web documents. You can use the function in an HTML document like this one:
<script src="TOC.js"></script>  <!-- Load the maketoc( ) function -->
<!-- Call the maketoc( ) function when the document is fully loaded -->
<body onload="maketoc(document.getElementById('placeholder'))">
<!-- This span element will be replaced by the generated TOC -->
<span id="placeholder">Table Of Contents</span>
// ... rest of document goes here ...
Another way to use the maketoc( ) function is to generate the TOC only when the reader requests it. You can do this by including a link (or button) that replaces itself with the generated TOC when the user clicks on it:
<a href="#" onclick="maketoc(this); return false;">Show Table Of Contents</a>
The code for the maketoc( ) function follows. Example 17-8 is long, but it is well commented and uses techniques that have already been demonstrated. It is worth studying as a practical example of the power of the DOM API. Note that the maketoc( ) function relies on two helper functions. For modularity, these helper functions are defined inside maketoc( ) itself. This prevents the addition of extra unnecessary functions to the global namespace.
Example 17-8. Automatically generating a table of contents
/**
 * Create a table of contents for this document, and insert the TOC into
 * the document by replacing the node specified by the replace argument.
 **/
function maketoc(replace) {
    // Create a <div> element that is the root of the TOC tree
    var toc = document.createElement("div");

    // Set a background color and font for the TOC. We'll learn about
    // the style property in the next chapter.
    toc.style.backgroundColor = "white";
    toc.style.fontFamily = "sans-serif";

    // Start the TOC with an anchor so we can link back to it
    var anchor = document.createElement("a");  // Create an <a> node
    anchor.setAttribute("name", "TOC");        // Give it a name
    toc.appendChild(anchor);                   // Insert it

    // Make the body of the anchor the title of the TOC
    anchor.appendChild(document.createTextNode("Table Of Contents"));

    // Create a <table> element that will hold the TOC and add it
    var table = document.createElement("table");
    toc.appendChild(table);

    // Create a <tbody> element that holds the rows of the TOC
    var tbody = document.createElement("tbody");
    table.appendChild(tbody);

    // Initialize an array that keeps track of section numbers
    var sectionNumbers = [0,0,0,0,0,0];

    // Recursively traverse the body of the document, looking for sections
    // sections marked with <h1>, <h2>, ... tags, and use them to create
    // the TOC by adding rows to the table
    addSections(document.body, tbody, sectionNumbers);

    // Finally, insert the TOC into the document by replacing the node
    // specified by the replace argument with the TOC subtree
    replace.parentNode.replaceChild(toc, replace);

    // This method recursively traverses the tree rooted at Node n, looking
    // looking for <h1> through <h6> tags, and uses the content of these tags
    // to build the table of contents by adding rows to the HTML table specified
    // by the toc argument. It uses the sectionNumbers array to keep track of
    // the current section number.
    // This function is defined inside of maketoc( ) so that it is not
    // visible from the outside. maketoc( ) is the only function exported
    // by this JavaScript module.
    function addSections(n, toc, sectionNumbers) {
        // Loop through all the children of n
        for(var m = n.firstChild; m != null; m = m.nextSibling) {
            // Check whether m is a heading element. It would be nice if we
            // could just use (m instanceof HTMLHeadingElement), but this is
            // not required by the specification and it does not work in IE.
            // Therefore, we must check the tagname to see if it is H1-H6.
            if ((m.nodeType == 1) &&  /* Node.ELEMENT_NODE */
                (m.tagName.length == 2) && (m.tagName.charAt(0) == "H")) {
                // Figure out what level heading it is
                var level = parseInt(m.tagName.charAt(1));
                if (!isNaN(level) && (level >= 1) && (level <= 6)) {
                    // Increment the section number for this heading level
                    sectionNumbers[level-1]++;
                    // And reset all lower heading-level numbers to zero
                    for(var i = level; i < 6; i++) sectionNumbers[i] = 0;
                    // Now combine section numbers for all heading levels
                    // to produce a section number like "2.3.1"
                    var sectionNumber = "";
                    for(var i = 0; i < level; i++) {
                        sectionNumber += sectionNumbers[i];
                        if (i < level-1) sectionNumber += ".";
                    }

                    // Create an anchor to mark the beginning of this section
                    // This will be the target of a link we add to the TOC
                    var anchor = document.createElement("a");
                    anchor.setAttribute("name", "SECT"+sectionNumber);

                    // Create a link back to the TOC and make it a
                    // child of the anchor
                    var backlink = document.createElement("a");
                    backlink.setAttribute("href", "#TOC");
                    backlink.appendChild(document.createTextNode("Contents"));
                    anchor.appendChild(backlink);

                    // Insert the anchor into the document right before the
                    // section header
                    n.insertBefore(anchor, m);

                    // Now create a link to this section. It will be added
                    // to the TOC below.
                    var link = document.createElement("a");
                    link.setAttribute("href", "#SECT" + sectionNumber);
                    // Get the heading text using a function defined below
                    var sectionTitle = getTextContent(m);
                    // Use the heading text as the content of the link
                    link.appendChild(document.createTextNode(sectionTitle));

                    // Create a new row for the TOC
                    var row = document.createElement("tr");
                    // Create two columns for the row
                    var col1 = document.createElement("td");
                    var col2 = document.createElement("td");
                    // Make the first column right-aligned and put the section
                    // number in it
                    col1.setAttribute("align", "right");
                    col1.appendChild(document.createTextNode(sectionNumber));
                    // Put a link to the section in the second column
                    col2.appendChild(link);
                    // Add the columns to the row, and the row to the table
                    row.appendChild(col1);
                    row.appendChild(col2);
                    toc.appendChild(row);

                    // Modify the section header element itself to add
                    // the section number as part of the section title
                    m.insertBefore(document.createTextNode(sectionNumber+": "),
                                   m.firstChild);
                }
            }
            else {  // Otherwise, this is not a heading element, so recurse
                addSections(m, toc, sectionNumbers);
            }
        }
    }

    // This utility function traverses Node n, returning the content of
    // all Text nodes found and discarding any HTML tags. This is also
    // defined as a nested function, so it is private to this module.
    function getTextContent(n) {
        var s = '';
        var children = n.childNodes;
        for(var i = 0; i < children.length; i++) {
            var child = children[i];
            if (child.nodeType == 3 /*Node.TEXT_NODE*/) s += child.data;
            else s += getTextContent(child);
        }
        return s;
    }
}
17.2.7. Working with XML Documents
Web browsers display HTML documents, but XML documents are becoming more and more important as sources of data. Since the DOM allows us to traverse and manipulate both HTML and XML documents, we can use DOM methods to load an XML document, extract information from it, and dynamically create an HTML version of that information for display in a web browser. Example 17-9 shows how this can be done in Netscape 6.1 and Internet Explorer 6. It is an HTML file that consists mostly of JavaScript code. The file expects to be loaded through a URL that uses the URL query string to specify the relative URL of the data file to load. For example, you might invoke this example file with a URL like this:
file://C:/javascript/DisplayEmployeeData.html?data.xml
DisplayEmployeeData.html is the name of the example file, and data.xml is the name of the XML file it uses. The XML file must contain data formatted like this:
<employees>
  <employee name="J. Doe"><job>Programmer</job><salary>32768</salary></employee>
  <employee name="A. Baker"><job>Sales</job><salary>70000</salary></employee>
  <employee name="Big Cheese"><job>CEO</job><salary>1000000</salary></employee>
</employees>
The example contains two JavaScript functions. The first, loadXML( ), is a generic function for loading any XML file. It contains standard DOM Level 2 code to load the XML document and also code that uses a proprietary Microsoft API to accomplish the same thing. The only really new thing in this example is the creation of a new Document object with the DOMImplementation.createDocument( ) method and the call to the load( ) method of that Document object. An important thing to notice here is that documents do not load instantaneously, so the call to loadXML( ) returns before the document is loaded. For this reason, we pass loadXML( ) a reference to another function that it should call when the document has finished loading.
The other function in the example is makeTable( ). This is the function that we pass to loadXML( ). When the XML file finishes loading, it passes the Document object representing the XML file and the URL of the file to makeTable( ). makeTable( ) uses DOM methods we've seen before to extract information from the XML document and insert it into a table in the HTML document displayed by the browser. This function also illustrates the use of some table-related convenience methods defined by HTMLTableElement, HTMLTableRowElement, and related interfaces. See the DOM reference section for complete details about these table-specific interfaces and their methods. Although the DOM methods and properties used in this function are all straightforward, they are used in dense combinations. Study the code carefully and you should have no difficulty understanding it.
Example 17-9. Loading and reading data from an XML document
<head><title>Employee Data</title>
<script>
// This function loads the XML document from the specified URL and, when
// it is fully loaded, passes that document and the URL to the specified
// handler function. This function works with any XML document.
function loadXML(url, handler) {
    // Use the standard DOM Level 2 technique, if it is supported
    if (document.implementation && document.implementation.createDocument) {
        // Create a new Document object
        var xmldoc = document.implementation.createDocument("", "", null);
        // Specify what should happen when it finishes loading
        xmldoc.onload = function( ) { handler(xmldoc, url); }
        // And tell it what URL to load
        xmldoc.load(url);
    }
    // Otherwise, use Microsoft's proprietary API for Internet Explorer
    else if (window.ActiveXObject) {
        var xmldoc = new ActiveXObject("Microsoft.XMLDOM");   // Create doc
        xmldoc.onreadystatechange = function( ) {              // Specify onload
            if (xmldoc.readyState == 4) handler(xmldoc, url);
        }
        xmldoc.load(url);                                     // Start loading!
    }
}

// This function builds an HTML table of employees from data it reads from
// the XML document it is passed
function makeTable(xmldoc, url) {
    // Create a <table> object and insert it into the document
    var table = document.createElement("table");
    table.setAttribute("border", "1");
    document.body.appendChild(table);

    // Use convenience methods of HTMLTableElement and related interfaces
    // to define a table caption and a header that gives a name to each column
    var caption = "Employee Data from " + url;
    table.createCaption( ).appendChild(document.createTextNode(caption));
    var header = table.createTHead( );
    var headerrow = header.insertRow(0);
    headerrow.insertCell(0).appendChild(document.createTextNode("Name"));
    headerrow.insertCell(1).appendChild(document.createTextNode("Job"));
    headerrow.insertCell(2).appendChild(document.createTextNode("Salary"));

    // Now find all <employee> elements in our xmldoc document
    var employees = xmldoc.getElementsByTagName("employee");

    // Loop through these <employee> elements
    for(var i = 0; i < employees.length; i++) {
        // For each employee, get name, job, and salary data using standard DOM
        // methods. The name comes from an attribute. The other values are
        // in Text nodes within <job> and <salary> tags.
        var e = employees[i];
        var name = e.getAttribute("name");
        var job = e.getElementsByTagName("job")[0].firstChild.data;
        var salary = e.getElementsByTagName("salary")[0].firstChild.data;

        // Now that we have the employee data, use methods of the table to
        // create a new row and then use the methods of the row to create
        // new cells containing the data as Text nodes
        var row = table.insertRow(i+1);
        row.insertCell(0).appendChild(document.createTextNode(name));
        row.insertCell(1).appendChild(document.createTextNode(job));
        row.insertCell(2).appendChild(document.createTextNode(salary));
    }
}
</script>
</head>
<!--
The body of the document contains no static text; everything is dynamically
generated by the makeTable( ) function. The onload event handler starts
things off by calling loadXML( ) to load the XML data file. Note the use of
location.search to encode the name of the XML file in the query string. Load
this HTML file with a URL like this: DisplayEmployeeData.html?data.xml.
-->
<body onload="loadXML(location.search.substring(1), makeTable)">
</body> |  | |
| 17. The Document Object Model |  | 17.3. DOM Compatibility with Internet Explorer 4 |

Copyright © 2003 O'Reilly & Associates. All rights reserved.