
 |  |
14.6. Images
The images[] property of the Document object is an array of Image elements, each representing one of the inline images, created with an <img> tag, that is contained in the document. The images[] array and the Image object were added in JavaScript 1.1. While web browsers have always been able to display images with the <img> tag, the addition of the Image object was a major step forward -- it allowed programs to dynamically manipulate those images.
14.6.1. Image Replacement with the src Property
The main feature of the Image object is that its src property is read/write. You can read this property to obtain the URL from which an image was loaded, and, more importantly, you can set the src property to make the browser load and display a new image in the same space. For this to work, the new image must have the same width and height as the original one.
In practice, the most common use for image replacement is to implement image rollovers, in which an image changes when the mouse pointer moves over it. When you make images clickable by placing them inside your hyperlinks, rollover effects are a powerful way to invite the user to click on the image. Here is a simple HTML fragment that displays an image within an <a> tag and uses JavaScript code in the onmouseover and onmouseout event handlers to create a rollover effect:
<a href="help.html"
   onmouseover="document.helpimage.src='images/help_rollover.gif';"
   onmouseout="document.helpimage.src='images/help.gif';">
<img name="helpimage" src="images/help.gif" width="80" height="20" border="0">
</a>
Note that in this code fragment we gave the <img> tag a name attribute, to make it easy to refer to the corresponding Image object in the event handlers of the <a> tag. We used the border attribute to prevent the browser from displaying a blue hyperlink border around the image. The event handlers of the <a> tag do all the work: they change the image that is displayed simply by setting the src property of the image to the URLs of the desired images.
The ability to dynamically replace one image in a static HTML document with another image opens the door to any number of special effects, from animation to digital clocks that update themselves in real time. With a bit of thought, you can probably imagine many more potential uses for this technique.
14.6.2. Offscreen Images and Caching
To make image-replacement techniques viable, the animations or other special effects need to be responsive. This means that we need some way to ensure that the necessary images are "pre-fetched" into the browser's cache. To force an image to be cached, we first create an offscreen image using the Image( ) constructor. Next, we load an image into it by setting its src property to the desired URL (exactly as we would do for an onscreen image). Later, when the same URL is used for an onscreen image, we know it can be quickly loaded from the browser's cache, rather than slowly loaded over the network. Note that we never actually do anything with the offscreen image we create. In particular, we do not assign the offscreen Image object into the images[] array of the document.
The image-rollover code fragment shown in the previous section did not pre-fetch the rollover image it used, so the user will probably notice a delay in the rollover effect the first time she moves the mouse over the image. To fix this problem, we could modify the code as follows.
<script>
// Create an offscreen image and pre-fetch the rollover image.
// Note that we don't bother saving a reference to the offscreen image,
// since there is nothing we can do with it later.
(new Image(80,20)).src = "images/help_rollover.gif";
</script>
<a href="help.html"
     onmouseover="document.helpimage.src='images/help_rollover.gif';"
     onmouseout="document.helpimage.src='images/help.gif';">
<img name="helpimage" src="images/help.gif" width="80" height="20" border="0">
</a>
Example 14-3 shows code that performs a simple animation using image replacement and uses offscreen images to pre-fetch the frames of the animation. Note that in this example we retain the offscreen image objects we create, because they are a convenient way to hold the URLs of the images that make up the animation. To perform the animation, we assign the src property of one of the offscreen images to the src property of the onscreen image that is the subject of the animation.
Example 14-3. An animation using image replacement
<!-- The image that will be animated. Give it a name for convenience. -->
<img name="animation" src="images/0.gif">

<script>
// Create a bunch of offscreen images, and pre-fetch the "frames"
// of the animation into them so that they're cached when we need them
var aniframes = new Array(10);
for(var i = 0; i < 10; i++) {
    aniframes[i] = new Image( );                 // Create an offscreen image
    aniframes[i].src = "images/" + i + ".gif";    // Tell it what URL to load
}

var frame = 0;          // The frame counter: keeps track of current frame
var timeout_id = null;  // Allows us to stop the animation with clearTimeout( )

// This function performs the animation. Call it once to start.
// Note that we refer to the onscreen image using its name attribute.
function animate( ) {
    document.animation.src = aniframes[frame].src;    // Display the current frame
    frame = (frame + 1)%10;                           // Update the frame counter
    timeout_id = setTimeout("animate( )", 250);      // Display the next frame later
}
</script>

<form>  <!-- This form contains buttons to control the animation -->
  <input type="button" value="Start"
         onclick="if (timeout_id == null) animate( );">
  <input type="button" value="Stop"
         onclick="if (timeout_id) clearTimeout(timeout_id); timeout_id=null;">
</form>
14.6.3. Image Event Handlers
In Example 14-3, our animation does not begin until the user clicks the Start button, which allows plenty of time for our images to be loaded into the cache. But what about the more common case in which we want to automatically begin an animation as soon as all the necessary images are loaded? It turns out that images, whether created onscreen with an <img> tag or offscreen with the Image( ) constructor, have an onload event handler that is invoked when the image is fully loaded.
The following code fragment shows how we could modify Example 14-3 to use this event handler to count the number of images that have loaded and automatically start the animation when all the images have loaded. Since offscreen images are not part of the HTML document, the event handler cannot be assigned as an HTML attribute. Instead, we simply assign a function to the onload property of each Image object we create. When each image is loaded, the browser calls the function.
var aniframes = new Array(10);  // Hold the offscreen animation frames.
var num_loaded_images = 0;      // How many have been loaded so far?

// This function is used as an event handler. It counts how many images
// have been loaded and, when all have been loaded, it starts the animation.
function countImages( ) {
    if (++num_loaded_images == aniframes.length) animate( );
}

// Create the offscreen images and assign the image URLs.
// Also assign an event handler to each image so we can track how many images
// have been loaded. Note that we assign the handler before the URL, because
// otherwise the image might finish loading (e.g., if it is already cached)
// before we assign the handler, and then the handler would never be triggered.
for(var i = 0; i < 10; i++) {
    aniframes[i] = new Image( );                 // Create an offscreen image
    aniframes[i].onload = countImages;            // Assign the event handler
    aniframes[i].src = "images/" + i + ".gif";    // Tell it what URL to load
}
In addition to the onload event handler, the Image object supports two others. The onerror event handler is invoked when an error occurs during image loading, such as when the specified URL refers to corrupt image data. The onabort handler is invoked if the user cancels the image load (for example, by clicking the Stop button in the browser) before it has finished. For any image, one (and only one) of these handlers is called.
In addition to these handlers, each Image object also has a complete property. This property is false while the image is loading; it is changed to true once the image has loaded or once the browser has stopped trying to load it. In other words, the complete property becomes true after one of the three possible event handlers is invoked.
14.6.4. Other Image Properties
The Image object has a few other properties as well. Most of them are simply mirror attributes of the <img> tag that created the image. The width , height, border, hspace, and vspace properties are integers that specify the size of the image, the width of its border, and the size of its horizontal and vertical margins. These properties are set by the attributes of the <img> tag that share their names. In Netscape 3 and 4, the properties are read-only, but in IE 4 and later and Netscape 6 and later, you can also assign values to these properties to dynamically change the size, border, or margins of the image.
The lowsrc property of the Image object mirrors the lowsrc attribute of the <img> tag. It specifies the URL of an optional image to display when the page is viewed on a low-resolution device. The lowsrc property is a read/write string, like src, but unlike the src property, setting lowsrc does not cause the browser to load and display the newly specified, low-resolution image. If you want to perform an animation or some other special effect that works with low-resolution images as well as high-resolution ones, always remember to update the lowsrc property before you set the src property. If the browser is running on a low-resolution device when you set the src literal, it loads the new lowsrc image instead.
14.6.5. Image-Replacement Example
Because image replacement is such a versatile technique, we'll end our discussion of the Image object with an extended example. Example 14-4 defines a ToggleButton class that uses image replacement to simulate a graphical checkbox. Because this class uses images that we provide, we can use bolder graphics than those plain old graphics used by the standard HTML Checkbox object. Figure 14-3 shows how these toggle-button graphics could appear on a web page. This is a complex, real-world example and is worth studying carefully.
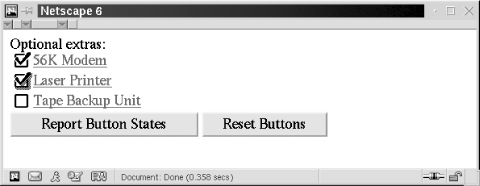
Figure 14-3. ToggleButtons implemented with image replacement
Example 14-4. Implementing a ToggleButton with image replacement
<script language="JavaScript1.1">
// This is the constructor function for our new ToggleButton class.
// Calling it creates a ToggleButton object and outputs the required
// <a> and <img> tags into the specified document at the current location.
// Therefore, don't call it for the current document from an event handler.
// Arguments:
// document: The Document object in which the buttons are to be created.
// checked: A boolean that says whether the button is initially checked.
// label: An optional string that specifies text to appear after the button.
// onclick: An optional function to be called when the toggle button is
// clicked. It is passed a boolean indicating the new state of
// the button. You can also pass a string, which is converted
// to a function that is passed a boolean argument named "state".
function ToggleButton(document, checked, label, onclick)
{
// The first time we are called (and only the first time), we have
// to do some special stuff. First, now that the prototype object
// is created, we can set up our methods.
// Second, we need to load the images we'll be using.
// Doing this gets the images in the cache for when we need them.
if (!ToggleButton.prototype.over) {
// Initialize the prototype object to create our methods
ToggleButton.prototype.over = _ToggleButton_over;
ToggleButton.prototype.out = _ToggleButton_out;
ToggleButton.prototype.click = _ToggleButton_click;
// Now create an array of Image objects and assign URLs to them.
// The URLs of the images are configurable and are stored in an
// array property of the constructor function itself. They are
// initialized below. Because of a bug in Netscape, we have
// to maintain references to these images, so we store the array
// in a property of the constructor rather than using a local variable.
ToggleButton.images = new Array(4);
for(var i = 0; i < 4; i++) {
ToggleButton.images[i] = new Image(ToggleButton.width,
ToggleButton.height);
ToggleButton.images[i].src = ToggleButton.imagenames[i];
}
}
// Save some of the arguments we were passed
this.document = document;
this.checked = checked;
// Remember that the mouse is not currently on top of us
this.highlighted = false;
// Save the onclick argument to be called when the button is clicked.
// If it is not already a function, attempt to convert it
// to a function that is passed a single argument, named "state".
this.onclick = onclick;
if (typeof this.onclick == "string")
this.onclick = new Function("state", this.onclick);
// Figure out what entry in the document.images[] array the images
// for this checkbox will be stored in
var index = document.images.length;
// Now output the HTML code for this checkbox. Use <a> and <img> tags.
// The event handlers we output here are confusing but crucial to the
// operation of this class. The "_tb" property is defined below, as
// are the over(), out(), and click( ) methods.
document.write(' <a href="about:blank" ' +
'onmouseover="document.images[' + index + ']._tb.over( );return true;" '+
'onmouseout="document.images[' + index + ']._tb.out( )" '+
'onclick="document.images[' + index + ']._tb.click( ); return false;">');
document.write('<img src="' + ToggleButton.imagenames[this.checked+0] +'"'+
' width=' + ToggleButton.width +
' height=' + ToggleButton.height +
' border="0" hspace="0" vspace="0" align="absmiddle">');
if (label) document.write(label);
document.write('</a></br>');
// Now that we've output the <img> tag, save a reference to the
// Image object that it created in the ToggleButton object
this.image = document.images[index];
// Also make a link in the other direction, from the Image object
// to this ToggleButton object. Do this by defining a "_tb" property
// in the Image object.
this.image._tb = this;
}
// This becomes the over( ) method
function _ToggleButton_over( )
{
// Change the image, and remember that we're highlighted
this.image.src = ToggleButton.imagenames[this.checked + 2];
this.highlighted = true;
}
// This becomes the out( ) method
function _ToggleButton_out( )
{
// Change the image, and remember that we're not highlighted
this.image.src = ToggleButton.imagenames[this.checked + 0];
this.highlighted = false;
}
// This becomes the click( ) method
function _ToggleButton_click( )
{
// Toggle the state of the button, change the image, and call the
// onclick method, if it was specified for this ToggleButton
this.checked = !this.checked;
this.image.src = ToggleButton.imagenames[this.checked+this.highlighted*2];
if (this.onclick) this.onclick(this.checked);
}
// Initialize static class properties that describe the checkbox images. These
// are just defaults. Programs can override them by assigning new values.
// But they should be overridden *before* any ToggleButtons are created.
ToggleButton.imagenames = new Array(4); // Create an array
ToggleButton.imagenames[0] = "images/button0.gif"; // The unchecked box
ToggleButton.imagenames[1] = "images/button1.gif"; // The box with a checkmark
ToggleButton.imagenames[2] = "images/button2.gif"; // Unchecked but highlighted
ToggleButton.imagenames[3] = "images/button3.gif"; // Checked and highlighted
ToggleButton.width = ToggleButton.height = 25; // Size of all images
</script>
<!-- Here's how we might use the ToggleButton class -->
Optional extras:<br>
<script language="JavaScript1.1">
// Create ToggleButton objects and output the HTML that implements them
// One button has no click handler, one has a function, and one has a string
var tb1 = new ToggleButton(document, true, "56K Modem");
var tb2 = new ToggleButton(document, false, "Laser Printer",
function(clicked) {alert("printer: " + clicked);});
var tb3 = new ToggleButton(document, false, "Tape Backup Unit",
"alert('Tape backup: ' + state)");
</script>
<!-- Here's how we can use the ToggleButton objects from event handlers -->
<form>
<input type="button" value="Report Button States"
onclick="alert(tb1.checked + '\n' + tb2.checked + '\n' + tb3.checked)">
<input type="button" value="Reset Buttons"
onclick="if (tb1.checked) tb1.click( );
if (tb2.checked) tb2.click( );
if (tb3.checked) tb3.click( );">
</form>
|  | |
| 14.5. Forms |  | 14.7. Links |

Copyright © 2003 O'Reilly & Associates. All rights reserved.