
 |  |
11.5. GNOME Applications
Now that you've got a feel for the desktop and how to get around it, let's take a look at some of the applications that are built to go with it. Note that these applications aren't restricted to the GNOME desktop, and they aren't the only applications you can run on the GNOME desktop — they're just built from the same materials and work particularly well together.
11.5.1. Ximian Evolution: Mail, Calendar, and Contacts
Ximian Evolution is what's known as a groupware suite; it combines email with a calendar and an address book so that communication and scheduling tasks all fall into one convenient package. We haven't got room to go into depth with all three, but a complete manual is included in the Help menu and is available online at http://support.ximian.com.
You can start Evolution by selecting Evolution from your Applications menu, or by typing evolution at the command line. A screen like the one in Figure 11-9 should come up.
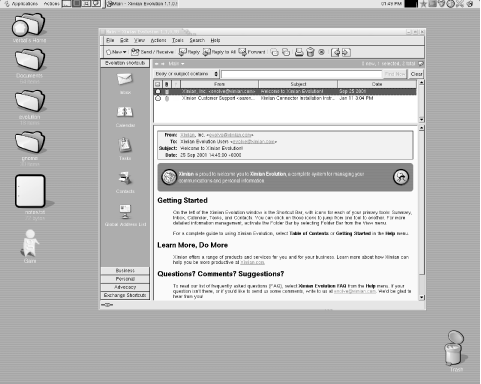
Figure 11-9. Evolution on the GNOME desktop
The first time you run Evolution, you'll be asked to create an email account by entering information about yourself and your email access. You can copy this information from your existing mail program, or ask your system administrator or ISP.
Evolution works with standard mail server protocols and can be used in almost any network environment. It lets you leave your mail on the server (the IMAP protocol), download mail to your local system (the POP protocol), or use mail spools on your local system, if you're running your own mail server. Ximian also sells a proprietary extension to Evolution called Ximian Connector, which connects to Microsoft Exchange 2000 servers for more extensive collaboration features.
Once you've created an account, you will be presented with the main Evolution window in its Summary view. The Evolution summary provides you with exactly that: weather, news, a list of upcoming tasks and appointments, and the number of new mail messages in your mail folders.
On the left side of the Evolution window is a shortcut bar, with a list of several important shortcuts. Click the buttons there to move to your Inbox, Contacts, or Calendar. For a different view of the available resources, select View, and then Folder Bar. The folder bar gives you a view that is more like a list of directories, and is especially useful if you have created a large number of folders.
The following sections describe Evolution's three major features.
11.5.1.1. Evolution mail
To start using Evolution mail, click the Inbox button, or select any mail folder in the folder bar. The mail view is divided into two portions: in the top half, a list of messages, and in the bottom half, the display of your selected message. You can change the proportions by dragging the gray bar between them.
In general, the mail features are fairly simple: click the Send and Receive button to check for new mail and send mail you've queued for later delivery, and the New Message button to compose a new message.
What distinguishes Evolution from other mail programs are the speed of its searches, the power and simplicity of its filters, and its unique vFolders, a sort of combination of searches and filters.
The search bar is located at the top of the message list. To search your mail, go to any mail folder, select a portion of the message to search (just the message body, the sender, the entire message, and so forth), enter a word into the text box, and press Enter. Evolution pre-indexes your mail, so the results are returned to you faster than with other tools.
Filters add an action to the end of a search: every time you get mail, Evolution will perform a search that you specify on the new messages, and then take actions based on those results. The most common uses of filters are to automatically file messages based on the senders, and to delete messages that are flagged as spam.
To create a filter, go to any mail view and open your list of filters by selecting Tools, and then Filters. Then, do the following:
-
Click the Add button to add a filter.
-
In the top half of the dialog, select a set of criteria you'll use to pick messages for the filter. For example, if you select Sender Contains in the first drop-down item, and enter gnome.org in the text box that appears next to it, your filter will act on mail that comes to you from all gnome.org email addresses.
-
In the bottom half of the window, select one or more actions for your messages. For example, if you select Move to Folder, you'll be offered a button labeled Click to Select Folder. Click that, select a destination folder, and your filter will file all mail from gnome.org addresses in your GNOME email folder.
-
Click OK in the filter creation box, and OK in the filter list. You're done.
If you find that you need more flexibility than filters offer you, you can use vFolders. A vFolder, or virtual folder, is essentially a complex saved search that looks like a folder. That also means that although an email message can exist only in a single standard folder, you can find it in several vFolders.
When you create a vFolder, you select criteria just like you would for a filter, but instead of choosing what to do with them, you specify where you want to look for these messages. Once you've created a vFolder, it appears in a list of vFolders at the bottom of your folder tree. Then, every time you open it, it searches your mail folders for messages that match the criteria you chose when you created it. So if you create your filters to file mail depending on its sender, you can create a vFolder that holds mail with a given subject, no matter who sent it.
11.5.1.2. Evolution calendar
The Evolution calendar allows you great flexibility in creating and viewing your schedule. To get started, click the Calendar button in the shortcut bar, or select the Calendar folder in the folder bar. You'll be presented with an empty work-week spread out before you, devoid of appointments.
To show less time, or more, you can select a range of days from the calendar in the upper right, or click one of the prebuilt ranges of days in the toolbar: today, one day, five days, a week, or a month.
Once you've got a feel for how to page through your datebook, you'll want to start scheduling events. To create one, click the New Appointment button. Enter a summary of the event, choose a time, and (optionally) enter a longer description.
At the lower right, you can select from a list of categories for this event. Events with categories, recurrences, or reminders are displayed with small icons in the calendar view: an alarm clock for reminders, arrows moving in a circle for recurrences, a birthday cake for birthdays, and so forth.
You can also schedule reminders and recurrences. For example, if you have an important meeting next week, you can schedule a reminder to pop up 15 minutes beforehand so that you have time to prepare. Just click the Reminder tab and choose a time and type of reminder, then click Add to add it to the list. Recurrences are similar: click the Recurrence tab, and choose how often you'd like to repeat the event. Is it just this Thursday and next Tuesday? Is it every Wednesday from now until Christmas? Is it a holiday that happens every year? Choose the recurrence rules, click Save and Close, and you've added the event to your calendar.
All that's left is to coordinate this event with other people. Select Actions, and then Forward as iCalendar to create an email message that has the event attached to it. When the recipient receives the message, he can click a single button to add the event to his calendar and send a note to you letting you know whether he'll attend.
11.5.1.3. Evolution contacts
The Evolution contact manager, or address book, is perhaps the least glamorous tool in the suite. However, it is interwoven with the email tools quite thoroughly. You can create contact cards by clicking the New Contact button in the contacts view, but you can also create a card by right-clicking any email address in an email someone has sent you.
If you're looking at your address book for someone's email address, you can right-click his card and have the option to send him a message, or to send his card to someone else, with just two clicks.
To have a look at the contact manager, click the Contacts button in the shortcut bar, or select any contact folder from the folder bar. You'll see a simple list of cards. If you prefer to have your contacts arranged as a phone list, select View, Current View, and then Phone List. You can also choose to display the list by organization rather than just by name.
11.5.2. Gnumeric Spreadsheet
If you work in an office and use spreadsheets, the odds are that you need to share those spreadsheets with Microsoft Excel users. It's also quite probable that you have used Excel and that it is the spreadsheet application with which you are most comfortable.
Those realities don't pose an obstacle to using Linux in your office, though, because Gnumeric is designed to be familiar to and comfortable for Excel users. In fact, unsuspecting observers have confused the two on more than one occasion. Gnumeric can import and export Excel files easily, and its options and data processing are quite comparable.
The boxes in the body of the worksheet display the results of formulas or numbers, and the formula field at the top of the window displays the actual formula that calculated your result.
For example, most spreadsheet users are familiar with the procedure to add a column of numbers: click the mouse in any of the fields, and enter a number in the formula field at the top of the window. Press Return to move down to the next one, and enter a new number. Once you have a few, go to an empty cell and press the Sum button, labeled with the Greek letter sigma, to calculate the sum. Then, enter the range of cells you want to add, or just select them with the mouse.
Gnumeric comes with an extensive manual, which you can read by selecting Help, and then Gnumeric Manual.
11.5.3. gPhoto, the Digital Camera Tool
gPhoto, the GNOME digital camera tool, lets you copy pictures from a digital camera onto your hard drive, organize them, and turn them into prebuilt web page galleries.
gPhoto does take some setting up, and the process will vary depending on the camera you are using. The first time you run gPhoto, it will ask you what model of camera you are using, and what port to use to access it. If you have run gPhoto before and want to set that information now, select Configure, Select Port, and then Camera Model.
Some systems may identify your camera automatically, and you will be able to use /dev/camera for your port name. Some may even have /mnt/camera set up as a standard directory, and you will be able to point gPhoto there as though it were a directory (do this by selecting File, Open, and then Directory).
Otherwise, you're in for just a little bit of tinkering. If you're using a serial cable (the kind of cable with visible pins on the end), you have probably plugged your camera into /dev/ttyS0 or /dev/ttyS1. If you have a USB cable, you have probably plugged the camera into /dev/usb. For FireWire (also known as iLink or IEEE-1394), it may be /dev/sga0 or /dev/sga1.
If none of these works, make sure that you have read and write permissions on the camera device — you can do this with Nautilus or with the chmod command at the command line. You may also try mounting the camera device as though it were a hard disk (do so according to your operating system's instructions). Some cameras will require this; others will not.
Once you have the setup complete, you're ready to go. To download a "thumbnail index" of all the images on your camera, press Ctrl+I or Camera, Download Index, and then Thumbnails. From there, you can decide which ones to keep and which to throw away. Select as many as you like (or choose Select, and then All to select them all), then press Ctrl+G or choose Camera, Download Selected, Images, and then Save to Disk to save them to a location on your hard disk.
To put your photos into a web gallery, start by selecting the items you want to include from the index. Then choose File, Export, and then HTML Gallery, or press Ctrl-M. You'll be prompted to choose a style for your pages, and a location to save the results. Make sure you choose a new and empty directory, and not your home directory, or you'll end up with a small web site scattered about your home directory.
gPhoto also lets you rotate, scale, and adjust the colors for individual images. However, it is not a dedicated image processing program — it's better to use the GIMP for serious editing tasks. For information about how to use the image alteration tools, or on other gPhoto features, select Help, and then User's Manual, or press Ctrl-H.
TIP: A significant set of changes is planned for gPhoto during the 2002-2003 development schedule. With gPhoto2, you will be able to install the "GnoCam" tool as well as gPhoto, use the GNOME Control Center to manage camera connections, and handle your camera's contents using the image thumbnail views of Nautilus. gPhoto2 promises to simplify the process of connecting to your camera and to let you use other graphical interfaces, depending on your choice of desktop environment. Visit http://gphoto.sourceforge.net for details.
11.5.4. Abiword Word Processor
Open the Abiword word processor by typing abiword from a terminal, or by selecting Abiword from your Applications menu. Abiword, like Gnumeric, is designed to be familiar to people who have used other, similar applications in the past. If you've used another word processor, you can probably guess that the b button in the toolbar makes your text bold, and that the diskette icon saves your files.
To use Abiword, you may need to install fonts or adjust your font path. To learn how, visit http://abisource.com.
11.5.5. Additional Applications and Resources
There are dozens, if not hundreds, of other GNOME applications, from software development tools to games to flow-charting and diagramming tools. The best ways to explore them are to visit the http://gnome.org web site and browse the software map, or to try installing a few from the Red Carpet GNOME channel.
If you get stuck, there are several places to turn for help. In addition to the Nautilus help system and the gnome.org web site, try looking for help in chat systems. Developers can be found on irc.gnome.org in #gnome, so if you have software development questions, go there. For help with using an application, visit http://support.ximian.com, join the mailing lists at http://lists.gnome.org, or try the user-supported help chat system built into Ximian applications by selecting Help, and then Help Chat.
Premium commercial support of GNOME and GNOME applications is also available from support.ximian.com for both individuals and corporations.
|  | |
| 11.4. The GNOME Desktop Environment |  | 11.6. Other X Applications |

Copyright © 2003 O'Reilly & Associates. All rights reserved.