
 |  |
7.3. General Upgrade Procedure
Of course, you'll have to periodically upgrade other pieces of your system. As discussed in the previous section, it's usually easier and best to upgrade only those applications you need to upgrade. For example, if you never use Emacs on your system, why bother keeping up-to-date with the most recent version of Emacs? For that matter, you may not need to stay completely current with oft-used applications. If something works for you, there's little need to upgrade.
Modern Linux systems provide various ways of upgrading software, some manual (which ultimately are the most flexible, but also the most difficult), others quite automated. In this section, we'll look at three different techniques: using the RPM package system, using the Debian package system, and doing things manually.
We'd like to stress here that using packages and package systems is convenient, and even if you are a power-user, you might want to use these techniques because they save you time for other, more fun stuff. Here is a short summary of the advantages:
-
You have everything that belongs to a software package in one downloadable file.
-
You can remove a software package entirely, without endangering other packages.
-
Package systems keep a dependency database and can thus automatically track dependencies. For example, they can tell you if you need to install a newer version of a library in order to run a certain application you are about to install (and will refuse to remove a library package as long as packages are installed that use the libraries this package provides).
Of course, package systems also have a few disadvantages, some of which we discuss when we talk about RPM and the Debian package system. A generic problem is that once you start using a package system (which is almost a requirement if you use the distributions' automated installation interfaces) you ought to really install everything through packages. Otherwise, you can't keep track of the dependencies. For the same reason, mixing different package systems is a bad idea.
7.3.1. Using RPM
RPM, the Red Hat Package Manager, is a tool that automates the installation of software binaries and remembers what files are needed so that you can be assured the software will run properly. Despite the name, RPM is not Red Hat-specific, but is used in many other distributions nowadays, including SuSE and Caldera. Using RPM makes installing and uninstalling software a lot easier.
The basic idea of RPM is that you have a database of packages and the files that belong to a package. When you install a new package, the information about this package is recorded in the database. Then, when you want to uninstall the package for every file of the package, RPM checks whether other installed packages are using this file too. If this is the case, the file in question is not deleted.
In addition, RPM tracks dependencies. Each package can be dependent on one or more other packages. When you install a package, RPM checks whether the packages the new package is dependent on are already installed. If not, it informs you about the dependency and refuses to install the package.
The dependencies are also used for removing packages: when you want to uninstall a package that other packages are still dependent upon, RPM tells you about this, too, and refuses to execute the task.
The increased convenience of using RPM packages comes at a price, however: first, as a developer, it is significantly more difficult to make an RPM package than to simply pack everything in a tar archive. And second, it is not possible to retrieve just one file from an RPM package; you have to install everything or nothing.
If you already have an RPM system, installing RPM packages is very easy. Let's say that you have an RPM package called SuperFrob-4.i386.rpm (RPM packages always have the extension .rpm; the i386 indicates that this is a binary package compiled for Intel x86 machines). You could then install it with:
tigger # rpm -i SuperFrob-4.i386.rpm
Instead of -i, you can also use the long-named version of this option; choose whatever you like better:
tigger # rpm - -install SuperFrob-4.i386.rpm
If everything goes well, there will be no output. If you want RPM to be more verbose, you can try:
tigger # rpm -ivh SuperFrob-4.i386.rpm
This prints the name of the package plus a number of hash marks so that you can see how the installation progresses.
If the package you want to install needs another package that is not yet installed, you will get something like the following:
tigger # rpm -i SuperFrob-4.i386.rpm
failed dependencies:
        frobnik-2 is needed by SuperFrob-4
If you see this, you have to hunt for the package frobnik-2 and install this first. Of course, this package can itself be dependent on other packages.
If you want to update a package that is already installed, use the -U or - -update option (which is just the -i option combined with a few more implied options):
tigger # rpm -U SuperFrob-5.i386.rpm
Uninstalling a package is done with the -e or - -erase option. In this case, you do not specify the package file (you might not have that around any longer), but rather, the package name and version number:
tigger # rpm -e SuperFrob-5
Besides the options described so far that alter the state of your system, the -q option provides various kinds of information about everything that is recorded in the RPM database as well as package files. Here are some useful things you can do with -q:
-
Find out the version number of an installed package:
tigger# rpm -q SuperFrob
SuperFrob-5
-
Get a list of all installed packages:
tigger# rpm -qa
SuperFrob-5
OmniFrob-3
...
glibc-2.2.2-38
-
Find out to which package a file belongs:
tigger# rpm -qf /usr/bin/dothefrob
SuperFrob-5
tigger# rpm -qf /home/kalle/.xinitrc
file /home/kalle/.xinitrc is not owned by any package
-
Display information about the specified package:
tigger# rpm -qi rpm Name : rpm Relocations: (not relocateable) Version : 3.0.6 Vendor: SuSE GmbH, Nuernberg, Germany Release : 78 Build Date: Fri 11 May 2001 05:18:18 PM CEST Install date: Sun 15 Jul 2001 03:06:14 PM CEST Build Host: hewitt.suse.de Group : System Environment/Base Source RPM: rpm-3.0.6-78.src.rpm Size : 7624258 License: GPL Packager : feedback@suse.de Summary : RPM Package Manager Description : RPM Package Manager is the main tool for managing software packages of the SuSE Linux distribution. rpm can be used to install and remove software packages; with rpm it's easy to update packages. rpm keep track of all these manipulations in a central database. This way it is possible to get an overview of all installed packages; rpm also supports database queries. Authors: - - - - - - - - Erik Troan <ewt@redhat.com> Marc Ewing <marc@redhat.com> SuSE series: a -
Show the files that will be installed for the specified package file:
tigger# rpm -qpl SuperFrob-5.i386.rpm
/usr/bin/dothefrob
/usr/bin/frobhelper
/usr/doc/SuperFrob/Installation
/usr/doc/SuperFrob/README
/usr/man/man1/dothefrob.1
What we've just finished showing are the basic modes of operation, which are supplemented by a large number of additional options. You can check those in the manual page for the rpm(8) command.
If you are faced with an RPM package that you want to install, but have a system like Slackware or Debian that is not based on RPM, things get a little bit more difficult.
You can either use the fairly self-explanatory command alien that can convert between various package formats and comes with most distributions, or you can build the RPM database from scratch.
The first thing you have to do in this latter case is to get the rpm program itself. You can download it from http://www.rpm.org. Follow the installation instructions to build and install it; if you have the C compiler gcc installed on your system, there should be no problems with this.
The next task is to initialize the RPM database. Distributions that come with RPM do the initialization automatically, but on other systems you will have to issue the command:
tigger # rpm - -initdb
This command creates several files in the directory /var/lib/rpm. The directory /var/lib should already exist; if it doesn't, create it with the mkdir command first.
Now you can install RPM packages the normal way, but because you have not installed the basic parts of the system, such as the C library with RPM, you will get errors like the following:
tigger # rpm -i SuperFrob-4.i386.rpm
failed dependencies:
        libm.so.5 is needed by SuperFrob-4
        libdl.so.1 is needed by SuperFrob-4
        libc.so.5 is needed by SuperFrob-4
because those files are not recorded in the RPM database. Of course, you really do have those files on your system; otherwise most programs wouldn't run. For RPM to work, you must tell it not to care about any dependencies. You do this by specifying the command-line option - -nodeps:
tigger # rpm -i - -nodeps SuperFrob-4.i386.rpm
Now, RPM will install the package without complaining. Of course, it will run only if the libraries it needs are installed. The mere fact that you use - -nodeps doesn't save you when the "dependent" library or software is not installed on your system.
With this information, you should be able to administer your RPM-based system. If you want to know more, read the manual page for the rpm command, or check out http://www.rpm.org.
Some commercial companies sell automated upgrade services based on RPM. As a subscriber to these services, you can have your system upgraded automatically; the service finds out which new packages are available and installs them for you. If you use the SuSE distribution, SuSE provides such a service for free. Even the Debian distribution (whose package system is described in the next section) has an automated upgrade system (described there). However, some security experts consider these automated upgrades a security risk.
7.3.2. Using dpkg and apt
After rpm, the most popular package manager for Linux distributions is dpkg, which is used to manage .deb archives; as the name implies, the .deb format originated with the Debian distribution, but it is also used by Libranet and Xandros, among other vendors. Like the RPM format, the .deb format keeps track of dependencies and files to help ensure your system is consistent.
The technical differences between the two formats are actually fairly small; although the RPM and .deb formats are incompatible (for example, you can't install a Debian package directly on Red Hat), you can use alien to translate .deb packages for other distributions (and vice versa). The main difference between the formats is that .deb packages are built using tools that help make sure they have a consistent layout and generally conform to policies (most notably, the Debian Policy Manual, provided in the debian-policy package) that help developers create high-quality packages.
While dpkg is the low-level interface to the Debian package manager, most functions are usually handled through either the apt suite of programs or frontends like dselect, aptitude, gnome-apt, synaptic, or kpackage.
Installing .deb packages on a Debian system is quite easy. For example, if you have a package named superfrob_4-1_i386.deb, you can install it with:
tigger # dpkg -i superfrob_4-1_i386.deb
Selecting previously deselected package superfrob.
(Reading database ... 159540 files and directories currently installed.)
Unpacking superfrob (from superfrob_4-1_i386.deb) ...
Setting up superfrob (4-1) ...
If the superfrob package is missing a dependency, dpkg will issue a warning message:
tigger # dpkg -i superfrob_4-1_i386.deb
Selecting previously deselected package superfrob.
(Reading database ... 159540 files and directories currently installed.)
Unpacking superfrob (from superfrob_4-1_i386.deb) ...
dpkg: dependency problems prevent configuration of superfrob:
 superfrob depends on frobnik (>> 2); however:
  Package frobnik is not installed.
dpkg: error processing superfrob (- -install):
 dependency problems - leaving unconfigured
Errors were encountered while processing:
 superfrob
The output indicates that you would need frobnik Version 2 or later for the package to install completely. (The files in the package are installed, but they may not work until frobnik is installed too.)
Unlike RPM, dpkg doesn't make a distinction between installing a new package and upgrading an existing one; the -i (or - -install) option is used in both cases. For example, if we want to upgrade superfrob using a newly downloaded package superfrob_5-1_i386.deb, we'd simply type:
tigger # dpkg -i superfrob_5-1_i386.deb
(Reading database ... 159546 files and directories currently installed.)
Preparing to replace superfrob 4-1 (using superfrob_5-1_i386.deb) ...
Unpacking replacement superfrob ...
Setting up superfrob (5-1) ...
To uninstall a package, you can use either the -r (- -remove) or -P (- -purge) options. The - -remove option will remove most of the package, but will retain any configuration files, while - -purge will remove the systemwide configuration files as well. For example, to completely remove superfrob:
tigger # dpkg -P superfrob
(Reading database ... 159547 files and directories currently installed.)
Removing superfrob ...
dpkg can also be used to find out what packages are installed on a system, using the -l (- -list) option:
tigger $ dpkg -l
Desired=Unknown/Install/Remove/Purge/Hold
| Status=Not/Installed/Config-files/Unpacked/Failed-config/Half-installed
|/ Err?=(none)/Hold/Reinst-required/X=both-problems (Status,Err: uppercase=bad)
||/ Name           Version        Description
+++-==============-==============-============================================
ii  a2ps           4.13b-15       GNU a2ps 'Anything to PostScript' converter
ii  aalib1         1.4p5-10       ascii art library
ii  abcde          2.0.3-1        A Better CD Encoder
...
ii  zlib1g-dev     1.1.3-19       compression library - development
The first three lines of the output are designed to tell you what the first three columns before each package's name mean. Most of the time, they should read ii, which means the package is correctly installed. If they don't, you should type dpkg - -audit for an explanation of what is wrong with your system and how to fix it.
You can also use the -l option with a package name or glob-style pattern; for example, you could find out what version of superfrob is installed using:
tigger $ dpkg -l superfrob
Desired=Unknown/Install/Remove/Purge/Hold
| Status=Not/Installed/Config-files/Unpacked/Failed-config/Half-installed
|/ Err?=(none)/Hold/Reinst-required/X=both-problems (Status,Err: uppercase=bad)
||/ Name           Version        Description
+++-==============-==============-============================================
ii  superfrob      4-1            The superfrobulator
dpkg can also be used to find out what package to which a particular file belongs:
tigger $ dpkg - -search /bin/false
shellutils: /bin/false
tigger $ dpkg - -search /home/kalle/.xinitrc
dpkg: /home/kalle/.xinitrc not found.
You can also display information about an installed package or .deb archive:
tigger $ dpkg - -status dpkg
Package: dpkg
Essential: yes
Status: install ok installed
Priority: required
Section: base
Installed-Size: 3156
Origin: debian
Maintainer: Dpkg Development <debian-dpkg@lists.debian.org>
Bugs: debbugs://bugs.debian.org
Version: 1.9.19
Replaces: dpkg-doc-ja
Pre-Depends: libc6 (>= 2.2.4-4), libncurses5 (>= 5.2.20020112a-1), libstdc++2.10-
glibc2.2 (>= 1:2.95.4-0.010810)
Conflicts: sysvinit (<< 2.80)
Conffiles:
 /etc/alternatives/README 69c4ba7f08363e998e0f2e244a04f881
 /etc/dpkg/dpkg.cfg 1db461ac9a1d4f4c8b47f5061078f5ee
 /etc/dpkg/dselect.cfg 190f7cf843556324495ef12759b752e3
 /etc/dpkg/origins/debian 24926c0576edec3e316fd9f6072b8118
Description: Package maintenance system for Debian
 This package contains the programs which handle the installation and
 removal of packages on your system.
 .
 The primary interface for the dpkg suite is the 'dselect' program;
 a more low-level and less user-friendly interface is available in
 the form of the 'dpkg' command.
 .
 In order to unpack and build Debian source packages you will need to
 install the developers' package 'dpkg-dev' as well as this one.
tigger $ dpkg - -info reportbug_1.43_all.deb
 new debian package, version 2.0.
 size 66008 bytes: control archive= 1893 bytes.
      40 bytes,     2 lines      conffiles
    1000 bytes,    24 lines      control
     986 bytes,    15 lines      md5sums
    1014 bytes,    41 lines   *  postinst             #!/bin/sh
     147 bytes,     5 lines   *  postrm               #!/bin/sh
     416 bytes,    19 lines   *  prerm                #!/bin/sh
 Package: reportbug
 Version: 1.43
 Section: utils
 Priority: standard
 Architecture: all
 Depends: python
 Recommends: python-newt
 Suggests: postfix | mail-transport-agent, gnupg | pgp, python-ldap (>= 1.8-1)
 Conflicts: python (>> 2.3), python-newt (= 0.50.17-7.1)
 Installed-Size: 195
 Maintainer: Chris Lawrence <lawrencc@debian.org>
 Description: Reports bugs in the Debian distribution.
  reportbug is a tool designed to make the reporting of bugs in Debian
  and derived distributions relatively painless.  Its features include:
  .
   * Integration with the mutt, af, and mh/nmh mail readers.
   * Access to outstanding bug reports to make it easier to identify
     whether problems have already been reported.
   * Support for following-up on outstanding reports.
   * Optional PGP/GnuPG integration.
  .
  reportbug is designed to be used on systems with an installed mail
  transport agent, like exim or sendmail; however, you can edit the
  configuration file and send reports using any available mail server.
dpkg can also list the files and directories included in a .deb archive:
tigger $ dpkg - -contents superfrob_4-1_i386.deb
-rwxr-xr-x root/root     44951 2002-02-10 12:16:48 ./usr/bin/dothefrob
-rwxr-xr-x root/root     10262 2002-02-10 12:16:48 ./usr/bin/frobhelper
...
dpkg, like rpm, has numerous other options; for more details, refer to the manual pages for dpkg and dpkg-deb.
In addition to dpkg, Debian and other Debian-based distributions provide the apt suite of programs.[24] APT is the "Advanced Package Tool," and is designed as an archive-independent system that can handle multiple package formats. Perhaps the most important feature of APT is its ability to resolve dependencies automatically; if, for example, superfrob requires Version 2 or later of frobnik, APT will try to find frobnik from the sources that are available to it (including CD-ROMs, local mirrors, and the Internet).
[24]Some RPM-based distributions now include APT as well because APT was designed to work with any packaging format.
The most useful interface to APT is the apt-get command. apt-get manages the list of available packages (the "package cache") and can be used to resolve dependencies and install packages. A typical session would start with an update of the APT cache:
tigger # apt-get update
Get:1 http://http.us.debian.org stable/main Packages [808kB]
Get:2 http://http.us.debian.org stable/main Release [88B]
Hit http://non-us.debian.org stable/non-US/main Packages
Hit http://non-us.debian.org stable/non-US/main Release
Get:3 http://security.debian.org stable/updates/main Packages [62.1kB]
Get:4 http://security.debian.org stable/updates/main Release [93B]
Fetched 870kB in 23s (37kB/s)
Reading Package Lists... Done
Building Dependency Tree... Done
The output indicates that there have been updates to the stable distribution, so we may want to upgrade the packages already installed on the system. To do this automatically, we can use apt-get's upgrade option:
tigger # apt-get upgrade
The following packages have been kept back:
  gnumeric
17 packages upgraded, 0 newly installed, 0 to remove and 1 not upgraded.
Need to get 16.3MB of archives.  After unpacking 5kB will be freed.
Do you want to continue? [Y/n] y
Get:1 http://http.us.debian.org stable/main base-passwd 3.4.6 [17.2kB]
Get:2 http://security.debian.org stable/updates/main ssh 1:3.1.6p4-1 [600kB]
...
(Reading database ... 159546 files and directories currently installed.)
Preparing to replace ssh 1:3.0.3p2-6 (using .../ssh_1%3a3.1.6p4-1_i386.deb) ...
Unpacking replacement ssh ...
...
One thing you will notice is that unlike most Linux commands, the actions taken by APT commands are specified without dashes. apt-get does allow some options, but they are used only to change the behavior of the main action specified.[25]
[25]Some other Linux commands, like cvs, also act this way.
Note that gnumeric was not automatically upgraded, probably because it would have required additional packages to be installed. To upgrade it and resolve dependencies, we can use apt-get's install option, with the names of one or more packages: [26]
[26]Note that apt-get does not install packages directly from .deb archives; dpkg's - -install option should be used instead for an archive that you have in a .deb archive on disk or have downloaded directly from the Internet. When using dpkg, you will need to resolve the dependencies yourself.
tigger # apt-get install gnumeric
The following extra packages will be installed:
  libgal36 libglade3
The following NEW packages will be installed:
  libgal36
2 packages upgraded, 1 newly installed, 0 to remove and 0 not upgraded.
Need to get 8.3MB of archives.  After unpacking 503kB will be used.
Do you want to continue? [Y/n] y
...
Another useful feature of APT is its ability to find information about packages in the repository. The apt-cache command is used to look up information about packages that are available for installation. One common use of apt-cache is to find packages based on keywords in the package's description, by using words, complete phrases (in quotes), or regular expressions. For example, if you want to find a package that allows you to play Ogg Vorbis-encoded music files, you can use the search option to find appropriate packages:
tigger $ apt-cache search "ogg vorbis"
audacity - A fast, cross-platform audio editor
bitcollider-plugins - bitcollider plugins
cplay - A front-end for various audio players
gqmpeg - a GTK+ front end to mpg321/mpg123 and ogg123
libapache-mod-mp3 - turns Apache into a streaming audio server
libvorbis0 - The Vorbis General Audio Compression Codec
mp3blaster - Full-screen console mp3 and ogg vorbis player
mp3burn - burn audio CDs directly from MP3s or Ogg Vorbis files
oggtst - Read comments in ogg vorbis files
python-pyvorbis - A Python interface to the Ogg Vorbis library
vorbis-tools - Several Ogg Vorbis Tools
xmms - Versatile X audio player that looks like Winamp
xmms-dev - XMMS development static library and header files
mq3 - a mp3/ogg audio player written in Qt.
Now, if we are interested in one of these packages, we can find out more about it using the show option of apt-cache:
tigger $ apt-cache show xmms
Package: xmms
Priority: optional
Section: sound
Installed-Size: 4035
Maintainer: Josip Rodin <jrodin@jagor.srce.hr>
...
Description: Versatile X audio player that looks like Winamp
 XMMS (formerly known as X11Amp) is an X/GTK+ based audio player
 for various audio formats.
 .
 It's able to read and play:
  * Audio MPEG layer 1, 2, and 3 (with mpg123 plug-in),
  * WAV, RAW, AU (with internal wav plug-in and MikMod plug-in),
  * MOD, XM, S3M, and other module formats (with MikMod plug-in),
  * CD Audio (with CDAudio plug-in), with CDDB support,
  * .cin files, id Software,
  * Ogg Vorbis files.
 It has eSound, OSS, and disk writer support for outputting sound.
 .
 It looks almost the same as famous Winamp, and includes those neat
 features like general purpose, visualization and effect plug-ins,
 several of which come bundled, then spectrum analyzer, oscilloscope,
 skins support, and of course, a playlist window.
While a full exploration of APT's features was beyond the scope of this chapter, the apt manual page (and the manual pages it references) along with the APT HOWTO (available in the apt-howto-en package) should answer any questions you may have.
In addition to the command-line tools, a number of easy-to-use text-based and graphical frontends have been developed. One of the most mature frontends is kpackage, which is part of the KDE Desktop Environment, but can be used with other desktops such as GNOME. kpackage can be run from the command line or found in the System menu of KDE. Figure 7-1 shows a sample screen from kpackage.
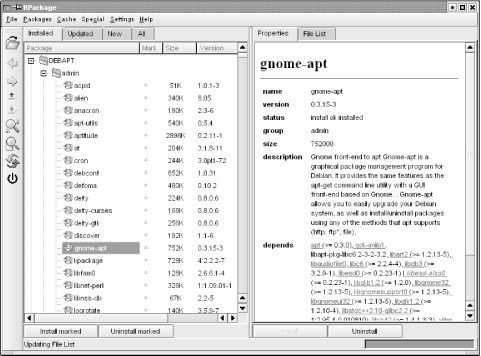
Figure 7-1. kpackage package manager
The main window of kpackage displays a list of all the packages available for your system on the left, with a box to the right; when you choose a package in the list, the box to the right includes information about the package you selected. You can install or uninstall packages by selecting them and choosing Install or Uninstall from the Packages menu, or by clicking the column labeled Mark to place a checkmark next to them, and then clicking the Install marked or Uninstall marked buttons. You can also install .deb packages directly by clicking the Open button on the toolbar to the left of the screen and selecting the file, or dragging .deb icons from KDE file manager windows into kpackage's window. kpackage also has tools for finding packages with particular names. Like all KDE applications, kpackage has help available by pressing F1 or using the Help menu.
7.3.3. Upgrading Other Software
In order to upgrade other applications, you'll have to obtain the newest release of the software. This is usually available as a gzipped or compressed tar file. Such a package could come in several forms. The most common are binary distributions, in which the binaries and related files are archived and ready to unpack on your system, and source distributions, in which the source code (or portions of the source code) for the software is provided, and you have to issue commands to compile and install it on your system.
Shared libraries make distributing software in binary form easy; as long as you have a version of the libraries installed that is compatible with the library stubs used to build the program, you're set. However, in many cases, it is easier (and a good idea) to release a program as source. Not only does this make the source code available to you for inspection and further development, but it also allows you to build the application specifically for your system, with your own libraries. Many programs allow you to specify certain options at compile time, such as selectively including various features in the program when built. This kind of customization isn't possible if you get prebuilt binaries.
There's also a security issue at play when installing binaries without source code. Although on Unix systems viruses are nearly unheard of,[27] it's not difficult to write a "Trojan Horse," a program that appears to do something useful but, in actuality, causes damage to the system. For example, someone could write an application that includes the "feature" of deleting all files in the home directory of the user executing the program. Because the program would be running with the permissions of the user executing it, the program itself has the ability to do this kind of damage. (Of course, the Unix security mechanism prevents damage being done to other users' files or to any important system files owned by root.)
[27]A "virus" in the classic sense is a program that attaches to a "host," which runs when the host is executed. On Unix systems, this usually requires root privileges to do any harm, and if programmers could obtain such privileges, they probably wouldn't bother with a virus.
While having source won't necessarily prevent this from happening (do you read the source code for every program you compile on your system?), at least it gives you a way to verify what the program is really doing. Also, if source code is available, it is likely that some people will peruse it so that using source is a bit safer; but you can't count on that.
At any rate, dealing with source and binary distributions of software is quite simple. If the package is released as a tar file, first use the tar t option to determine how the files have been archived. In the case of binary distributions, you may be able to unpack the tar file directly on your system — say, from / or /usr. When doing this, be sure to delete any old versions of the program and its support files (those that aren't overwritten by the new tar file). If the old executable comes before the new one on your path, you'll continue to run the old version unless you remove it.
Source distributions are a bit trickier. First, you must unpack the sources into a directory of their own. Most systems use /usr/src for just this. Because you usually don't have to be root to build a software package (although you will usually require root permissions to install the program once compiled!), it might be a good idea to make /usr/src writable by all users, with the command:
chmod 1777 /usr/src
This allows any user to create subdirectories in /usr/src and place files there. The first 1 in the mode is the "sticky" bit, which prevents users from deleting each other's subdirectories.
You can now create a subdirectory under /usr/src and unpack the tar file there, or you can unpack the tar file directly from /usr/src if the archive contains a subdirectory of its own.
Once the sources are available, the next step is to read any README and INSTALL files or installation notes included with the sources. Nearly all packages include such documentation. The basic method used to build most programs is:
-
Check the Makefile. This file contains instructions for make, which controls the compiler to build programs. Many applications require you to edit minor aspects of the Makefile for your own system; this should be self-explanatory. The installation notes will tell you if you have to do this. If there is no Makefile in the package, you might have to generate it first. See item 3 for how to do this.
-
Possibly edit other files associated with the program. Some applications require you to edit a file named config.h; again, this will be explained in the installation instructions.
-
Possibly run a configuration script. Such a script is used to determine what facilities are available on your system, which is necessary to build more complex applications.
Specifically, when the sources do not contain a Makefile in the top-level directory, but instead a file called Makefile.in and a file called configure, the package has been built with the Autoconf system. In this (more and more common) case, you run the configuration script like this:
./configure
The ./ should be used so that the local configure is run, and not another configure program that might accidentally be in your path. Some packages let you pass options to configure that often enable or disable specific features of the package. (You can find out what these options are with configure - -help.) Once the configure script has run, you can proceed with the next step.
-
Run make. Generally, this executes the appropriate compilation commands as given in the Makefile. In many cases you'll have to give a "target" to make, as in make all or make install. These are two common targets; the former is usually not necessary but can be used to build all targets listed in a Makefile (e.g., if the package includes several programs, but only one is compiled by default); the latter is often used to install the executables and support files on the system after compilation. For this reason, make install is usually run as root.
Even after the installation, there is often one major difference between programs installed from source or from a binary package. Programs installed from source are often installed below /usr/local by default, which is rarely the case with binary packages.
You might have problems compiling or installing new software on your system, especially if the program in question hasn't been tested under Linux, or depends on other software you don't have installed. In Chapter 13, we talk about the compiler, make, and related tools in detail.
Most software packages include manual pages and other files, in addition to the source and executables. The installation script (if there is one) will place these files in the appropriate location. In the case of manual pages, you'll find files with names such as foobar.1 or foobar.man. These files are usually nroff source files, which are formatted to produce the human-readable pages displayed by the man command. If the manual page source has a numeric extension, such as .1, copy it to the directory /usr/man/man1, where 1 is the number used in the filename extension. (This corresponds to the manual "section" number; for most user programs, it is 1.) If the file has an extension such as .man, it usually suffices to copy the file to /usr/man/man1, renaming the .man extension to .1.
|  | |
| 7.2. Upgrading Software |  | 7.4. Building a New Kernel |

Copyright © 2003 O'Reilly & Associates. All rights reserved.