1.4. A Walk Through PHP
PHP pages are HTML pages with PHP commands embedded in them. This is in contrast to many other dynamic web-page solutions, which are scripts that generate HTML. The web server processes the PHP commands and sends their output (and any HTML from the file) to the browser. Example 1-1 shows a complete PHP page.
Example 1-1. hello.php
<html>
  <head>
    <title>Look Out World</title>
  </head>
  <body>
    <?php echo 'Hello, world!' ?>
  </body>
</html>
Save the contents of Example 1-1 to a file, hello.php, and point your browser to it. The results appear in Figure 1-3.

Figure 1-3. Output of hello.php
The PHP echo command produces output (the string "Hello, world!"), which is inserted into the HTML file. In this example, the PHP code is placed between <?php and ?> tags. There are other ways to tag your PHP code—see Chapter 2 for a full description.
1.4.1. Configuration Page
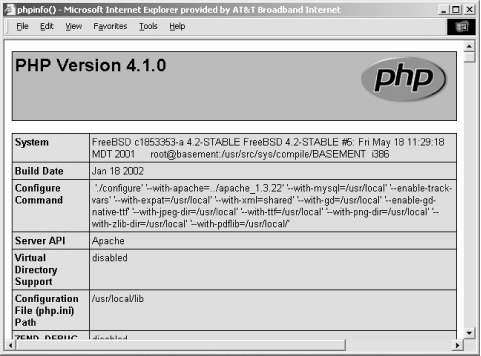
The PHP function phpinfo( ) creates an HTML page full of information on how PHP was installed. You can use it to see whether you have particular extensions installed, or whether the php.ini file has been customized. Example 1-2 is a complete page that displays the phpinfo( ) page.
Example 1-2. Using phpinfo( )
<?php phpinfo( ); ?>
Figure 1-4 shows the first part of the output of Example 1-2.

Figure 1-4. Partial output of phpinfo( )
1.4.2. Forms
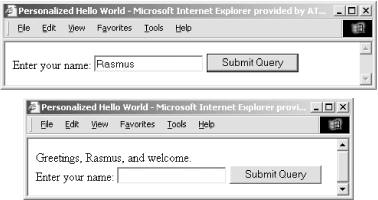
Example 1-3 creates and processes a form. When the user submits the form, the information typed into the name field is sent back to this page. The PHP code tests for a name field and displays a greeting if it finds one.
Example 1-3. Processing a form
<html>
  <head>
    <title>Personalized Hello World</title>
  </head>
  <body>
    <?php if(!empty($_POST['name'])) {
      echo "Greetings, {$_POST['name']}, and welcome.";
    } ?>
    <form action="<?php $PHP_SELF; ?>" method="post">
      Enter your name: <input type="text" name="name" />
      <input type="submit" />
    </form>
  </body>
</html>
The form and the message are shown in Figure 1-5.

Figure 1-5. Form and greeting
PHP programs access form values through the $_POST and $_GET array variables. Chapter 7 discusses forms and form processing in more detail.
1.4.3. Databases
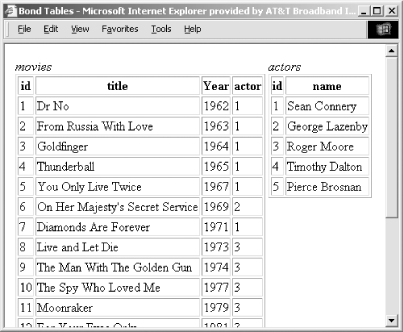
PHP supports all the popular database systems, including MySQL, PostgreSQL, Oracle, Sybase, and ODBC-compliant databases. Figure 1-6 shows part of a MySQL database with two tables: actors, which assigns a unique identifier to each actor who played James Bond; and movies, which records each movie's name, release date, and the identifier of the Bond actor.

Figure 1-6. Contents of the Bond tables
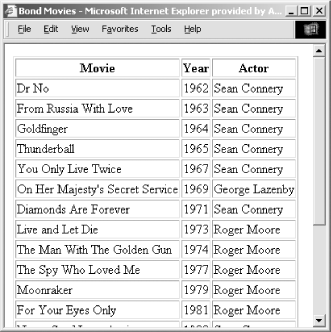
The code in Example 1-4 connects to the database, issues a query to match up movies with the actor's name, and produces a table as output. It uses the DB library to access a MySQL database, issue a query, and display the results. The <?= and ?> bracketing construct runs PHP code and prints the result.
Example 1-4. Querying the Bond database
<html><head><title>Bond Movies</title></head>
<body>
<table border=1>
<tr><th>Movie</th><th>Year</th><th>Actor</th></tr>
<?php
 // connect
 require_once('DB.php');
 $db = DB::connect("mysql://username:password@server/webdb");
 if (DB::iserror($db)) {
   die($db->getMessage( ));
 }
 // issue the query
 $sql = "SELECT movies.title,movies.year,actors.name
         FROM movies,actors
         WHERE movies.actor=actors.id
         ORDER BY movies.year ASC";
 $q = $db->query($sql);
 if (DB::iserror($q)) {
   die($q->getMessage( ));
 }
 // generate table
 while ($q->fetchInto($row)) {
?>
<tr><td><?= $row[0] ?></td>
    <td><?= $row[1] ?></td>
    <td><?= $row[2] ?></td>
</tr>
<?php
 }
?>
</table>
</body></html>
The output of Example 1-4 is shown in Figure 1-7.

Figure 1-7. Output of the database query
Database-provided dynamic content drives the news and e-commerce sites at the heart of the Web. More details on accessing databases from PHP are given in Chapter 8.
1.4.4. Graphics
With PHP, you can easily create and manipulate images using the GD extension. Example 1-5 provides a text-entry field that lets the user specify the text for a button. It takes an empty button image file, and on it centers the text passed as the GET parameter "message". The result is then sent back to the browser as a PNG image.
Example 1-5. Dynamic buttons
<?php
 if (isset($_GET['message'])) {
   // load font and image, calculate width of text
   $font = 'times';
   $size = 12;
   $im = ImageCreateFromPNG('button.png');
   $tsize = imagettfbbox($size,0,$font,$_GET['message']);
   // center
   $dx = abs($tsize[2]-$tsize[0]);
   $dy = abs($tsize[5]-$tsize[3]);
   $x = ( imagesx($im) - $dx ) / 2;
   $y = ( imagesy($im) - $dy ) / 2 + $dy;
   // draw text
   $black = ImageColorAllocate($im,0,0,0);
   ImageTTFText($im, $size, 0, $x, $y, $black, $font, $_GET['message']);
   // return image
   header('Content-type: image/png');
   ImagePNG($im);
   exit;
 }
?>
<html>
<head><title>Button Form</title></head>
<body>
<form action="<?= $PHP_SELF ?>" method="GET">
Enter message to appear on button:
<input type="text" name="message" /><br />
<input type="submit" value="Create Button" /> </form>
</body>
</html>
The form generated by Example 1-5 is shown in Figure 1-8. The button created is shown in Figure 1-9.

Figure 1-8. Button-creation form

Figure 1-9. Button created
You can use GD to dynamically resize images, produce graphs, and much more. PHP also has several extensions to generate documents in Adobe's popular PDF format. Chapter 9 covers dynamic image generation in depth, and Chapter 10 shows how to create Adobe PDF files.
1.4.5. From the Shell
If you compile PHP without specifying a specific web server type, you get a PHP interpreter as a program instead of a web server module. This lets you write PHP scripts that use PHP functionality such as databases and graphics and yet are callable from the command line.
For example, Example 1-6 also creates buttons. However, it is run from the command line, not from a web server. The -q option to the php executable inhibits the generation of HTTP headers.
Example 1-6. Shell-based PHP program to create a button
#!/usr/local/bin/php -q
<?php
 if ($argc != 3) {
   die("usage: button-cli filename message\n");
 }
 list(, $filename, $message) = $argv;
 // load font and image, calculate width of text
 $font = 'Arial.ttf';
 $size = 12;
 $im = ImageCreateFromPNG('button.png');
 $tsize = imagettfbbox($size,0,$font,$message);
 // center
 $dx = abs($tsize[2]-$tsize[0]);
 $dy = abs($tsize[5]-$tsize[3]);
 $x = ( imagesx($im) - $dx ) / 2;
 $y = ( imagesy($im) - $dy ) / 2 + $dy;
 // draw text
 $black = ImageColorAllocate($im,0,0,0);
 ImageTTFText($im, $size, 0, $x, $y, $black, $font, $message);
 // return image
 ImagePNG($im, $filename);
?>
Save Example 1-6 to button-cli and run it:
# ./button-cli
usage: button-cli filename message
# ./button-cli php-button.png "PHP Button"
# ls -l php-button.png
-rwxr-xr-x  1 gnat  gnat  1837 Jan 21 22:17 php-button.png
Now that you've had a taste of what is possible with PHP, you are ready to learn how to program in PHP. We start with the basic structure of the language, with special focus given to user-defined functions, string manipulation, and object-oriented programming. Then we move to specific application areas such as the Web, databases, graphics, XML, and security. We finish with quick references to the built-in functions and extensions. Master these chapters, and you've mastered PHP!

Copyright © 2003 O'Reilly & Associates. All rights reserved.


