12.3. The <img> Tag and Its Attributes
The <img> tag inserts a graphic image into the document's text flow. Placing graphics inline with the text does not introduce any line breaks or extra space. By default, the bottom of an image aligns with the baseline of surrounding text (ways to alter this are discussed later).
There are over a dozen attributes that can be added within the <img> tag to affect its display, but the only required attribute is src, which provides the URL of the graphic. The HTML 4.01 specification has declared the alt attribute (for alternative text, see explanation below) to be required as well, but the graphic will display just fine without it. The minimal HTML tag for placing an image on the page looks like this:
<IMG SRC="url of graphic">
Figure 12-1 shows an inline image and its HTML source.

Figure 12-1. A graphic placed within a line of text
The URL of the graphic can be absolute (including the protocol and domain name) or relative to the current document (using a relative pathname). The conventions for relative pathnames are described in detail in Chapter 4, "A Beginner's Guide to the Server".
12.3.1. Linked Graphics
To make a graphic a link, place anchor tags around the image tag just as you would around any string of text characters:
<A HREF="document.html"><IMG SRC="picture.gif"></A>
When a graphic is linked, the browser displays a two-pixel-wide border around the image in the same color as the text links on the page (bright blue by default). In most cases, this blue border is unacceptable, particularly around a graphic with transparent edges, but it is quite simple to turn it off using the border attribute.
The border attribute specifies the width of the border in number of pixels. Specifying a value of zero turns the borders off, as shown in the following example. Of course, if you are fond of the blue borders, you could just as easily make them really wide by setting a higher number value.
<A HREF="document.html"><IMG SRC="picture.gif" BORDER="0"></A>
12.3.2. Alternative Text
If a graphic cannot be displayed (either because the file is corrupted or cannot be found), the browser displays a generic broken graphic icon in its place. The browser will also display a generic graphic icon when the user has chosen to turn graphics off for faster browsing (and a lot of users do). The alt attribute allows you to specify a string of alternative text to be displayed in place of the graphic when the graphic is unavailable, as shown in Figure 12-2. It is also what non-graphical browsers display in place of images.

Figure 12-2. Alternative text is displayed when graphics are unavailable
When alternative text is provided in the image tag, users at least know what they're missing. This is particularly important when graphics are links that make up the main navigation of the site. Readers can follow a link if they know where it goes, even if the graphic isn't visible. Without the alternative text, the page would be a big dead end.
Internet Explorer 4.0+ and Netscape 6 display alternative text as a pop-up "tool tip" when the mouse rests on the image area.
Taking the extra time to provide alternative text for your images is the simplest way to make your page accessible to the greatest number of readers. In fact, the HTML 4.01 specification has declared alt to be a required attribute within the <img> tag (although browsers are not currently enforcing this).
12.3.3. Specifying Width and Height
Although src is the only truly necessary attribute in the <img> tag, a few others come strongly recommended. The first is alt, discussed in the previous section. width and height are the others. The width and height attributes simply indicate the dimension of the graphic in pixels, such as:
<IMG SRC="star.gif" WIDTH="50" HEIGHT="50">
With this information, the browser can lay out the page before the graphics download. Without width and height values, the page may be redrawn several times (first without graphics in place, and again each time new graphics arrive). It is worthwhile to take the time to include accurate width and height information in the image tag.
12.3.3.1. Resizing images
If the values specified in the width and height attributes are different than the actual dimensions of the graphic, the browser resizes the graphic to match the specified dimensions. If you specify a percentage value for width and height, some later browsers resize the image to the desired proportions.
Although this effect can certainly be used strategically, as for resizing a single pixel graphic to hold a certain amount of space, it usually just results in a pixelated, poor image quality, as shown in Figure 12-3. It is better to resize images in a graphics program than to leave it up to the browser.

Figure 12-3. Scaling an image with width and height attributes
12.3.3.2. Using width and height to preload images
Preloading images refers to methods used for downloading images and storing them in cache before they actually need to be displayed on the page. One trick for preloading is to place the graphic on a page that will be accessed first (such as a home page), but with the width and height attributes set to one pixel. This causes the image to download with the rest of the page, but the only thing that will be visible is a one-pixel dot (which can be tucked away in a inconspicuous place).
<IMG SRC="bigpicture.gif" WIDTH="1" HEIGHT="1">
Ideally, the image finishes downloading quietly and is stored in the browser's cache while the user is still reading the first page. The graphic should then pop into view instantly when the user links to the page where the image is displayed at its full size.
12.3.4. Vertical Alignment
The align attribute is used to control how the graphic is positioned in relation to the flow of the text.
Vertical alignment controls the placement of the graphic in relation to points in the surrounding text (usually the baseline). The default alignment is bottom, which aligns the bottom of the image with the baseline of the surrounding text. Figure 12-4 shows the result for the following code with no vertical alignment settings:
<P>Star light <IMG SRC="star.gif"> Star bright.</P>
Figure 12-4. Default (bottom) alignment of image with text
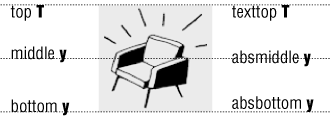
The universally supported values for vertical alignment are top, middle , and bottom . Netscape Navigator introduced another (somewhat more subtle) set, which was then picked up for support in Internet Explorer 4.0. These are absbottom, absmiddle, texttop, and baseline (the same as bottom ).
Figure 12-5 demonstrates the intended effects of each of these alignment values. The reality is slightly different. The absbottom value, for instance, seems to render the same as bottom , even in Navigator.

Figure 12-5. Vertical alignment values
12.3.5. Horizontal Alignment
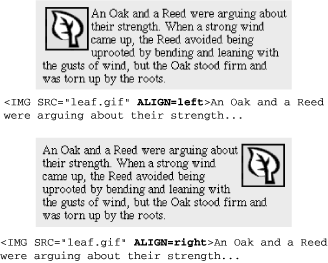
The align attribute can be used to align a graphic on the left or right margin of the page by using the values left or right, respectively. What makes the left and right alignment special is that in addition to placing the graphic on a margin, it allows the text to flow around it.
Figure 12-6 shows how images are displayed when set to align to the left or right.

Figure 12-6. Text wraps around images when they are aligned to the left or right
Right Alignment Without Text Wrap
Using the align=right attribute to place a graphic against the right margin automatically results in text wrapping around the graphic. If you want to move it to the right without the wrap, put the image in a paragraph (<p>), then align the paragraph to the right, as shown here:
<P ALIGN="right"><IMG SRC="leaf.gif"></P>
<P>An Oak and a Reed were arguing...</P>
12.3.5.1. Adding space around aligned images
When text flows around a graphic, it tends to bump up against the graphic's edge. Usually, it is preferable to have a little space between the graphic and the surrounding text. In HTML, this space is provided by using the vspace and hspace attributes within the <img> tag.
The vspace (vertical space) attribute holds a specified number of pixels space above and below an aligned graphic. Space to the left and the right is added with hspace (horizontal space). Note that space is always added symmetrically (both top and bottom, or on both sides), and it is not possible with these attributes to specify an amount of space along a particular side of the graphic (you can, however, do this with style sheets). Figure 12-7 shows an image aligned with the hspace attribute set to 12.

Figure 12-7. Image alignment with horizontal spacing
12.3.5.2. Stopping text wrap
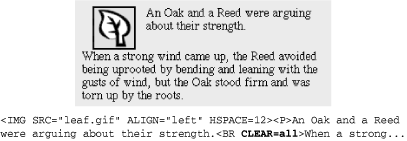
Text automatically wraps to fill the space along the side of an aligned graphic (or other inline object). To stop the text from wrapping and start the next line against the margin (instead of against the image), insert a line break tag (<br>) with the clear attribute.
The clear attribute gives the browser directions on where to place the new line. It has three possible values: left , right, and all. If your graphic is aligned right, insert <br clear=right> to begin the text below the graphic against the right margin. For left-aligned graphics, use <br clear=left>. The <br clear=all> tag starts the text below the graphics on both margins (see Figure 12-8), so it may be the only value you'll ever need.

Figure 12-8. The CLEAR attribute starts the next line below an aligned graphic
12.3.6. Tips for Placing Graphics
These are a few tips for graphics use that may not be obvious from simply looking at HTML code.
12.3.6.1. Link to large images
Remember that when designing for the Web, you must always consider the time it takes to download files. Images are particularly bandwidth-hungry, so you should use them with care. One successful strategy for providing access to very large images (with correspondingly large file sizes) is to provide a postage-stamp-sized preview graphic that links to the full-size graphic.
The preview could be a reduction of the whole image or just an alluring fragment. Be sure to provide information necessary to help users decide whether they want to spend the time clicking the link, such as a description of what they're going to get and the file size of the image (so they can make an estimate of how long they'll need to wait).
12.3.6.2. Reuse images whenever possible
When a browser downloads a graphic, it stores it in the disk cache (a space for temporarily storing files on the hard disk). That way, if it needs to redisplay the page, it can just pull up a local copy of the HTML and graphics files without making a new trip out to the remote server.
When you use the same graphic repetitively in a page or a site, the browser only needs to download the graphic once. Every subsequent instance of the graphic is grabbed from the local cache, which means less traffic for the server and faster display for the end user.
The browser recognizes a graphic by its entire pathname, not just the file name, so if you want to take advantage of file caching, be sure that each instance of your graphic is pointing to the same graphic on the server (not multiple copies of the same graphic in different directories).
12.3.6.3. The lowsrc trick
Large graphics may take a long time to download via slow connection speeds, which means your viewers may spend moments staring at an empty space on the screen. The lowsrc attribute for the <img> tag (introduced by Netscape) provides one way to quickly give users some indication of the image to come while the "real" graphic is still downloading.
The lowsrc attribute provides the URL for an image file that the browser loads and displays when it first encounters the <img> tag. Then, once the document has completely loaded, the browser goes back and retrieves the image specified by the src attribute, as shown in Figure 12-9.

Figure 12-9. Code and images for using the lowsrc trick
To use this the way it was intended, the lowsrc image should contain the same image as the final graphic, but in a format that compresses to a much smaller file size. For instance, an image made up of only black and white pixels could stand in for a full-color JPEG.
With improving bandwidth speeds, this technique has grown a bit antiquated. When a page loads quickly, the initial image may appear as a brief flash or not be visible at all. The lowsrc attribute is not recognized in the HTML 4.01 specification and is supported only by Netscape Navigator.

Copyright © 2002 O'Reilly & Associates. All rights reserved.


