
11.6. Imagemaps
Ordinarily, placing an image within anchor tags makes the entire image a link to a single document when the user clicks anywhere on the image. As an alternative, you can create multiple links, or "hot spots," within a single graphic. These graphics are called imagemaps. The effect is created with HTML tags and/or text files and scripts on the server; the image itself is an ordinary graphic file that just serves as a backdrop for the pixel coordinates.
There are two types of imagemaps: client-side and server-side. For client-side imagemaps, the coordinate and URL information necessary to create each link is contained right in the HTML document. The process of putting the pieces together happens in the browser on the user's machine (thus, client-side). For server-side imagemaps, as the name suggests, the map information resides on the server and is processed by the server or a separate CGI script.
Client-side imagemaps are a slightly newer technology and are not supported by first-version browsers (although nearly all current browsers know what to do). For this reason, some web developers create redundant imagemaps (both client- and server-side) so that if the browser doesn't recognize the client-side map, the server's imagemap processor can take over.
11.6.1. Creating Imagemaps
The key to making imagemaps work is a map, based on the image, that associates pixel coordinates with URLs. This map is handled differently for client-side and server-side (as outlined in the following sections), but the outcome is the same. When the user clicks somewhere within the image, the browser passes the coordinates of the mouse pointer to the map, which, in turn, generates the appropriate link.
11.6.1.1. Available tools
Although it is possible to put together imagemap information manually, it is much easier to use a tool to do it. There are many imagemap creation tools available as shareware for both Windows and the Mac. Be sure to look for one that is capable of outputting both client- and server-side map information, such as the following:
- Macintosh
-
MapMaker 1.1.2 by Frederic Eriksson, available at http://allmacintosh.xs4all.nl/adnload/206185_84149.html.
- Windows
-
MapEdit, by Tom Boutell, available at http://www.boutell.com/mapedit/.MapEdit is now also available for the Macintosh.
The full-featured WYSIWYG web authoring tools (such as Macromedia Dreamweaver and Adobe GoLive) have imagemap creation tools built in. This is particularly handy for creating client-side imagemaps right in the current document.
11.6.1.2. Creating the map
Regardless of the tool you're using, and regardless of the type of imagemap you're creating, the process for creating the map information is basically the same. Read the documentation for your imagemap tool to learn about features not listed here.
-
Open the image in an imagemap program.
-
Define areas within the image that will be clickable by using the appropriate shape tools: rectangle, circle, or polygon (for tracing irregular shapes).
-
While the outline of the area is still highlighted, enter a URL for that area in the text entry field provided, as shown in Figure 11-1.
-
Continue adding shapes and their respective URLs for each clickable area in the image.
-
For server-side imagemaps, you also need to define a default URL, which is the page that displays if users click outside a defined area. Many tools have a prominent field for entering the default URL, but on others you may need to look for it under a pull-down menu.
-
Select the type of imagemap (client- or server-side) you want to create.
-
Save or export the map information. Server-side imagemaps are saved in a map definition file (.map) that resides on the server. Client-side imagemaps are embedded directly in the HTML file.
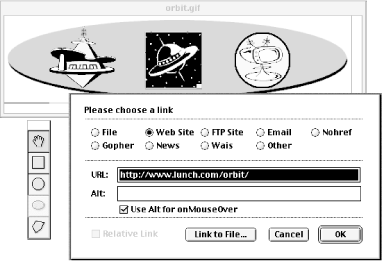
Figure 11-1. Creating map information (shown in MapMaker 1.1.2)
If you do not have an imagemap tool, it is possible to write out the map information by hand following the examples in this chapter. Simply note the pixel coordinates of the shapes as indicated in an image editing program (in Photoshop, they are provided in the Info palette) and type them into the appropriate place in the map file.
11.6.2. Client-Side Imagemaps
Client-side imagemaps have three components:
-
An ordinary graphic file (.gif, .jpeg, or .png)
-
A map delimited by <map> tags containing the coordinate and URL information for each area
-
The usemap attribute within the image tag (<img>) that indicates which map to reference
There are many advantages to using client-side imagemaps. They are self-contained within the HTML document and do not rely on a server to function. This means you can test the imagemap on your local machine or make working site demos for distribution on disk. It also cuts down on the load on your server and improves response times. In addition, complete URL information displays in the status bar when the user mouses over the hot spot (server-side imagemaps display only coordinates).
The only disadvantage to client-side imagemaps is that because it is slightly newer technology, they are not universally supported. Netscape Navigator 1.0 and Internet Explorer 2.0 do not support client-side imagemaps. Experimental or obscure browser programs may not either. Fortunately, these browsers make up a miniscule portion of the current browser population.
11.6.2.1. Sample client-side imagemap
Figure 11-2 shows a sample imagemapped graphic. Example 11-1 provides the HTML document that contains the client-side imagemap.
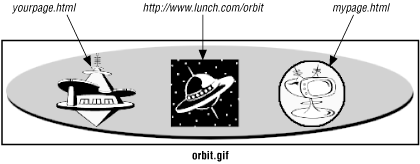
Figure 11-2. Imagemapped graphic
Example 11-1. HTML for client-side imagemap
<HTML>
<HEAD><TITLE>Client-side Imagemap Sample</TITLE></HEAD>
<BODY>
<MAP NAME="spacey"> (A)
<AREA SHAPE="RECT" COORDS="203,23,285,106" (B)
HREF="http://www.lunch.com/orbit/">
<AREA SHAPE="CIRCLE" COORDS="372,64,40" HREF="mypage.html"> (C)
<AREA SHAPE="POLY" (D)
COORDS="99,47,105,41,94,39,98,34,110,35,115,28,120,35,133,38,133,
42,124,42,134,58,146,56,157,58,162,63,158,67,141,68,145,72,155,
73,158,75,159,80,148,83,141,83,113,103,87,83,72,83,64,80,64,76,
68,73,77,72,79,63,70,59,67,53,68,47,78,45,89,45,99,47"
HREF="yourpage.html">
</MAP>
<IMG SRC="orbit.gif" WIDTH=500 HEIGHT=125 BORDER=0 USEMAP="#spacey"> (E)
</BODY>
</HTML>
- (A)
-
This marks the beginning of the map. You must give the map a name. Within the <map>, there are <area> tags for each hotspot within the image.
- (B)
-
Each area tag contains the shape identifier (shape), pixel coordinates (coords), and the URL for the link (href). In this case, the shape is the rectangle (rect) that corresponds to the black square in the center of the image. The value of the coords attribute identifies the top-left and bottom-right pixel positions of the rectangle (ooords="x1,y1,x2,y2"). Some browsers also support the nonstandard rectangle as an equivalent to rect, but this is not widely supported.
- (C)
-
This area corresponds to the circular area on the right of the image in Figure 11-2. Its shape is circle. For circles, the first two coordinates identify the position of the center of the circle and the third value is its radius in pixels (coords="x,y,r"). Some browsers also support the nonstandard circ as an equivalent to circle.
- (D)
-
This is the area tag for the irregular (polygon) shape on the left of the image in Figure 11-2. For polygons, the coordinates are pairs of x,y coordinates for each point or vertex along the path that surrounds the area (coords="x1,y1,x2,y2,x3,y3..."). At least three pairs are required to define a triangle; complex polygons generate a long list of coordinates. Some browsers also support the nonstandard polygon as an equivalent to poly.
11.6.3. Server-Side Imagemaps
Server-side imagemaps work with all browsers, but they are a bit more involved to create. In addition, they rely on the server, which makes them less portable than their client-side counterparts and increases the load on the server. For a number of reasons, server-side imagemaps are going out of style and aren't used nearly as often as their client-side counterparts.
Server-side imagemaps have four elements:
-
An ordinary graphic file (.gif, .jpeg, or .png)
-
HTML tags in the document: the ismap attribute within the graphic's <img> tag and an anchor tag that links the graphic to the .map file on the server
-
A map definition file (.map) containing the pixel coordinate and URL information for each clickable area; the .map file resides on the server and the format is server-dependent
-
A CGI script that runs on the server (or a built-in function of the server software) that interprets the .map file and sends the correct URL to the HTTP server
Because server-side imagemaps are so dependent on the configuration of the server, you need to coordinate with your server administrator if you plan to use them. You'll need to find out what type of .map file to create ("NCSA" and "CERN" are two possibilities, based on the type of server) as well as the pathname to which the imagemapped graphic should be linked (this usually includes a cgi-bin directory).
11.6.3.1. Sample map definition file (.map) file
Example 11-2 shows a server-side image map (called spacey.map) for the imagemapped graphic shown in Figure 11-2.
Example 11-2. Server-side imagemap
default index.html (A)
rect http://www.lunch.com/orbit/ 203,23 285,106 (B)
circle mypage.html 372,64 412,104
poly yourpage.html 99,47 105,41 94,39 98,34 110,35 115,28 120,35 133,38
133,42 124,42 134,58 146,56 157,58 162,63 158,67 141,68 145,72 155,73
158,75 159,80 148,83 141,83 113,103 87,83 72,83 64,80 64,76 68,73 77,72
79,63 70,59 67,53 68,47 78,45 89,45 99,47
- (A)
-
This establishes the default URL, which is what the browser displays if the user clicks outside one of the clickable areas. Set this to the current document if you want to give the impression that the click has no effect.
- (B)
-
Each hot area in the image is defined by a shape name (rect, circle, poly), a URL, and a set of pixel coordinates. The syntax for the coordinates varies by shape and is generally the same as explained for client-side imagemaps above. The syntax for some shapes may vary from server to server. In this .map file, the coordinates are defined for use by an Apache server. Note that the coordinates defining the circle are different than in the client-side example. Apache's syntax for defining a circle is "x1,y1 x2,y2," which corresponds to the x,y coordinates of the circle's center point followed by the x,y coordinates for a point on the circle. Server-side imagemaps do not recognize the nonstandard shape values rectangle, circ, and polygon.
11.6.3.2. The HTML document
Within the HTML file, the image is treated as shown here:
<HTML>
<HEAD><TITLE>Server-side Sample</TITLE></HEAD>
<BODY>
<A HREF="/cgi-bin/imagemap/spacey.map">
<IMG SRC="orbit.gif" BORDER=0 ISMAP></A>
</BODY>
</HTML>
The anchor tag links the whole graphic to the map definition file (spacey.map), which is located within the cgi-bin directory on the server. This is a typical configuration; however, you should follow your server administrator's instructions.
The ismap attribute within the image tag tells the browser that the graphic is an imagemap.
11.6.4. When Not to Use Imagemaps
Imagemaps are not always the best solution and are actually waning somewhat in popularity as web design evolves. Slicing up a large image, each slice of which can be linked to a different document, and holding the pieces together with a table often offers functionality that an imagemap can't match. This technique is so popular that it is built into web graphics tools such as Macromedia Fireworks and Adobe Photoshop 6 and ImageReady. There is also a demonstration in Chapter 13, "Tables".
11.6.4.1. Providing complete alternative text
When a user cannot view images (or has chosen to turn them off), the browser displays the text specified by the alt attribute within the <img> tag. Unfortunately, for each imagemap graphic you get only one alternative text message, which may not be useful for users with non-graphical browsers (although Lynx can construct a list of links based on the href values from each area).
One common solution to this problem is to provide a redundant set of links in HTML text somewhere else on the page so that users who cannot view graphics can still navigate the site.
If the image is divided into pieces rather than using an imagemap, you can provide alternative text for each linked piece, which alleviates the need to add the extra line of linked text to your HTML page.
11.6.4.2. Rollover buttons
Rollover buttons (graphics that change when the user rolls the mouse over them) are popular effects that use the power of JavaScript. Although it is possible to have an entire imagemap graphic change based on mouse-over cues, it is more efficient to break the image into pieces and swap out only the small portion that needs to change with the mouseover. You decrease the download time by preloading only the necessary small graphics. See Chapter 28, "Introduction to JavaScript" for sample JavaScript code for creating rollover effects.
 |  |  |
| 11.5. Targeting Windows |  | 11.7. Non-Web Links and Protocols |

Copyright © 2002 O'Reilly & Associates. All rights reserved.