
9.2. Introduction to Flash
Macromedia Flash utilizes vector-based technology to deliver interactive real-time animation and sound over slow modem connections. Unlike Director, Flash was developed specifically for the Web. Mathematical algorithms enable Flash to stream high-resolution vector-based graphics instantaneously. Figure 9-2 shows vector artwork in the main Flash authoring window combined with bitmap images.
Figure 9-2. Flash 4 scene window
Flash's primary advantage over Shockwave is that its extremely small vector animations download quickly and play at real-time speeds, allowing more bandwidth to be allocated to audio content. For this reason, Flash is generally regarded as one of the few interactive multimedia formats that really works over limited bandwidths. Flash has expanded its user base even more since Macromedia declared the Flash file format an open Internet standard. In 2000, Adobe will release a product, LiveMotion, which writes Flash files as well as many other files.
The Flash plug-in is also much smaller than the Director Shockwave plug-in. Director Shockwave has the additional overhead of the Lingo interpreter and streaming decoder. Macromedia was determined to retain the Flash plug-in's optimal 150 KB file size. So despite the fact that Lingo and SWA decompression capabilities would enhance Flash, Macromedia did not incorporate them into Flash. Instead, Flash 4 now supports MP3 encoding for better audio quality and ActionScript to give developers greater control and customization of their Flash content.
While not as powerful as Director for creating advanced games and more complex CD-ROM-like interactive applications, Flash'ssimplified authoring environment with predefined actions and JavaScript support is ideal for most interactive web presentations with animation, button sounds, ambient loops, and streaming audio.
RealFlash
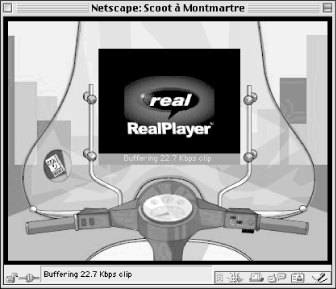
By using Flash in conjunction with RealNetwork's RealSystem 5.0 and up, you can create hybrid RealFlash presentations that are interactive and dependable (see Figure 9-3).
Figure 9-3. A RealFlash presentation with vector line art and an embedded RealVideo window
Flash 4's bandwidth-friendly vector animation and image compression combined with the server reliability and superior streaming efficiency of RealAudio make RealFlash a real boon for web developers. For more information, read the section, "Creating RealFlash content" in Chapter 6, "Encoding, Serving, and Streaming Sound with RealAudio". Note that you can also get the benefits of robust broadcasting using Flash with Qdesign music tracks in QuickTime 4.
9.2.1. Flash audio: event-driven sound versus streaming sound
Flash allows you to integrate two basic types of audio: short event-driven sound files for button rollovers, loops, and transition effects; and long-playing streamed sound files for synchronizing speech and music to animation sequences.
Event-driven sound effects are embedded within a single keyframe of a Flash movie timeline and must be entirely downloaded before they can play back. Event-driven sounds are ideal for button sounds and loops that need to play instantly in response to a user action such as a mouse rollover or a particular animation event. An event-driven sound begins playback when a movie's timeline reaches a particular keyframe.
Once an event sound is triggered, it plays back autonomously from other elements in a Flash movie.Aside from the initial startpoint, event sounds cannot be continuously synchronized along a timeline to specific points in an animation sequence. Flash playback rates are largely determined by a computer's processor speed; thus, it is difficult to predict how an event-driven sound longer than 10 seconds will synchronize with specific animation sequences. To avoid synchronization problems and lengthy download times, use short event-driven sounds no greater than five seconds in length.
Unlike event sounds, streaming sounds are divided into smaller segments or packets of data and attached to each frame's image data. When playing back a synchronized streaming audio clip, Flash places a higher priority on keeping the sound in sync with specified keyframes rather than on preserving the overall frame rate. If there is not enough bandwidth to stream both the audio and the graphic data, Flash drops out image data or animation frames to keep in sync with the audio.
Production tip
For reliable and quick delivery of embedded event sounds, combine all your separate sound clips into one contiguous audio file. Then set in and out times on your audio master file where each sound starts and ends.
While both event-driven and streaming sounds allow you to specify the exact keyframe at which the audio file will start playing, only streamed audio lets you synchronize continuous speech, sound, or music to specific visual cues or events in an animation sequence. If you are creating a music-intensive Flash movie that needs to synchronize with motion graphics, use streaming audio. However, keep in mind that streaming audio tends to produce jerky animation and lost frames -- which makes the use of event sounds a more favorable alternative for designers.
Flash allows you to control the following sound parameters:
-
In and out points. One of the most useful features in Flash is the ability to define smaller sound clips by selecting in and out points from larger event sounds embedded in a Flash movie. You can drastically reduce your Flash download times by reusing sound data or applying different effects such as volume envelopes and looping to portions of the same sound clip. For example, you can use in and out points to make several short button sounds from a longer ambient loop file. Note that you cannot use this feature with streaming sounds.
-
Volume settings. Flash allows you to set the volume level of an audio clip. Use volume settings to create fade-ins and fade-outs or as a sound design effect to manipulate softer sounds and louder sounds.
-
Stereo panning effects. Flash allows you to set the stereo playback parameters of an audio clip. Using a short event sound that pans from left to right as it plays back can create interesting button and motion effects.
-
Looping effects. With event sounds, you can build compelling loops by changing the envelopes over the course of the loop, looping segments defined by the start/stop handles, and layering multiple effects in the timeline.
9.2.2. Flash audio tutorial
We're not going to teach Flash here. What we're interested in is adding audio to a Flash presentation.
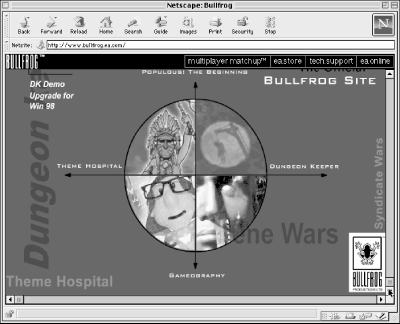
Case study: Bullfrog Production's multimedia web site
The Bullfrog web site (http://www.bullfrog.ea.com), shown in Figure 9-4, is a good example of a soundtrack that enhances the viewing experience, makes navigation fun, and draws in users.
Figure 9-4. The Bullfrog web site
The web site was designed by Insomnious (http://www.insomnious.com). The site's sound design employs well-crafted, short event sounds that synchronize well with onscreen animations and button rollovers. The short intro event sound downloads quickly and sets the tone for the rest of the site. And richly textured rollover button sounds provide a satisfying auditory stimulus to the navigation experience.
If you continue to navigate the Bullfrog site, you will encounter a streaming soundtrack for the trailer preview of the game, "Populous: The Beginning" (http://www.bullfrog.ea.com/). Despite the trailer's simplicity, this is another good example of how a soundtrack synchronized with a few still images in a low-bandwidth environment can draw in an audience.
9.2.2.1. Adding an event sound
To add audio to your Flash presentation, follow these steps:
-
Under File, import an AIFF or a WAV file. The file will appear in the sound library window, as shown in Figure 9-5. Make sure to import a 22 kHz 16-bit source audio file for best results, especially if you want to take advantage of Flash's new MP3 support. If the audio file is set to a different sampling rate and bit-depth, change it to 22 kHz 16-bit before importing it into Flash.
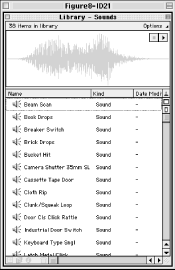
Figure 9-5. Sound library window
-
Select Insert
 Layer to add a new layer for your audio track.
Figure 9-6 shows the main authoring window as seen
in Flash 4 on a Mac. Here we have created a new layer called Sound
Effects. We want this sound to start at the 5-second mark. So we
select that frame on the timeline and choose Insert Keyframe.
Keyframes mark where a transition begins or ends in a scene or where
some object, such as a sound file, starts to play.
Layer to add a new layer for your audio track.
Figure 9-6 shows the main authoring window as seen
in Flash 4 on a Mac. Here we have created a new layer called Sound
Effects. We want this sound to start at the 5-second mark. So we
select that frame on the timeline and choose Insert Keyframe.
Keyframes mark where a transition begins or ends in a scene or where
some object, such as a sound file, starts to play.
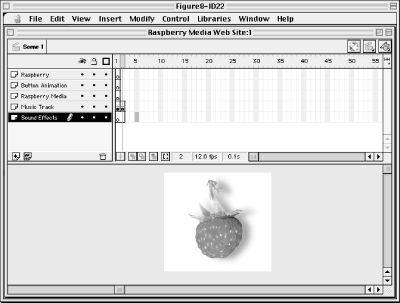
Figure 9-6. The main authoring window
-
Double-click on the desired keyframe to call up the Frame Properties dialog box, as shown in Figure 9-7. The Frame Properties window will default to the sound tab when you click on a frame layer with sound. Then choose the name of the sound file you want to associate with the keyframe. Note that the Frame Properties window features a pull-down of all the imported audio files in your sound library.
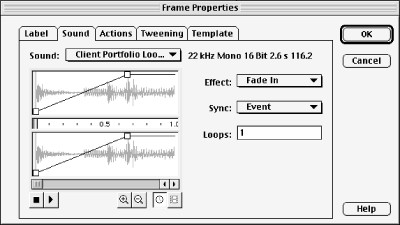
Figure 9-7. The Sound tab within the Frame Properties window
-
In the Sound window, make sure to select the appropriate options in the Effect, Sync, and Loops fields and then hit OK. Under Effect, you can select from a menu of predefined effects such as fade-ins and fade-outs and panning from right to left, as shown in Figure 9-8. For more accurate results, we recommend you apply custom effects manually with the volume and panning controls instead of using the predefined effects.
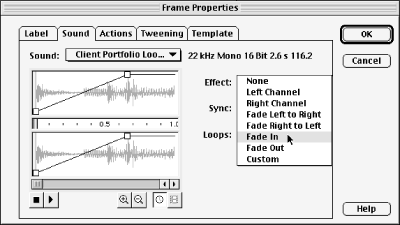
Figure 9-8. The Effects pull-down menu
-
Under the Sync menu, make sure to select Event (for embedded short sounds) or Stream (for longer-playing streaming synchronized sounds). Here we chose Event, as shown in Figure 9-9.
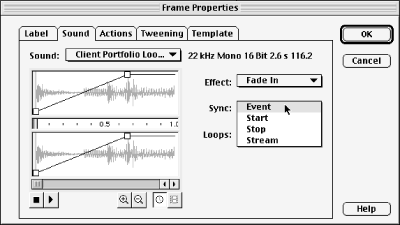
Figure 9-9. The Sync pull-down menu
-
In the Loop field, you can specify how many times you want the sound to repeat. The loop option is useful for creating ambient loops. Make sure to specify a large enough number to keep the loop playing for the duration of the scene. With embedded sounds, you cannot sync the exact end time of the loop with a particular animation frame in the movie.
9.2.2.2. Publishing and file size optimization
Once you have finished building your Flash scenes with all the animation and audio layers in place and properly synced together, you will want to optimize each sound to achieve the smallest file size possible. There are two ways to optimize the file size of your Flash movie: you can set the overall compression rate and encoding format for the audio stream (streamed sounds) and audio event (event-driven sounds), or you can specify individual compression rates for each sound in a Flash scene.
To specify separate audio compression rates, select a sound in the sound library window and go to the pull-down menu on the top right of the library window and click Properties. The Sound Properties window will then appear, as shown in Figure 9-10. The Sound Properties menu allows you to select the compression type, bitrate, and encoding speed for the selected sound.
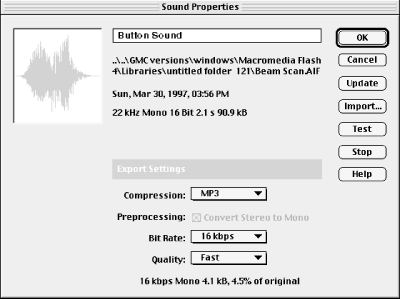
Figure 9-10. The Sound Properties dialog box
By experimenting with different settings, you can optimize the compression rates for each sound. Some sounds work just fine at super-low bitrates such as 8 Kbps and 16 Kbps, while others (such as speech) might require a higher bitrate of 24 Kbps to pass your acceptable audio quality threshold. With a convenient Testbutton, the Sound Properties window makes it easy to preview the result of any given bitrate and compression type. If you have a Flash scene with eight audio files, you can set five of them at a bitrate of 16 Kbps and the other three at a rate of 32 Kbps.
Optimizing separate sound files will come in handy when you run your scenes through the Flash Bandwidth Profiler to check frame by frame for data spikes that shoot above your specified stream rate. The Bandwidth Profiler enables you to manage your Flash streams by locating data spikes and moving content to different frames in order to spread out the bandwidth load. For example, if a certain frame peaks above your specified 28 Kbps stream rate, you can set some of the objects to preload in the beginning of the Flash movie, preventing glitches in playback. To use the Bandwidth Profiler, click the Test Movie menu option. Figure 9-11 shows a short intro scene from a Flash site in the Bandwidth Profiler window.

Figure 9-11. The Bandwidth Profiler window
If you don't want to bother specifying a customized compression setting for each sound or if you want to override the settings, you can simply specify a universal compression type and bitrate for all sounds in the Publish Settings window when you go to export your Flash content, as shown in Figure 9-12. In the Publish Settings window, first select the "Override sound settings" checkbox, then specify the global sound settings for all event sounds and streamed sounds.
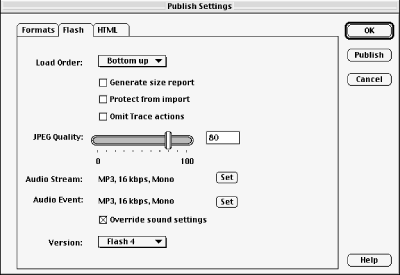
Figure 9-12. The Publish Settings window
Flash case study
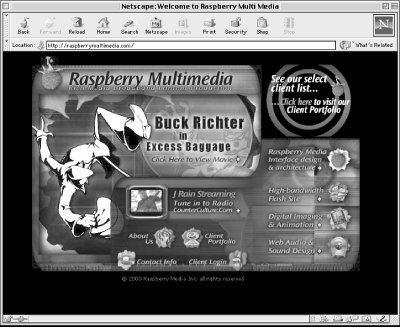
Let's take a look at Raspberry Media's promotional Flash multimedia site, shown in Figure 9-13, at http://www.raspberrymultimedia.com. Raspberry Media, a web design firm founded by co-author Josh Beggs, redesigned its text- and graphics-based web site into a media-rich site with audio and animation. The plan was to develop a multimedia version of their existing sites so they could show clients the difference firsthand and give them a glimpse of what they could expect from a site enhanced with Flash.
Figure 9-13. The home page of the Raspberry Media Flash site
- Building a soundtrack in Flash
If you use Flash, you know that its compact vector graphics allow plenty of room for audio. According to Raspberry Creative Director Ethan Allen, it was important to incorporate audio into Raspberry's Flash site. "If we had to do all the tweening and overlay effects with bitmap images, like we did in the old days of Shockwave, there would be no bandwidth left over to include a soundtrack."
Even though Flash vector animation is extremely compact, it's still a tight fit to include additional audio information at 28.8 Kbps bandwidths. "When we first started designing the site, we were excited about implementing a diverse soundtrack with multiple tracks of sound firing off in sync with the animations. But when we started beta-testing the Flash site with three or five event-driven sounds for a particular animation sequence, we ran into major bandwidth congestion problems. With so many embedded event sounds, the Flash site would not buffer properly due to too much data throughput at a given frame on the movie timeline. We had to simplify most of the soundtrack to only include one music loop per animation sequence. Now that Flash supports MP3 compression, resulting in much smaller file sizes for event sounds, we plan on redoing the site to incorporate more sound effects."
With Flash movies you have to make a choice early in the site design to use either less audio and more intensive visual effects or more audio and less complex animations. "As is typical with many multimedia productions, we started producing the visuals first and then started adding audio later when the animations were nearly complete," says Ethan. "In hindsight, this was a mistake. We should have started thinking about the soundtrack from the beginning. Then we could have simplified the animations in certain spots to accommodate additional event sounds in the timeline. It is much more difficult to change the animation components at the end.
"Ultimately, we made the choice to go with only one or two event sounds per animation sequence. Every main section of the Flash site has an accompanying one-bar ambient music loop. In cases where we had enough bandwidth we added another short event sound to the movie. Since we were using so few sounds we had to find creative ways to make the soundtrack interesting."
The key to keeping your Flash movie size small is to recycle or reuse sounds. As mentioned earlier, Flash allows you to set in and out points in the keyframe where the event sound is located. With a two- or three-second sound, you can use in and out points to create multiple button sounds from one event sound.
According to Ethan, what worked best with the Raspberry multimedia site was to use two event-driven sounds, a repeating music loop for background ambiance, and a short sound effect for buttons and transitions. "In several of the Flash movies, we tried to reuse portions of the music loop to add spice and variation to the animation sequence. This approach did not work because the reused sound effect was hard to distinguish from the original music loop. Reusing a louder portion such as a drum hit did not work either since it randomly came in over the music loop and sounded like a mistake."
Ultimately, the best approach was to incorporate a separate sound effect to overlay the music loop. Using two distinct sound files gave us the best result and the most flexibility, says Ethan. "With an additional sound effect we were able to add more variation to the soundtrack and accentuate the visual effects."
 |  |  |
| 9. Interactive Sound Design with Flash and Shockwave |  | 9.3. Introduction to Shockwave |

Copyright © 2002 O'Reilly & Associates. All rights reserved.