
6.2. Streaming RealAudio from a web server
If you are adding streaming media to your web site for the first time, you may wonder where to start. If you have your own web server, your first option is to download and install the free RealServer 5.0 or RealServer G2 basic servers from the RealNetworks web site. For the simplest and most cost-effective way to add streaming media to your web site without installing RealServer, HTTP pseudo-streaming from a standard web server is a good solution.
You can serve RealMedia content from your existing web site in the same manner that you serve JPEGs, GIFs, and HTML. However, remember that while an ordinary web server can deliver a RealAudio clip, it cannot fast forward the clip or compensate for network congestion. Computer networks are not built for real-time media delivery. To compensate, a dedicated streaming media system such as RealNetwork's Basic Server Plus employs many sophisticated techniques for delivering media efficiently and robustly.
Although streaming media from a web server is not as reliable as a dedicated RealServer, it is adequate for small-scale broadcasting to a handful of simultaneous listeners.
Support for simultaneous streams
The number of streams supported by your web server or dedicated RealServer is largely determined by your available bandwidth. Bandwidth usage of HTTP streaming is dependent on the combined bitrates of the content being streamed. Sixty simultaneous streams of 20 Kbps RealAudio clips would roughly consume the better part of a T1 line (1.2 MB out of 1.5 available).
6.2.1. Pros and cons
There are advantages and disadvantages to streaming audio from a web server. HTTP pseudo-streaming, for example, is a good option for serving RealAudio and RealVideo files on the Web without the added management requirements and expense of server-side streaming software. And from the developer's point of view, there's no added work because RealAudio and RealVideo files require no special handling for HTTP serving.
One of the main disadvantages to HTTP pseudo-streaming is that it is not well-suited for high-volume sites serving numerous simultaneous streams. There are some important differences, however, between the capabilities of HTTP and those of specialized server software such as RealNetworks' RealServer 5.0. For example, you can't automatically detect the user's modem speed using HTTP. Instead, files optimized for each of the various connection speeds must be made available for users to select themselves. Also, the HTTP-based approach does not allow for live streaming audio or video presentations because complete files must be stored on the web server before they can be accessed.
Finally, HTTP does not perform well under heavy server loads. But for sites serving no more than a handful of simultaneous streams at any given time, this is a great way to add streaming audio and video features to your web site without incurring extra costs.
6.2.2. Requirements for HTTP streaming
The only requirement for HTTP streaming is a web server configured to recognize the .ra, .ram, .rm,and .rpm MIME types, which are standardized file classifications. You or your ISP will have to define the following MIME types for your web server:
- audio/x-pn-realaudio
-
Files with a .ra, .ram, or .rm file extension
- audio/x-pn-realaudio-plugin
-
Files with a .rpm file extension
Many servers already use the appropriate MIME types. If not, it's a relatively simple process to configure your host server for these types, and you can request that your service provider add this feature for you.
Let's take a quick look at how to broadcast RealAudio clips from a web server. Most popular web servers automatically support the .ra and .ram extensions. However, you may need to add the more recent .rm and .rpm file extensions since many web servers do not yet understand them. Note that many of the problems associated with embedding the player in web pages spawn from missing or incorrect MIME typing.
6.2.3. HTTP streaming tutorial
To prepare, upload, and broadcast your RealAudio content from a HTTP web server, perform the following steps:
-
Plug your audio source into the "line in" on your soundcard.
-
Start a basic sound recording and editing application such as SoundForge, CoolEdit, or SoundEdit 16. Open the record window and make sure you are getting an incoming signal (green LEDs should be flashing up and down). Even though it's possible to record directly into the RealEncoder 5.0, you get better results with a standalone recording application that has editing capabilities. To enhance your sound file, remove unwanted noises and silence at the beginning of a track, add fade-ins and fade-outs, and normalize the sound file before converting it to a RealAudio clip.
-
Bring up a volume control window and adjust the amplitude gain for optimum recording levels. Try a few short tests to make sure the input gain is not too low or too high. If the input gain is set too high (if the meters peak into the red), you are likely to get distortion. If they are too low, you will get more system noise and dull-sounding files. When you are satisfied with the recording level settings, click Record.
-
Optimize and edit your file as mentioned in step 2 and save it as a WAV file. Refer to Chapter 4, "Optimizing Your Sound Files" for more in-depth information about file optimization and editing techniques.
-
Start the RealEncoder 5.0 application and select File
 New Session, as shown in Figure 6-5. An Advanced Mode dialog window
will appear, asking you to specify input and output settings. Under
input settings, you will need to specify whether you are encoding a
live signal or a prerecorded sound file. For the output settings, you
will need to specify the various codecs for different bandwidths that
you want. If you are not sure which settings to choose, try the
step-by-step Wizard Mode guide accessible from the dialog box.
New Session, as shown in Figure 6-5. An Advanced Mode dialog window
will appear, asking you to specify input and output settings. Under
input settings, you will need to specify whether you are encoding a
live signal or a prerecorded sound file. For the output settings, you
will need to specify the various codecs for different bandwidths that
you want. If you are not sure which settings to choose, try the
step-by-step Wizard Mode guide accessible from the dialog box.
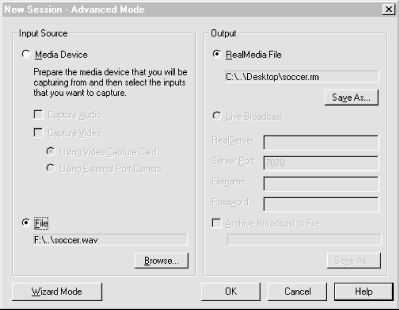
Figure 6-5. In RealEncoder's Advanced Mode window, you specify whether you are encoding a live signal or a prerecorded sound file.
-
Consider backwards compatibility. Even with the release of RealSystem G2, many listeners still use RealPlayer version 3.0 or lower. If a lot of your listeners are using older players, download a "legacy" 3.0 RealEncoder from the RealNetworks DevZone and create an 8 Kbps encoded .ra file. Then create an additional hyperlink on your web page to the alternative .ra file that's compatible with older RealPlayers.
You might also want to include a third link to a high fidelity file encoded with the new G2 RealProducer encoder for listeners with high-speed connections.
Under Input Source, select File to import your audio file. If you do not have a sound editor for recording, you can capture an audio input signal directly into the RealEncoder 5.0 by selecting Media Device and Capture Audio as shown in Figure 6-6.
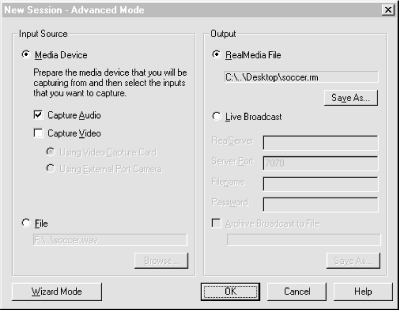
Figure 6-6. Select Media Device and check Capture Audio to capture an audio signal directly to RealEncoder.
-
Under Output Source, select RealMedia File then hit OK. A dialog box will appear asking you to specify a codec, the Media Clip Information, and checkboxes for Mobile Download and Selective Recording as shown in Figure 6-7. Mobile Download enables users to download audio clips in a format suitable for playback over an alternative mobile playback device.Selective Recording allows users to record and download audio clips to their desktop.

Figure 6-7. The RealMedia Output dialog box
-
After you have selected a good all-purpose codec such as Audio 28.8 Voice, click on Start, and the RealEncoder will be converted your audio file into a RealMedia file named yourfilename.rm. At this point, you should see the green LED lights. The LED amplitude meter should not trigger the red peak light indicator at the top of the graph. If the signal peaks up in the red zone, go back to the original file and use a sound editor to reduce the amplitude peak before encoding. When the encoder is finished converting your file, you'll see the message "Encoding Complete."
-
Use a text editor (such as Notepad or Simple Text) to create a metafile ( yourfilename.ram) containing a link to the RealAudio/RealVideo file ( yourfilename.rm). A metafile is a simple text document containing a URL that points to the RealMedia file. The contents of the file will look like this:
http://www.hostname.com/yourfilename.rm
-
On your web page, create a hyperlink to the metafile. The code should look like this:
<A HREF="yourfilename.ram">
If you want to use absolute paths, you must include both the hostname and the complete path. For example:
<A HREF="http://www.hostname.com/yourfilename.ram">
-
Upload the both the .ram file and the .rm file, along with the new HTML page, to the web server, and you should be up and running with a sound-enhanced web site.
All things audio
Exactly on the hour, a lone SGI Challenge computer in the middle of Washington, D.C., opens its audio input port, receives a five-minute live news update, converts the audio signal to the appropriate format, sends the file to the RealServer, and then streams it across the globe without the touch of a human hand.
For National Public Radio's webmaster, Robert Holt, processing and encoding NPR's daily programming is one of the greatest challenges of broadcasting RealAudio content. Robert created a custom Unix script to automate the entire RealAudio conversion and streaming process for NPR's hourly news update.
At 55 minutes after the hour, NPR's SGI Indy machine runs a time query that syncs the machine's internal clock with NPR's master clock. Then, at exactly one minute past the hour, the SGI opens its built-in audio port and records a five-minute live feed from NPR's broadcast sound studio. At seven past the hour, the SGI computer converts the five-minute AIFF file to a WAV file. A script then commands the RealEncoder to encode the file and place a time and date stamp into the .ra file. Finally, the script copies the file through a firewall to NPR's RealServer, replacing the previous five-minute news update file.
NPR's system configuration is a dedicated audio server consisting of a RealServer 5.0 running on a Sun Sparc 20 and Netscape Enterpriseweb server software running on an SGI Origin 200 server. The system includes 128 MB of RAM to ensure enough memory for NPR's thousand-stream license, and a 10 GB hard drive to hold NPR's RealAudio content. NPR has a partial T3 connection (equivalent of five T1 lines) to the Internet.
Installing the system was a simple process for Robert: "For the most part, installing the RealServer is a just a matter of configuring your MIME types and going through the automatic installation process." And there was little trouble keeping the system running smoothly. In fact, the hardest part about maintaining the RealAudio System is not the server but the content. "It's easy to get the system up and working. The hard part is feeding the beast new content and retooling your audio files with the newest codecs."
Robert works as part of a three-person team, editing, encoding, and administering the delivery of over five hours of daily programming, in addition to the five-minute hourly news update. Since the installation of NPR's RealServer in 1995, Robert has edited, processed, and served many RealAudio files. Here are some of his tips for getting quality results from RealAudio:
Use the highest-quality source audio files you can get. Internet compression algorithms, especially higher-bandwidth 40 and 80 Kbps codecs magnify mistakes or glitches in the original recording. NPR is fortunate enough to use source files that have been recorded in their custom $150,000 broadcast studio, with top-of-the-line Neumann condenser microphones. All the audio is recorded from the very beginning with the proper equalization and compression. Note that even if you do not have a deluxe studio, there are steps you can take to capture high-quality source material. See Chapter 3, "Capturing Original Source Material" and Chapter 4, "Optimizing Your Sound Files" for more information.
Make sure you have plenty of disk space for all of your content. An hour of content encoded with the RealAudio 28.8 algorithm fills 8 MB. All your programming, especially if you keep archives on disk, can quickly add up to a huge amount of disk space.
Make sure your connection to the Internet is stable and that you are using a high-quality Internet Service Provider. Call your ISP and check the data throughput with a program such as Net Medic.
Make sure your ISP has enough bandwidth to deliver all your streams. One of the most common problems with the RealAudio System is not the system performance or the CPU speed, but inadequate bandwidth. Typically, bandwidth on the Internet router gets swallowed up first. There is not much you can do about that, but you can make sure your connection to the Internet is big enough to meet your needs.
If you are broadcasting from your own in-house server, always watch system performance. Keep an eye on CPU usage and keep the load balanced between two servers. Always pay attention to memory and system speed.
 |  |  |
| 6. Encoding, Serving, and Streaming Sound with RealAudio |  | 6.3. Professional webcasting |

Copyright © 2002 O'Reilly & Associates. All rights reserved.