
3.2. Recording techniques
Capturing a signal to tape or disk clean of excessive reverberation or noise is critical. You can always add effects later to enhance or alter a sound, but it is difficult to remove distortion and noise from the original source. Compression in the encoding process also degrades your sound slightly. The higher the quality of the original source material, the higher the quality of the final output to the Web. In addition to selecting the right equipment, properly setting up your studio and reducing noise on location also results in a cleaner signal.
A studio environment is optimized for the best possible acoustics in music and voice recording. In a typical studio situation, you also work with well-rehearsed, professional voice or music talent and have access to a wide selection of high-quality microphones and effects processors.
In contrast, field recording requires capturing sounds in less than optimal conditions. Because most field recordings take place outdoors, it is difficult to prevent poor acoustics and the intrusion of extraneous noise. Furthermore, in a field-recording situation, your equipment is limited to a set of microphones and a small portable DAT machine, making it likely you will capture spontaneous, unrehearsed dialogue and sounds.
For both environments, there are recommended ways of dealing with unwanted sounds.
3.2.1. Studio recording
If you are recording voice or music talent on a regular basis, you will want to reconfigure an existing room to optimize the acoustics, or better yet, build a new room specifically designed for audio recording. A good sound studio should have optimal acoustics for music or voice (as described later in this section) and isolation from extraneous noises.
Ideally, your studio should isolate recording and engineering activities in separate rooms. This completely removes equipment noise from your recording environment. If you have only one room for recording, mixing, and monitoring your sound, implement some or all of these suggestions:
-
Isolate and place noisy, fan-cooled hard drives or power amps into a padded box or a closet with enough air circulation around the components.
-
Place the microphone as far away from the equipment as possible, and point it away from any noise sources.
-
Cover the wall behind the voice talent with four-inch acoustical foam.
-
Record at night, after office hours if your recording studio is in a busy office environment.
3.2.1.1. Proper room acoustics: capturing a "dry" signal
We perceive spatial distance audibly by the direction or angle of strong sound reflections. Minimizing reflections in your studio prevents these unwanted "directional" clues from being permanently imbued on your source recording. If you record a direct signal with as little reflection as possible, you can add artificial reverberation to recreate any acoustic environment. For voice-over work, recording a " dry" signal without reverberation provides the maximum flexibility to "sweeten" the sound with digital effects in the post-production process. If your source recording has highly distinctive characteristics, it is nearly impossible to remove those reflections in post-production.
To determine the characteristics of your room, try this simple test. Wait for a quiet moment and clap your hands loudly or yell. Listen to the amount of reverberation and reflections produced. If you hear an echo or large amounts of reverberation, consider using a different room entirely. If you hear a pitch or a ringing sound, a fair amount of acoustical treatment will be needed. An example of the use of acoustic foam is shown in Figure 3-6. If you hear only a slight echo or reverberation, which will be the case in most small, carpeted rooms in an office or home, you will need to make only a few minor adjustments to achieve good acoustics.

Figure 3-6. A recording studio with a small strip of acoustic foam placed in the corner to dampen unwanted reflections
Saving high-quality masters
Always record your source audio with the highest sample rate and bit-depth possible. 16-bit, 44,100 Hz audio is the standard for high-quality source files. 24-bit masters are even better, but probably are not necessary for most web audio applications. For recording web audio, keep in mind that increased bandwidth in the future will allow for higher quality streaming audio. Always save your original high-quality source file in the event you want to convert it into a higher-quality format at a later time, or to incorporate it into other media such as television or film.
3.2.1.2. Optimizing your recording environment
Isolating your studio from outside street noise is difficult. Anywhere air can pass into your studio -- under doors, through cracks in window panes -- noise will follow. You can reduce the intrusion of most high-pitched frequencies by placing rubber sealing strips along the sides of doors and windows and patching any other spots in your studio where air can pass through. Isolating your studio from bass frequencies is far more difficult. Unlike most high-frequency sounds, bass frequencies travel easily through walls.
True isolation from the sounds of passing cars or airplanes is achieved by constructing a room within a room where the walls of the outer room contain substantial mass, and the inside room is carefully isolated or physically disconnected from the walls of the outer room. In most cases, this process is far too expensive and laborious for small-scale audio production. If you are recording in an urban environment, select a room in the middle of a building or one with extra-thick walls.
Music recording
For recording music, you will want a "livelier" room with more reverb. A room with hardwood floors generally produces more pleasing acoustics than will a sound-deadening room with wall-to-wall carpet.
The problems that arise from recording in small rooms are associated with unwanted reflections and echoes. Hard, flat surfaces, such as hardwood or tile flooring, bare sheetrock or cement walls, and glass windows are problematic because they reflect a slightly delayed copy of the original sound back to the microphone (in the form of an echo). This echo effect can be exacerbated if the sound is further reflected between parallel walls.
Placing thick acoustic foam on strategic spots on walls and ceilings is the easiest solution to reduce reflections. The usual strategy is to place foam opposite bare spots in a checkerboard pattern. The most common mistake is to use too much foam, which leads to unwanted bass build-up, since foam has little effect on low frequencies. If you cannot afford acoustic foam, you can improvise with additional wall hangings, rugs, bookshelves, and other furniture, as well as with pillows, blankets, or mattresses. These accessories help absorb the sound waves and create diffuse surfaces to reflect the audio away from the microphone.
Recording voice-overs: tips from an expert
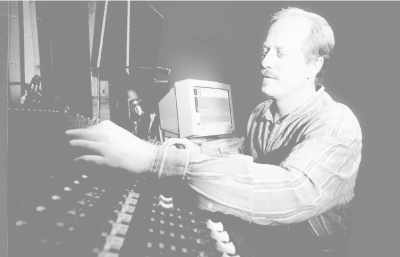
Reid Ridgway has been working with digital audio for 15 years. He is the owner and chief recording engineer for C.S. Audio Visual, a multimedia and recording studio in Santa Cruz, California. Ridgway's interactive sound design credits include MCA Records' On the Road with B. B. King CD-ROM for Mindscape, and Apple Computer's Twentieth Anniversary Mac welcome presentation. Reid also produces sound for television and film. See Figure 3-7.
Figure 3-7. Reid Ridgway at the mixing controls of his Santa Cruz sound studio where the production of MCA Record's On the Road with B. B. King took place
In addition to proper room acoustics and microphone selection, Ridgway says the key steps to capturing a good voice-over are microphone placement, talent selection, and coaching.
Microphone placement. Place the microphone approximately six to eight inches from the speaker's mouth. For a richer, deeper bass tone, place it a bit closer. Point the microphone slightly off-axis to the speaker's mouth to prevent air from blowing directly into the microphone's capsule. Place a pop screen between the speaker's mouth and the microphone to further reduce wind noises and unwanted P's and S's.
To determine optimal mic placement, ask the voice-over artist to speak at different distances and angles from the microphone. Listen to the sound change as the voice-over artist moves about and take note of the best distance or angle.
If you are using an inexpensive microphone, pay close attention to its placement. The pick-up characteristics of cheaper microphones vary widely. It is generally best to place a less-sensitive microphone as close as possible to a person's mouth to get a louder direct signal with less room noise.
Selecting a voice-over artist. Have three to four artists audition with a sample script in front of your client. Ideally, use a voice-over artist with theatrical experience and an even quality of voice who has some familiarity with microphone technique. If you can, hire the professional yourself instead of letting the client do it. Avoid getting stuck with a dry-sounding employee with little or no voice-over experience. A company representative may be handy at pointing out terms and jargon, but don't let them explore a new career in front of the microphone.
Coaching. Voice artists are essentially actors reading from scripts in a studio environment without an audience or the context of human interaction. You have to provide the context for the artist. If you allow them simply to read a script without feeling or inspiration, the results will be disappointing. Coaching is especially important if you are unable to get a professional voice-over artist.
3.2.1.3. Desktop audio recording
Managing your studio's acoustics, microphone placement, and recording talent are the more difficult aspects of studio recording. Actually getting the sound onto your desktop is easy. Most sound recording and editing applications use familiar tape deck controls, such as play, record, pause, and stop. Macromedia SoundEdit 16's controls are shown in Figure 3-8. You'll also note a less familiar button -- the loop control -- activated; it continually repeats the selected audio.

Figure 3-8. The controls window in SoundEdit 16 with (from left to right) record, stop, pause, play, and loop buttons
The most important control in the recording process is the
recording
level. In SoundEdit 16, this control is located under Menu![]() Windows
Windows![]() Levels,
and is shown in Figure 3-9. If your
microphone is plugged into your computer and your sound card is
properly configured, you will see green LED lights bounce up and down
as the microphone picks up the signal. The green light represents the
signal as it approaches 0dB; the red light indicates that the signal
has gone over 0dB and is distorting your audio. Adjust the levels as
you test the microphone placement until the signal stays completely
in the green. We explore using SoundEdit 16 more
in Chapter 4, "Optimizing Your Sound Files".
Levels,
and is shown in Figure 3-9. If your
microphone is plugged into your computer and your sound card is
properly configured, you will see green LED lights bounce up and down
as the microphone picks up the signal. The green light represents the
signal as it approaches 0dB; the red light indicates that the signal
has gone over 0dB and is distorting your audio. Adjust the levels as
you test the microphone placement until the signal stays completely
in the green. We explore using SoundEdit 16 more
in Chapter 4, "Optimizing Your Sound Files".
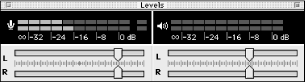
Figure 3-9. The Levels window in SoundEdit 16
3.2.2. Field recording
Of course, not all the audio on your web site will be recorded in a studio environment. Capturing audio on location complicates matters considerably. Field recording requires the use of a lightweight, portable DAT machine with phantom power and high-quality built-in mic pre-amps. Microphone selection and placement are especially crucial to capturing good sound on location. A few steps that also make for a positive experience include packing a foam microphone covering or windsock to protect against wind, carrying a backup microphone with an alternate pick-up pattern, or simply moving the microphone closer to the sound source. The following sections include some recommended methods for capturing sound in different scenarios.
3.2.2.1. Live concerts and events
There are two primary methods for recording the sound of live events and concerts: capturing the live stereo output of the public address mixing console or placing two condenser microphones in front of the stage or PA speakers. Capturing the mix from the PA console is more convenient, but using your own microphones generally results in a higher-quality recording.
All amplified events have some type of mixing console to blend the various microphones onstage into two left and right channels for output to the main speakers. A direct signal from the stage or main concert mixing board produces the cleanest recording without crowd noises and unwanted room reflections.
Connect one of the extra left and right output channels directly into your portable DAT machine. Check ahead of time that you have the proper adapter cables to connect your DAT to the mixing board outputs. Whenever possible, you should use XLR three-prong cables to connect to the back of the mixing board. If your portable DAT machine does not have XLR inputs, you will need an XLR-to-quarter-inch or stereo mini-cable adapter. (See Appendix A, "Creating the Ultimate Web Sound Studio: Buyers Guide and Web Resources" for more on XLR and adapters.)
If you are at an event or concert without a PA system or you do not have access to the main mixing console, use a microphone plugged into a portable DAT to capture the sound source. Set up a six- to eight-foot tall microphone stand toward the middle or back of the concert hall at the center stage position. Attach two small diaphragm condenser microphones to the top of the stand and point them toward the stage. You can place the microphones in an "x" position, as shown in Figure 3-10, or parallel to each other and six feet apart, pointed slightly outward to the left and right sides of the stage, as shown in Figure 3-11.
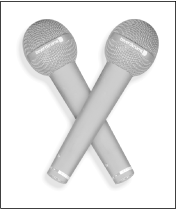
Figure 3-10. Microphones placed in an x crossing position
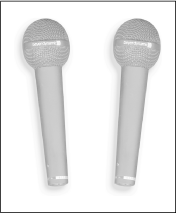
Figure 3-11. Microphones placed in parallel, pointing slightly outward
3.2.2.2. On-location interviews and panel discussions
In-studio interviews are not always possible and, in some cases, not even preferred. Even if the acoustics and equipment selection are less than optimal, it is best to interview people in an environment in which they're comfortable. An on-location interview can be captured easily with a small portable DAT machine and a microphone. Set up your equipment efficiently and try to make the recording experience as transparent as possible. Often people are intimidated by speaking into a microphone or are uncomfortable just knowing every word is being captured on tape.
Telephone interviews
The easiest way to capture a telephone interview is to use an inexpensive telephone recording box that sits between the wall outlet and your phone. Radio Shack's Telephone Recording Connector receives a standard RJ11 phone jack cord and contains a stereo mini output jack. To record the telephone interview, simply plug the stereo mini cable into a portable DAT machine.
Depending on the level of extraneous noise in your immediate environment and the number of voices you are capturing, use one of these techniques to record interviews:
-
A small lavaliere clip-on microphone attached to the interviewee's shirt and placed directly below his or her mouth is best for recording in noisy environments. An omnidirectional condenser microphone placed on a tabletop stand is best for capturing several voices in a quiet environment.
-
A cardioid microphone placed on a tabletop stand works well for capturing a single voice in a quiet environment. (Place the microphone on a thick towel or foam pad to reduce thumps and eliminate the high-end coloration you often get from sound reflections off the tabletop.)
-
Use a single omnidirectional microphone to record multiperson interviews and group discussions. You need to sit everyone at a round or square table equidistant from the microphone in order to capture all the voices at equal volume.
3.2.2.3. Capturing ambient sounds
To record ambient environmental sounds such as a city street with cars passing or a distant bird call in a forest, use an omnidirectional microphone with a wind protective foam covering (known as a windsock). A shotgun microphone works best for capturing the direct signal of a distant sound source.
Panel particulars
A single microphone will not work if your recording environment is too noisy or people are sitting side by side in a long row. For panel discussions, use a separate lavaliere or cardioid microphone for each person's voice. Run the microphones through a small eight- or twelve-channel mixer with built-in pre-amps. Mix the signals down to a stereo signal and run the output to a portable DAT machine.
The greatest challenge to ambient recording is capturing soft or distant sounds without increasing the level of system noise. Using high-quality, professional gear is the best way to ensure good ambient recording. If you are capturing the soft sounds of a distant bird call, for example, and use a consumer-grade portable DAT machine, you will instantly notice the presence of system noise in the form of a continuous "shhh." This is because boosting the input levels increases the system noise. Professional-grade DAT machines have higher quality mic pre-amps and do a better job of boosting the signal without introducing noise.
If you are using a consumer-grade DAT machine, avoid turning the input levels up too high. To capture a louder signal, position your microphone closer to the sound source instead.
 |  |  |
| 3. Capturing Original Source Material |  | 3.3. Summary |

Copyright © 2002 O'Reilly & Associates. All rights reserved.