6.4. Packaging Tools
The following packaging options come with Mac OS X.
- PackageMaker
- Found in /Developer/Applications, PackageMaker can be used to create packages that are bundles consisting of all the items that the Mac OS X Installer (/Applications/Utilities) needs to perform an installation. PackageMaker can also create metapackages, which can be used to install multiple packages at the same time.
- gnutar and gzip
- The Unix tape archive tools (tar and gnutar; gnutar is preferred because it can handle longer pathnames) are used to bundle the directories and resources for distribution. GNU Zip (gzip) is used to compress the tar archives to make file sizes as small as possible. Using these tools is generally the simplest way to copy a collection of files from one machine to another.
- Disk Copy
- One of the easiest ways to distribute an application is to use Disk Copy (/Applications/Utilities) to create a disk image. You can use Disk Copy to create a double-clickable archive, which mounts as a disk image on the user's desktop. From there, the user can choose to mount the disk image each time the application is run, copy the application to the hard drive (usually to the /Applications directory), or burn the image to a CD.
Each of these tools will be discussed separately in the sections that follow.
6.4.1. Using PackageMaker
Apple's native format for packaging and distributing software is PackageMaker. Packages created with PackageMaker have a .pkg extension. When a user double-clicks on a package, the Installer application (/Applications/Utilities) is invoked and the installation process begins. These packages are bundles that contain all of the items the Installer needs.
You can also use PackageMaker to create metapackages for installing multiple packages. Metapackages, or bundles, contain meta-information, files, and libraries associated with a given application. Packages can also contain multiple versions of an application; typically, both Mac OS X and Classic versions.
PackageMaker documentation is available in the Help Viewer at /Developer/Documentation/DeveloperTools/PackageMaker/PackageMaker.help.
The basic components of a package are:
-
A bill of materials (.bom) binary file that describes the contents of the package. You can view the contents of a bill of materials with the lsbom command.
-
An information file (.info) that contains the information entered in the GUI application PackageMaker when the package was created.
-
An archive file (.pax) that contains the complete set of files to be installed by the package. (This archive file can be compressed, giving it a .pax.gz extension.) This is similar to a tar archive.
-
A size calculation file (.sizes) that lists the sizes of the compressed and uncompressed software.
-
Resources that the installer uses during the installation, such as README files, license agreements, and pre- and post-install scripts. These resources are typically not installed; instead, they are used only during the installation process.
6.4.1.1. Setting up the directory
To demonstrate how to create a package, we'll use the hellow.c and hellow.1 examples shown earlier in this chapter (in Example 6-1 and Example 6-2).
PackageMaker expects you to set up the files using a directory structure that mirrors your intended installation. So, if you plan to install hellow into /usr/bin, and hellow.1 into /usr/share/man/man1, you'll need to create the appropriate subdirectories under your working directory.
Suppose that your hellow project resides in ~/src/hellow. To keep things organized, you can create a subdirectory called stage that contains the installation directory. In that case, you'd want to place the hellow binary in ~/src/hellow/stage/bin and the hellow.1 manpage in ~/src/hellow/stage/share/man/man1. The makefile shown in Example 6-4 compiles hellow.c, creates the stage directory and its subdirectories, and copies the distribution files into those directories when you run the command make prep.
Example 6-4. makefile for hellow
hellow:
        cc -o hellow hellow.c

prep: hellow
        mkdir -p stage/bin
        mkdir -p stage/share/man/man1
        cp hellow stage/bin/
        cp hellow.1 stage/share/man/man1/
WARNING: The directories you create in the stage directory should have the same permissions as the directories into which you are installing the package. If your umask is set so that the permissions are not right, use chmod in your makefile to correct the permissions after you create the staging directories.
To get started, you need only hellow.c, hellow.1, and makefile. When you run the command make prep, it compiles the program and copies the files to their locations in the stage directory. After that, you're ready to launch PackageMaker and bundle up the application.
6.4.1.2. Creating the package
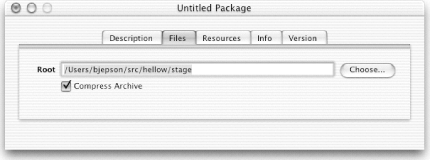
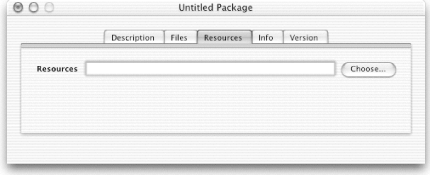
Run PackageMaker and set the options as appropriate for your package. Figure 6-2 through Figure 6-6 show the settings for the hellow sample. The options are as follows:
- Description tab
-
Contains items that describe the package so the person installing the
package can find its name and version.
- Title
- The title, or name, of the package.
- Version
- The version number of the package.
- Description
- A description of the package.
- Delete Warning
-
A custom warning message to display when a user removes the package.
Mac OS X does not have a utility to uninstall a package, though.
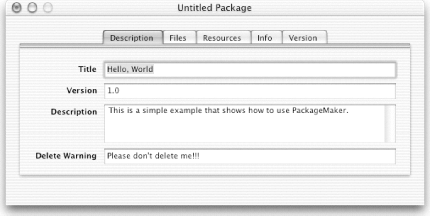
Figure 6-2. PackageMaker's Description tab
- Files tab
- Contains information related to file locations and compression.
- Resources tab
- Specifies the location of extra resources.
- Info tab
-
Specifies miscellaneous package options.
- Default Location
- This option indicates the default target location for the package.
- Restart Action
- If this option is set to Required Restart, the system must be rebooted when the installation is finished. Other options include No Restart Required, Recommended Restart, and Shutdown Required.
- Authorization Action
- Set this option to Root Authorization if the user needs to supply authentication to install the package. (This escalates the user's privileges to root temporarily.) Other options include No Authorization Required and Admin Authorization (if the user needs only to be an Admin user, but does not need to escalate privileges). If the package will be installed into a protected directory (such as /usr), you should use Root Authorization.
- Allows Back Rev.
- This option allows the user to install an older version of the package over a newer one.
- Install Fat
- This option supports multiple architecture binaries.
- Relocatable
- This option allows the user to choose an alternate location for the installed files.
- Required
- This option implies that certain packages (when installed as part of a larger install) are required.
- Root Volume Only
- This option requires that the user install the package on the current root volume (the volume from which you booted Mac OS X).
- Update Installed Languages Only
- When you update a package, this option will only update the currently installed localization projects.
- Overwrite Permissions
-
If the installer overwrites an existing file or directory, this
option will cause it to change the permissions to match what
PackageMaker found in the staging area.
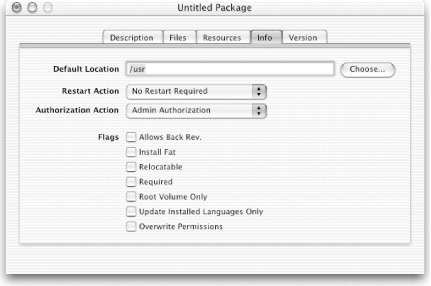
Figure 6-5. PackageMaker's Info tab
- Version tab
-
Specifies detailed version information.
- Display name
- The name of the package to use when reporting its version
- Identifier
- A unique package name
- Get-Info string
- The version number to use when inspecting the package in the Finder with Get Info
- Short version
- An abbreviated version number
- Version: Major
- A major version number (the 1 in 1.0)
- Version: Minor
-
A minor version number (the 0 in 1.0)
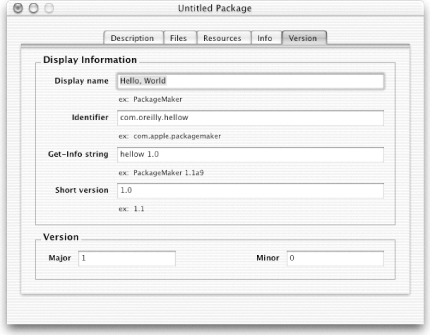
Figure 6-6. PackageMaker's Version tab
After you have filled in the package settings, select Tools
 Create Package to create the
.pkg file. To install it, double-click on the
file and install as you would any other Mac OS X
package.
6.4.2. Using GNU tar
For Unix-based software that does not involve resource forks or creator types, gnutar and gzip can be used to create a .tar.gz or .tgz tarball. This type of tarball preserves paths, permissions, and symbolic links. It also supports authentication and compresses well. Tools to uncompress the tarball are available for many platforms.
The automated creation of such a tarball can be worked into the same makefile that is used to build the software. Preservation of resource forks is tricky, but possible, in this method. For example, the following command preserves Macintosh resource forks (where foo/ is a directory):
gnutar -pczf foo.tgz foo/
Every good tarball has a single top-level directory that contains everything else. You should not create tarballs that dump their contents into the current directory. To install software packaged this way, you can use the following command:
gnutar -pxzf foo.tgz
This simply unpacks the tarball into the file and directory structure that existed prior to packaging. Basically, it reverses the packing step. This method can be used to simply write files to the appropriate places on the system, such as /usr/local/bin, /usr/local/lib, /usr/local/man, /usr/local/include, and so on.
WARNING: When creating packages, you should keep your package contents out of directories such as /etc, /usr/bin, /usr/lib, /usr/include, or any top-level directory reserved for the operating system, since you have no way of knowing what a future software update or Mac OS X upgrade will include. For example, the Fink project stays out of Mac OS X's way by keeping most of its files in /sw. We suggest that you use /usr/local for the packages that you compile.
This packaging method can also be arranged so that the unpacking is done first in a temporary directory. The user can then run an install script that relocates the package contents to their final destination. This approach is usually preferred, since the install script could be designed to do some basic checking of dependencies, the existence of destination directories, the recataloging of libraries, etc. You could also include an uninstall script with your distribution.
The disadvantages of the tarball method of distributing software are:
-
There is no built-in mechanism for keeping track of which files go where.
-
There is no built-in method for uninstalling the software.
-
It is difficult to list what software is installed and how the installed files depend on each other or on other libraries.
-
There is no checking of dependencies and prerequisite software prior to the installation.
These tasks could be built into install and uninstall scripts, but there is no inherently uniform, consistent, and coherent method for accomplishing these tasks when multiple software packages are installed in this manner. Fortunately, more sophisticated methods of packaging, distributing, and maintaining software on Unix systems have been devised, such as Red Hat's RPM, Debian's dpkg, and Apple's PackageMaker.
6.4.3. Disk Images
Many applications in Mac OS X do not require a special installer. Often, they can be installed by simply dragging the application's folder or icon to a convenient location in the directory structure, usually the /Applications folder. Applications that are distributed this way are typically packaged as a disk image. A disk image is a file that, when double-clicked, creates a virtual volume that is mounted on the user's desktop, as shown in Figure 6-7.
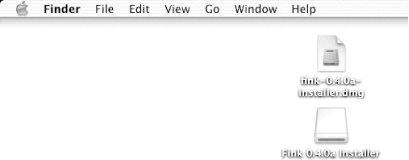
Figure 6-7. A disk image and its mounted volume
TIP: You can turn a Java application into a .app with MRJAppBuilder (/Developer/Applications). Since Mac OS X comes with Java, you can place your Java application on a disk image, secure in the knowledge that any Mac OS X user can double-click on the application to launch it.
Disk images can be created either using Disk Copy (/Applications/Utilities) or via the command line (described later). There are two types of disk images. One is a dual fork disk image with an .img extension, and the other is a single fork disk image with a .dmg extension. A dual fork disk image requires additional (MacBinary) encoding in order for it to be transferred across networks. The single fork version is preferred for distributing software in Mac OS X, as it requires no additional encoding.
The Unix command df will reveal a disk image as
a mounted volume, and it will appear in the
/Volumes directory. When you are done with the
mounted volume, it can be ejected to unmount it. This is accomplished
by clicking on the volume (in Figure 6-7, the
mounted volume is named Fink 0.4.0a Installer) to select it and going
to File  Eject (
 -E).
You could also drag the mounted volume to the Trash.
TIP: If you've used earlier versions of the Mac OS, you're probably familiar with the Put Away command (-Y); however, that command no longer exists for Mac OS X. Instead, you must use Eject to unmount a disk image.
6.4.3.1. Creating a disk image with Disk Copy
To create a disk image using Disk Copy, perform the following steps:
-
Launch Disk Copy (/Applications/Utilities).
-
Select File
 New
New  Blank Image.
Disk Copy prompts you for a name, location, size (the maximum size is
limited by available disk space), volume name, format, and encryption
options, as shown in Figure 6-8. If you choose to
enable encryption, Disk Copy will prompt you for a passphrase.
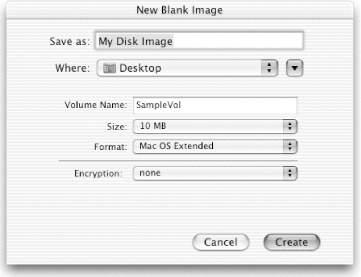
Figure 6-8. Creating a new blank image with Disk Copy
-
Name the new image "My Disk Image" and choose the Desktop as the location. Set the Volume Name to "SampleVol" and click Create. The new image will be created as My Disk Image.dmg and mounted as SampleVol.
-
Double-click on the disk icon to open the empty volume in a Finder window, as shown in Figure 6-9.

Figure 6-9. A blank disk image, ready to be loaded up with files
-
Select File
 New Finder Window (or
 -N) to open a new Finder window, where
you can select the files you want to place in the disk image, as
shown in Figure 6-10.
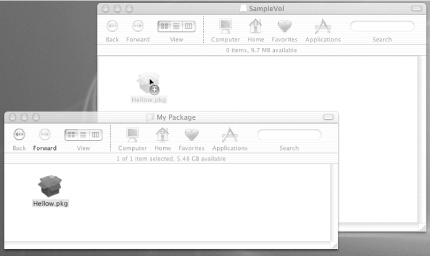
Figure 6-10. Copying a file to the disk image
-
To copy the files to the mounted volume, select and then drag the items into the empty SampleVol window.
-
Once you've placed the files into the disk image, eject this disk (
 -E, or drag SampleVol
to the Trash).
-
Return to the Disk Copy application, select File
 Convert Image, locate the disk image file in the Convert Image
window, and click on the Convert button, as shown in Figure 6-11.
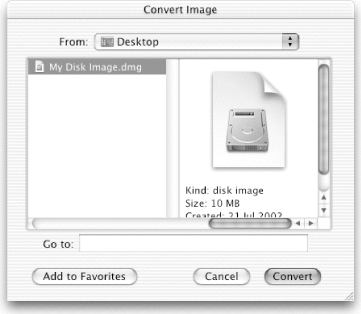
Figure 6-11. Choosing the image to convert
-
The Convert Image window will change. Enter either a new name or the same name in the Save As field, and then select read-only from the Image Format pull-down menu, as shown in Figure 6-12. (You can also compress the disk image from this selection.)
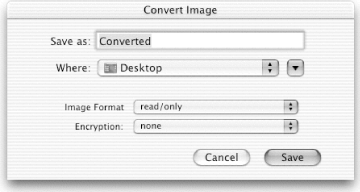
Figure 6-12. Converting an image
-
Click the Convert button. If you've given the disk image the same filename as the original image you created, an alert window will appear, asking you to confirm whether or not you want to replace the older file with the new one. Click Replace to finish the process.
6.4.3.2. Creating a disk image from the command line
The following example illustrates how to create a disk image at the command line.
WARNING: To avoid accidentally wiping out a physical disk, make sure you are logged in as an unprivileged user when you use these commands. Do not log in as root or use sudo.
-
Change (cd ) to the directory where you want to create the disk image:
cd ~/Documents
-
Create the disk image of a given size (10 MB in this example) using hdiutil:
hdiutil create -megabytes 10 Sample.dmg -layout NONE
-
Associate the disk image with a device without actually mounting it:
hdid -nomount Sample.dmg
This attaches the image to the system under an unused device, such as /dev/disk2. (hdid will report the device, or you can use hdiutil info to see all of the attached images.)
-
Format the disk as HFS+ with newfs_hfs. (Replace REAL_DEVICE with the actual device used, such as /dev/disk2.) Be careful with this command--if you run it on your hard drive, it could wipe out your disk.
newfs_hfs -v SampleVol /dev/REAL_DEVICE
-
Detach the newly formatted device:
hdiutil eject /dev/REAL_DEVICE
-
Mount the writable image as a volume. Since you named it SampleVol when you issued the newfs_hfs command, it will appear on the desktop as SampleVol:
hdid Sample.dmg
-
Use the Finder or command-line tools to write to the volume SampleVol. It will appear on your desktop and will be available in /Volumes/SampleVol.
-
When you are done writing to the volume, you can eject it in the Finder, using one of the methods described earlier.
-
Copy the disk image to a compressed, read-only image named Ready4Dist.dmg:
hdiutil convert -format UDZO Sample.dmg -o Ready4Dist.dmg
Whenever you want to mount this volume again, you can double-click the file Ready4Dist.dmg in the finder. Note that the writable disk image Sample.dmg is not destroyed in this process.
There were several names involved with that last example, so here's a refresher:
- Sample.dmg
- A writable 10 MB disk image created in Step 2.
- /dev/disk2, /dev/REAL_DEVICE
- The system device under which you attached Sample.dmg in Step 3.
- SampleVol
- The volume name you gave to the disk image when you formatted this in Step 4.
- Ready4Dist.dmg
- A read-only, compressed copy of Sample.dmg, created in Step 9. Since it's a copy, it has the same volume name as Sample.dmg: SampleVol.
6.4.4. Distributing Your Image
Once you've created a disk image, you can share it
with the world. Put the image up on a web server or FTP server for
others to enjoy, share it on your iDisk, or burn it to a CD using
Disk Copy (select File  Burn
Image).

Copyright © 2003 O'Reilly & Associates. All rights reserved.


