
17.7. The Photo Image Type
Like Bitmap and Pixmap image types, a Photo supports -data and -file options. Unlike those simpler images, Photos additionally support several image formats and manipulation methods. The Photo constructor attempts to auto-detect the format of an image, but failing that, we can state it explicitly. The -format option is a case-insensitive string that can be one of "bmp", "ppm", or "gif" (or "png", "jpeg", or "tiff", if you have those image extensions installed).
All current Photo image formats are binary data, so to incorporate them into our Perl/Tk code we need to encode the data into printable characters. All Photo image formats that support the -data option require that the data be Base64 MIME encoded. Given a filename, encode_photo_data does just that and returns the resulting string:
sub encode_photo_data {

    my($file) = @_;

    use MIME::Base64;
    my ($bin, $data, $stat);

    open PHOTO, $file or die "Cannot open $file: $!";
    while ( $stat = sysread PHOTO, $bin, 57 * 17 ) {
        $data .= encode_base64($bin);
    }
    close PHOTO or die $!;
    die "sysread error: $!" unless defined $stat;

    $data;

} # end encode_photo_data
The Photo data method can do the encoding for us as well. All we need to do is specify the format:
my $encoded_data = $photo->data(-format => 'png');
In either case, you can print the encoded results to a file and insert the data directly into your Perl/Tk program.
Unfortunately, the Photo format handlers are not created equally where -data is concerned. Currently the PPM handler doesn't support -data at all, and the Photo constructor won't recognize a GIF format without a -format hint. Table 17-1 lists the photo formats.
Table 17-1. Photo formats
|
Photo format |
-data supported? |
-format required to recognize -data? |
|---|---|---|
|
BMP |
Yes |
No |
|
PPM |
No |
n/a |
|
GIF |
Yes |
Yes |
|
PNG |
Yes |
No |
|
JPEG |
Yes |
No |
|
TIFF |
Yes |
No |
Photos allow direct manipulation of the image pixels. We'll look at the copy method in detail shortly. It allows us to copy selected pixels from one Photo to another or to subsample, zoom, clip, rotate, or re-aspect a Photo. Here a list of the other Photo methods:
- $photo->blank
- Blanks the Photo so it's transparent
- $photo->get
- Fetches the RGB value of a pixel
- $photo->put
- Stores an array of RGB pixel values
- $photo->read
- Reads an array of pixels from a file into the Photo
- $photo->redither
- Redithers the Photo
- $photo->write
- Writes an array of Photo pixels to a file
17.7.1. Creating a Color Palette with the put Method
We can spiff up the native option menu example from Chapter 12, "The Menu System". Rather than displaying textual menu items, create tiny Photo color swatches and show them instead. Figure 17-8 shows an example.
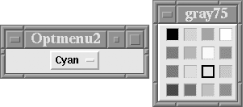
Figure 17-8. A multicolumn color palette menu; cyan is selected
As a reminder, the menu items are radiobuttons, each of which accepts an -image option used when the radiobutton is not selected and a -selectimage option used when the radiobutton is selected. Essentially, we'll create two Photo images per radiobutton, a color swatch for the -image option, and a color swatch with a black border for the -selectimage option.
Examine Figure 17-8 closely, and note that each of the images (excluding cyan, which is selected) has a sunken relief. This illusion is created by drawing a one pixel wide line of the color $topborder along the top and left edges of the color swatch and a similar line of the color $bottomborder along the bottom and right edges. The top and left edges are a darker shade of gray, fooling us into thinking that the light originates from the upper left.
my $topborder    = 'gray50';
my $bottomborder = 'gray75';

foreach my $i (0 .. $#colors) {
Each menu item has a -label option that is its actual color name, such as 'red4', 'NavyBlue', or 'Cyan', which we'll use to paint the color swatch. To begin, create an empty Photo 16 pixels on a side that is addressed using a scheme just like Canvas coordinates: (0, 0) is the upper-left coordinate and (15, 15) is the lower-right coordinate.
Now it gets a little tricky. The first put method draws the top border line, so we want to paint pixels 0 through 15 in row zero. The -to option specifies the rectangular region to color, but the last row and last column of the rectangle are not drawn! So the 2-row by 17-column rectangle defined by the coordinates (0, 0) and (16, 1) actually paints one row of 16 pixels. The next three put calls complete the relief border, and the last put colors the remaining interior pixels.
    my $color = $menu->entrycget($i, -label);
    my $p = $mw->Photo(qw/-width 16 -height 16/);
    $p->put($topborder,    qw/-to  0  0 16  1/);
    $p->put($topborder,    qw/-to  0  1  1 16/);
    $p->put($bottomborder, qw/-to  1 15 16 16/);
    $p->put($bottomborder, qw/-to 15  1 16 15/);
    $p->put($color,        qw/-to  1  1 15 15/);
The second image (-selectimage) is similar to the first, except the border is solid black and two pixels wide.
    my $r = $mw->Photo(qw/-width 16 -height 16/);
    $r->put(qw/black          -to  0  0 16  2/);
    $r->put(qw/black          -to  0  2  2 16/);
    $r->put(qw/black          -to  2 14 16 16/);
    $r->put(qw/black          -to 14  2 16 14/);
    $r->put($color       , qw/-to  2  2 14 14/);
Now reconfigure the menu item and specify the two images.
    $menu->entryconfigure($i, -columnbreak => 1) unless $i % 4;
    $menu->entryconfigure($i,
        -image       => $p,
        -hidemargin  => 1,
        -selectimage => $r,
    );

}
And finally, add a tearoff so we can float the palette wherever we want.
$menu->configure(-tearoff => 1);
17.7.2. Using put to Create a Progress Bar with a 3D Look
We can use Photo's put method to generate dynamic images with minimal overhead. And, if we paint the pixels just right, we can add a lighting effect that simulates depth. The following progress bar image was borrowed from Mac OS 9 by initiating a copy and grabbing the Mac's progress bar in action, zooming in "fat bits" mode, and sampling individual pixels to determine their component RGB color values.
Like the previous color swatch example, the light originates from the left and behind us, slightly above the horizon, as shown in Figure 17-9. The actual Mac progress bar consists of three main segments: the concave base on the left, a repeating column of pixels that represent the progress bar proper, and a dark cap on the right. Taken together, the three segments emphasize the desired lighting and 3D effect. This example ignores the right-side cap, but see Chapter 15, "Anatomy of the MainLoop", where we turn this progress bar example into a real Perl/Tk mega-widget and treat the cap too. (We can imagine other uses for our progress bar; for instance, a volume meter that indicates the instantaneous level of an audio channel.)

Figure 17-9. A 3D progress bar image
The Mac progress bar is 10 pixels high and dark blue on the top and bottom, graduating to almost pure white in the middle (which accentuates its protruding, rounded appearance). But for our purposes, we use a progress bar 20 pixels in height for clarity. We do this by doubling each row of a column so it occupies 2 pixels. Let's see how to accomplish this task.
First, we use a Canvas with a cyan background as the backdrop for the progress bar. Then we create an empty Photo wide enough for a 100 pixel image and place the empty image at Canvas coordinates (100, 30).
my $c = $mw->Canvas(qw/-width 200 -height 60 -background cyan/)->grid;

my $w = 100;
my $h = 20;

my $i = $c->Photo(-width => $w, -height => $h);
$c->createImage(100, 30, -image => $i);
Now paint the bar's left-side base segment. The base is normally 2 pixels wide, but it's expanded to 4 pixels in this example: each of the two columns is painted over two columns. The left two columns are a single shade of dark blue, while the right two columns are dark on the top and bottom and grow brighter toward the middle. The net effect is a concave, 3D look.
$i->put('#6363ce', -to => 0, 0, 2, $h);
$i->put([
    '#6363ce', '#6363ce',
    '#9c9cff', '#9c9cff',
    '#ceceff', '#ceceff',
    '#efefef', '#efefef',
    '#efefef', '#efefef',
    '#efefef', '#efefef',
    '#ceceff', '#ceceff',
    '#9c9cff', '#9c9cff',
    '#6363ce', '#6363ce',
    '#31319c', '#31319c',
], -to => 2, 0, 4, $h);
Now for the progress bar itself. It's a single column of pixels (again, doubled in height for clarity) that's repeatedly laid out from left to right, one column every 25 milliseconds.
for (my $col = 4; $col < $w; $col++) {
    $i->put([
        '#30319d', '#30319d',
        '#6563cd', '#6563cd',
        '#9c9cff', '#9c9cff',
        '#ceceff', '#ceceff',
        '#f0f0f0', '#f0f0f0',
        '#ceceff', '#ceceff',
        '#9c9cff', '#9c9cff',
        '#6563cd', '#6563cd',
        '#30319d', '#30319d',
        '#020152', '#020152',
    ], -to => $col, 0, $col + 1, $h);
    $mw->update;
    $mw->after(25);
}
To complete the effect, we should add a right-side end cap and some sort of border. Chapter 15, "Anatomy of the MainLoop" shows us how to do this.
17.7.3. Capturing a Window with Tk::WinPhoto
There's a special Photo format called WinPhoto (available only on Unix) that makes Photo images not from files or embedded data but from a window on your display (hence the format's name). The WinPhoto format is not available by default; you have to use it:
use Tk::WinPhoto;
To ensure that you capture the image you want, always update the display:
$mw->update;
Create the Photo image by specifying the X11 window ID of the desired window with the -data option. You can manipulate the Photo as you see fit, including writing an image file in any supported format.
my $img = $mw->Photo(-format => 'Window', -data => oct($mw->id));
$img->write('win.ppm', -format => 'ppm');
17.7.3.1. What you see is not always what you get
Here's a little program that "diffs" two XPM files: the original and one created by capturing a WinPhoto of an image of the original, then writing a new XPM file. We'll see that typically the two files will be different. "Pure colors" such as black, white, red, green, and blue might capture correctly, but "off-colors" such as tabby-orange might easily have varying pixel representations, depending on your display, pixel depth, and visual.
use Tk::WinPhoto;

# Create a Label with a picture of the neko.

my $mw = MainWindow->new;
my $neko = $mw->Label(-image => $mw->Photo(-file => 'Icon.xpm'),
                       -borderwidth => 0);
$neko->pack;

# Capture the window and write a new XPM file.

$mw->update;
my $win_img = $mw->Photo(-format => 'Window', -data => oct($mw->id));
$win_img->write('winphoto-neko.xpm', -format => 'xpm');

# Graphically compare the original and captured XPM files. First,
# read the original XPM file into a Text widget.
#
# Notice the $/ trick.  Setting the input record separator to undef
# means that the file is read as a single line with embedded newlines,
# which is then inserted into the Text widget as a single line without
# any tags. Otherwise, insert( ) would see a list of lines, insert the
# first, treat the second as a tag, insert the third, treat the fourth
# as a tag, etcetera.

my $f = $mw->Frame->pack;
my $t1 = $f->Text(qw/-width 35 -height 40 -font fixed/);
$t1->pack(-side => 'left');

open XPM, 'Icon.xpm' or die $!;
$/ = undef;
$t1->insert('end', <XPM>);
close XPM;

# Now create an empty Photo and read the new XPM image into it. We'll
# then loop through the image pixel by pixel, read the RGB values,
# and display them as a pseudo-XPM file.

my $neko_image = $mw->Photo;
$neko_image->read('winphoto-neko.xpm');

my $t2 = $f->Text(qw/-width 32 -height 40 -font fixed/);
$t2->pack(-side => 'left');

# Typically, the image captured by WinPhoto is not identical to the
# original.  This mapping approximates the original XPM file.

my %pixmap = ('000000' => '.',
              '00ff00' => 'o',
              'ffffff' => ' ',
              'ffd500' => 'X',
              'ffaa00' => 'X',
             );

$t2->insert('end', "The new pixmappings differ:\n\n");
foreach (keys %pixmap) {
    $t2->insert('end', " $pixmap{$_}      $_\n");
}

# Prior to Tk800.018, the get( ) method returned a string with
# 3 space-separated integers. Now get( ) returns a proper list.

my($w, $h) = ($neko_image->width, $neko_image->height);

foreach my $y (0 .. $h - 1) {
    foreach my $x (0 .. $w - 1) {
        #my($r, $g, $b) = split ' ', $neko_image->get($x, $y);
        my($r, $g, $b) = $neko_image->get($x, $y);
        my $code = sprintf  "%02x%02x%02x", $r, $g, $b;
        $t2->insert('end', $pixmap{$code});
    }
    $t2->insert('end', "\n");
}
Figure 17-10 graphically shows the before and after images. In the original, the tabby-orange color is 0xFFBD00, but WinPhoto captured that color as two distinct (although very similar) colors, 0xFFD500 and 0xFFAA00.
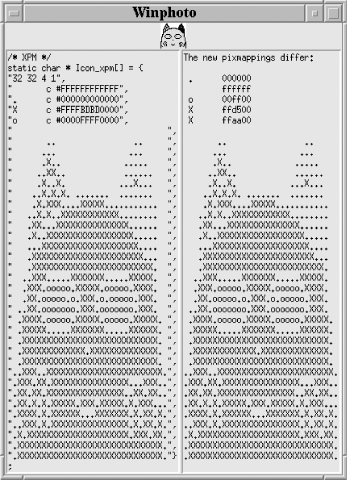
Figure 17-10. A captured window only approximates the original
17.7.4. Tk::Thumbnail
To appreciate the power of Photos, let's examine a Thumbnail widget. Thumbnails are shrunken images of larger (or zoomed images of smaller) pictures, typically arranged in a tabular format. Looking at Figure 17-11, Tk::Thumbnail's rendered POD documentation, we see the thumbnail width and height is selectable, the images can be labeled, and there's a -command option so we can supply a <Button-1> callback. The list of images (of any supported format) can be a mixture of filenames and/or existing Photo images. Tk::Thumbnail is responsible for disposing of any Photos it creates, thus it uses an OnDestroy callback to perform object cleanup.
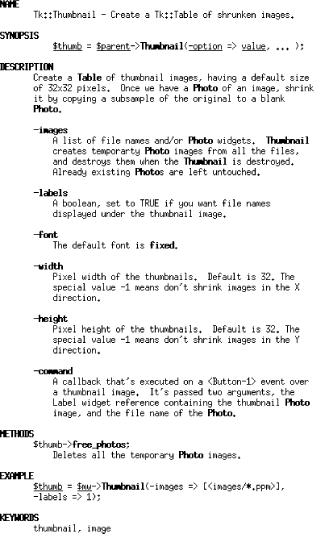
Figure 17-11. POD documentation for Tk::Thumbnail
Given a desired thumbnail width and height, Tk::Thumbnail takes each image in turn and either shrinks it (via the copy -subsample method, described shortly) or enlarges it (via the copy -zoom method). This means that images of any size and format can be combined in the same Thumbnail widget.
This sample code, tkthumb, created Figure 17-12:
use Tk::Thumbnail;

my $mw = MainWindow->new;
my $skel = $mw->Photo(-file => 'tkskel.gif');

my $tn = $mw->Thumbnail(
    -images     => ['mouse.xbm', $skel, <*.ppm>],
    -command    => sub {
        my $i = $_[0]->cget(-image);
        print "args=@_, image=$i\n";
    },
    @ARGV);
$tn->pack;
The list of images consists of an XBM filename of the small mouse cursor, a large GIF Photo image, and a file glob of lots of medium-sized PPM images of the neko. In real life, the -command callback might actually do something when clicked over a thumbnail, but in tkthumb, it simply prints an informative message. Finally, note that @ARGV holds the command-line arguments, so we can run the program with different options and experiment with the Thumbnail widget.
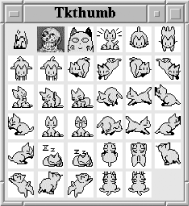
Figure 17-12. A mixture of image formats and sizes in one Thumbnail
From the discussions in Chapter 14, "Creating Custom Widgets in Pure Perl/Tk", it should be clear that Tk::Thumbnail is a derived mega-widget based on Tk::Table. By the time Populate is called, Perl/Tk has already created the Table, $self, for us and blessed it into class Tk::Thumbnail.
$Tk::Thumbnail::VERSION = '1.0';

package Tk::Thumbnail;

use Carp;
use File::Basename;
use Tk::widgets qw/Table JPEG PNG TIFF/;
use base qw/Tk::Derived Tk::Table/;
use subs qw/free_photos/;
use strict;

Construct Tk::Widget 'Thumbnail';
Populate removes from the argument hash those options that are specific to the Thumbnail and needed only within itself. Scrollbars have proven to be distracting, so they're disabled unless the user specifically requests them. The thumbnail pixel dimensions also have default values unless overridden by options on the constructor call.
sub Populate {

    my($self, $args) = @_;

    my $img = delete $args->{-images}; # reference to array of images
    my $lbl = delete $args->{-labels}; # display file names IFF true
    my $pxx = delete $args->{-width};  # thumbnail pixel width
    my $pxy = delete $args->{-height}; # thumbnail pixel height
    $args->{-scrollbars} = '' unless defined $args->{-scrollbars};
    $pxx ||= 32;
    $pxy ||= 32;
    croak "Tk::Thumbnail: -images argument is required." unless defined $img;
    $self->SUPER::Populate($args);
This code computes the minimum dimensions required to fit all the thumbnail images in a square Table.
    my $count = scalar @$img;
    my $rows = int(sqrt $count);
    $rows++ if $rows * $rows != $count;
For each element of the image array, we invoke UNIVERSAL::isa to test if it's already a Photo or if we need to create the Photo ourselves. (We could have used the ref function, but isa will detect derived Photo classes.) Once we have a Photo reference in $photo, we determine its width and height so we know whether to shrink or expand it to thumbnail size.
  THUMB:
    foreach my $r (1 .. $rows) {
        foreach my $c (1 .. $rows) {
            last THUMB if --$count < 0;

            my $i = @$img[$#$img - $count];
            my ($photo, $w, $h);
            $photo = UNIVERSAL::isa($i, 'Tk::Photo') ? $i :
                $self->Photo(-file => $i);

            ($w, $h) = ($photo->width, $photo->height);
We start by making an empty Photo, $subsample, which will receive pixels from the main Photo, $photo. To shrink a picture, we subsample it, which means we extract every nth pixel from the source Photo before copying to the destination Photo. For example, if the source Photo is 64x64, we subsample every other pixel to reduce it to a 32x32 thumbnail. If the source Photo is 320x320, we subsample every tenth bit, and so on. We do this for both x and y. The special value -1 tells us not to subsample a particular dimension, keeping its size unchanged, and gives us one way to change the Thumbnail's aspect ratio.
            my $subsample = $self->Photo;
            my $sw = $pxx == -1 ? 1 : ($w / $pxx);
            my $sh = $pxy == -1 ? 1 : ($h / $pxy);
So the variables $sw and $sh are typically integers greater than one, specifying how many pixels to subsample in width and height. If that's the case, invoke a subsample copy from $photo to $subsample, creating a shrunken thumbnail. But if the source Photo is smaller than the thumbnail size, the subsample width and height are fractional and we need to enlarge the Photo, so we zoom in for a closer look.
Finally, a little bookkeeping is required. We're responsible for deleting every thumbnail when the widget is destroyed, so we keep a list of Photos in an instance variable.
            if ($sw >= 1 and $sh >= 1) {
                $subsample->copy($photo, -subsample => ($sw, $sh));
            } else {
                $subsample->copy($photo, -zoom => (1 / $sw, 1 / $sh));
            }
            push @{$self->{photos}}, $subsample;
This uneventful code stuffs the thumbnail image in a Label and put s it in the Table widget, optionally adding a Label with the thumbnail's filename. The bind statement arranges for the user's -command callback (if any) to be invoked on a <Button-1> event over the thumbnail. Lastly, delete the source Photo, assuming we created it in the first place.
            my $f = $self->Frame;
            my $l = $f->Label(-image => $subsample)->grid;
            my $file = $photo->cget(-file);
            $l->bind('<Button-1>' => [$self => 'Callback', '-command',
                                      $l, $file]);
            $f->Label(-text => basename($file))->grid if $lbl;
            $self->put($r, $c, $f);

            $photo->delete unless UNIVERSAL::isa($i, 'Tk::Photo');

        } # forend columns
    } #forend rows
Here's a rather typical ConfigSpecs call. See Chapter 14, "Creating Custom Widgets in Pure Perl/Tk" for details.
    $self->ConfigSpecs(
        -font       => ['DESCENDANTS',
                        'font',       'Font',      'fixed'],
        -background => [['DESCENDANTS', 'SELF'],
                        'background', 'Background', undef],
        -command    => ['CALLBACK',
                        'command',    'Command',     undef],
                      );
When an OnDestroy callback is invoked, it's guaranteed to have an intact mega-widget hash, including all instance variables. The object method free_photos then has a chance to delete all the thumbnail Photos.
    $self->OnDestroy([$self => 'free_photos']);

} # end Populate

sub free_photos {

    # Free all our subsampled Photo images.

    foreach my $photo (@{$_[0]->{photos}}) {
        $photo->delete;
    }

} # end free_photos

1;
Figure 17-13 and Figure 17-14 demonstrate the flexibility of the Photo copy method.

Figure 17-13. tkthumb -width 8 -height 8
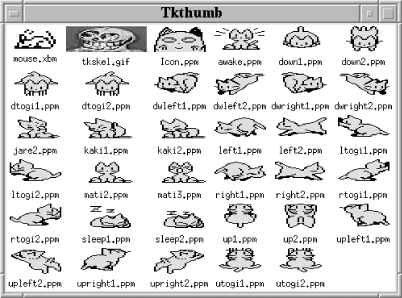
Figure 17-14. tkthumb -width 64 -height 32 -labels 1 -background white

Copyright © 2002 O'Reilly & Associates. All rights reserved.


