15.4. Executing Nonblocking System Commands
One of the most common requests seen on the comp.lang.perl.tk newsgroup is how to execute a system command and display its output in a Text widget. The typical response is some variation of tktail, which uses fileevent to signal that output data is available without blocking the application.
Here's the program:
open(H, "tail -f -n 25 $ARGV[0]|") or die "Nope: $!";

my $t = $mw->Text(-width => 80, -height => 25, -wrap => 'none');
$t->pack(-expand => 1);
$mw->fileevent(\*H, 'readable', [\&fill_text_widget, $t]);
MainLoop;

sub fill_text_widget {

    my($widget) = @_;

    $_ = <H>;
    $widget->insert('end', $_);
    $widget->yview('end');

}
The standard way to keep Perl/Tk programs from blocking is to use multiple processes. Here we use Perl's open function to create a separate process that sends its output to a pipe. fileevent then defines a callback that gets invoked whenever the file handle H has data available to read. The callback appends one line to the Text widget and uses yview to ensure that we always see the end of the file.
There's a problem here. The statement $_ = <H> expects to read an entire line, one that's newline terminated. If only a partial line were available, the read would block, and so would tktail. To be rigorous, we should use sysread for our I/O, which handles partial lines:
sub fill_text_widget {

    my($widget) = @_;

    my($stat, $data);
    $stat = sysread H, $data, 4096;
    die "sysread error:  $!" unless defined $stat;
    $widget->insert('end', $data);
    $widget->yview('end');

}
Later we take this simple example and turn it into a first-class mega-widget that's more powerful and flexible.
15.4.1. fileevent Syntax
The syntax for fileevent is as follows:
$mw->fileevent(handle, operation => callback);
handle is a Perl file handle, which may be a reference to a glob (\*STDIN), the return value from IO::Handle, etc.
operation may be readable or writable.
callback is a standard callback or the empty string "". The callback is invoked when the file is readable/writable. If callback is the empty string, the callback is canceled.
Please refer to Chapter 19, "Interprocess Communicationwith Pipes and Sockets" for more information on fileevent.
15.4.2. Tk::ExecuteCommand
Tk::ExecuteCommand runs a command yet still allows Tk events to flow. All command output and errors are displayed in a window. This ExecuteCommand mega-widget is composed of a LabEntry widget for command entry, a "Do It" Button that initiates command execution, and a ROText widget that collects command execution output. While the command is executing, the "Do It" Button changes to a "Cancel" Button that can prematurely kill the executing command.
We start with a typical Frame-based mega-widget prologue, fully detailed in Chapter 14, "Creating Custom Widgets in Pure Perl/Tk". As with the previous example, it depends on fileevent to keep the application from blocking.
$Tk::ExecuteCommand::VERSION = '1.1';

package Tk::ExecuteCommand;

use IO::Handle;
use Proc::Killfam;
use Tk::widgets qw/ROText/;
use base qw/Tk::Frame/;
use strict;

Construct Tk::Widget 'ExecuteCommand';
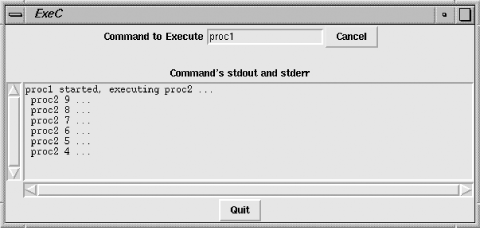
The Populate subroutine in the next example defines the widget pictured in Figure 15-1. Type the command (or commands) to execute in the Entry widget and start it running by clicking the "Do It" Button. Once pressed, "Do It" changes to "Cancel." The subroutine _reset_doit_button ensures that the Button is properly configured to begin command execution. The leading underscore in the method name indicates a private method, one that the widget's users should not call. The OnDestroy call ensures that any running command is terminated when the widget goes away.

Figure 15-1. Tk::ExecuteCommand in action
The instance variable $self->{-finish} is true when it's time to kill the command. It can be set either by clicking the "Cancel" button or when the fileevent handler has sensed end-of-file. The widget's -command option is stored in another instance variable, $self->{-command}.
sub Populate {

    my($self, $args) = @_;

    $self->SUPER::Populate($args);

    my $f1 = $self->Frame->pack;
    $f1->LabEntry(
        -label => 'Command to Execute',
        -labelPack => [qw/-side left/],
        -textvariable => \$self->{-command},
    )->pack(qw/-side left/);

    my $doit = $f1->Button(-text => 'Do It!')->pack(qw/-side left/);
    $self->Advertise('doit' => $doit);
    $self->_reset_doit_button;

    $self->Frame->pack(qw/pady 10/);
    $self->Label(-text => 'Command\'s stdout and stderr')->pack;

    my $text = $self->Scrolled('ROText', -wrap => 'none');
    $text->pack(qw/-expand 1 -fill both/);
    $self->Advertise('text' => $text);
    $self->OnDestroy([$self => 'kill_command']);

    $self->{-finish} = 0;

    $self->ConfigSpecs(
        -command => [qw/METHOD command Command/, 'sleep 5; pwd'],
    );

} # end Populate

sub command {

    my($self, $command) = @_;
    $self->{-command} = $command;

} # end command
When the "Do It" Button is pressed, it begins flashing and continues to do so until the command has completed or is canceled. We use a Tcl/Tk idiom of rescheduling a timer callback that alternates the Button's background color. The first time through, the Button's background color is $val1, but the subsequent after callback reverses the colors so that $interval milliseconds later, the background changes to $val2. When the command finishes, no further timer callbacks are queued, and the flashing ceases.
sub _flash_doit {

    # Flash "Do It" by alternating its background color.

    my($self, $option, $val1, $val2, $interval) = @_;

    if ($self->{-finish} == 0) {
			$self->Subwidget('doit')->configure($option => $val1);
			$self->idletasks;
			$self->after($interval, [\&_flash_doit, $self, $option, $val2,
            $val1, $interval]);
    }

} # end _flash_doit
Here's a private method that reads command output and inserts it into the Text widget. It calls kill_command to perform cleanup operations when the command completes or the user clicks on the "Cancel" Button.
sub _read_stdout {

    # Called when input is available for the output window.  Also checks
    # to see if the user has clicked Cancel.

    my($self) = @_;

    if ($self->{-finish}) {
			$self->kill_command;
    } else {
			my $h = $self->{-handle};
			if ( sysread $h, $_, 4096 ) {
			    my $t = $self->Subwidget('text');
			    $t->insert('end', $_);
			    $t->yview('end');
			} else {
			    $self->{-finish} = 1;
			}
    }

} # end _read_stdout
The private method _reset_doit_button ensures that the "Do It" button is properly configured to start a new command. Besides setting the Button's text and appearance, it also configures the callback so that, once pressed, the Button is disabled (preventing a possible race condition), and command execution begins.
Notice it's not sufficient to use cget to fetch the background color, because the Button may have been flashing by alternating its background color. The only sure-fire way is to use configure and fetch the original default color from the configuration specifications. All Tk options are described by a five element array containing the option name, resource database name, class name, default value, and current value. The "Do It" Button's specifications might look like this:
-background background Background #d9d9d9 cyan

sub _reset_doit_button {

    # Establish normal "Do It" button parameters.

    my($self) = @_;

    my $doit = $self->Subwidget('doit');
    my $doit_bg = ($doit->configure(-background))[3];

    $doit->configure(
        -text       => 'Do It',
        -relief     => 'raised',
        -background => $doit_bg,
        -state      => 'normal',
        -command    => [sub {
            my($self) = @_;
            $self->{-finish} = 0;
            $self->Subwidget('doit')->configure(
                -text   => 'Working ...',
                -relief => 'sunken',
                -state  => 'disabled'
            );
            $self->execute_command;
        }, $self],
    );

} # end _reset_doit_button
Here are all the public methods. execute_command creates a new file handle and stores it in an instance variable. Then it uses a pipe-open to execute the command, redirecting STDERR to STDOUT. If the open fails, the error is posted in the Text widget. The file handle is unbuffered, so data can be read as quickly as possible, and the readable fileevent is created. The "Do It" button is reconfigured into the "Cancel" button, and we start it flashing.
sub execute_command {

    # Execute the command and capture stdout/stderr.

    my($self) = @_;

    my $h = IO::Handle->new;
    die "IO::Handle->new failed." unless defined $h;
    $self->{-handle} = $h;

    $self->{-pid} = open $h, $self->{-command} . ' 2>&1 |';
    if (not defined $self->{-pid}) {
			$self->Subwidget('text')->insert('end',
                 "'" . $self->{-command} . "' : $!\n");
			$self->kill_command;
			return;
    }
    $h->autoflush(1);
    $self->fileevent($h, 'readable' => [\&_read_stdout, $self]);

    my $doit = $self->Subwidget('doit');
    $doit->configure(
        -text    => 'Cancel',
        -relief  => 'raised',
        -state   => 'normal',
        -command => [\&kill_command, $self],
    );

    my $doit_bg = ($doit->configure(-background))[3];
    $self->_flash_doit(-background => $doit_bg, qw/cyan 500/);

} # end execute_command
kill_command sets the finish flag so that the flash and fileevent handlers know to quit. It releases resources by clearing the fileevent handler, killing the command and all its children, and closing the file handle. Then it resets "Do It."
The killfam command is an extension to the CPAN module Proc::ProcessTable. It accepts the same arguments as the Perl built-in kill command, but recursively kills subchildren. For the code, as well as the POD for this module, see Appendix C, "Complete Program Listings".
sub kill_command {

    # A click on the blinking Cancel button resumes normal operations.

    my($self) = @_;

    $self->{-finish} = 1;
    my $h = $self->{-handle};
    return unless defined $h;
    $self->fileevent($h, 'readable' => ''); # clear handler
    killfam 'TERM', $self->{-pid} if defined $self->{-pid};
    close $h;
    $self->_reset_doit_button;

} # end kill_command

1;
15.4.3. An MPG Player—tkmpg123
Using fileevent, the mpg123 library, and its Perl interface, Audio::Play::MPG123, we can write a Tk program to play our favorite tunes. Audio::Play::MPG123 sports an object-oriented syntax and methods that load, play, and pause a song.
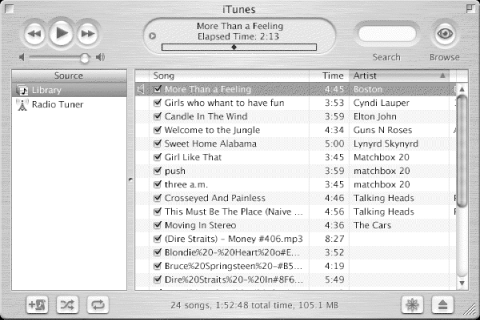
Besides playing the music, our program needs a user interface. In this case, we've become extremely lazy and taken the skin from Apple's iTunes application and used it as a basis for our own. Briefly, we took a screenshot of the original application, shown in Figure 15-2, and placed that over the entire area of a Canvas. Then widgets and images were overlaid at key hot spots, which we bound to actions. For instance, the play and pause buttons are actually tiny images, which are selectively placed over the original play/pause button (see Figure 15-3).
The images, of course, we excised from iTunes while it was running.

Figure 15-2. Apple's iTunes Player
As for the remainder of the interface, we've essentially ignored it, preferring to concentrate on listening to tunes instead. For instance, instead of an oval display and status window, we use a simple Frame. Instead of a multicolumn play list, we use a Scrolled Listbox. The complete program listing appears in Appendix C, "Complete Program Listings".
Figure 15-3. Play and pause images
We start by creating an Audio::Play::MPG123 instance, $player, and retrieving the player's input file handle, $phand, which we'll tie to a fileevent handler. The mpg123 library has its own event loop, and when $phand is readable, we must empty the mpg123 event queue in order to keep the music playing.
$player = Audio::Play::MPG123->new;
$phand = $player->IN;
Here we create the Canvas, overlay the iTunes skin, and configure the Canvas' width and height to match the dimensions of the skin. See Chapter 17, "Images and Animations" for details on images.
    $c = $mw->Canvas(
        -width  => 1,
        -height => 1,
        -background => 'dark slate gray',
    )->pack;
    my $itunes = $c->Photo(-file => 'images/itunes.gif');
    $c->createImage(0, 0,
        -image => $itunes,
        -tag   => 'itunes',
        -anchor => 'nw',
    );
    $c->configure(-width => $itunes->width, -height => $itunes->height);
Overlay the play button image on top of the static background button and tag it with the string 'play-image'. Create a Canvas item button-1 binding that invokes the pause subroutine. Subroutine pause toggles the player's pause state, as well as the play/pause image.
    $paus = $c->Photo(-file => 'images/paus.gif');
    $play = $c->Photo(-file => 'images/play.gif');

    $c->createImage(80, 40, -image => $play, -tag => 'play-image');
    $c->bind('play-image', '<1>' => \&pause);
Every song has optional data associated with it, such as the title, artist, and album. We can display this data in a simple Label widget, using a timer event to rotate through the information list and update the Label's -textvariable, $infov.
Similarly, we use another Label to display the song's elapsed and total playing time, in minutes and seconds.
    $infov = '';
    my $info = $f->Label(
        -textvariable => \$infov,
        -font         => $font,
        -background   => $green,
    );
    $info->pack(-side => 'top');

    $timev = 'Elapsed Time: 0:00';
    my $time = $f->Label(
        -textvariable => \$timev,
        -font         => $font,
        -background   => $green,
    );
    $time->pack(-side => 'top');
Create the Listbox and populate it with songs from the current directory. The button bindings says call subroutine play with the name of the song under the cursor as its one argument.
    my $mpgs = $f2->Scrolled('Listbox')->pack(-fill => 'y', -expand => 1);
    foreach my $mpg (<*.mpg>, <*.mp3>) {
        $mpgs->insert('end', $mpg);
    }
    $mpgs->bind('<1>' => sub {play $mpgs->get( $mpgs->nearest($Tk::event->y)  )});
When the play/pause button image is clicked, subroutine pause is called. It first toggles the player's state, pausing it if it was playing or resuming play if it was paused. Then the play/pause image is updated appropriately.
sub pause {
    $player->pause;
    $c->itemconfigure('play-image',
        -image => ($player->state == 1) ? $paus : $play
    );
}
We get here after a button click on a song name, where we load the song and start it playing. @info holds the title, artist, and album data (any of which may be undef).
sub play {
    my $song = shift;
    if (defined $song) {
        $player->load($song);
        @info = map {$player->$_} qw/title artist album/;
        start_play;
    }
}
Subroutine start_play does three things:
-
Creates a timer event to display each song's title, artist, and album over and over again
-
Creates another timer event that updates the song's elapsed playing time
-
Creates a fileevent read handler to empty mpg123's event queue
The code for start_play is:
sub start_play {

    my $info_tid = $mw->repeat(5000 => sub {
	$infov = $info[0];
	 unshift @info, pop @info;
    });

    my $time_tid = $mw->repeat(1000 => sub {
        my(@toks) = split ' ', $player->stat;
        $timev = sprintf( "Elapsed Time: %s of %s\n",
            &ctm($toks[3]), &ctm($toks[3] + $toks[4]) );
    });
At last, the heart of Tkmpg123, a single fileevent call pointing to an anonymous, readable subroutine. The subroutine calls poll in nonblocking mode (with 0 as its argument) to empty the mpg123 event queue, then update to empty Tk's event queue. This sequence repeats until the state method reports zero, meaning the song has ended. The stop method unloads the song, the fileevent is cleared, and the two timers are canceled.
    my $in_hand = sub {
	$player->poll(0);
	$mw->update;
	if ($player->state == 0) {
	    $player->stop;
	    $mw->fileevent(\$phand, 'readable' => '');
	    $mw->afterCancel($info_tid);
	    $mw->afterCancel($time_tid);
	}
    };
    $mw->fileevent(\$phand, 'readable' => $in_hand);

}
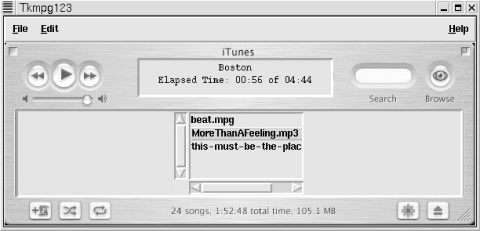
Figure 15-4 shows the tkmpg123 program in action.

Figure 15-4. tkmpg123 playing a tune

Copyright © 2002 O'Reilly & Associates. All rights reserved.


