6.4. Examples
These examples are included to hopefully clear up any confusion about using Scrollbars in the real world. Each example uses the Scrolled method if possible, then does the same thing manually. We haven't covered all the widget types we are using here, but we aren't doing anything fancy with them either. If you see an option or method you don't recognize, just see the appropriate chapter for that widget to learn more.
6.4.1. Entry Widget
The Entry widget can only be scrolled horizontally. The Entry can contain only one line of text at most, so a vertical Scrollbar would do nothing. Using Scrolled to create a scrolled Entry widget is easy:
$mw->Scrolled("Entry", -scrollbars => "s", -width => 30)->pack( );If you want to make the Scrollbar appear only when the data in the Entry widget requires it, use -scrollbars => "os". Using the Scrollbar method is a bit more work:
$scrollbar = $mw->Scrollbar(-orient => 'horizontal');
$entry = $mw->Entry(-width => 30,
                    -xscrollcommand => ['set' , $scrollbar]);
$scrollbar->configure(-command => ['xview', $entry]);
$scrollbar->pack(-side => 'bottom', -fill => 'x');
$entry->pack(-side => 'bottom', -fill => 'x');
Both will create an Entry that looks similar to the one in Figure 6-14.

Figure 6-14. Entry widget with a Scrollbar
6.4.2. Listbox, Text, and Canvas Widgets
A Listbox widget can be scrolled both horizontally and vertically, although you might not always want to use both options. If you know how wide your data is going to be and the window can accommodate it, a horizontal Scrollbar is unnecessary. Our first example uses the Scrolled method and creates two Scrollbars:
$mw->Scrolled("Listbox", -scrollbars => "se",
              -width => 50, -height => 12)->pack( );
To do the same thing manually, we need to use Scrollbar to create two Scrollbars and configure them to work with the widget:
$f = $mw->Frame( )->pack(-side => 'top', expand => 1, -fill => 'both');
$xscroll = $f->Scrollbar(-orient => 'horizontal');
$yscroll = $f->Scrollbar( );
$lb = $f->Listbox(-width => 50, -height => 12,
                   -yscrollcommand => ['set', $yscroll],
                   -xscrollcommand => ['set', $xscroll]);
$xscroll->configure(-command => ['xview', $lb]);
$yscroll->configure(-command => ['yview', $lb]);
$xscroll->pack(-side => 'bottom', -fill => 'x');
$yscroll->pack(-side => 'right', -fill => 'y');
$lb->pack(-side => 'bottom', -fill => 'both', -expand => 1);
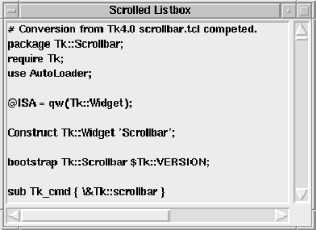
As you can see, using Scrolled saves a lot of extra work. In Figure 6-15, we see a Listbox with two Scrollbars, one on the south and one on the east. This window was created using Scrolled . There is a subtle differencefrom one using Scrollbar: the small square of open space where the two Scrollbars meet in the southeast corner. When we create the Scrollbars ourselves, we don't get that small space (whichever Scrollbar gets packed first takes it).

Figure 6-15. A Listbox with two Scrollbars
Scrolled Text and Canvas widgets are created the same exact way as a scrolled Listbox widget, so we won't bother repeating the code again.
6.4.3. One Scrollbar, Multiple Widgets
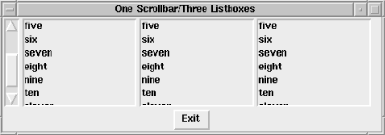
There are times you want to use one Scrollbar with more than one widget. When the user clicks on the Scrollbar, it should scroll all the widgets in the same direction at the same time. In the following example, we create three Listboxes, each with eleven items. There is one Scrollbar that scrolls all three lists when the user clicks on it. When the user tabs to the Listboxes and scrolls up and down by using the arrow keys or the pageup/pagedown keys, the other Listboxes are also scrolled. Figure 6-16 shows what the window looks like.

Figure 6-16. A window with three Listboxes all controlled by the same Scrollbar
The code is as follows:
use Tk;

$mw = MainWindow->new( );
$mw->title("One Scrollbar/Three Listboxes");
$mw->Button(-text => "Exit",
            -command => sub { exit })->pack(-side => 'bottom');

$scroll = $mw->Scrollbar( );
# Anonymous array of the three Listboxes
$listboxes = [ $mw->Listbox(), $mw->Listbox(), $mw->Listbox( ) ];

# This method is called when one Listbox is scrolled with the keyboard
# It makes the Scrollbar reflect the change, and scrolls the other lists
sub scroll_listboxes {
  my ($sb, $scrolled, $lbs, @args) = @_;
  $sb->set(@args); # tell the Scrollbar what to display
  my ($top, $bottom) = $scrolled->yview( );
  foreach $list (@$lbs) {
    $list->yviewMoveto($top); # adjust each lb
  }
}

# Configure each Listbox to call &scroll_listboxes
foreach $list (@$listboxes) {
  $list->configure(-yscrollcommand => [ \&scroll_listboxes, $scroll,
                                       $list, $listboxes ]);
}

# Configure the Scrollbar to scroll each Listbox
$scroll->configure(-command => sub { foreach $list (@$listboxes) {
                                       $list->yview(@_);
                                     }});

# Pack the Scrollbar and Listboxes
$scroll->pack(-side => 'left', -fill => 'y');
foreach $list (@$listboxes) {
  $list->pack(-side => 'left');
  $list->insert('end', "one", "two", "three", "four", "five", "six",
                       "seven", "eight", "nine", "ten", "eleven");
}

MainLoop;
To connect multiple widgets to one Scrollbar, we first use the Scrollbar command to create the Scrollbar. Then we configure the Scrollbar so it calls yview for each of the Listboxes we are scrolling (the Listboxes are kept in an anonymous array so that all methods can reference them easily). The other part that makes the Listboxes truly connected is to configure each Listbox to call a special subroutine that scrolls all three Listboxes in addition to adjusting the Scrollbar. Normally, -yscrollcommand would have only ['set', $lb] assigned to it. Instead, we use a callback to \&scroll_listboxes and call set from within that subroutine.

Copyright © 2002 O'Reilly & Associates. All rights reserved.


