
 |  |
2.4. The form Geometry Manager
The final geometry manager we want to cover is form. Recently added into the Perl/Tk distribution, form is a very different geometry manager than those we've seen so far. To try and compare it with what we already know, it behaves like a combination of pack and place. Using form, it is legal to overlap widgets (as you would with place), but you can also display the widgets relative to each other and stretch them out to fill the entire available area and resize with the window (as you would with pack). The combination of all these abilities results in a powerful geometry manager.
When using form, each edge of a widget can be attached to something: the container's grid, another widget, or nothing at all. You can also use springs to push your widgets around in the window based on the strength (or weight) of the spring. As with the other geometry managers, you can add padding to your widget.
Let's look at the options briefly, then go into more detail on how to use them.
2.4.1. Options for form
The following are all the legal options for form. The following sections show you how to use these options to the best effect.
- -bottom => attachment
- Uses the given attachment on the bottom side of the widget.
- -bottomspring => weight
- Uses the given weight for a spring on the bottom side of the widget.
- -fill => 'x' | 'y' | 'both' | 'none'
- Specifies the direction in which to fill when springs are used. There is no default value.
- -in => $master
- Uses $master as the container to put the widget in. If used, the -in option must be the first one specified.
- -left => attachment
- Uses the given attachment on the left side of the widget.
- -leftspring => weight
- Uses the given weight for a spring on the left side of the widget.
- -padbottom => value, -padleft => value, -padright => value, and -padtop => value
- Place padding on the given side of the widget.
- -padx => value
- Places padding on the left and right sides of the widget.
- -pady => amount
- Places padding on the top and bottom of the widget.
- -right => attachment
- Uses the given attachment on the right side of the widget.
- -rightspring => weight
- Uses the given weight for a spring on the right side of the widget.
- -top => attachment
- Uses the given attachment on the top side of the widget.
- -topspring => weight
- Uses the given weight for a spring on the top side of the widget.
2.4.2. Attachments
The edge (top, bottom, left, and right) of each widget can be attached to something else in the container. The left side can be attached to the grid (which we'll say more about in a minute), the right to another widget, and the top and bottom might be attached to nothing at all. In addition to an anchor point, you can specify a positive or negative offset from that point. An offset is a number given in screen units. A positive offset moves the widget to the right or down from the anchor point. A negative offset moves the widget to the left or up from the anchor point. An attachment is comprised of either an anchor point or an anonymous array of [ anchor_point, offset ]. The examples we go through to demonstrate each type will make this clear.
2.4.2.1. Attaching to the grid
There is an unseen grid in each container widget that uses form. Don't confuse this grid with the grid geometry manager. The default size of form's grid is 100 x 100, and does not change even if the container size changes. Within the container, the left and top are both at 0, the right and bottom are at 100. Using these numbers, we can specify a spot to attach a widget edge to. This is different from place because instead of using pixel points that change as the window changes size, the size of the grid remains static. To specify a grid attachment, use the form '%xx' replacing xx with the grid location. If you leave out the %, you are specifying an offset only, rather than a grid location. This example demonstrates using a grid attachment:
foreach (1..5) {
    # Create Buttons and attach them to grid at intervals of 5
    $mw->Button(-text => $_ * 5)->form(-left => '%' . $_ * 5,
                                       -top => '%' . $_ * 5);
}
This code creates five widgets, putting them on the grid at (5, 5), (10, 10), (15, 15), and so on. Take a look at Figure 2-48 and you'll see what happens when we resize this window. Notice that the widgets overlap each other and move as the window is resized. This demonstrates that the grid size stays the same as the window resizes, and the widgets move with the grid. If you make the window large enough, the widgets no longer overlap.
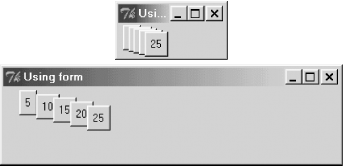
Figure 2-48. How the form grid works (both windows have grid sizes of 100x100)
For the previous example, we used the -top and -left options to specify where to locate the widgets in the window. If you call form with no options at all, each widget is put at (0, 0), piled one on top of the other. The order in which the widgets are created is important in this case, because the last one created is placed on top of the pile.
You can change the size of the widget by attaching opposite sides to different points in the grid. The widget will resize with the window (see Figure 2-49):
# First Button is 'normal'
$b1 = $mw->Button(-text => "small")->form(-left => '%10');
# Second Button is attached to $b1 on left, and grid 70 on right
$mw->Button(-text => "BIG")->form(-left => $b1, -right => '%70',
                                  -top => '%0', -bottom => '%80');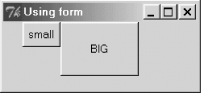
Figure 2-49. A widget attached to the grid on two sides stretches to stay attached
There are a few things to note about the code associated with Figure 2-49. We didn't specify a -top attachment point for the small Button. The default is always going to be 0 if there isn't a top/bottom or left/right attachment point explicitly used with form. Also, the -left attachment point for the BIG Button was another widget. That's a widget-to-widget attachment, which we'll cover next.
To shift your widget 10 pixels to the right of the grid coordinate (5, 5), you would use an anonymous array to specify the whole attachment:
$mw->Button(-text => "shifted right")->form(-left => ['%5', 10],
                                            -top => '%5');
If the offset is 0, you don't need to specify it at all.
2.4.2.2. Widget-to-widget attachments
There are two ways to attach one widget to another: by using the same side (both top, both bottom, and so on), or by using opposite sides. Any widgets attached to one another must be managed by form in the same parent container.
Here's an example of opposite side attachment:
$thisbutton->form(-left => $b1);
You would read that in English as "Attach the left side of $thisbutton to the opposite (right) side of $b1." Remember the option name you are using (-left, -right, -top, or -bottom) applies to the widget on which you are currently calling form. If you want a bit of space between two widgets, add an offset to the -left attachment point:
$b1 = $mw->Button(-text => "small")->form(-left => '%10');
# Second Button is attached to $b1 on left, and grid 70 on right
$mw->Button(-text => "BIG")->form(-left => [$b1, 5], -right => '%70',
                                  -top => '%0', -bottom => '%80');
By changing the argument to -left (in bold), we add a bit of space between the two widgets, as shown in Figure 2-50.
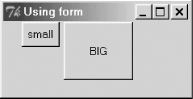
Figure 2-50. Using an offset with a widget attachment
What if we want to line up the left sides of a bunch of widgets? We use a same-side attachment. (In the docs this is called Parallel Side Attachment). To tell form you are using a same-side attachment, add the '&' character as the first item in an anonymous array.
$b1 = $mw->Button(-text => 'top widget')->form(-left => '%10');
$b2 = $mw->Button(-text => 'bottom widget')->form(-left => ['&', $b1],
	-top => $b1);
$mw->Button(-text => 'bottom widget(2)')->form(-left => ['&', $b1, ],
	-top => [$b2, 10]);
This code creates three Buttons, all left aligned, with the third Button 10 pixels from the bottom of the one above it. We are lining up both the second and third Button to $b1. See what this looks like in Figure 2-51.
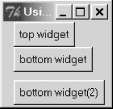
Figure 2-51. Using same-side and opposite-side attachments together
What if we want to stretch all three widgets to the same length? With pack we'd just use -fill => 'y' inside the container. With form, we add -right => '%100' to the options of each form call. This will stretch each widget all the way to the right edge of the container, as shown in Figure 2-52.
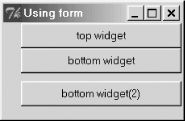
Figure 2-52. Stretching widgets to the same point in the container
Using form this way has one disadvantage: if you wanted to put something to the right of all those Buttons, you'd be better off sticking all three widgets in a Frame and treating them as one. A way around this is to use an attachment to the grid of -right => '%80' on all three widgets, but crazy things can happen if the window is sized smaller than you expect.
Here's an example of centering a widget directly in the container:
# Center a widget across the whole screen:
$w = -($a->reqwidth( )/2);
$h = -($a->reqheight( )/2);
print "W: $w, H: $h\n";
$a->form(-top => ['%50', $h], -left => ['%50', $w]);
We use reqwidth and reqheight to find out how large the widget should be, then use those values as offsets to the center grid position '%50' on both the top and left. In order to shift the widget correctly, we make the offsets negative. It isn't necessary to specify -right and -bottom edges.
2.4.3. Springs
As this book was being written, springs were not fully implemented.[10] They are supposed to act as forces on each side of the widget to adjust the position of the widget within its container. If the widget is attached to another widget, the result can be a widget that resizes properly, but doesn't overlap as things move around.
[10] It appears that top and bottom springs work, but left and right don't. Hopefully this will be fixed soon, as springs make form more powerful.
If you use a spring, it has a weight. The weight doesn't really matter except in relation to any other spring weights you are using in your parent container. If each spring has a weight of 1, they are all pushing with the same amount of force. The same can be said if every spring has a weight of 2. If one spring has a weight of 1, and another a weight of 2, then the second spring is twice as powerful as the first spring.
To discover what springs really do to your widgets, here's a "Play with form" widget displaying program:
use Tk;

$mw = MainWindow->new(-title => 'Play w/form');


# Create a Frame at the bottom of the window to use 'form' in
$f = $mw->Frame(-borderwidth => 2, -relief => 'groove')
	->pack(-side => 'bottom', -expand => 1, -fill =>'both');

# Display the Button in the default position to start
$button = $f->Button(-text => "Go!", -command => \&reForm)->form;

# Use grid to create the Entry widgets to take our options:
$f1 = $mw->Frame->pack(-side => 'top', -fill => 'x');
$f1->Label(-text => '-top')->grid($f1->Entry(-textvariable => \$top),
	$f1->Label(-text => '-topspring'),
	$f1->Entry(-textvariable => \$topspring),
	-sticky => 'w', -padx => 2, -pady => 5);

$f1->Label(-text => '-bottom')->grid($f1->Entry(-textvariable => \$bottom),
	$f1->Label(-text => '-bottomspring'),
	$f1->Entry(-textvariable => \$bottomspring),
	-sticky => 'w', -padx => 2, -pady => 5);

$f1->Label(-text => '-left')->grid($f1->Entry(-textvariable => \$left),
	$f1->Label(-text => '-leftspring'),
	$f1->Entry(-textvariable => \$leftspring),
	-sticky => 'w', -padx => 2, -pady => 5);

$f1->Label(-text => '-right')->grid($f1->Entry(-textvariable => \$right),
	$f1->Label(-text => '-rightspring'),
	$f1->Entry(-textvariable => \$rightspring),
	-sticky => 'w', -padx => 2, -pady => 5);

# Add this Button in case the options we put in causes the 'formed' Button
# to go off screen somewhere.
$f1->Button(-text => "Go!", -command => \&reForm)
	->grid('-', '-', '-', -pady => 5);

MainLoop;

sub reForm
{
	print "top => $top\t";
	print "topspring => $topspring\n";
	print "bottom => $bottom\t";
	print "bottomspring => $bottomspring\n";
	print "left => $left\t";
	print "leftspring => $leftspring\n";
	print "right => $right\t";
	print "rightspring => $rightspring\n";
	print "-----------------------------\n";

	# Remove Button from container for now
	$button->formForget;

	my @args = ( );

	if ($top ne '') { push (@args, ('-top', $top)); }
	if ($bottom ne '') { push (@args, ('-bottom', $bottom)); }
	if ($right ne '') { push (@args, ('-right', $right)); }
	if ($left ne '') { push (@args, ('-left', $left)); }
	if ($topspring ne '') { push (@args, ('-topspring', $topspring)); }
	if ($bottomspring ne ''){push (@args, ('-bottomspring', $bottomspring));}
	if ($rightspring ne '') { push (@args, ('-rightspring', $rightspring)); }
	if ($rightspring ne '') { push (@args, ('-rightspring', $rightspring)); }
	print "ARGS: @args\n";

	# Put Button back in container using new args
	$button->form(@args);

}
You can't enter anonymous arrays as values in this application, but you can play with the basic way of attaching to a grid and with the springs. Take a look at Figure 2-53 to see what the widget looks like after the options are changed.
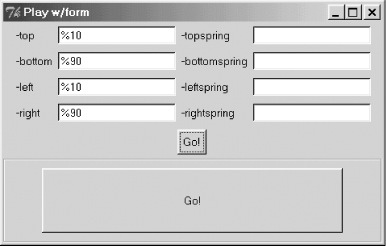
Figure 2-53. Using the Play with form program to test options
Using the top and bottom springs pushes the widget around a bit: if you enter 1 for both -topspring and -bottomspring, the height of the widget goes back to its default size and becomes centered in the screen.
2.4.4. form Methods
The following sections summarize form's methods.
2.4.4.1. Changing the grid size
You can change the grid at any time by calling formGrid with new x and y sizes. You can also determine the current size of the grid.
$parent->formGrid(200, 200);
($x, $y) = $parent->formGrid;
2.4.4.2. Removing a widget from a container
To take a widget out of its container, call $widget->formForget. Any attachments defined for this widget no longer apply.
2.4.4.3. Options info for form
Just like all the other geometry managers, form has an Info method to get detailed information about how a widget was put in its parent container:
%forminfo = $widget->formInfo;
$top_value = $widget->formInfo(-top);
2.4.4.4. What's managed by form?
To get a list of all the widgets managed by a parent container using form, call formSlaves on the parent. The order in the list is the same as how the widgets were added into the parent.
@widgets = $parent->formSlaves;
print "Widgets in $parent are @widgets\n";
|  | |
| 2.3. The place Geometry Manager |  | 2.5. Geometry Management Summary |

Copyright © 2002 O'Reilly & Associates. All rights reserved.