Chapter 7 TOC Chapter 9
Chapter 8. A Tkinter Tour, Part 2
8.1 "On Today's Menu: Spam, Spam, and Spam"
This chapter is the second in a two-part tour of the Tkinter library. It picks up where Chapter 7 left off, and covers some of the more advanced widgets and tools in the Tkinter arsenal. Among the topics presented in this chapter:
· Menu, Menubutton, and OptionMenu widgets
· The Scrollbar widget: for scrolling text, lists, and canvases
· The Listbox widget: a list of multiple selections
· The Text widget: a general text display and editing tool
· The Canvas widget: a general graphical drawing tool
· The grid table-based geometry manager
· Time-based tools: after, update, wait, and threads
· Basic Tkinter animation techniques
· Clipboards, erasing widgets and windows, etc.
By the time you've finished this chapter, you will have seen the bulk of the Tkinter library, and have all the information you need to compose larger portable user interfaces of your own. You'll also be ready to tackle the larger GUI examples presented in Chapter 9. As a segue to the next chapter, this one also closes with a look at the PyDemos and PyGadgets launcher toolbars -- GUIs used to start larger GUI examples.
8.2 Menus
Menus are the pull-down lists you're accustomed to seeing at the top of a window (or the entire display, if you're accustomed to seeing them on a Macintosh). Move the mouse cursor to the menu bar at the top, click on a name (e.g., File), and a list of selectable options pops up under the name you clicked (e.g., Open, Save). The options within a menu might trigger actions, much like clicking on a button; they may also open other "cascading" submenus that list more options, pop-up dialog windows, and so on. In Tkinter, there are two kinds of menus you can add to your scripts: top-level window menus and frame-based menus. The former option is better suited to whole windows, but the latter also works as a nested component.
8.2.1 Top-Level Window Menus
In more recent Python releases (using Tk 8.0 and beyond), you can associate a horizontal menu bar with a top-level window object (e.g., a Tk or Toplevel). On Windows and Unix (X Windows), this menu bar is displayed along the top of the window; on Macintosh, this menu replaces the one shown at the top of the screen when the window is selected. In other words, window menus look like you would expect on whatever underlying platform your script runs upon.
This scheme is based on building trees of Menu widget objects. Simply associate one top-level Menu with the window, add other pull-down Menu objects as cascades of the top-level Menu, and add entries to each of the pull-downs. Menus are cross-linked with the next higher level, by using parent widget arguments and the Menu widget's add_cascade method. It works like this:
1. Create a topmost Menu as the child of the window widget, and configure the window's menu attribute to be the new Menu.
2. For each pull-down, make a new Menu as the child of the topmost Menu, and add the child as a cascade of the topmost Menu using add_cascade.
3. Add menu selections to each pull-down Menu from Step 2, using the command options of add_command to register selection callback handlers.
4. Add a cascading submenu by making a new Menu as the child of the Menu the cascade extends, and using add_cascade to link parent to child.
The end result is a tree of Menu widgets with associated command callback handlers. This is all probably simpler in code than in words, though. Example 8-1 makes a main menu with two pull-downs, File and Edit; the Edit pull-down in turn has a nested submenu of its own.
Example 8-1. PP2E\Gui\Tour\menu_win.py
# Tk8.0 style top-level window menus
from Tkinter import * # get widget classesfrom tkMessageBox import * # get standard dialogsdef notdone(): showerror('Not implemented', 'Not yet available') def makemenu(win):
top = Menu(win) # win=top-level window
win.config(menu=top) # set its menu option
file = Menu(top)file.add_command(label='New...', command=notdone, underline=0)
file.add_command(label='Open...', command=notdone, underline=0)
file.add_command(label='Quit', command=win.quit, underline=0)
top.add_cascade(label='File', menu=file, underline=0)
edit = Menu(top, tearoff=0)edit.add_command(label='Cut', command=notdone, underline=0)
edit.add_command(label='Paste', command=notdone, underline=0)
edit.add_separator()top.add_cascade(label='Edit', menu=edit, underline=0)
submenu = Menu(edit, tearoff=0) submenu.add_command(label='Spam', command=win.quit, underline=0)submenu.add_command(label='Eggs', command=notdone, underline=0)
edit.add_cascade(label='Stuff', menu=submenu, underline=0)
if __name__ == '__main__':
root = Tk() # or Toplevel()
root.title('menu_win') # set window-mgr info
makemenu(root) # associate a menu bar
msg = Label(root, text='Window menu basics') # add something below
msg.pack(expand=YES, fill=BOTH) msg.config(relief=SUNKEN, width=40, height=7, bg='beige') root.mainloop()
There is a lot of code in this file devoted to setting callbacks and such, so it might help to isolate the bits involved with the menu tree building process. For the File menu, it's done like this:
top = Menu(win) # attach Menu to windowwin.config(menu=top) # cross-link window to menufile = Menu(top) # attach a Menu to top Menu
top.add_cascade(label='File', menu=file) # cross-link parent to child
Apart from building up the menu object tree, this script also demonstrates some of the most common menu configuration options:
Separator lines
The script makes a separator in the Edit menu with add_separator; it's just a line used to set off groups of related entries.
Tear-offs
The script also disables menu tear-offs in the Edit pull-down by passing a tearoff=0 widget option to Menu. Tear-offs are dashed lines that appear by default at the top of Tkinter menus, and create a new window containing the menu's contents when clicked. They can be a convenient shortcut device (you can click items in the tear-off window right away, without having to navigate through menu trees), but are not widely used on all platforms.
Keyboard shortcuts
The script uses the underline option to make a unique letter in a menu entry a keyboard shortcut. It gives the offset of the shortcut letter in the entry's label string. On Windows, for example, the Quit option in this script's File menu can be selected with the mouse as usual, but also by pressing the Alt key, then "f", then "q", You don't strictly have to use underline -- on Windows, the first letter of a pull-down name is a shortcut automatically, and arrow and Enter keys can be used to move through and select pull-down items. But explicit keys can enhance usability in large menus; for instance, the key sequence Alt+E+S+S runs the quit action in this script's nested submenu, without any mouse or arrow key movement.
Let's see what all this translates to in the realm of the pixel. Figure 8-1 shows the window that first appears when this script is run live on Windows; it looks different, but similar, on Unix and Macintosh.
Figure 8-1. menu_win: a top-level window menu bar
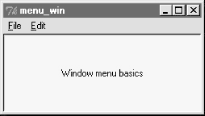
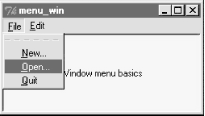
Figure 8-2 shows the scene when the File pull-down is selected. Notice that Menu widgets are linked, not packed (or gridded) -- the geometry manager doesn't really come into play here. If you run this script, you'll also notice that all of its menu entries either quit the program immediately or pop up a "Not Implemented" standard error dialog. This example is about menus, after all, but menu selection callback handlers generally do more useful work in practice.
Figure 8-2. The File menu pull-down
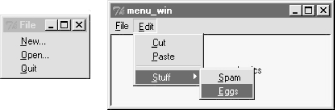
And finally, Figure 8-3 shows what happens after clicking the File menu's tear-off line and selecting the cascading submenu in the Edit pull-down. Cascades can be nested as deep as you like, but your users probably won't be happy if this gets silly.
Figure 8-3. A File tear-off and Edit cascade
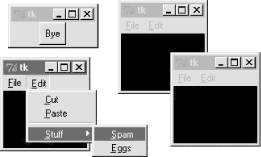
In Tkinter, every top-level window can have a menu bar, including pop-ups that you create with the Toplevel widget. Example 8-2 makes three pop-up windows with the same menu bar as the one we just met; when run, it constructs the scene captured in Figure 8-4.
Example 8-2. PP2E\Gui\Tour\menu_win-multi.py
from menu_win import makemenu
from Tkinter import *
root = Tk()
for i in range(3): # 3 popup windows with menus win = Toplevel(root) makemenu(win) Label(win, bg='black', height=5, width=15).pack(expand=YES, fill=BOTH)Button(root, text="Bye", command=root.quit).pack()
root.mainloop()
Figure 8-4. Multiple Toplevels with menus
8.2.2 Frame- and Menubutton-Based Menus
Although less commonly used for top-level windows, it's also possible to create a menu bar as a horizontal Frame. Before I show you how, though, let me explain why you should care. Because this frame-based scheme doesn't depend on top-level window protocols, it can also be used to add menus as nested components of larger displays. In other words, it's not just for top-level windows. For example, Chapter 9's PyEdit text editor can be used both as a program and an attachable component. We'll use window menus to implement PyEdit selections when it is run as a standalone program, but use frame-based menus when PyEdit is embedded in the PyMail and PyView displays. Both schemes are worth knowing.
Frame-based menus require a few more lines of code, but aren't much more complex than window menus. To make one, simply pack Menubutton widgets within a Frame container, associate Menu widgets with the Menubuttons, and associate the Frame with the top of a container window. Example 8-3 creates the same menu as Example 8-2, but using the frame-based approach.
Example 8-3. PP2E\Gui\Tour\menu_frm.py
# Frame-based menus: for top-levels and components
from Tkinter import * # get widget classesfrom tkMessageBox import * # get standard dialogsdef notdone(): showerror('Not implemented', 'Not yet available') def makemenu(parent):
menubar = Frame(parent) # relief=RAISED, bd=2...
menubar.pack(side=TOP, fill=X) fbutton = Menubutton(menubar, text='File', underline=0) fbutton.pack(side=LEFT) file = Menu(fbutton)file.add_command(label='New...', command=notdone, underline=0)
file.add_command(label='Open...', command=notdone, underline=0)
file.add_command(label='Quit', command=parent.quit, underline=0)
fbutton.config(menu=file) ebutton = Menubutton(menubar, text='Edit', underline=0) ebutton.pack(side=LEFT) edit = Menu(ebutton, tearoff=0)edit.add_command(label='Cut', command=notdone, underline=0)
edit.add_command(label='Paste', command=notdone, underline=0)
edit.add_separator()ebutton.config(menu=edit)
submenu = Menu(edit, tearoff=0) submenu.add_command(label='Spam', command=parent.quit, underline=0)submenu.add_command(label='Eggs', command=notdone, underline=0)
edit.add_cascade(label='Stuff', menu=submenu, underline=0)
return menubarif __name__ == '__main__':
root = Tk() # or TopLevel or Frame
root.title('menu_frm') # set window-mgr info
makemenu(root) # associate a menu bar
msg = Label(root, text='Frame menu basics') # add something below
msg.pack(expand=YES, fill=BOTH) msg.config(relief=SUNKEN, width=40, height=7, bg='beige') root.mainloop()
Again, let's isolate the linkage logic here to avoid getting distracted by other details. For the File menu case, here is what this boils down to:
menubar = Frame(parent) # make a Frame for the menubarfbutton = Menubutton(menubar, text='File') # attach a MenuButton to Framefile = Menu(fbutton) # attach a Menu to MenuButton
fbutton.config(menu=file) # crosslink button to menu
There is an extra Menubutton widget in this scheme, but it's not much more complex than making top-level window menus. Figures Figure 8-5 and Figure 8-6 show this script in action on Windows.
Figure 8-5. menu_frm: Frame and Menubutton menu bar
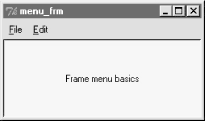
Figure 8-6. With the Edit menu selected
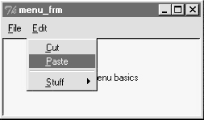
The menu widgets in this script provide a default set of event bindings that automatically pop up menus when selected with a mouse. This doesn't look or behave exactly like the top-level window menu scheme shown earlier, but it is close, can be configured in any way that frames can (i.e., with colors and borders), and will look similar on every platform (though this is probably not a feature).
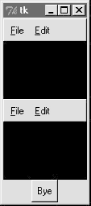
The biggest advantage of frame-based menu bars, though, is that they can also be attached as nested components in larger displays. Example 8-4 and its resulting interface (Figure 8-7) show how.
Example 8-4. PP2E\Gui\Tour\menu_frm-multi.py
from menu_frm import makemenu # can't use menu_win here--one windowfrom Tkinter import * # but can attach from menus to windowsroot = Tk()
for i in range(2): # 2 menus nested in one window mnu = makemenu(root) mnu.config(bd=2, relief=RAISED) Label(root, bg='black', height=5, width=15).pack(expand=YES, fill=BOTH)Button(root, text="Bye", command=root.quit).pack()
root.mainloop()
Figure 8-7. Multiple Frame menus on one window
Because they are not tied to the enclosing window, frame-based menus can also be used as part of another attachable component's widget package. For example, the menu embedding behavior in Example 8-5 even works if the menu's parent is another Frame container, not the top-level window.
Example 8-5. PP2E\Gui\Tour\menu_frm-multi2.py
from menu_frm import makemenu # can't use menu_win here--root=Framefrom Tkinter import *
root = Tk()
for i in range(3): # 3 menus nested in the containersfrm = Frame()
mnu = makemenu(frm) mnu.config(bd=2, relief=RAISED) frm.pack(expand=YES, fill=BOTH) Label(frm, bg='black', height=5, width=15).pack(expand=YES, fill=BOTH)Button(root, text="Bye", command=root.quit).pack()
root.mainloop()
8.2.2.1 Using Menubuttons and Optionmenus
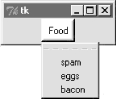
In fact, menus based on Menubutton are even more general than Example 8-3 implies -- they can actually show up anywhere on a display that normal buttons can, not just within a menubar Frame. Example 8-6 makes a Menubutton pull-down list that simply shows up by itself, attached to the root window; Figure 8-8 shows the GUI it produces.
Example 8-6. PP2E\Gui\Tour\mbutton.py
from Tkinter import * root = Tk()mbutton = Menubutton(root, text='Food') # the pull-down stands alonepicks = Menu(mbutton)
mbutton.config(menu=picks) picks.add_command(label='spam', command=root.quit)picks.add_command(label='eggs', command=root.quit)picks.add_command(label='bacon', command=root.quit)
mbutton.pack()
mbutton.config(bg='white', bd=4, relief=RAISED)
root.mainloop()
Figure 8-8. A Menubutton all by itself
The related Tkinter Optionmenu widget displays an item selected from a pull-down menu. It's roughly like a Menubutton plus a display label, and displays a menu of choices when clicked; but you must link Tkinter variables (described in Chapter 7) to fetch the choice after the fact instead of registering callbacks, and menu entries are passed as arguments in the widget constructor call after the variable.
Example 8-7 illustrates typical Optionmenu usage, and builds the interface captured in Figure 8-9. Clicking on either of the first two buttons opens a pull-down menu of options; clicking on the third "state" button fetches and prints the current values displayed in the first two.
Example 8-7. PP2E\Gui\Tour\optionmenu.py
from Tkinter import *
root = Tk()
var1 = StringVar()
var2 = StringVar()
opt1 = OptionMenu(root, var1, 'spam', 'eggs', 'toast') # like Menubutton
opt2 = OptionMenu(root, var2, 'ham', 'bacon', 'sausage') # but shows choice
opt1.pack(fill=X)
opt2.pack(fill=X)
var1.set('spam')var2.set('ham')def state(): print var1.get(), var2.get() # linked variablesButton(root, command=state, text='state').pack()
root.mainloop()
Figure 8-9. An Optionmenu at work

There are other menu-related topics that we'll skip here in the interest of space. For instance, scripts can add entries to system menus, and generate pop-up menus (posted in response to events, without an associated button). Refer to Tk and Tkinter resources for more details on this front.
In addition to simple selections and cascades, menus can also contain disabled entries, checkbutton and radiobutton selections, and bitmap and photo images. The next section demonstrates how some of these special menu entries are programmed.
8.2.3 Windows with Both Menus and Toolbars
Besides showing a menu at the top, it is common for windows to display a row of buttons at the bottom. This bottom button row is usually called a toolbar, and often contains shortcuts to items also available in the menus at the top. It's easy to add a toolbar to windows in Tkinter -- simply pack buttons (and other kinds of widgets) into a frame, pack the frame on the bottom of the window, and set it to expand horizontally only. This is really just hierarchical GUI layout at work again, but make sure to pack toolbars (and frame-based menu bars) early, so that other widgets in the middle of the display are clipped first when the window shrinks.
Example 8-8 shows one way to go about adding a toolbar to a window. It also demonstrates how to add photo images in menu entries (set the image attribute to PhotoImage object), and how to disable entries and give them a grayed-out appearance (call the menu entryconfig method with the index of the item to disable, starting from 1). Notice that PhotoImage objects are saved as a list; remember, unlike other widgets, these go away if you don't hold onto them.
Example 8-8. PP2E\Gui\Tour\menuDemo.py
#!/usr/local/bin/python
#########################################################################
# Tk8.0 style main window menus
# menu/tool bars packed before middle, fill=X (pack first=clip last);
# adds photos menu entries; see also: add_checkbutton, add_radiobutton
#########################################################################
from Tkinter import * # get widget classesfrom tkMessageBox import * # get standard dialogsclass NewMenuDemo(Frame): # an extended frame
def __init__(self, parent=None): # attach to top-level?
Frame.__init__(self, parent) # do superclass init
self.pack(expand=YES, fill=BOTH)self.createWidgets() # attach frames/widgets
self.master.title("Toolbars and Menus") # set window-manager info
self.master.iconname("tkpython") # label when iconified
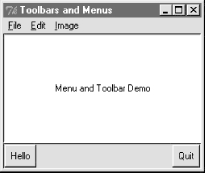
def createWidgets(self): self.makeMenuBar() self.makeToolBar() L = Label(self, text='Menu and Toolbar Demo') L.config(relief=SUNKEN, width=40, height=10, bg='white') L.pack(expand=YES, fill=BOTH) def makeToolBar(self): toolbar = Frame(self, cursor='hand2', relief=SUNKEN, bd=2) toolbar.pack(side=BOTTOM, fill=X)Button(toolbar, text='Quit', command=self.quit ).pack(side=RIGHT)
Button(toolbar, text='Hello', command=self.greeting).pack(side=LEFT) def makeMenuBar(self): self.menubar = Menu(self.master)self.master.config(menu=self.menubar) # master=top-level window
self.fileMenu() self.editMenu() self.imageMenu() def fileMenu(self): pulldown = Menu(self.menubar) pulldown.add_command(label='Open...', command=self.notdone)pulldown.add_command(label='Quit', command=self.quit)
self.menubar.add_cascade(label='File', underline=0, menu=pulldown) def editMenu(self): pulldown = Menu(self.menubar)pulldown.add_command(label='Paste', command=self.notdone)
pulldown.add_command(label='Spam', command=self.greeting)
pulldown.add_separator()pulldown.add_command(label='Delete', command=self.greeting)
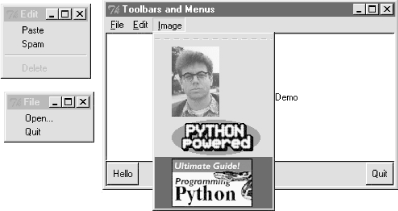
pulldown.entryconfig(4, state=DISABLED) self.menubar.add_cascade(label='Edit', underline=0, menu=pulldown) def imageMenu(self): photoFiles = ('guido.gif', 'pythonPowered.gif', 'ppython_sm_ad.gif') pulldown = Menu(self.menubar)
self.photoObjs = [] for file in photoFiles: img = PhotoImage(file='../gifs/' + file) pulldown.add_command(image=img, command=self.notdone)self.photoObjs.append(img) # keep a reference
self.menubar.add_cascade(label='Image', underline=0, menu=pulldown) def greeting(self): showinfo('greeting', 'Greetings')def notdone(self):
showerror('Not implemented', 'Not yet available') def quit(self): if askyesno('Verify quit', 'Are you sure you want to quit?'): Frame.quit(self)if __name__ == '__main__': NewMenuDemo().mainloop() # if I'm run as a script
Figure 8-10. menuDemo: menus and toolbars
When run, this script generates the scene in Figure 8-10 at first. Figure 8-11 shows this window after being stretched a bit, with its File and Edit menus torn off, and its Image menu selected. That's Python creator Guido van Rossum in this script's third menu (wearing his now-deprecated eyeglasses). Run this on your own computer to get a better feel for its behavior.[1]
Figure 8-11. Images and tear-offs on the job
8.2.3.1 Automating menu construction
Menus are a powerful Tkinter interface device. If you're like me, though, the examples in this section probably seem like a lot of work. Menu construction can be both code-intensive and error-prone if done by calling Tkinter methods directly. A better approach might automatically build and link up menus from a higher-level description of their contents. In fact, we will -- in Chapter 9, we'll meet a tool called GuiMixin that automates the menu construction process, given a data structure that contains all menus desired. As an added bonus, it supports both window and frame-style menus, so it can be used by both standalone programs and nested components. Although it's important to know the underlying calls used to make menus, you don't necessarily have to remember them for long.
8.3 Listboxes and Scrollbars
Listbox widgets allow you to display a list of items for selection, and Scrollbarsare designed for navigating through the contents of other widgets. Because it is common to use these widgets together, let's study them both at once. Example 8-9 builds both a Listbox and a Scrollbar, as a packaged set.
Example 8-9. PP2E\Gui\Tour\scrolledlist.py
from Tkinter import *
class ScrolledList(Frame):
def __init__(self, options, parent=None): Frame.__init__(self, parent)self.pack(expand=YES, fill=BOTH) # make me expandable
self.makeWidgets(options) def handleList(self, event):index = self.listbox.curselection() # on list double-click
label = self.listbox.get(index) # fetch selection text
self.runCommand(label) # and call action here
def makeWidgets(self, options): # or get(ACTIVE)
sbar = Scrollbar(self) list = Listbox(self, relief=SUNKEN)sbar.config(command=list.yview) # xlink sbar and list
list.config(yscrollcommand=sbar.set) # move one moves other
sbar.pack(side=RIGHT, fill=Y) # pack first=clip last
list.pack(side=LEFT, expand=YES, fill=BOTH) # list clipped first
pos = 0for label in options: # add to list-box
list.insert(pos, label) # or insert(END,label)
pos = pos + 1#list.config(selectmode=SINGLE, setgrid=1) # select,resize modes
list.bind('<Double-1>', self.handleList) # set event handler
self.listbox = listdef runCommand(self, selection): # redefine me lower
print 'You selected:', selectionif __name__ == '__main__':
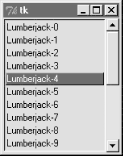
options = map((lambda x: 'Lumberjack-' + str(x)), range(20)) ScrolledList(options).mainloop()
This module can be run standalone to experiment with these widgets, but is also designed to be useful as a library object. By passing in different selection lists to the options argument and redefining the runCommand method in a subclass, the ScrolledList component class defined here can be reused any time you need to display a scrollable list. With just a little forethought, it's easy to extend the Tkinter library with Python classes.
When run standalone, this script generates the window shown in Figure 8-12. It's a Frame, with a Listbox on its left containing 20 generated entries (the fifth has been clicked), along with an associated Scrollbar on its right for moving through the list. If you move the scroll, the list moves, and vice versa.
Figure 8-12. scrolledlist at the top
8.3.1 Programming Listboxes
Listboxes are straightforward to use, but they are populated and processed in somewhat unique ways compared to the widgets we've seen so far. Many listbox calls accept a passed-in index to refer to an entry in the list. Indexes start at integer and grow higher, but Tkinter also accepts special name strings in place of integer offsets -- "end" to refer to the end of the list, "active" to denote the line selected, and more. This generally yields more than one way to code listbox calls.
For instance, this script adds items to the listbox in this window by calling its insert method, with successive offsets (starting at zero):
list.insert(pos, label)
pos = pos + 1
But you can also fill a list by simply adding items at the end without keeping a position counter at all, with either of these statements:
list.insert('end', label) # add at end: no need to count positionslist.insert(END, label) # END is preset to 'end' inside Tkinter
The listbox widget doesn't have anything like the command option we use to register callback handlers for button presses, so you either need to fetch listbox selections while processing other widgets' events (e.g., a button press elsewhere in the GUI), or tap into other event protocols to process user selections. To fetch a selected value, this script binds the <Double-1> left mouse button double-click event to a callback handler method with bind (seen earlier on this tour).
In the double-click handler, this script grabs the selected item out of the listbox with this pair of listbox method calls:
index = self.listbox.curselection() # get selection indexlabel = self.listbox.get(index) # fetch text by its index
Here, too, you can code this differently. Either of the following lines have the same effect; they get the contents of the line at index "active" -- the one selected:
label = self.listbox.get('active') # fetch from active indexlabel = self.listbox.get(ACTIVE) # ACTIVE='active' in Tkinter
For illustration purposes, the class's default runCommand method prints the value selected each time you double-click an entry in the list -- as fetched by this script, it comes back as a string reflecting the text in the selected entry:
C:\...\PP2E\Gui\Tour>python scrolledlist.py
You selected: Lumberjack-2
You selected: Lumberjack-19
You selected: Lumberjack-4
You selected: Lumberjack-12
8.3.2 Programming Scrollbars
The deepest magic in this script, though, boils down to two lines of code:
sbar.config(command=list.yview) # call list.yview when I movelist.config(yscrollcommand=sbar.set) # call sbar.set when I move
The scrollbar and listbox are effectively cross-linked to each other through these configuration options; their values simply refer to bound widget methods of the other. By linking like this, Tkinter automatically keeps the two widgets in sync with each other as they move. Here's how this works:
· Moving a scrollbar invokes the callback handler registered with its command option. Here, list.yview refers to a built-in listbox method that adjusts the listbox display proportionally, based on arguments passed to the handler.
· Moving a listbox vertically invokes the callback handler registered with its yscrollcommand option. In this script, the sbar.set built-in method adjusts a scrollbar proportionally.
In other words, moving one automatically moves the other. It turns out that every scrollable object in Tkinter -- Listbox, Entry, Text, and Canvas -- has built-in yview and xview methods to process incoming vertical and horizontal scroll callbacks, as well as yscrollcommand and xscrollcommand options for specifying an associated scrollbar's callback handler. Scrollbars all have a command option, to name a handler to call on moves. Internally, Tkinter passes information to all these methods that specifies their new position (e.g., "go 10% down from the top"), but your scripts need never deal with that level of detail.
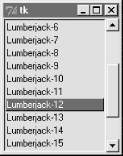
Because the scrollbar and listbox have been cross-linked in their option settings, moving the scrollbar automatically moves the list, and moving the list automatically moves the scrollbar. To move the scrollbar, either drag the solid part or click on its arrows or empty areas. To move the list, click on the list and move the mouse pointer above or below the listbox without releasing the mouse button. In both cases, the list and scrollbar move in unison. Figure 8-13 is the scene after moving down a few entries in the list, one way or another.
Figure 8-13. scrolledlist in the middle
8.3.3 Packing Scrollbars
Finally, remember that widgets packed last are always clipped first when a window is shrunk. Because of that, it's important to pack scrollbars in a display as soon as possible, so that they are the last to go when the window becomes too small for everything. You can generally make due with less than complete listbox text, but the scrollbar is crucial for navigating through the list. As Figure 8-14 shows, shrinking this script's window cuts out part of the list, but retains the scrollbar.
Figure 8-14. scrolledlist gets small

At the same time, you don't generally want a scrollbar to expand with a window, so be sure to pack it with just a fill=Y (or fill=X for a horizontal scroll), and not an expand=YES. Expanding this example's window, for instance, makes the listbox grow along with the window, but keeps the scrollbar attached to the right, and of the same size.
We'll see both scrollbars and listboxes repeatedly in later examples in this and later chapters (flip ahead to PyEdit, PyForm, PyTree, and ShellGui for more examples). And although the example script in this section captures the fundamentals, I should point out that there is more to both scrollbars and listboxes than meets the eye here.
For example, it's just as easy to add horizontal scrollbars to scrollable widgets; they are programmed almost exactly like the vertical one implemented here, but callback handler names start with "x", not "y", and an orient='horizontal' configuration option is set for the scrollbar object (see the later PyEdit and PyTree programs for examples). Listboxes can also be useful input devices even without attached scrollbars; they also accept color, font, and relief configuration options, and support multiple selections (the default is selectmode=SINGLE).
Scrollbars see more kinds of GUI action too -- they can be associated with other kinds of widgets in the Tkinter library. For instance, it is common to attach one to the Text widget; which brings us to the next point of interest on this tour.
8.4 Text
It's been said that Tkinter's strongest points may be its text and canvas widgets. Both provide a remarkable amount of functionality. For instance, the Tkinter Text widget was powerful enough to implement the Grail web browser, discussed in Chapter 15; it supports complex font style settings, embedded images, and much more. The Tkinter Canvas widget, a general-purpose drawing device, has also been the basis of sophisticated image processing and visualization applications.
In Chapter 9, we'll put these two widgets to use to implement text editors (PyEdit), paint programs (PyDraw), clock GUIs (PyClock), and photo slideshows (PyView). For the purposes of this tour chapter, though, let's start out using these widgets in simpler ways. Example 8-10 implements a simple scrolled-text display, which knows how to fill its display with a text string or file.
Example 8-10. PP2E\Gui\Tour\scrolledtext.py
# a simple text or file viewer component
print 'PP2E scrolledtext'
from Tkinter import *
class ScrolledText(Frame):
def __init__(self, parent=None, text='', file=None): Frame.__init__(self, parent)self.pack(expand=YES, fill=BOTH) # make me expandable
self.makewidgets() self.settext(text, file) def makewidgets(self): sbar = Scrollbar(self) text = Text(self, relief=SUNKEN)sbar.config(command=text.yview) # xlink sbar and text
text.config(yscrollcommand=sbar.set) # move one moves other
sbar.pack(side=RIGHT, fill=Y) # pack first=clip last
text.pack(side=LEFT, expand=YES, fill=BOTH) # text clipped first
self.text = text def settext(self, text='', file=None): if file: text = open(file, 'r').read()self.text.delete('1.0', END) # delete current text
self.text.insert('1.0', text) # add at line 1, col 0
self.text.mark_set(INSERT, '1.0') # set insert cursor
self.text.focus() # save user a click
def gettext(self): # returns a string
return self.text.get('1.0', END+'-1c') # first through last
if __name__ == '__main__':
root = Tk() try:st = ScrolledText(file=sys.argv[1]) # filename on cmdline
except IndexError:st = ScrolledText(text='Words\ngo here') # or not: 2 lines
def show(event): print repr(st.gettext()) # show as raw string
root.bind('<Key-Escape>', show) # esc = dump text
root.mainloop()
Like the ScrolledList of Example 8-9, the ScrolledText object in this file is designed to be a reusable component, but can also be run standalone to display text file contents. Also like the last section, this script is careful to pack the scrollbar first so that it is cut out of the display last as the window shrinks, and arranges for the embedded Text object to expand in both directions as the window grows. When run with a filename argument, this script makes the window shown in Figure 8-15; it embeds a Text widget on the left, and a cross-linked Scrollbar on the right.
Figure 8-15. scrolledtext in action
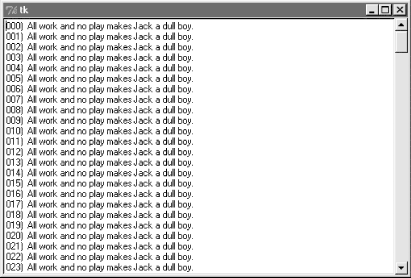
Just for fun, I populated the text file displayed in the window with the following code and command lines (and not just because I happen to live near an infamous hotel in Colorado):
C:\...\PP2E\Gui\Tour>type temp.py
f = open('temp.txt', 'w')for i in range(250):
f.write('%03d) All work and no play makes Jack a dull boy.\n' % i)
f.close()
C:\...\PP2E\Gui\Tour>python temp.py
C:\...\PP2E\Gui\Tour>python scrolledtext.py temp.txt
PP2E scrolledtext
To view a file, pass its name on the command line -- its text is automatically displayed in the new window. By default, it is shown in a non-fixed-width font, but we'll pass a font option to the text widget in the next example to change that.
Notice the "PP2E scrolledtext" message printed when this script runs. Because there is also a ScrolledText.py file in the standard Python distribution with a very different interface, the one here identifies itself when run or imported so you can tell which one you've got. If the standard one ever goes away, import the one listed here for a simple text browser, and adjust configuration calls to include a ".text" qualifier level (the library version subclasses Text, not Frame).
8.4.1 Programming the Text Widget
To understand how this script works at all, though, we have to detour into a few Text widget details here. Earlier we met the Entry and Message widgets, which address a subset of the Text widget's uses. The Text widget is much richer in both features and interfaces -- it supports both input and display of multiple lines of text, editing operations for both programs and interactive users, multiple fonts and colors, and much more. Text objects are created, configured, and packed just like any other widget, but they have properties all their own.
8.4.1.1 Text is a Python string
Although the Text widget is a powerful tool, its interface seems to boil down to two core concepts. First of all, the content of a Text widget is represented as a string in Python scripts, and multiple lines are separated with the normal \n line terminator. The string 'Words\ngo here', for instance, represents two lines when stored in or fetched from a Text widget; it would normally have a trailing \n too, but doesn't have to.
To help illustrate this point, this script binds the Escape key press to fetch and print the entire contents of the Text widget it embeds:
C:\...\PP2E\Gui\Tour>python scrolledtext.py
PP2E scrolledtext
'Words\012go here'
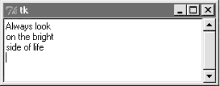
'Always look\012on the bright\012side of life\012'
When run with arguments, the script stores a file's contents in the text widget. When run without arguments, the script stuffs a simple literal string into the widget, displayed by the first Escape press output here (recall that \012 is the octal escape form of the \n line terminator). The second output here happens when pressing Escape in the shrunken window captured in Figure 8-16.
Figure 8-16. scrolledtext gets a positive outlook
8.4.1.2 String positions
The second key to understanding Text code has to do with the ways you specify a position in the text string. Like the listbox, text widgets allow you to specify such a position in a variety of ways. In Text, methods that expect a position to be passed in will accept an index, a mark, or a tag reference. Moreover, some special operations are invoked with predefined marks and tags -- the insert cursor is mark INSERT, and the current selection is tag SEL.
8.4.1.2.1 Text indexes
Because it is a multiple-line widget, Text indexes identify both a line and a column. For instance, consider the interfaces of the basic insert, delete, and fetch text operations used by this script:
self.text.insert('1.0', text) # insert text at the startself.text.delete('1.0', END) # delete all current textreturn self.text.get('1.0', END+'-1c') # fetch first through last
In all of these, the first argument is an absolute index that refers to the start of the text string: string "1.0" means row 1, column (rows are numbered from 1 and columns from 0). An index "2.1" refers to the second character in the second row.
Like the listbox, text indexes can also be symbolic names: the END in the preceding delete call refers to the position just past the last character in the text string (it's a Tkinter variable preset to string "end"). Similarly, the symbolic index INSERT (really, string "insert") refers to the position immediately after the insert cursor -- the place where characters would appear if typed at the keyboard. Symbolic names like INSERT can also be called marks, described in a moment.
For added precision, you can add simple arithmetic extensions to index strings. The index expression END+'-1c' in the get call in the previous example, for instance, is really the string "end-1c", and refers to one character back from END. Because END points to just beyond the last character in the text string, this expression refers to the last character itself. The -1c extension effectively strips the trailing \n that this widget adds to its contents (and may add a blank line if saved in a file).
Similar index string extensions let you name characters ahead (+1c), lines ahead and behind (+2l, -2l), and specify things like word and line starts around an index (lineend, wordstart). Indexes show up in most Text widget calls.
8.4.1.2.2 Text marks
Besides row/column identifier strings, you can also pass positions as names of marks -- symbolic names for a position between two characters. Unlike absolute row/column positions, marks are virtual locations that move as new text is inserted or deleted (by your script or your user). A mark always refers to its original location, even if that location shifts to a different row and column over time.
To create a mark, call the text mark_set method with a string name and an index to give its logical location. For instance, this script sets the insert cursor at the start of the text initially, with a call like the first one here:
self.text.mark_set(INSERT, '1.0') # set insert cursor to startself.text.mark_set('linetwo', '2.0') # mark current line 2
The name INSERT is a predefined special mark that identifies the insert cursor position; setting it changes the insert cursor's location. To make a mark of your own, simply provide a unique name as in the second call here, and use it anywhere you need to specify a text position. The mark_unset call deletes marks by name.
8.4.1.2.3 Text tags
In addition to absolute indexes and symbolic mark names, the Text widget supports the notion of tags -- symbolic names associated with one or more substrings within the Text widget's string. Tags can be used for many things, but they also serve to represent a position anywhere you need one: tagged items are named by their beginning and ending indexes, which can be later passed to position-based calls.
For example, Tkinter provides a built-in tag name SEL -- a Tkinter name preassigned to string "sel" -- which automatically refers to currently selected text. To fetch the text selected (highlighted) with a mouse, run either of these calls:
text = self.text.get(SEL_FIRST, SEL_LAST) # use tags for from/to indexestext = self.text.get('sel.first', 'sel.last') # strings and constants work
The names SEL_FIRST and SEL_LAST are just preassigned variables in the Tkinter module that refer to the strings used in the second line here. The text get method expects two indexes; to fetch text names by a tag, add .first and .last to the tag's name to get its start and end indexes.
To tag a substring, call the text widget's tag_add method with a tag name string and start and stop positions (text can also be tagged as added in insert calls). To remove a tag from all characters in a range of text, call tag_remove:
self.text.tag_add('alltext', '1.0', END) # tag all text in the widgetself.text.tag_add(SEL, index1, index2) # select from index1 up to index2self.text.tag_remove(SEL, '1.0', END) # remove selection from all text
The first line here creates a new tag that names all text in the widget -- from start through end positions. The second line adds a range of characters to the built-in SEL selection tag -- they are automatically highlighted, because this tag is predefined to configure its members that way. The third line removes all characters in the text string from the SEL tag (all selections are unselected). Note that the tag_remove call just untags text within the named range; to really delete a tag completely, call tag_delete instead.
You can map indexes to tags dynamically too. For example, the text search method returns the row.column index of the first occurrence of a string between start and stop positions. To automatically select the text thus found, simply add its index to the built-in SEL tag:
where = self.text.search(target, INSERT, END) # search from insert cursorpastit = where + ('+%dc' % len(target)) # index beyond string foundself.text.tag_add(SEL, where, pastit) # tag and select found stringself.text.focus() # select text widget itself
If you only want one string to be selected, be sure to first run the tag_remove call listed earlier -- this code adds a selection in addition to any selections that already exist (it may generate multiple selections in the display). In general, you can add any number of substrings to a tag to process them as a group.
To summarize: indexes, marks, and tag locations can be used anytime you need a text position. For instance, the text see method scrolls the display to make a position visible; it accepts all three kinds of position specifiers:
self.text.see('1.0') # scroll display to topself.text.see(INSERT) # scroll display to insert cursor markself.text.see(SEL_FIRST) # scroll display to selection tag
Text tags can also be used in broader ways for formatting and event bindings, but I'll defer those details until the end of this section.
8.4.2 Adding Text-Editing Operations
Example 8-11 puts some of these concepts to work. It adds support for four common text-editing operations -- file save, text cut and paste, and string find searching -- by subclassing ScolledText to provide additional buttons and methods. The Text widget comes with a set of default keyboard bindings that perform some common editing operations too, but they roughly mimic the Unix Emacs editor, and are somewhat obscure; it's more common and user-friendly to provide GUI interfaces to editing operations in a GUI text editor.
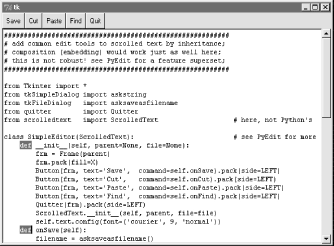
Example 8-11. PP2E\Gui\Tour\simpleedit.py
#########################################################
# add common edit tools to scrolled text by inheritance;
# composition (embedding) would work just as well here;
# this is not robust! see PyEdit for a feature superset;
#########################################################
from Tkinter import *
from tkSimpleDialog import askstring
from tkFileDialog import asksaveasfilenamefrom quitter import Quitterfrom scrolledtext import ScrolledText # here, not Python's
class SimpleEditor(ScrolledText): # see PyEdit for more def __init__(self, parent=None, file=None): frm = Frame(parent) frm.pack(fill=X)Button(frm, text='Save', command=self.onSave).pack(side=LEFT)
Button(frm, text='Cut', command=self.onCut).pack(side=LEFT)
Button(frm, text='Paste', command=self.onPaste).pack(side=LEFT)Button(frm, text='Find', command=self.onFind).pack(side=LEFT)
Quitter(frm).pack(side=LEFT) ScrolledText.__init__(self, parent, file=file) self.text.config(font=('courier', 9, 'normal')) def onSave(self): filename = asksaveasfilename() if filename:alltext = self.gettext() # first through last
open(filename, 'w').write(alltext) # store text in file
def onCut(self):text = self.text.get(SEL_FIRST, SEL_LAST) # error if no select
self.text.delete(SEL_FIRST, SEL_LAST) # should wrap in try
self.clipboard_clear()
self.clipboard_append(text)def onPaste(self): # add clipboard text
try: text = self.selection_get(selection='CLIPBOARD') self.text.insert(INSERT, text) except TclError:pass # not to be pasted
def onFind(self): target = askstring('SimpleEditor', 'Search String?') if target:where = self.text.search(target, INSERT, END) # from insert cursor
if where: # returns an index
print wherepastit = where + ('+%dc' % len(target)) # index past target
#self.text.tag_remove(SEL, '1.0', END) # remove selection
self.text.tag_add(SEL, where, pastit) # select found target
self.text.mark_set(INSERT, pastit) # set insert mark
self.text.see(INSERT) # scroll display
self.text.focus() # select text widget
if __name__ == '__main__':
try:SimpleEditor(file=sys.argv[1]).mainloop() # filename on command line
except IndexError:SimpleEditor().mainloop() # or not
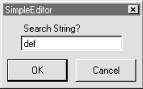
This, too, was written with one eye toward reuse -- the SimpleEditor class it defines could be attached or subclassed by other GUI code. As I'll explain at the end of this section, though, it's not yet as robust as a general-purpose library tool should be. Still, it implements a functional text editor in a small amount of portable code. When run standalone, it brings up the window in Figure 8-17 (shown running in Windows); index positions are printed on stdout after each successful find operation:
C:\...\PP2E\Gui\Tour>python simpleedit.py simpleedit.py
PP2E scrolledtext
14.4
24.4
Figure 8-17. simpleedit in action
The save operation pops up the common save dialog available in Tkinter, and tailored to look native on each platform. Figure 8-18 shows this dialog in action on Windows. Find operations also pop up a standard dialog box to input a search string (Figure 8-19); in a full-blown editor, you might want to save this string away to repeat the find again (we will, in the next chapter's PyEdit).
Figure 8-18. Save pop-up dialog on Windows
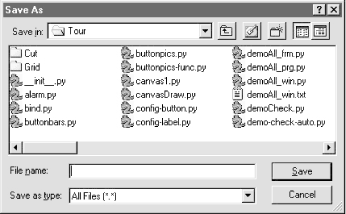
Figure 8-19. Find pop-up dialog
8.4.2.1 Using the clipboard
Besides text widget operations, Example 8-11 applies the Tkinter clipboard interfaces in its cut and paste functions. Together, these operations allow you to move text within a file (cut in one place, paste in another). The clipboard they use is just a place to store data temporarily -- deleted text is placed on the clipboard on a cut, and text is inserted from the clipboard on a paste. If we restrict our focus to this program alone, there really is no reason that the text string cut couldn't simply be stored in a Python instance variable. But the clipboard is actually a much larger concept.
The clipboard used by this script is an interface to a systemwide storage space, shared by all programs on your computer. Because of that, it can be used to transfer data between applications, even ones that know nothing of Tkinter. For instance, text cut or copied in a Microsoft Word session can be pasted in a SimpleEditor window, and text cut in SimpleEditor can be pasted in a Microsoft Notepad window (try it). By using the clipboard for cut and paste, SimpleEditor automatically integrates with the window system at large. Moreover, the clipboard is not just for the text widget -- it can also be used to cut and paste graphical objects in the Canvas widget (discussed next).
As used in this script, the basic Tkinter clipboard interface looks like this:
self.clipboard_clear() # clear the clipboardself.clipboard_append(text) # store a text string on it
text = self.selection_get(selection='CLIPBOARD') # fetch contents, if any
All of these calls are available as methods inherited by all Tkinter widget objects because they are global in nature. The CLIPBOARD selection used by this script is available on all platforms (a PRIMARY selection is also available, but is only generally useful on X Windows, so we'll ignore it here). Notice that the clipboard selection_get call throws a TclError exception if it fails; this script simply ignores it and abandons a paste request, but we'll do better later.
8.4.2.2 Composition versus inheritance
As coded, SimpleEditor uses inheritance to extend ScrolledText with extra buttons and callback methods. As we've seen, it's also reasonable to attach (embed) GUI objects coded as components, like ScrolledText. The attachment model is usually called composition; some people find it simpler to understand, and less prone to name clashes than extension by inheritance.
To give you an idea of the differences between these two approaches, the following sketches the sort of code you would write to attach a ScrolledText to SimpleEditor with changed lines in bold font (see file simpleedit-2.py on the CD for a complete composition implementation). It's mostly a matter of passing in the right parents, and adding an extra "st" attribute name to get to the Text widget's methods:
class SimpleEditor(Frame):
def __init__(self, parent=None, file=None): Frame.__init__(self, parent) self.pack()frm = Frame(self)
frm.pack(fill=X)Button(frm, text='Save', command=self.onSave).pack(side=LEFT)
...more... Quitter(frm).pack(side=LEFT)self.st = ScrolledText(self, file=file) # attach, not subclass
self.st.text.config(font=('courier', 9, 'normal')) def onSave(self): filename = asksaveasfilename() if filename:alltext = self.st.gettext() # go through attribute
open(filename, 'w').write(alltext) def onCut(self): text = self.st.text.get(SEL_FIRST, SEL_LAST) self.st.text.delete(SEL_FIRST, SEL_LAST) ...more...
The window looks identical when such code is run. I'll let you be the judge of whether composition or inheritance is better here. If you code your Python GUI classes right, they will work under either regime.
8.4.2.3 It's called "Simple" for a reason
Finally, before you change your system registry to make SimpleEditor your default text file viewer, I should mention that although it shows the basics, it's something of a stripped-down version of the PyEdit example we'll meet in Chapter 9. In fact, you should study that example now if you're looking for more complete Tkinter text processing code in general. Because the text widget is so powerful, it's difficult to demonstrate more of its features without the volume of code that is already listed in the PyEdit program.
I should also point out that SimpleEditor is not only limited in function, it's just plain careless -- many boundary cases go unchecked and trigger uncaught exceptions that don't kill the GUI, but are not handled or reported. Even errors that are caught are not reported to the user (e.g., a paste, with nothing to be pasted). Be sure to see the PyEdit example for a more robust and complete implementation of the operations introduced in SimpleEditor.
8.4.3 Advanced Text and Tag Operations
Besides position specifiers, text tags can also be used to apply formatting and behavior to both all characters in a substring, and all substrings added to a tag. In fact, this is where much of the power of the text widget lies:
· Tags have formatting attributes for setting color, font, tabs, and line spacing and justification; to apply these to many parts of the text at once, associate them with a tag and apply formatting to the tag with the tag_config method, much like the general widget config we've been using.
· Tags can also have associated event bindings, which lets you implement things like hyperlinks in a Text widget: clicking the text triggers its tag's event handler. Tag bindings are set with a tag_bind method, much like the general widget bind method we've already met.
With tags, it's possible to display multiple configurations within the same text widget; for instance, you can apply one font to the text widget at large, and other fonts to tagged text. In addition, the text widget allows you to embed other widgets at an index (they are treated like a single character), as well as images.
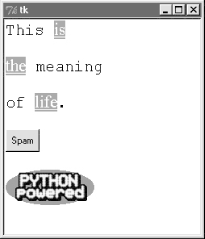
Example 8-12 illustrates the basics of all these advanced tools at once, and draws the interface captured in Figure 8-20. This script applies formatting and event bindings to three tagged substrings, displays text in two different font and color schemes, and embeds an image and a button. Double-clicking any of the tagged substrings (or the embedded button) with a mouse triggers an event that prints a "Got tag event" message to stdout.
Example 8-12. PP2E\Gui\Tour\texttags.py
# demo advanced tag and text interfaces
from Tkinter import *
root = Tk()
def hello(event): print 'Got tag event'
# make and config a Text
text = Text()
text.config(font=('courier', 15, 'normal')) # set font for alltext.config(width=20, height=12)
text.pack(expand=YES, fill=BOTH)
text.insert(END, 'This is\n\nthe meaning\n\nof life.\n\n') # insert 6 lines# embed windows and photos
btn = Button(text, text='Spam', command=lambda: hello(0)) # embed a buttonbtn.pack()
text.window_create(END, window=btn) # embed a phototext.insert(END, '\n\n')
img = PhotoImage(file='../gifs/PythonPowered.gif')
text.image_create(END, image=img)
# apply tags to substrings
text.tag_add('demo', '1.5', '1.7') # tag 'is'text.tag_add('demo', '3.0', '3.3') # tag 'the'text.tag_add('demo', '5.3', '5.7') # tag 'life'text.tag_config('demo', background='purple') # change colors in tagtext.tag_config('demo', foreground='white') # not called bg/fg heretext.tag_config('demo', font=('times', 16, 'underline')) # change font in tagtext.tag_bind('demo', '<Double-1>', hello) # bind events in tagroot.mainloop()
Figure 8-20. Text tags in action
Such embedding and tag tools could ultimately be used to render a web page. In fact, Python's standard htmllib HTML parser module can help automate web page GUI construction. As you can probably tell, though, the text widget offers more GUI programming options than we have space to list here. For more details on tag and text options, consult other Tk and Tkinter references. Right now, art class is about to begin.
8.5 Canvas
When it comes to graphics, the Tkinter Canvas widget is the most free-form device in the library. It's a place to draw shapes, move objects dynamically, and place other kinds of widgets. The canvas is based on a structured graphic object model: everything drawn on a canvas can be processed as an object. You can get down to the pixel-by-pixel level in a canvas, but you can also deal in terms of larger objects like shapes, photos, and embedded widgets.
8.5.1 Basic Canvas Operations
Canvases are ubiquitous in much nontrivial GUI work, and we'll see larger canvas examples show up later in this book under the names PyDraw, PyView, PyClock, and PyTree. For now, let's jump right into an example that illustrates the basics. Example 8-13 runs most of the major canvas drawing methods.
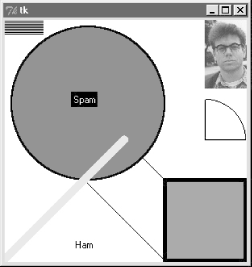
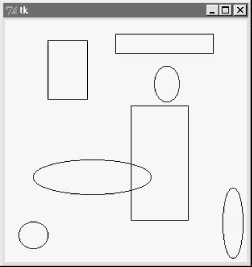
Example 8-13. PP2E\Gui\Tour\canvas1.py
# demo all basic canvas interfaces
from Tkinter import *
canvas = Canvas(width=300, height=300, bg='white') # 0,0 is top left cornercanvas.pack(expand=YES, fill=BOTH) # increases down, rightcanvas.create_line(100, 100, 200, 200) # fromX, fromY, toX, toYcanvas.create_line(100, 200, 200, 300) # draw shapesfor i in range(1, 20, 2):
canvas.create_line(0, i, 50, i)canvas.create_oval(10, 10, 200, 200, width=2, fill='blue')
canvas.create_arc(200, 200, 300, 100)
canvas.create_rectangle(200, 200, 300, 300, width=5, fill='red')
canvas.create_line(0, 300, 150, 150, width=10, fill='green')
photo=PhotoImage(file='../gifs/guido.gif')
canvas.create_image(250, 0, image=photo, anchor=NW) # embed a photowidget = Label(canvas, text='Spam', fg='white', bg='black')
widget.pack()
canvas.create_window(100, 100, window=widget) # embed a widgetcanvas.create_text(100, 280, text='Ham') # draw some textmainloop()
When run, this script draws the window captured in Figure 8-21. We saw how to place a photo on canvas and size a canvas for a photo earlier on this tour (see Section 7.9 near the end of Chapter 7). This script also draws shapes, text, and even an embedded Label widget. Its window gets by on looks alone; in a moment we'll learn how to add event callbacks that let users interact with drawn items.
Figure 8-21. canvas1 hardcoded object sketches
8.5.2 Programming the Canvas Widget
Canvases are easy to use, but rely on a coordinate system, define unique drawing methods, and name objects by identifier or tag. This section introduces these core canvas concepts.
8.5.2.1 Coordinates
All items drawn on a canvas are distinct objects, but they are not really widgets. If you study the canvas1 script closely, you'll notice that canvases are created and packed (or gridded or placed) within their parent container just like any other widget in Tkinter. But the items drawn on a canvas are not -- shapes, images, and so on are positioned and moved on the canvas by coordinates, identifiers, and tags. Of these, coordinates are the most fundamental part of the canvas model.
Canvases define an (X,Y) coordinate system for their drawing area; X means the horizontal scale, Y means vertical. By default, coordinates are measured in screen pixels (dots), the upper-left corner of the canvas has coordinates (0,0), and X and Y coordinates increase to the right and down, respectively. To draw and embed objects within a canvas, you supply one or more (X,Y) coordinate pairs to give absolute canvas locations. This is different than the constraints we've used to pack widgets thus far, but allows very fine-grained control over graphical layouts, and supports more freeform interface techniques such as animation.[2]
8.5.2.2 Object construction
The canvas allows you to draw and display common shapes like lines, ovals, rectangles, arcs, and polygons. In addition, you can embed text, images, and other kinds of Tkinter widgets such as labels and buttons. The canvas1 script demonstrates all the basic graphic object constructor calls; to each, you pass one or more sets of (X,Y) coordinates to give the new object's location, start and end points, or diagonally opposite corners of a bounding box that encloses the shape:
id = canvas.create_line(fromX, fromY, toX, toY) # line start, stopid = canvas.create_oval(fromX, fromY, toX, toY) # two opposite box cornersid = canvas.create_arc( fromX, fromY, toX, toY) # two opposite oval cornersid = canvas.create_rectangle(fromX, fromY, toX, toY) # two opposite corners
Other drawing calls specify just one (X,Y) pair, to give the location of the object's upper-left corner:
id = canvas.create_image(250, 0, image=photo, anchor=NW) # embed a photoid = canvas.create_window(100, 100, window=widget) # embed a widget
id = canvas.create_text(100, 280, text='Ham') # draw some text
The canvas also provides a create_polygon method that accepts an arbitrary set of coordinate arguments defining the end-points of connected lines; it's useful for drawing more arbitrary kinds of shapes composed of straight lines.
In addition to coordinates, most of these drawing calls let you specify common configuration options, such as outline width, fill color, outline color, and so on. Individual object types have unique configuration options all their own too; for instance, lines may specify the shape of an optional arrow, and text, widgets, and images may all be anchored to a point of the compass (this looks like the packer's anchor, but really gives a point on the object that is positioned at the (X,Y) coordinates given in the create call; NW puts the upper-left corner at (X,Y)).
Perhaps the most important thing to notice here, though, is that Tkinter does most of the "grunt" work for you -- when drawing graphics, you provide coordinates, and shapes are automatically plotted and rendered in the pixel world. If you've ever done any lower-level graphics work, you'll appreciate the difference.
8.5.2.3 Object identifiers and operations
Although not used by the canvas1 script, every object you put on a canvas has an identifier, returned by the create_ method that draws or embeds the object (what was coded as "id" in the last section's examples). This identifier can later be passed to other methods that move the object to new coordinates, set its configuration options, delete it from the canvas, raise or lower it among other overlapping objects, and so on.
For instance, the canvas move method accepts both an object identifier and X and Y offsets (not coordinates), and moves the named object by the offsets given:
canvas.move(objectIdOrTag, offsetX, offsetY) # move object(s) by offset
If this happens to move the object offscreen, it is simply clipped (not shown). Other common canvas operations process objects too:
canvas.delete(objectIdOrTag) # delete object(s) from canvascanvas.tkraise(objectIdOrTag) # raise object(s) to frontcanvas.lower(objectIdOrTag) # lower object(s) below otherscanvas.itemconfig(objectIdOrTag, fill='red') # fill object(s) with red color
Notice the tkraise name -- raise by itself is a reserved word in Python. Also note that the itemconfig method is used to configure objects drawn on a canvas after they have been created; use config to set configuration options for the canvas itself. The best thing to notice here, though, is that because Tkinter is based on structured objects, you can process a graphic object all at once; there is no need to erase and redraw each pixel manually to implement a move or raise.
8.5.2.4 Canvas object tags
But it gets even better: In addition to object identifiers, you can also perform canvas operations on entire sets of objects at once, by associating them all with a tag , a name that you make up and apply to objects on the display. Tagging objects in a Canvas is at least similar in spirit to tagging substrings in the Text widget we studied in the prior section. In general terms, canvas operation methods accept either a single object's identifier or a tag name.
For example, you can move an entire set of drawn objects by associating all with the same tag, and passing the tag name to the canvas move method. In fact, this is why move takes offsets, not coordinates -- when given a tag, each object associated with the tag is moved by the same (X,Y) offsets; absolute coordinates would make all the tagged objects appear on top of each other instead.
To associate an object with a tag, either specify the tag name in the object drawing call's tag option, or call the addtag_withtag(tag, objectIdOrTag) canvas method (or its relatives). For instance:
canvas.create_oval(x1, y1, x2, y2, fill='red', tag='bubbles')
canvas.create_oval(x3, y3, x4, y4, fill='red', tag='bubbles')
objectId = canvas.create_oval(x5, y5, x6, y6, fill='red')
canvas.addtag_withtag('bubbles', objectId)canvas.move('bubbles', diffx, diffy)
This makes three ovals and moves them at the same time by associating them all with the same tag name. Many objects can have the same tag, many tags can refer to the same object, and each tag can be individually configured and processed.
As in Text, Canvas widgets have predefined tag names too: tag "all" refers to all objects on the canvas, and "current" refers to whatever object is under the mouse cursor. Besides asking for an object under the mouse, you can also search for objects with the find_ canvas methods: canvas.find_closest(X,Y), for instance, returns a tuple whose first item is the identifier of the closest object to the supplied coordinates -- handy after you've received coordinates in a general mouseclick event callback.
We'll revisit the notion of canvas tags by example later in this chapter (see the animation scripts near the end if you can't wait). Canvases support additional operations and options that we don't have space to cover here (e.g., the canvas postscript method lets you save the canvas in a postscript file). See later examples in this book such as PyDraw for more details, and consult other Tk or Tkinter references for an exhaustive list of canvas object options.
8.5.3 Scrolling Canvases
As demonstrated by Example 8-14, scrollbars can be cross-linked with a canvas using the same protocols we used to add them to listboxes and text earlier, but with a few unique requirements.
Example 8-14. PP2E\Gui\Tour\scrolledcanvas.py
from Tkinter import *
class ScrolledCanvas(Frame):
def __init__(self, parent=None, color='brown'): Frame.__init__(self, parent)self.pack(expand=YES, fill=BOTH) # make me expandable
canv = Canvas(self, bg=color, relief=SUNKEN)canv.config(width=300, height=200) # display area size
canv.config(scrollregion=(0,0,300, 1000)) # canvas size corners
canv.config(highlightthickness=0) # no pixels to border
sbar = Scrollbar(self)sbar.config(command=canv.yview) # xlink sbar and canv
canv.config(yscrollcommand=sbar.set) # move one moves other
sbar.pack(side=RIGHT, fill=Y) # pack first=clip last
canv.pack(side=LEFT, expand=YES, fill=BOTH) # canv clipped first
for i in range(10): canv.create_text(150, 50+(i*100), text='spam'+str(i), fill='beige')canv.bind('<Double-1>', self.onDoubleClick) # set event handler
self.canvas = canvdef onDoubleClick(self, event):
print event.x, event.y print self.canvas.canvasx(event.x), self.canvas.canvasy(event.y)if __name__ == '__main__': ScrolledCanvas().mainloop()
This script makes the window in Figure 8-22. It is similar to prior scroll examples, but scrolled canvases introduce two kinks:
· You can specify the size of the displayed view window, but must specify the size of the scrollable canvas at large.
· In addition, you must map between event view area coordinates and overall canvas coordinates if the canvas is larger than its view area. In a scrolling scenario, the canvas will almost always be larger than the part displayed, so mapping is often needed when canvases are scrolled.
Figure 8-22. scrolledcanvas live
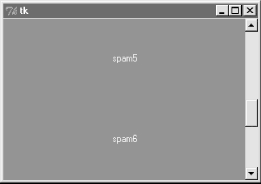
Sizes are given as configuration options. To specify a view area size, use canvas width and height options. To specify an overall canvas size, give the (X,Y) coordinates of the upper-left and lower-right corners of the canvas in a four-item tuple passed to the scrollregion option. If no view area size is given, a default size is used. If no scrollregion is given, it defaults to the view area size; this makes the scrollbar useless, since the view is assumed to hold the entire canvas.
Mapping coordinates is a bit more subtle. If the scrollable view area associated with a canvas is smaller than the canvas at large, then the (X,Y) coordinates returned in event objects are view area coordinates, not overall canvas coordinates. You'll generally want to scale the event coordinates to canvas coordinates, by passing them to the canvasx and canvasy canvas methods before using them to process objects.
For example, if you run the scrolled canvas script and watch the messages printed on mouse double-clicks, you'll notice that the event coordinates are always relative to the displayed view window, not the overall canvas:
C:\...\PP2E\Gui\Tour>python scrolledcanvas.py
2 0 event x,y when scrolled to top of canvas2.0 0.0 canvas x,y -same, as long as no border pixels150 106
150.0 106.0
299 197 299.0 197.0 3 2 event x,y when scrolled to bottom of canvas3.0 802.0 canvas x,y -y differs radically296 192
296.0 992.0
152 97 when scrolled to a mid point in the canvas152.0 599.0
16 187
16.0 689.0
Here, the mapped canvas X is always the same as the canvas X because the display area and canvas are both set at 300 pixels wide (it would be off by two pixels due to automatic borders if not for the script's highlightthickness setting). But notice that the mapped Y is wildly different from the event Y if you click after a vertical scroll. Without scaling, the event's Y incorrectly points to a spot much higher in the canvas.
Most of this book's canvas examples need no such scaling -- (0,0) always maps to the upper-left corner of the canvas display in which a mouseclick occurs -- but just because canvases are not scrolled. But see the PyTree program later in this book for an example of a canvas with both horizontal and vertical scrolls, and dynamically changed scroll region sizes.
As a rule of thumb, if your canvases scroll, be sure to scale event coordinates to true canvas coordinates in callback handlers that care about positions. Some handlers might not care if events are bound to individual drawn objects instead of the canvas at large; but we need to talk more about events to see why.
8.5.4 Using Canvas Events
Like Text and Listbox, there is no notion of a single command callback for Canvas. Instead, canvas programs generally use other widgets, or the lower-level bind call to set up handlers for mouse-clicks, key-presses, and the like, as in Example 8-14. Example 8-15 shows how to bind events for the canvas itself, in order to implement a few of the more common canvas drawing operations.
Example 8-15. PP2E\Gui\Tour\canvasDraw.py
#################################################################
# draw elastic shapes on a canvas on drag, move on right click;
# see canvasDraw_tags*.py for extensions with tags and animation
#################################################################
from Tkinter import *
trace = 0
class CanvasEventsDemo:
def __init__(self, parent=None): canvas = Canvas(width=300, height=300, bg='beige') canvas.pack()canvas.bind('<ButtonPress-1>', self.onStart) # click
canvas.bind('<B1-Motion>', self.onGrow) # and drag
canvas.bind('<Double-1>', self.onClear) # delete all
canvas.bind('<ButtonPress-3>', self.onMove) # move latest
self.canvas = canvasself.drawn = None
self.kinds = [canvas.create_oval, canvas.create_rectangle] def onStart(self, event): self.shape = self.kinds[0]self.kinds = self.kinds[1:] + self.kinds[:1] # start dragout
self.start = event self.drawn = Nonedef onGrow(self, event): # delete and redraw
canvas = event.widget if self.drawn: canvas.delete(self.drawn) objectId = self.shape(self.start.x, self.start.y, event.x, event.y) if trace: print objectId self.drawn = objectId def onClear(self, event):event.widget.delete('all') # use tag all
def onMove(self, event):if self.drawn: # move to click spot
if trace: print self.drawn canvas = event.widget diffX, diffY = (event.x - self.start.x), (event.y - self.start.y) canvas.move(self.drawn, diffX, diffY) self.start = eventif __name__ == '__main__':
CanvasEventsDemo() mainloop()
This script intercepts and processes three mouse-controlled actions:
Clearing the canvas
To erase everything on the canvas, the script binds the double left-click event to run the canvas's delete method with tag "all" -- again, a built-in tag that associates every object on the screen. Notice that the canvas widget clicked is available in the event object passed in to the callback handler (it's also available as self.canvas).
Dragging out object shapes
Pressing the left mouse button and dragging (moving it while the button is still pressed) creates a rectangle or oval shape as you drag. This is often called dragging out an object -- the shape grows and shrinks in an elastic, rubber-band fashion as you drag the mouse, and winds up with a final size and location given by the point where you release the mouse button.
To make this work in Tkinter, all you need to do is delete the old shape and draw another as each drag event fires; both delete and draw operations are fast enough to achieve the elastic drag-out effect. Of course, to draw a shape to the current mouse location you need a starting point; and to delete before a redraw you also must remember the last drawn object's identifier. Two events come into play: the initial button press event saves the start coordinates (really, the initial press event object, which contains the start coordinates), and mouse movement events erase and redraw from the start coordinates to the new mouse coordinates, and save the new object ID for the next event's erase.
Object moves
When you click the right mouse button (button 3), the script moves the most recently drawn object to the spot you clicked in a single step. The event argument gives the (X,Y) coordinates of the spot clicked, and we subtract the saved starting coordinates of the last drawn object to get the (X,Y) offsets to pass to the canvas move method (again, move does not take positions). Remember to scale event coordinates first if your canvas is scrolled.
The net result creates a window like that shown in Figure 8-23 after user interaction. As you drag out objects, the script alternates between ovals and rectangles; set the script's trace global to watch object identifiers scroll on stdout as new objects are drawn during a drag. This screen shot was taken after a few object drag-outs and moves, but you'd never tell from looking at it; run this example on your own computer to get a better feel for the operations it supports.
Figure 8-23. canvasDraw after a few drags and moves
8.5.4.1 Binding events on specific items
Much like we did for the Text widget, it is also possible to bind events for one or more specific objects drawn on a Canvas with its tag_bind method. This call accepts either a tag name string or object ID in its first argument. For instance, you can register a different callback handler for mouseclicks on every drawn item, or on any in a group of drawn and tagged items, rather than for the entire canvas at large. Example 8-16 binds a double-click handler in both the canvas itself and on two specific text items within it, to illustrate the interfaces; it generates Figure 8-24 when run.
Example 8-16. PP2E\Gui\Tour\canvas-bind.py
from Tkinter import *
def onCanvasClick(event):
print 'Got canvas click', event.x, event.y, event.widgetdef onObjectClick(event):
print 'Got object click', event.x, event.y, event.widget,print event.widget.find_closest(event.x, event.y) # find text object's id
root = Tk()
canv = Canvas(root, width=100, height=100)
obj1 = canv.create_text(50, 30, text='Click me one')
obj2 = canv.create_text(50, 70, text='Click me two')
canv.bind('<Double-1>', onCanvasClick) # bind to whole canvascanv.tag_bind(obj1, '<Double-1>', onObjectClick) # bind to drawn itemcanv.tag_bind(obj2, '<Double-1>', onObjectClick) # a tag works here toocanv.pack()
root.mainloop()
Figure 8-24. Canvas-bind window
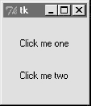
Object IDs are passed to tag_bind here, but a tag name string would work too. When you click outside the text items in this script's window, the canvas event handler fires; when either text item is clicked, both the canvas and text object handlers fire. Here is the stdout result after clicking on the canvas twice and on each text item once; the script uses the canvas find_closest method to fetch the object ID of the particular text item clicked (the one closest to the click spot):
C:\...\PP2E\Gui\Tour>python canvas-bind.py
Got canvas click 3 6 .8217952 canvas clicksGot canvas click 46 52 .8217952
Got object click 51 33 .8217952 (1,) first text clickGot canvas click 51 33 .8217952
Got object click 55 69 .8217952 (2,) second text clickGot canvas click 55 69 .8217952
We'll revisit the notion of events bound to canvases in the PyDraw example in Chapter 9, where we'll use them to implement a feature-rich paint and motion program. We'll also return to the canvasDraw script later in this chapter, to add tag-based moves and simple animation with time-based tools, so keep this page bookmarked for reference. First, though, let's follow a promising side road to explore another way to lay out widgets within windows.
8.6 Grids
So far, we've been arranging widgets in displays by calling their pack methods -- an interface to the packer geometry manager in Tkinter. This section introduces grid, the most commonly used alternative to the packer.
As we learned earlier, Tkinter geometry managers work by arranging child widgets within a parent container widget (parents are typically Frames or top-level windows). When we ask a widget to pack or grid itself, we're really asking its parent to place it among its siblings. With pack, we provide constraints and let the geometry manager lay out widgets appropriately. With grid, we arrange widgets in rows and columns in their parent, as though the parent container widget was a table.
Gridding is an entirely distinct geometry management system in Tkinter. In fact, at this writing pack and grid are mutually exclusive for widgets that have the same parent -- within a given parent container, we can either pack widgets or grid them, but not both. That makes sense, if you realize that geometry managers do their jobs at parents, and a widget can only be arranged by one geometry manager.
At least within one container, though, that means that you must pick either grid or pack and stick with it. So why grid, then? In general, grid is handy for laying out form-like displays; arranging input fields in row/column fashion can be at least as easy as laying out the display with nested frames. As we'll see, though, grid doesn't offer substantial code or complexity savings compared to equivalent packer solutions in practice, especially when things like resizability are added to the GUI picture. In other words, the choice between the two layout schemes is largely one of style, not technology.
8.6.1 Grid Basics
Let's start off with the basics; Example 8-17 lays out a table of Labels and Entry fields -- widgets we've already met. Here, though, they are arrayed on a grid.
Example 8-17. PP2E\Gui\Tour\Grid\grid1.py
from Tkinter import *
colors = ['red', 'green', 'orange', 'white', 'yellow', 'blue']
r = 0
for c in colors:
Label(text=c, relief=RIDGE, width=25).grid(row=r, column=0)
Entry(bg=c, relief=SUNKEN, width=50).grid(row=r, column=1)
r = r+1mainloop()
When run, this script creates the window shown in Figure 8-25, pictured with data typed into a few of the input fields. Once again, this book won't do justice to the colors displayed on the right, so you'll have to stretch your imagination a little (or run this script on a computer of your own).
Figure 8-25. The grid geometry manager in pseudo-living color
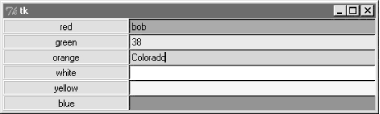
This is a classic input form layout: labels on the left describe data to type into entry fields on the right. Just for fun, this script displays color names on the left and the entry field of the corresponding color on the right. It achieves its nice table-like layout with the following two lines:
Label(...).grid(row=r, column=0) Entry(...).grid(row=r, column=1)
From the perspective of the container window, the label is gridded to column in the current row number (a counter that starts at 0), and the entry is placed in column 1. The upshot is that the grid system lays out all the labels and entries in a two-dimensional table automatically, with evenly sized columns large enough to hold the largest item in each column.
8.6.2 grid Versus pack
Time for some compare-and-contrast: Example 8-18 implements the same sort of colorized input form with both grid and pack, to make it easy to see the differences between the two approaches.
Example 8-18. PP2E\Gui\Tour\Grid\grid2.py
# add equivalent pack window
from Tkinter import *
colors = ['red', 'green', 'yellow', 'orange', 'blue', 'navy']
def gridbox(parent):
r = 0 for c in colors:l = Label(parent, text=c, relief=RIDGE, width=25)
e = Entry(parent, bg=c, relief=SUNKEN, width=50)
l.grid(row=r, column=0) e.grid(row=r, column=1) r = r+1def packbox(parent):
for c in colors: f = Frame(parent)l = Label(f, text=c, relief=RIDGE, width=25)
e = Entry(f, bg=c, relief=SUNKEN, width=50)
f.pack(side=TOP) l.pack(side=LEFT) e.pack(side=RIGHT)if __name__ == '__main__':
root = Tk() gridbox(Toplevel()) packbox(Toplevel()) Button(root, text='Quit', command=root.quit).pack() mainloop()
The basic label and entry widgets are created the same way by these two functions, but they are arranged in very different ways:
· With pack, we use side options to attach labels and rows on the left and right, and create a Frame for each row (itself attached to the parent's top).
· With grid, we instead assign each widget a row and column position in the implied tabular grid of the parent, using options of the same name.
The difference in the amount code required for each scheme is roughly a wash: the pack scheme must create a Frame per row, but the grid scheme must keep track of the current row number. Running the script makes the windows in Figure 8-26.
Figure 8-26. Equivalent grid and pack windows
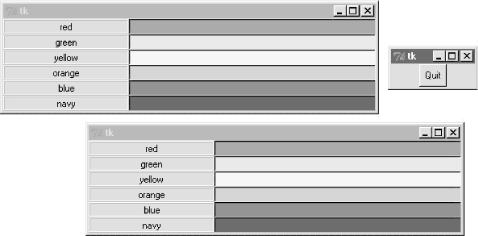
8.6.3 Combining grid and pack
Notice that the prior script passes a brand new Toplevel to each form constructor function, so that the grid and pack versions wind up in distinct top-level windows. Because the two geometry managers are mutually exclusive within a given parent, we have to be careful not to mix them carelessly. For instance, Example 8-19 is able to put both the packed and gridded widgets on the same window, but only by isolating each in its own Frame container widget.
Example 8-19. PP2E\Gui\Tour\Grid\grid2-same.py
##################################################################
# can't grid and pack in same parent container (e.g., root window)
# but can mix in same window if done in different parent frames;
##################################################################
from Tkinter import *
from grid2 import gridbox, packbox
root = Tk()
Label(root, text='Grid:').pack()
frm = Frame(root, bd=5, relief=RAISED); frm.pack(padx=5, pady=5)
gridbox(frm)
Label(root, text='Pack:').pack()
frm = Frame(root, bd=5, relief=RAISED); frm.pack(padx=5, pady=5)
packbox(frm)
Button(root, text='Quit', command=root.quit).pack()
mainloop()
We get a composite window when this runs with two forms that look identical (Figure 8-27), but the two nested frames are actually controlled by completely different geometry managers.
Figure 8-27. grid and pack in the same window
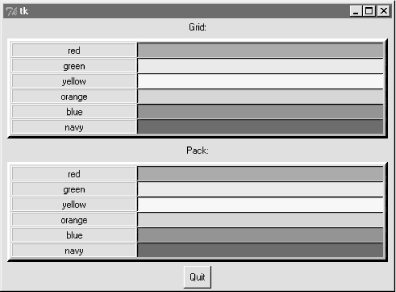
On the other hand, the sort of code in Example 8-20 fails badly, because it attempts to use pack and grid at the same parent -- only one geometry manager can be used on any one parent.
Example 8-20. PP2E\Gui\Tour\Grid\grid2-fails.py
##################################################################
# FAILS-- can't grid and pack in same parent (root window)
##################################################################
from Tkinter import *
from grid2 import gridbox, packbox
root = Tk()
gridbox(root)
packbox(root)
Button(root, text='Quit', command=root.quit).pack()
mainloop()
This script passes the same parent (the top-level window) to each function in an effort to make both forms appear in one window. It also utterly hangs the Python process on my machine, without ever showing any windows at all (on Windows 98, I had to resort to Ctrl-Alt-Delete to kill it). Geometry manager combinations can be subtle until you get the hang of this; to make this example work, for instance, we simply need to isolate the grid box in a parent container all its own to keep it away from the packing going on in the root window:
root = Tk()
frm = Frame(root)
frm.pack() # this worksgridbox(frm) # gridbox must have its own parent in which to grid
packbox(root)
Button(root, text='Quit', command=root.quit).pack()
mainloop()
Again, today you must either pack or grid within one parent, but not both. It's possible that this restriction may be lifted in the future, but seems unlikely given the disparity in the two window manager schemes; try your Python to be sure.
8.6.4 Making Gridded Widgets Expandable
And now, some practical bits. The grids we've seen so far are fixed in size; they do not grow when the enclosing window is resized by a user. Example 8-21 implements an unreasonably patriotic input form with both grid and pack again, but adds the configuration steps needed to make all widgets in both windows expand along with their window on a resize.
Example 8-21. PP2E\Gui\Tour\Grid\grid3.py
# add label and resizing
from Tkinter import *
colors = ['red', 'white', 'blue']
def gridbox(root):
Label(root, text='Grid').grid(columnspan=2) r = 1 for c in colors:l = Label(root, text=c, relief=RIDGE, width=25)
e = Entry(root, bg=c, relief=SUNKEN, width=50)
l.grid(row=r, column=0, sticky=NSEW) e.grid(row=r, column=1, sticky=NSEW) root.rowconfigure(r, weight=1) r = r+1 root.columnconfigure(0, weight=1) root.columnconfigure(1, weight=1)def packbox(root):
Label(root, text='Pack').pack() for c in colors: f = Frame(root)l = Label(f, text=c, relief=RIDGE, width=25)
e = Entry(f, bg=c, relief=SUNKEN, width=50)
f.pack(side=TOP, expand=YES, fill=BOTH)
l.pack(side=LEFT, expand=YES, fill=BOTH)
e.pack(side=RIGHT, expand=YES, fill=BOTH)root = Tk()
gridbox(Toplevel(root))
packbox(Toplevel(root))
Button(root, text='Quit', command=root.quit).pack()
mainloop()
When run, this script makes the scene in Figure 8-28. It builds distinct pack and grid windows again, with entry fields on the right colored red, white, and blue (or for readers not working along on a computer: gray, white, and an arguably darker gray).
Figure 8-28. grid and pack windows before resizing
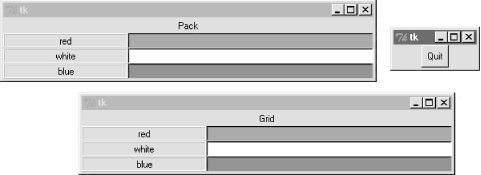
This time, though, resizing both windows with mouse drags makes all their embedded labels and entry fields expand along with the parent window, as we see in Figure 8-29.
Figure 8-29. grid and pack windows resized
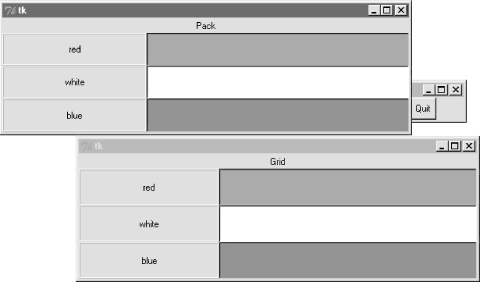
8.6.4.1 Resizing in grids
Now that I've shown you what these windows do, I need to explain how they do it. We learned earlier how to make widgets expand with pack: we use expand and fill options to increase space allocations and stretch into them. To make expansion work for widgets arranged by grid, we need to use different protocols: rows and columns must be marked with a weight to make them expandable, and widgets must also be made sticky so that they are stretched within their allocated grid cell:
Heavy rows and columns
With pack, we make each row expandable by making the corresponding Frame expandable, with expand=YES and fill=BOTH. Gridders must be a bit more specific: to get full expandability, call the grid container's rowconfig method for each row, and its columnconfig for each column. To both methods, pass a weight option with a value greater than zero to enable rows and columns to expand. Weight defaults to zero (which means no expansion), and the grid container in this script is just the top-level window. Using different weights for different rows and columns makes them grow at proportionally different rates.
Sticky widgets
With pack, we use fill options to stretch widgets to fill their allocated space horizontally or vertically, and anchor options to position widgets within their allocated space. With grid , the sticky option serves the roles of both fill and anchor in the packer. Gridded widgets can optionally be made sticky on one side of their allocated cell space (like anchor) or more than one side to make them stretch (like fill). Widgets can be made sticky in four directions -- N, S, E, and W, and concatenations of these letters specify multiple-side stickiness. For instance, a sticky setting of W left-justifies the widget in its allocated space (like a packer anchor=W), and NS stretches the widget vertically within its allocated space (like a packer fill=Y).
Widget stickiness hasn't been useful in examples thus far because the layouts were regularly sized (widgets were no smaller than their allocated grid cell space), and resizes weren't supported at all. Here, this script specifies NSEW stickiness to make widgets stretch in all directions with their allocated cells.
Different combinations of row and column weights and sticky settings generate different resize effects. For instance, deleting the columnconfig lines in the grid3 script makes the display expand vertically but not horizontally. Try changing some of these settings yourself to see the sorts of effects they produce.
8.6.4.2 Spanning columns and rows
There is one other big difference in how the grid3 script configures its windows. Both the grid and pack windows display a label on the top that spans the entire window. For the packer scheme, we simply make a label attached to the top of the window at large (remember, side defaults to TOP):
Label(root, text='Pack').pack()
Because this label is attached to the window's top before any row frames are, it appears across the entire window top as expected. But laying out such a label takes a bit more work in the rigid world of grids; the first line of the grid implementation function does it like this:
Label(root, text='Grid').grid(columnspan=2)
To make a widget span across multiple columns, we pass grid a columnspan option with spanned-column count. Here, it just specifies that the label at the top of the window should stretch over the entire window -- across both the label and entry columns. To make a widget span across multiple rows, pass a rowspan option instead. The regular layouts of grids can be either an asset or a liability, depending on how regular your user interface will be; these two span settings let you specify exceptions to the rule when needed.
So which geometry manager comes out on top here? When resizing is factored in, as in this script, gridding actually becomes slightly more complex (in fact, gridding requires three extra lines of code here). On the other hand, grid is nice for simple forms, and your grids and packs may vary.
8.6.5 Laying Out Larger Tables with grid
So far, we've been building two-column arrays of labels and input fields. That's typical of input forms, but the Tkinter grid manager is capable of configuring much grander matrixes. For instance, Example 8-22 builds a five-row by four-column array of labels, where each label simply displays its row and column number (row.col). When run, the window in Figure 8-30 appears on screen.
Example 8-22. PP2E\Gui\Tour\Grid\grid4.py
# simple 2d table
from Tkinter import *
for i in range(5):
for j in range(4): l = Label(text='%d.%d' % (i, j), relief=RIDGE) l.grid(row=i, column=j, sticky=NSEW)mainloop()
Figure 8-30. A 5 x 4 array of coordinates labels

If you think this is starting to look like it might be a way to program spreadsheets, you may be on to something. Example 8-23 takes this idea a bit further, and adds a button that prints the table's current input field values to the stdout stream (usually, to the console window).
Example 8-23. PP2E\Gui\Tour\Grid\grid5.py
# 2d table of input fields
from Tkinter import *
rows = []
for i in range(5):
cols = [] for j in range(4): e = Entry(relief=RIDGE) e.grid(row=i, column=j, sticky=NSEW) e.insert(END, '%d.%d' % (i, j)) cols.append(e) rows.append(cols)def onPress():
for row in rows: for col in row: print col.get(), printButton(text='Fetch', command=onPress).grid()
mainloop()
When run, this script creates the window in Figure 8-31, and saves away all the grid's entry field widgets in a two-dimensional list of lists. When its Fetch button is pressed, the script steps through the saved list of lists of entry widgets, to fetch and display all the current values in the grid. Here is the output of two Fetch presses -- one before I made input field changes, and one after:
C:\...\PP2E\Gui\Tour\Grid>python grid5.py
0.0 0.1 0.2 0.3
1.0 1.1 1.2 1.3
2.0 2.1 2.2 2.3
3.0 3.1 3.2 3.3
4.0 4.1 4.2 4.3
0.0 0.1 0.2 42
1.0 1.1 1.2 43
2.0 2.1 2.2 44
3.0 3.1 3.2 45
4.0 4.1 4.2 46
Figure 8-31. A larger grid of input fields
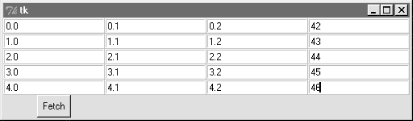
Now that we know how to build and step through arrays of input fields, let's add a few more useful buttons. Example 8-24 adds another row to display column sums, and buttons to clear all fields to zero and calculate column sums.
Example 8-24. PP2E\Gui\Tour\Grid\grid5b.py
# add column sums, clearing
from Tkinter import *
numrow, numcol = 5, 4
rows = []
for i in range(numrow):
cols = [] for j in range(numcol): e = Entry(relief=RIDGE) e.grid(row=i, column=j, sticky=NSEW) e.insert(END, '%d.%d' % (i, j)) cols.append(e) rows.append(cols)sums = []
for i in range(numcol):
l = Label(text='?', relief=SUNKEN) l.grid(row=numrow, col=i, sticky=NSEW) sums.append(l)def onPrint():
for row in rows: for col in row:print col.get(),
print printdef onSum():
t = [0] * numcol for i in range(numcol): for j in range(numrow): t[i]= t[i] + eval(rows[j][i].get()) for i in range(numcol): sums[i].config(text=str(t[i]))def onClear():
for row in rows: for col in row: col.delete('0', END) col.insert(END, '0.0') for sum in sums: sum.config(text='?')import sys
Button(text='Sum', command=onSum).grid(row=numrow+1, column=0)Button(text='Print', command=onPrint).grid(row=numrow+1, column=1)
Button(text='Clear', command=onClear).grid(row=numrow+1, column=2)
Button(text='Quit', command=sys.exit).grid(row=numrow+1, column=3)mainloop()
Figure 8-32 shows this script at work summing up four columns of numbers; to get a different size table, change the numrow and numcol variables at the top of the script.
Figure 8-32. Adding column sums
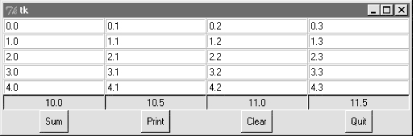
And finally, Example 8-25 is one last extension that is coded as a class for reusability, and adds a button to load the table from a data file. Data files are assumed to be coded as one line per row, with whitespace (spaces or tabs) between each column within a row line. Loading a file of data automatically resizes the table GUI to accommodate the number of columns in the table.
Example 8-25. PP2E\Gui\Tour\Grid\grid5c.py
# recode as an embeddable class
from Tkinter import *
from PP2E.Gui.Tour.quitter import Quitter # reuse, pack, and gridclass SumGrid(Frame):
def __init__(self, parent=None, numrow=5, numcol=5): Frame.__init__(self, parent)self.numrow = numrow # I am a frame container
self.numcol = numcol # caller packs or grids me
self.makeWidgets(numrow, numcol) # else only usable one way
def makeWidgets(self, numrow, numcol): self.rows = [] for i in range(numrow): cols = [] for j in range(numcol): e = Entry(self, relief=RIDGE) e.grid(row=i+1, column=j, sticky=NSEW) e.insert(END, '%d.%d' % (i, j)) cols.append(e) self.rows.append(cols) self.sums = [] for i in range(numcol): l = Label(self, text='?', relief=SUNKEN) l.grid(row=numrow+1, col=i, sticky=NSEW) self.sums.append(l)Button(self, text='Sum', command=self.onSum).grid(row=0, column=0)
Button(self, text='Print', command=self.onPrint).grid(row=0, column=1) Button(self, text='Clear', command=self.onClear).grid(row=0, column=2)Button(self, text='Load', command=self.onLoad).grid(row=0, column=3)
Quitter(self).grid(row=0, column=4) # fails: Quitter(self).pack()
def onPrint(self): for row in self.rows: for col in row: print col.get(), print print def onSum(self): t = [0] * self.numcol for i in range(self.numcol): for j in range(self.numrow): t[i]= t[i] + eval(self.rows[j][i].get()) for i in range(self.numcol): self.sums[i].config(text=str(t[i])) def onClear(self): for row in self.rows: for col in row:col.delete('0', END)
col.insert(END, '0.0') for sum in self.sums: sum.config(text='?') def onLoad(self): import string from tkFileDialog import * file = askopenfilename() if file: for r in self.rows: for c in r: c.grid_forget() for s in self.sums: s.grid_forget()filelines = open(file, 'r').readlines()
self.numrow = len(filelines) self.numcol = len(string.split(filelines[0])) self.makeWidgets(self.numrow, self.numcol) row = 0 for line in filelines: fields = string.split(line) for col in range(self.numcol):self.rows[row][col].delete('0', END)
self.rows[row][col].insert(END, fields[col]) row = row+1if __name__ == '__main__':
import sys root = Tk() root.title('Summer Grid') if len(sys.argv) != 3:SumGrid(root).pack() # .grid() works here too
else: rows, cols = eval(sys.argv[1]), eval(sys.argv[2]) SumGrid(root, rows, cols).pack() mainloop()
Notice that this module's SumGrid class is careful not to either grid or pack itself. In order to be attachable to containers where other widgets are being gridded or packed, it leaves its own geometry management ambiguous, and requires callers to pack or grid its instances. It's okay for containers to pick either scheme for their own children, because they effectively seal off the pack-or-grid choice. But attachable component classes that aim to be reused under both geometry managers cannot manage themselves, because they cannot predict their parent's policy.
This is a fairly long example that doesn't say much else about gridding or widgets in general, so I'll leave most of it as suggested reading and just show what it does. Figure 8-33 shows the initial window created by this script after changing the last column and requesting a sum.
Figure 8-33. Adding data file loads
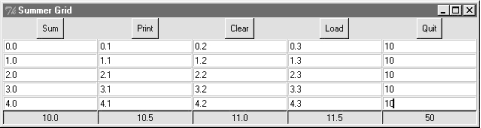
By default, the class makes the 5-by-5 grid here, but we can pass in other dimensions to both the class constructor and the script's command line. When you press the Load button, you get the standard file selection dialog we met earlier on this tour (Figure 8-34).
Figure 8-34. Opening a data file for SumGrid
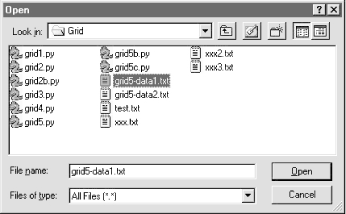
Data file grid-data1.txt contains seven rows and six columns of data:
C:\...\PP2E\Gui\Tour\Grid>type grid5-data1.txt
1 2 3 4 5 6
1 2 3 4 5 6
1 2 3 4 5 6
1 2 3 4 5 6
1 2 3 4 5 6
1 2 3 4 5 6
1 2 3 4 5 6
Loading this into our GUI makes the dimensions of the grid change accordingly -- the class simply reruns its widget construction logic after erasing all the old entry widgets with the grid_forget method.[3] Figure 8-35 captures the scene after a file load.
Figure 8-35. Data file loaded, displayed, and summed
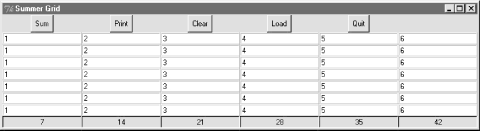
Data file grid5-data2.txt has the same dimensions, but contains expressions in two of its columns, not just simple numbers. Because this script converts input field values with the Python eval built-in function, any Python syntax will work in this table's fields, as long as it can be parsed and evaluated within the scope of the onSum method:
C:\...\PP2E\Gui\Tour\Grid>type grid5-data2.txt
1 2 3 2*2 5 6
1 3-1 3 2<<1 5 6
1 5%3 3 pow(2,2) 5 6
1 2 3 2**2 5 6
1 2 3 [4,3][0] 5 6
1 {'a':2}['a'] 3 len('abcd') 5 61 abs(-2) 3 eval('2+2') 5 6
Summing these fields runs the Python code they contain, as seen in Figure 8-36. This can be a powerful feature; imagine a full-blown spreadsheet grid, for instance -- field values could be Python code "snippets" that compute values on the fly, call functions in modules, even download current stock quotes over the Internet with tools we'll meet in the next part of this book.
It's also a potential dangerous tool -- a field might just contain an expression that erases your hard drive! If you're not sure what expressions may do, either don't use eval (convert with more limited built-in functions like int and float instead), or see Chapter 15 for details on the Python rexec restricted-execution mode module.
Figure 8-36. Python expressions in the data and table
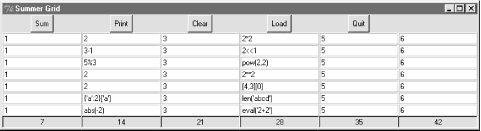
Of course, this still is nowhere near a true spreadsheet program; further mutations towards that goal are left as exercises. I should also point out that there is more to gridding than we have time to present fully here. For instance, by creating subframes that have grids of their own, we can build up more sophisticated layouts in much the same way as nested frames arranged with the packer. For now, let's move on to one last widget survey topic.
8.7 Time Tools, Threads, and Animation
The last stop on our widget tour is the most unique. Tkinter also comes with a handful of tools that have to do with the event-driven programming model, not graphics displayed on a computer screen.
Some GUI applications need to perform background activities periodically. For example, to "blink" a widget's appearance, we'd like to register a callback handler to be invoked at regular time intervals. Similarly, it's not a good idea to let a long-running file operation block other activity in a GUI; if the event loop could be forced to update periodically, the GUI could remain responsive. Tkinter comes with tools for both scheduling such delayed actions and forcing screen updates:
widget.after( milliseconds, function, *args)
This tool schedules the function to be called after a number of milliseconds. function can be any callable Python object: a function, bound method, etc. This form of the call does not pause the program -- the callback function is run later from the normal Tkinter event loop. The milliseconds value can be a floating point number, to specify fractions of a second. This returns an ID which can be passed to after_cancel to cancel the callback. Since this method is so commonly used, I'll say more about it by example in a moment.
widget.after( milliseconds)
This tool pauses the program for a number of milliseconds. For example, an argument of 5000 pauses for 5 seconds. This is essentially the same as Python's library function time.sleep, and both calls can be used to add a delay in time-sensitive displays (e.g., animation programs like PyDraw and the simpler examples ahead).
widget.after_idle( function, *args)
This tool schedules the function to be called when there are no more pending events to process. That is, function becomes an idle handler, which is invoked when the GUI isn't busy doing anything else.
widget.after_cancel( id)
This tool cancels a pending after callback event before it occurs.
widget.update()
This tool forces Tkinter to process all pending events in the event queue, including geometry resizing, and widget updates and redraws. You can call this periodically from a long-running callback handler to refresh the screen and perform any updates to it that your handler has already requested. If you don't, your updates may not appear on screen until your callback handler exits. In fact, your display may hang completely during long-running handlers if not manually updated (and handlers are not run in threads, as described in the next section); the window won't even redraw itself until the handler returns if covered and uncovered by another. For instance, programs that animate by repeatedly moving an object and pausing must call for an update before the end of the animation, or only the final object position will appear on screen; worse, the GUI will be completely inactive until the animation callback returns (see the simple animation examples later in this chapter, and PyDraw in the next chapter).
widget.update_idletasks()
This tool processes any pending idle events. This may sometimes be safer than after which has the potential to set up race (looping) conditions in some scenarios. Tk widgets use idle events to display themselves.
_tkinter.createfilehandler( file, mask, function)
This tool schedules the function to be called when a file's status changes. The function may be invoked when the file has data for reading, is available for writing, or triggers an exception. File handlers are often used to process pipes or sockets, since normal input/output requests can block the caller. This is not available on Windows under Tk 8.0, and so won't be used in this book.
widget.wait_variable(var)
widget.wait_window(win)
widget.wait_visibility(win)
These tools pause the caller until a Tkinter variable changes its value, a window is destroyed, or a window becomes visible. All of these enter a local event loop, such that the application's mainloop continues to handle events. Note that var is a Tkinter variable object (discussed earlier), not a simple Python variable. To use for modal dialogs, first call widget.focus() (to set input focus) and widget.grab() (to make a window be the only one active).
We won't go into further details on all of these tools here; see other Tk and Tkinter documentation for more information.
8.7.1 Using Threads with GUIs
Keep in mind that for many programs, Python's thread support that we met in Chapter 3, can serve some of the same roles as the Tkinter tools listed in the previous section. For instance, to avoid blocking a GUI during a long-running file or socket transfer, the transfer can simply be run in a spawned thread, while the rest of the program continues to run normally. We'll meet such threaded GUI programs in Part III (e.g., PyMailGui in Chapter 11). Similarly, GUIs that must watch for inputs on pipes or sockets can do so in spawned threads (or after callbacks), without blocking the GUI itself.
If you do use threads in Tkinter programs, however, only the main thread (the one that built the GUI and started the mainloop) can make GUI calls. Even things like the update method described in the previous section cannot be called from spawned threads in a GUI program -- they'll likely trigger very strange program crashes. This GUI thread story may be improved in future Python and Tkinter releases, but imposes a few structural and platform-specific constraints today.
For example, because spawned threads cannot perform GUI processing, they must generally communicate with the main thread using global variables, as required by the application. A thread that watches a socket, for instance, might simply set global variables that trigger GUI changes in after event callbacks. Note that this is not a Python or Tkinter limitation (it's much lower in the software hierarchy that runs your GUI), and may go away in the future. In addition, some Tkinter canvas calls may actually be thread-safe (see the animation script in Example 8-31). We'll revisit this limitation later in this book, when we meet larger threaded GUI programs.
8.7.2 Using the after Method
The after method allows scripts to schedule a callback handler to be run at some time in the future, and we'll use this often in later examples in this book. For instance, in Chapter 9 we'll meet a clock program that uses after to wake up 10 times per second and check for a new time, and an image slideshow program that uses after to schedule the next photo display (see PyClock and PyView). To illustrate the basics of scheduled callbacks, Example 8-26 does something a bit different.
Example 8-26. PP2E\Gui\Tour\alarm.py
#!/usr/local/bin/python
from Tkinter import *
class Alarm(Frame):
def repeater(self): # on every N millisecs
self.bell() # beep now
self.stopper.flash() # flash button now
self.after(self.msecs, self.repeater) # reschedule handler
def __init__(self, msecs=1000): # default = 1 second
Frame.__init__(self) self.msecs = msecs self.pack() stopper = Button(self, text='Stop the beeps!', command=self.quit)stopper.pack()
stopper.config(bg='navy', fg='white', bd=8) self.stopper = stopper self.repeater()if __name__ == '__main__': Alarm(msecs=1000).mainloop()
This script builds the window in Figure 8-37 and periodically calls both the button widget's flash method to make the button flash momentarily (it alternates colors quickly), and the Tkinter bell method to call your system's sound interface. The repeater method beeps and flashes once, and schedules a callback to be invoked after a specific amount of time with the after method.
Figure 8-37. Stop the beeps!

But after doesn't pause the caller: callbacks are scheduled to occur in the background, while the program performs other processing -- technically, as soon as the Tk event loop is able to notice the time rollover. To make this work, repeater calls after each time through, to reschedule the callback. Delayed events are one-shot callbacks; to repeat the event, we need to reschedule.
The net effect is that when this script runs, it starts beeping and flashing once its one-button window pops up. And it keeps beeping and flashing. And beeping. And flashing. Other activities and GUI operations don't affect it. Even if the window is iconified, the beeping continues because Tkinter timer events fire in the background. You need to kill the window or press the button to stop the alarm. By changing the msecs delay, you can make this beep as fast or slow as your system allows (some platforms can't beep as fast as others). And this may or may not be the best demo to launch in a crowded office, but at least you've been warned.
8.7.2.1 Hiding and redrawing widgets and windows
The button flash method flashes the widget, but it's easy to dynamically change other appearance options of widgets like buttons, labels, and text, with the widget config method. For instance, you can also achieve a flash-like effect by manually reversing foreground and background colors with the widget config method, in scheduled after callbacks. Just for fun, Example 8-27 specializes the alarm to go a step further.
Example 8-27. PP2E\Gui\Tour\alarm-hide.py
from Tkinter import *
import alarm
class Alarm(alarm.Alarm): # change alarm callbackdef repeater(self): # on every N millisecs
self.bell() # beep now
if self.shown:self.stopper.pack_forget() # hide or erase button now
else: # or reverse colors, flash...
self.stopper.pack()self.shown = not self.shown # toggle state for next time
self.after(self.msecs, self.repeater) # reschedule handler
def __init__(self, msecs=1000): # default = 1 second
self.shown = 0 alarm.Alarm.__init__(self, msecs)if __name__ == '__main__': Alarm(msecs=500).mainloop()
When this script is run, the same window appears, but the button is erased or redrawn on alternating timer events. The widget pack_forget method erases (unmaps) a drawn widget, and pack makes it show up again; grid_forget and grid similarly hide and show widgets in a grid. The pack_forget method is useful for dynamically drawing and changing a running GUI. For instance, you can be selective about which components are displayed, and build widgets ahead of time and show them only as needed. Here, it just means that users must press the button while it's displayed, or else the noise keeps going.
To hide and unhide the entire window instead of just one widget within it, use the top-level window widget withdraw and deiconify methods. The withdraw method, demonstrated in Example 8-28, completely erases the window and its icon (use iconify if you want the window's icon to appear during a hide), and the state method returns the window's current state ("normal", "iconic", or "withdrawn"). These are also useful to pop up prebuilt dialog windows dynamically, but are perhaps less practical here.
Example 8-28. PP2E\Gui\Tour\alarm-withdraw.py
from Tkinter import *
import alarm
class Alarm(alarm.Alarm):
def repeater(self): # on every N millisecs
self.bell() # beep now
if self.master.state() == 'normal': # is window displayed?
self.master.withdraw() # hide entire window, no icon
else: # iconify shrinks to an icon
self.master.deiconify() # else redraw entire window
self.master.lift() # and raise above others
self.after(self.msecs, self.repeater) # reschedule handler
if __name__ == '__main__': Alarm().mainloop() # master = default Tk root
This works the same, but the entire window appears or disappears on beeps -- you have to press it when it's shown. There are lots of other effects you could add to the alarm. Whether your buttons and windows should flash and disappear or not, though, probably depends less on Tkinter technology than on your users' patience.
8.7.3 Simple Animation Techniques
Apart from the direct shape moves in the canvasDraw example, all of the GUIs presented so far in this part of the book have been fairly static. This last section shows you how to change that, by adding simple shape movement animations to the canvas drawing example listed in Example 8-15. It also demonstrates the notion of canvas tags -- the move operations performed here move all canvas objects associated with a tag at once. All oval shapes move if you press "o", and all rectangles move if you press "r"; as mentioned earlier, canvas operation methods accept both object IDs and tag names.
But the main goal here is to illustrate simple animation techniques using the time-based tools described earlier in this section. There are three basic ways to move objects around a canvas:
· By loops that use time.sleep to pause for fractions of a second between multiple move operations, along with manual update calls. The script moves, sleeps, moves a bit more, and so on. A time.sleep call pauses the caller, and so fails to return control to the GUI event loop -- any new requests that arrive during a move are deferred. Because of that, canvas.update must be called to redraw the screen after each move, or else updates don't appear until the entire movement loop callback finishes and returns. This is a classic long-running callback scenario; without manual update calls, no new GUI events are handled until the callback returns in this scheme (even window redraws).
· By using the widget.after method to schedule multiple move operations to occur every few milliseconds. Because this approach is based upon scheduled events dispatched by Tkinter to your handlers, it allows multiple moves to occur in parallel, and doesn't require canvas.update calls. You rely on the event loop to run moves, so there's no reason for sleep pauses, and the GUI is not blocked while moves are in progress.
· By using threads to run multiple copies of the time.sleep pausing loops of the first approach. Because threads run in parallel, a sleep in any thread blocks neither the GUI nor other motion threads. GUIs should not be updated from spawned threads in general (in fact, calling canvas.update from a spawned thread will likely crash the GUI today), but some canvas calls such as movement seem to be thread safe in the current implementation.
Of these three schemes, the first yields the smoothest animations but makes other operations sluggish during movement, the second seems to yield slower motion than the others but is safer than using threads in general, and the last two both allow multiple objects to be in motion at the same time.
8.7.3.1 Using time.sleep loops
The next three sections demonstrate the code structure of all three approaches in turn, with new subclasses of the canvasDraw example we met in Example 8-15. Example 8-29 illustrates the first approach.
Example 8-29. PP2E\Gui\Tour\canvasDraw_tags.py
##################################################################
# add tagged moves with time.sleep (not widget.after or threads);
# time.sleep does not block the gui event loop while pausing, but
# screen not redrawn until callback returns or widget.update call;
# the currently running onMove callback gets exclusive attention
# until it returns: others pause if press 'r' or 'o' during move;
##################################################################
from Tkinter import *
import canvasDraw, time
class CanvasEventsDemo(canvasDraw.CanvasEventsDemo):
def __init__(self, parent=None): canvasDraw.CanvasEventsDemo.__init__(self, parent) self.canvas.create_text(75, 8, text='Press o and r to move shapes')self.canvas.master.bind('<KeyPress-o>', self.onMoveOvals)
self.canvas.master.bind('<KeyPress-r>', self.onMoveRectangles)
self.kinds = self.create_oval_tagged, self.create_rectangle_tagged def create_oval_tagged(self, x1, y1, x2, y2): objectId = self.canvas.create_oval(x1, y1, x2, y2) self.canvas.itemconfig(objectId, tag='ovals', fill='blue') return objectId def create_rectangle_tagged(self, x1, y1, x2, y2): objectId = self.canvas.create_rectangle(x1, y1, x2, y2) self.canvas.itemconfig(objectId, tag='rectangles', fill='red') return objectId def onMoveOvals(self, event): print 'moving ovals'self.moveInSquares(tag='ovals') # move all tagged ovals
def onMoveRectangles(self, event): print 'moving rectangles' self.moveInSquares(tag='rectangles')def moveInSquares(self, tag): # 5 reps of 4 times per sec
for i in range(5): for (diffx, diffy) in [(+20, 0), (0, +20), (-20, 0), (0, -20)]: self.canvas.move(tag, diffx, diffy)self.canvas.update() # force screen redraw/update
time.sleep(0.25) # pause, but don't block gui
if __name__ == '__main__':
CanvasEventsDemo() mainloop()
All three of the scripts in this section create a window of blue ovals and red rectangles as you drag new shapes out with the left mouse button. The drag-out implementation itself is inherited from the superclass. A right mouse button click still moves a single shape immediately, and a double-left click still clears the canvas too -- other operations inherited from the original superclass. In fact, all this new script really does is change the object creation calls to add tags and colors here, add a text field, and add bindings and callbacks for motion. Figure 8-38 shows what this subclass's window looks like after dragging out a few shapes to be animated.
Figure 8-38. Drag-out objects ready to be animated
The "o" and "r" keys are set up to start animation of all the ovals and rectangles you've drawn, respectively. Pressing "o", for example, makes all the blue ovals start moving synchronously. Objects are animated to mark out five squares around their location, and move four times per second. New objects drawn while others are in motion start to move too, because they are tagged. You need to run these live to get a feel for the simple animations they implement, of course (you could try moving this book back and forth and up and down, but it's not quite the same, and might look silly in public places).
8.7.3.2 Using widget.after events
The main drawback of this first approach is that only one animation can be going at once: if you press "r" or "o" while a move is in progress, the new request puts the prior movement on hold until it finishes because each move callback handler assumes the only thread of control while it runs. Screen updates are a bit sluggish while moves are in progress too, because they only happen as often as manual update calls are made (try a drag-out or a cover/uncover of the window during a move to see for yourself). Example 8-30 specializes just the moveInSquares method to remove such limitations.
Example 8-30. PP2E\Gui\Tour\canvasDraw_tags_after.py
########################################################################
# similar, but with .after scheduled events, not time.sleep loops;
# because these are scheduled events, this allows both ovals and
# rectangles to be moving at the _same_ time and does not require
# update calls to refresh the gui (only one time.sleep loop callback
# can be running at once, and blocks others started until it returns);
# the motion gets wild if you press 'o' or 'r' while move in progress,
# though--multiple move updates start firing around the same time;
########################################################################
from Tkinter import *
import canvasDraw_tags
class CanvasEventsDemo(canvasDraw_tags.CanvasEventsDemo):
def moveEm(self, tag, moremoves): (diffx, diffy), moremoves = moremoves[0], moremoves[1:] self.canvas.move(tag, diffx, diffy) if moremoves: self.canvas.after(250, self.moveEm, tag, moremoves) def moveInSquares(self, tag): allmoves = [(+20, 0), (0, +20), (-20, 0), (0, -20)] * 5 self.moveEm(tag, allmoves)if __name__ == '__main__':
CanvasEventsDemo() mainloop()
This version lets you make both ovals and rectangles move at the same time -- drag out a few ovals and rectangles, and then press "o" and then "r" right away to make this go. In fact, try pressing both keys a few times; the more you press, the more the objects move, because multiple scheduled events are firing and moving objects from wherever they happen to be positioned. If you drag out a new shape during a move, it starts moving immediately as before.
8.7.3.3 Using multiple time.sleep loop threads
Running animations in threads can sometimes achieve the same effect; it can be dangerous to update the screen from a spawned thread in general, but works in this example, at least on Windows. Example 8-31 runs each animation task as an independent and parallel thread. That is, each time you press the "o" or "r" keys to start an animation, a new thread is spawned to do the work. This works on Windows, but failed on Linux at the time I was writing this book -- the screen is not updated as threads change it, so you won't see any changes until later GUI events.
Example 8-31. PP2E\Gui\Tour\canvasDraw_tags_thread.py
########################################################################
# similar, but run time.sleep loops in parallel with threads, not
# .after events or single active time.sleep loop; because threads run
# in parallel, this also allows ovals and rectangles to be moving at
# the _same_ time and does not require update calls to refresh the gui:
# in fact, calling .update() can make this _crash_ today, though some
# canvas calls seem to be thread safe or else this wouldn't work at all;
########################################################################
from Tkinter import *
import canvasDraw_tags
import thread, time
class CanvasEventsDemo(canvasDraw_tags.CanvasEventsDemo):
def moveEm(self, tag): for i in range(5): for (diffx, diffy) in [(+20, 0), (0, +20), (-20, 0), (0, -20)]: self.canvas.move(tag, diffx, diffy)time.sleep(0.25) # pause this thread only
def moveInSquares(self, tag): thread.start_new_thread(self.moveEm, (tag,))if __name__ == '__main__':
CanvasEventsDemo() mainloop()
This version lets you move shapes at the same time just like Example 8-30, but this time it's a reflection of threads running in parallel. In fact, this uses the same scheme as the first time.sleep version. Here, though, there is more than one active thread of control, so move handlers can overlap in time -- time.sleep only blocks the calling thread, not the program at large. This seems to work (at least on Windows), but it is usually safer to have your threads do number crunching only, and let the main thread (the one that built the GUI) handle any screen updates. It's not impossible that GUI threads may be better supported in later Tkinter releases, so see more recent releases for more details.
8.7.3.4 Other animation options
We'll revisit animation in Chapter 9's PyDraw example; there, all three techniques will be resurrected to move shapes, text, and photos to arbitrary spots on a canvas marked with a mouseclick. And although the canvas widget's absolute coordinate system make it the workhorse of most nontrivial animations, Tkinter animation in general is limited mostly by your imagination. As we saw in the flashing and hiding alarm examples earlier, it's easy to change the appearance of other kinds of widgets dynamically too; you can even erase and redraw widgets and windows on the fly.
I should also note that the sorts of movement and animation techniques shown in this chapter and the next are suitable for many game-like programs, but not all. For more advanced 3D animation needs, be sure to also see the support in the PIL extension package for common animation and movie file formats such as FLI and MPEG. As currently implemented, Python is not widely used as the sole implementation language of graphic-intensive game programs, but it can still be used as both a prototyping and scripting language for such products.[4] And when integrated with 3D graphics libraries, it can serve even broader roles. See http://www.python.org for links to other available extensions in this domain.
8.8 The End of the Tour
And that's a wrap for our tour around the Tkinter library. You have now seen all the widgets and tools previewed at the end of Chapter 6 (flip back for a summary of territory covered on this tour). For more details, watch for all of the tools introduced here to appear again in larger GUI examples in Chapter 9, and the remainder of the book at large. And consult Tk and Tkinter resources for options not listed explicitly here; although other Tkinter options are analogous to those presented on this tour, the space I have for illustrating such options in this book is limited by both my publisher and my fingers.
8.9 The PyDemos and PyGadgets Launchers
To close out this chapter, I want to show the implementations of the two GUIs used to run major book examples. The following GUIs, PyDemos and PyGadgets, are simply GUIs for launching other GUI programs. In fact, we've now come to the end of the demo launcher story: both of the programs here interact with modules that we met earlier in Chapter 8 and Chapter 3:
· launchmodes.py starts independent Python programs portably.
· Launcher.py finds programs, and ultimately runs both PyDemos and PyGadgets when used by the self-configuring top-level launcher scripts.
· LaunchBrowser.py spawns web browsers.
See Examples Example 3-24, Example 4-14, and Example 4-15 for the code for these modules. The programs listed here add the GUI components to the program launching system -- they simply provide easy-to-use pushbuttons that spawn most of the larger examples in this text when pressed.
Both these scripts also assume that they will be run with the current working directory set to their directory (they hardcode paths to other programs relative to that). Either click on their names in a file explorer, or run them from a command-line shell after a cd to the top-level PP2E examples root directory. These scripts could allow invocations from other directories by prepending the PP2EHOME environment variable's value to program script paths, but they were really only designed to be run out of the PP2E root.
8.9.1 PyDemos Launcher Bar
The PyDemos script constructs a bar of buttons that run programs in demonstration mode, not for day-to-day use. I use PyDemos to show off Python programs whenever I can -- it's much easier to press its buttons than to run command lines or fish through a file explorer GUI to find scripts. You should use PyDemos to start and interact with examples presented in this book -- all of the buttons on this GUI represent examples we will meet in later chapters.
To make this launcher bar even easier to run, drag it out to your desktop to generate a clickable Windows shortcut (do something similar on other systems). Since this script hardcodes command lines for running programs elsewhere in the examples tree, it is also useful as an index to major book examples. Figure 8-39 shows what PyDemos looks like when run on Windows; it looks slightly different but works the same on Linux.
Figure 8-39. PyDemos with its pop-ups
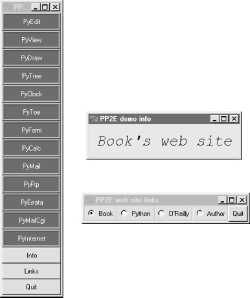
The source code that constructs this scene is listed in Example 8-32. PyDemos doesn't present much new in terms of GUI interface programming; its demoButton function simply attaches a new button to the main window, spring-loaded to spawn a Python program when pressed. To start programs, PyDemos calls an instance of the launchmodes.PortableLauncher object we met at the end of Chapter 3 -- its role as a Tkinter callback handler here is why a call operation is used to kick off the launched program.
As pictured in Figure 8-39, PyDemos also constructs two pop-up windows when buttons at the bottom of the main window are pressed -- an Info pop-up giving a short description of the last demo spawned, and a Links pop-up containing radiobuttons that open a local web browser on book-related sites when pressed:
· The Info pop-up displays a simple message line, and changes its font every second to draw attention to itself; since this can be a bit distracting, the pop-up starts out iconified (click the Info button to see or hide it).
· The Links pop-up's radiobuttons are much like hyperlinks in a web page, but this GUI isn't a browser: when pressed, the portable LaunchBrowser script we met in a prior chapter is used to find and start a web browser used to connect to the relevant site, assuming you have an Internet connection.
PyDemos runs on Windows and Linux, but that's largely due to the inherent portability of both Python and Tkinter. For more details, consult the source, which is shown in Example 8-32.
Example 8-32. PP2E\PyDemos.pyw
##############################################################################
# PyDemos.pyw
# Programming Python, 2nd Edition (PP2E), 1999--2001
#
# Launch major Python+Tk GUI examples from the book, in a
# platform-neutral way. This file also serves as an index# to major program examples, though many book examples aren't
# GUI-based, and so aren't listed here (e.g., see the Linux
# gcc build scripts in the examples root directory for C
# integration program pointers). Also see: #
# - PyGadgets.py, a simpler script for starting programs in
# non-demo mode that you wish to use on a regular basis # - PyGadgets_bar.pyw, which creates a button bar for starting
# all PyGadgets programs on demand, not all at once # - Launcher.py for starting programs without environment
# settings--finds Python, sets PYTHONPATH, etc.# - Launch_*.py for starting PyDemos and PyGadgets with
# Launcher.py--run these for a quick look# - LaunchBrowser.py for running example web pages with an
# automatically-located web browser# - README-PP2E.txt, for general examples information
#
# Internet-based demos live here:
# http://starship.python.net/~lutz/PyInternetDemos.html# but this program tries to start a browser on the main web pages
# automatically, either on the site above or on local page files.
# Additional program comments were moved to file PyDemos.doc.txt
##############################################################################
import sys, time, os, launchmodes
from Tkinter import *
# -live loads root pages off net, -file loads local files
InternetMode = '-file'
##################################
# start building main gui windows
##################################
Root = Tk()
Root.title('PP2E Demos')# build message window
Stat = Toplevel()
Stat.protocol('WM_DELETE_WINDOW', lambda:0) # ignore wm deleteStat.title('PP2E demo info')Info = Label(Stat, text = 'Select demo',
font=('courier', 20, 'italic'), padx=12, pady=12, bg='lightblue')Info.pack(expand=YES, fill=BOTH)
#############################################
# add launcher buttons with callback objects
#############################################
# demo launcher class
class Launcher(launchmodes.PortableLauncher): # use wrapped launcher classdef announce(self, text): # customize to set GUI label
Info.config(text=text)def demoButton(name, what, where):
b = Button(Root, bg='navy', fg='white', relief=RIDGE, border=4) b.config(text=name, command=Launcher(what, where)) b.pack(side=TOP, expand=YES, fill=BOTH)demoButton('PyEdit', 'Text file editor', # edit myself
'Gui/TextEditor/textEditor.pyw PyDemos.pyw') # assume in cwd
demoButton('PyView', 'Image slideshow, plus note editor', 'Gui/SlideShow/slideShowPlus.py Gui/gifs')demoButton('PyDraw', 'Draw and move graphics objects', 'Gui/MovingPics/movingpics.py Gui/gifs') demoButton('PyTree', 'Tree data structure viewer', 'Dstruct/TreeView/treeview.py')demoButton('PyClock', 'Analog/digital clocks','Gui/Clock/clockStyles.py Gui/gifs')
demoButton('PyToe', 'Tic-tac-toe game (AI)', 'Ai/TicTacToe/tictactoe.py') demoButton('PyForm', # view in-memory dict'Persistent table viewer/editor', # or cwd shelve of class
#'Dbase/TableBrowser/formgui.py') # 0=do not reinit shelve
#'Dbase/TableBrowser/formtable.py shelve 0 pyformData-1.5.2')
'Dbase/TableBrowser/formtable.py shelve 1 pyformData')
demoButton('PyCalc', 'Calculator, plus extensions', 'Lang/Calculator/calculator_plusplus.py')demoButton('PyMail', 'Python+Tk pop/smtp email client', 'Internet/Email/PyMailGui.py')demoButton('PyFtp', 'Python+Tk ftp clients', 'Internet/Ftp/PyFtpGui.pyw')if InternetMode == '-file':
pagepath = os.getcwd() + '/Internet/Cgi-Web'demoButton('PyErrata',
'Internet-based errata report system', 'LaunchBrowser.py -file %s/PyErrata/pyerrata.html' % pagepath)demoButton('PyMailCgi',
'Browser-based pop/smtp email interface', 'LaunchBrowser.py -file %s/PyMailCgi/pymailcgi.html' % pagepath) demoButton('PyInternet','Internet-based demo launcher page',
'LaunchBrowser.py -file %s/PyInternetDemos.html' % pagepath)else:
site = 'starship.python.net/~lutz'demoButton('PyErrata',
'Internet-based errata report system','LaunchBrowser.py -live PyErrata/pyerrata.html ' + site)
demoButton('PyMailCgi',
'Browser-based pop/smtp email interface', 'LaunchBrowser.py -live PyMailCgi/pymailcgi.html ' + site) demoButton('PyInternet','Main Internet demos launcher page',
'LaunchBrowser.py -live PyInternetDemos.html ' + site)#To try: bind mouse entry events to change info text when over a button
#See also: site http://starship.python.net/~lutz/PyInternetDemos.html
#############################################
# toggle info message box font once a second
#############################################
def refreshMe(info, ncall):
slant = ['normal', 'italic', 'bold', 'bold italic'][ncall % 4] info.config(font=('courier', 20, slant)) Root.after(1000, (lambda info=info, ncall=ncall: refreshMe(info, ncall+1)) )########################################
# unhide/hide status box on info clicks
########################################
Stat.iconify()
def onInfo():
if Stat.state() == 'iconic': Stat.deiconify() else:Stat.iconify() # was 'normal'
############################################
# popup a few web link buttons if connected
############################################
radiovar = StringVar() # use a global
def onLinks():
popup = Toplevel() popup.title('PP2E web site links')links = [("Book", 'LaunchBrowser.py -live about-pp.html rmi.net/~lutz'),
("Python", 'LaunchBrowser.py -live index.html www.python.org'),
("O'Reilly", 'LaunchBrowser.py -live index.html www.oreilly.com'),("Author", 'LaunchBrowser.py -live index.html rmi.net/~lutz')]
for (name, command) in links: callback = Launcher((name + "'s web site"), command) link = Radiobutton(popup, text=name, command=callback) link.config(relief=GROOVE, variable=radiovar, value=name) link.pack(side=LEFT, expand=YES, fill=BOTH) Button(popup, text='Quit', command=popup.destroy).pack(expand=YES,fill=BOTH) if InternetMode != '-live': from tkMessageBox import showwarning showwarning('PP2E Demos', 'Web links require an Internet connection')#############################################
# finish building main gui, start event loop
#############################################
Button(Root, text='Info', command=onInfo).pack(side=TOP, fill=X)Button(Root, text='Links', command=onLinks).pack(side=TOP, fill=X)
Button(Root, text='Quit', command=Root.quit).pack(side=BOTTOM, fill=X)refreshMe(Info, 0) # start togglingRoot.mainloop()
8.9.2 PyGadgets Launcher Bar
The PyGadgets script runs some of the same programs as PyDemos, but for real, practical use, not as flashy demonstrations. Both scripts use launchmodes to spawn other programs and display bars of launcher buttons, but this one is a bit simpler because its task is more focused. PyGadgets also supports two spawning modes: it can either start a canned list of programs immediately and all at once, or display a GUI for running each program on demand (Figure 8-40 shows the launch bar GUI made in on-demand mode).
Because of such differences, PyGadgets takes a more data-driven approach to building the GUI: it stores program names in a list and steps through it as needed, rather than using a sequence of precoded demoButton calls. The set of buttons on the launcher bar GUI in Figure 8-40, for example, depends entirely upon the contents of the programs list.
Figure 8-40. PyGadgets launcher bar
![]()
The source code behind this GUI is listed in Example 8-33; it's not much, because it relies on other modules (launchmodes, LaunchBrowser) to work most of its magic. PyGadgets is always open on my machines (I have a clickable shortcut to this script on my Windows desktop too). I use it to gain easy access to Python tools that I use on a daily basis -- text editors, calculators, and so on -- all of which we'll meet in upcoming chapters.
To customize PyGadgets for your own use, simply import and call its functions with program command-line lists of your own, or change the mytools list of spawnable programs near the end of this file. This is Python, after all.
Example 8-33. PP2E\PyGadgets.py
#!/bin/env python
####################################################################
# Start various examples; run me at system boot time to make them
# always available. This file is meant for starting programs you# actually wish to use; see PyDemos for starting Python/Tk demos
# and more details on program start options. Windows usage note: # this is a '.py' file, so you get a dos box console window when it
# is clicked; the dos box is used to show a startup message (and we
# sleep 5 seconds to make sure it's visible while gadgets start up).
# If you don't want the dos popup, run with the 'pythonw' program
# (not 'python'), use a '.pyw' suffix, mark with a 'run minimized'
# Windows property, or spawn the file from elsewhere; see PyDemos.
####################################################################
import sys, time, os, time
from Tkinter import *
from launchmodes import PortableLauncher # reuse program start classdef runImmediate(mytools):
# launch gadget programs immediatelyprint 'Starting Python/Tk gadgets...' # msgs to temp stdout screen
for (name, commandLine) in mytools:PortableLauncher(name, commandLine)() # call now to start now
print 'One moment please...' # \b means a backspace
if sys.platform[:3] == 'win': # on Windows keep stdio console window up for 5 seconds for i in range(5): time.sleep(1); print ('\b' + '.'*10), def runLauncher(mytools):
# put up a simple launcher bar for later use root = Tk() root.title('PyGadgets PP2E') for (name, commandLine) in mytools: b = Button(root, text=name, fg='black', bg='beige', border=2,command=PortableLauncher(name, commandLine))
b.pack(side=LEFT, expand=YES, fill=BOTH) root.mainloop()mytools = [
('PyEdit', 'Gui/TextEditor/textEditor.pyw'),
('PyView', 'Gui/SlideShow/slideShowPlus.py Gui/gifs'),
('PyCalc', 'Lang/Calculator/calculator.py'),
('PyMail', 'Internet/Email/PyMailGui.py'),
('PyClock', 'Gui/Clock/clock.py -size 175 -bg white'
' -picture Gui/gifs/pythonPowered.gif'),
('PyToe', 'Ai/TicTacToe/tictactoe.py'
' -mode Minimax -fg white -bg navy'),('PyNet', 'LaunchBrowser.py -file ' + os.getcwd() +
'/Internet/Cgi-Web/PyInternetDemos.html')]
if __name__ == '__main__':
prestart, toolbar = 1, 0 if prestart: runImmediate(mytools) if toolbar: runLauncher(mytools)
By default, PyGadgets starts programs immediately when it is run. To run PyGadgets in launcher-bar mode instead, Example 8-34 simply imports and calls the appropriate function with an imported program list. Because it is a .pyw file, you only see the launcher bar GUI it constructs initially, not a DOS console streams window.
Example 8-34. PP2E\PyGadgets_bar.pyw
# run PyGadgets tool bar only, instead of starting all the
# gadgets immediately; filename avoids dos popup on windows
import PyGadgets
PyGadgets.runLauncher(PyGadgets.mytools)
This script is the file my desktop shortcut invokes; I prefer to run gadget GUIs on demand. You can also run a script like this at your system's startup to make it always available (and save a mouseclick). For instance:
· On Windows, such a script can be automatically started by adding it to your StartUp folder -- click on your system's Start button, select Settings, go to the Taskbar & Start Menu dialog, and click your way through remaining steps.
· On Linux and Unix, you can automatically start this script by spawning it with a command line in your startup scripts (e.g., your home directory's .cshrc, .profile, or .login) after X Windows has been started.
Whether run via a shortcut, file explorer click, typed command line, or other means, the PyGadgets launcher bar at the top of Figure 8-41 appears.
Figure 8-41. PyGadgets launcher bar
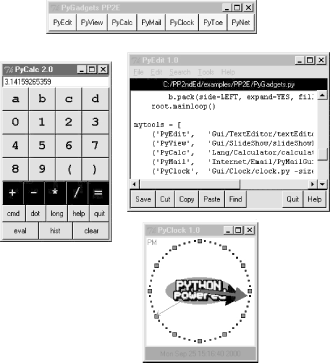
Of course, the whole point of PyGadgets is to spawn other programs. Pressing on its launcher bar's buttons starts programs like those shown in the rest of Figure 8-41, but if you want to know more about those, you'll have to turn the page and move on to the next chapter.
[1] Also note that toolbar items can be pictures too --
simply associate small images with toolbar buttons, as shown at the end of Chapter
7. [back]
[2] Animation techniques are covered at the end of this
tour. Because you can embed other widgets in a canvas's drawing area, their
coordinate system also makes them ideal for implementing GUIs that let users
design other GUIs by dragging embedded widgets around on the canvas -- a useful
canvas application we would explore in this book if I had a few hundred pages
to spare. [back]
[3] grid_forget unmaps
gridded widgets, and so effectively erases them from the display. Also see the
widget pack_forget and window withdraw
methods used in the after event "alarm" examples of the next section,
for other ways to erase and redraw GUI components. [back]
[4] Origin Systems, a major game software development
company, uses Python in this role to script the animation in some of their
games. At last report, their online game product Ultima Online II was to be
scripted with Python. [back]