Chapter 17 TOC Chapter 19
Chapter 18. Text and Language
18.1 "See Jack Hack. Hack, Jack, Hack"
In one form or another, processing text-based information is one of the more common tasks that applications need to perform. This can include anything from scanning a text file by columns to analyzing statements in a language defined by a formal grammar. Such processing usually is called parsing -- analyzing the structure of a text string. In this chapter, we'll explore ways to handle language and text-based information and summarize some Python development concepts in sidebars along the way.
Some of this material is advanced, but the examples are small. For instance, recursive descent parsing is illustrated with a simple example to show how it can be implemented in Python. We'll also see that it's often unnecessary to write custom parsers for each language processing task in Python. They can usually be replaced by exporting APIs for use in Python programs, and sometimes by a single built-in function call. Finally, this chapter closes by presenting PyCalc -- a calculator GUI written in Python, and the last major Python coding example in this text. As we'll see, writing calculators isn't much more difficult than juggling stacks while scanning text.
18.2 Strategies for Parsing Text in Python
In the grand scheme of things, there are a variety of ways to handle text processing in Python:
· Built-in string objects
· String module (and method) utilities
· Regular expression matching
· Parser-generator integrations
· Hand-coded parsers
· Running Python code with eval and exec built-ins
For simpler tasks, Python's built-in string object is often all we really need. Python strings can be indexed, concatenated, sliced, and processed both with built-in functions and with the string module. Our emphasis in this chapter, though, is on higher-level tools and techniques for analyzing textual information. Let's briefly explore each of the other approaches above with representative examples.
18.3 String Module Utilities
Python's string module includes a variety of text-processing utilities that go above and beyond string expression operators. For instance:
· string.find performs substring searches.
· string.atoi converts strings to integers.
· string.strip removes leading and trailing whitespace.
· string.upper converts to uppercase.
· string.replace performs substring substitutions.
The Python library manual includes an exhaustive list of available tools. Moreover, as of Python 2.0, Unicode (wide) strings are fully supported by Python string tools, and most of the string module's functions are also now available as string object methods. For instance, in Python 2.0, the following two expressions are equivalent:
string.find(str, substr) # traditionalstr.find(substr) # new in 2.0
except that the second form does not require callers to import the string module first. As usual, you should consult the library manuals and Appendix A, for late-breaking news on the string tools front.
In terms of this chapter's main focus, though, Python's built-in tools for splitting and joining strings around tokens turn out to be especially useful when it comes to parsing text:
string.split
Splits a string into substrings, using either whitespace (tabs, spaces, newlines) or an explicitly passed string as a delimiter.
string.join
Concatenates a list or tuple of substrings, adding a space or an explicitly passed separator string between each.
As we saw earlier in this book, split chops a string into a list of substrings, and join puts them back together:[1]
>>> import string
>>> string.split('A B C D')['A', 'B', 'C', 'D']
>>> string.split('A+B+C+D', '+')['A', 'B', 'C', 'D']
>>> string.join(['a', 'b', 'c'], '--')
'a--b--c'
Despite their simplicity, they can handle surprisingly complex text-parsing tasks. Moreover, the string module is very fast because it has been migrated to C. For instance, to quickly replace all tabs in a file with four periods, pipe the file into a script that looks like this:
from sys import *
from string import *
stdout.write( join( split(stdin.read( ), '\t'), '.'*4) )
The split call here divides input around tabs, and the join puts it back together with periods where tabs had been. The combination of the two calls is equivalent to using the global replacement call in the string module as follows:
stdout.write( replace(stdin.read( ), '\t', '.'*4) )
18.3.1 Summing Columns in a File
Let's look at a couple of practical applications of string splits and joins. In many domains, scanning files by columns is a fairly common task. For instance, suppose you have a file containing columns of numbers output by another system, and you need to sum each column's numbers. In Python, string splitting does the job (see Example 18-1). As an added bonus, it's easy to make the solution a reusable tool in Python.
Example 18-1. PP2E\Lang\summer.py
#!/usr/local/bin/python
import string
def summer(numCols, fileName):
sums = [0] * numCols # make list of zeros
for line in open(fileName, 'r').readlines( ): # scan file's lines
cols = string.split(line) # split up columns
for i in range(numCols): # around blanks/tabs
sums[i] = sums[i] + eval(cols[i]) # add numbers to sums
return sumsif __name__ == '__main__':
import sysprint summer(eval(sys.argv[1]), sys.argv[2]) # '% summer.py cols file'
As usual, you can both import this module and call its function, and run it as a shell tool from the command line. The summer calls split to make a list of strings representing the line's columns, and eval to convert column strings to numbers. Here's an input file that uses both blanks and tabs to separate columns:
C:\...\PP2E\Lang>type table1.txt
1 5 10 2 1.0
2 10 20 4 2.0
3 15 30 8 3
4 20 40 16 4.0
C:\...\PP2E\Lang>python summer.py 5 table1.txt
[10, 50, 100, 30, 10.0]
Notice that because the summer script uses eval to convert file text to numbers, you could really store arbitrary Python expressions in the file. Here, for example, it's run on a file of Python code snippets:
C:\...\PP2E\Lang>type table2.txt
2 1+1 1<<1 eval("2")
16 2*2*2*2 pow(2,4) 16.0
3 len('abc') [1,2,3][2] {'spam':3}['spam']
C:\...\PP2E\Lang>python summer.py 4 table2.txt
[21, 21, 21, 21.0]
We'll revisit eval later in this chapter when we explore expression evaluators.[2]
18.3.2 Parsing and Unparsing Rule Strings
Example 18-2 demonstrates one way that splitting and joining strings can be used to parse sentences in a simple language. It is taken from a rule-based expert system shell (holmes) that is written in Python and included at http://examples.oreilly.com/python2 (see the top-level Ai examples directory). Rule strings in holmes take the form:
"rule <id> if <test1>, <test2>... then <conclusion1>, <conclusion2>..."
Tests and conclusions are conjunctions of terms ("," means "and"). Each term is a list of words or variables separated by spaces; variables start with ?. To use a rule, it is translated to an internal form -- a dictionary with nested lists. To display a rule, it is translated back to the string form. For instance, given a call:
rules.internal_rule('rule x if a ?x, b then c, d ?x')
the conversion in function internal_rule proceeds as follows:
string = 'rule x if a ?x, b then c, d ?x'
i = ['rule x', 'a ?x, b then c, d ?x']
t = ['a ?x, b', 'c, d ?x']
r = ['', 'x']
result = {'rule':'x', 'if':[['a','?x'], ['b']], 'then':[['c'], ['d','?x']]}
It first splits around the if, then around the then, and finally around rule. The result is the three substrings that were separated by the keywords. Test and conclusion substrings are split around "," and spaces last. join is used to convert back (unparse) to the original string for display. Example 18-2 is the concrete implementation of this scheme.
Example 18-2. PP2E\Lang\rules.py
from string import split, join, strip
def internal_rule(string): i = split(string, ' if ')
t = split(i[1], ' then ')
r = split(i[0], 'rule ')
return {'rule':strip(r[1]), 'if':internal(t[0]), 'then':internal(t[1])}def external_rule(rule):
return ('rule ' + rule['rule'] +
' if ' + external(rule['if']) +
' then ' + external(rule['then']) + '.')
def internal(conjunct):
res = [] # 'a b, c d'
for clause in split(conjunct, ','): # -> ['a b', ' c d']
res.append(split(clause)) # -> [['a','b'], ['c','d']]
return resdef external(conjunct):
strs = []for clause in conjunct: # [['a','b'], ['c','d']]
strs.append(join(clause)) # -> ['a b', 'c d']
return join(strs, ', ') # -> 'a b, c d'
As usual, we can test components of this module interactively:
>>> import rules
>>> rules.internal('a ?x, b')[['a', '?x'], ['b']]
>>> rules.internal_rule('rule x if a ?x, b then c, d ?x'){'if': [['a', '?x'], ['b']], 'rule': 'x', 'then': [['c'], ['d', '?x']]}>>> r = rules.internal_rule('rule x if a ?x, b then c, d ?x')>>> rules.external_rule(r)
'rule x if a ?x, b then c, d ?x.'
Parsing by splitting strings around tokens like this only takes you so far: there is no direct support for recursive nesting of components, and syntax errors are not handled very gracefully. But for simple language tasks like this, string splitting might be enough, at least for prototyping systems. You can always add a more robust rule parser later or reimplement rules as embedded Python code or classes .
Lesson 1: Prototype and MigrateAs a rule of thumb, use the string module's functions instead of things like regular expressions whenever you can. They tend to be much faster, because they've been moved to a C language implementation. When you import string, it internally replaces most of its content with functions imported from the strop C extension module; strop methods are reportedly 100-1000 times faster than their Python-coded equivalents. [a] The string module was originally written in Python but demands for string efficiency prompted recoding it in C. The result was dramatically faster performance for string client programs without impacting the interface. That is, string module clients became instantly faster without having to be modified for the new C-based module. A similar migration was applied to the pickle module we met in Chapter 16 -- the newer cPickle recoding is compatible but much faster. Which is a great lesson about Python development: modules can be coded quickly in Python at first, and translated to C later for efficiency if required. Because the interface to Python and C extension modules is identical (both are imported), C translations of modules are backward compatible with their Python prototypes. The only impact of the translation of such modules on clients is an improvement in performance. There is usually no need to move every module to C for delivery of an application: you can pick and choose performance-critical modules (like string and pickle) for translation, and leave others coded in Python. Use the timing and profiling techniques of the prior chapter to isolate which modules will give the most improvement when translated to C. C-based extension modules are introduced in the next part of this book. Actually, in Python 2.0, the string module has changed its implementation again: it is now a frontend to new string methods, which are able to also handle Unicode strings. As mentioned, most string functions are also available as object methods in 2.0. For instance, string.split(X) is now simply a synonym for X.split( ); both forms are supported, but the latter may become prevalent over time. Either way, clients of the original string module are not affected by this change -- yet another lesson! |
18.3.2.1 More on the holmes expert system shell
So how are these rules actually used? As mentioned, the rule parser we just met is part of the Python-coded holmes expert system shell. This book does not cover holmes in detail due to lack of space; see the PP2E\AI\ExpertSystem directory on the book CD (see http://examples.oreilly.com/python2) for its code and documentation. But by way of introduction, holmes is an inference engine that performs forward and backward chaining deduction on rules that you supply. For example, a rule:
rule pylike if ?X likes coding, ?X likes spam then ?X likes Python
can be used both to prove whether someone likes Python (backward, from "then" to "if"), and to deduce that someone likes Python from a set of known facts (forward, from "if" to "then"). Deductions may span multiple rules, and rules that name the same conclusion represent alternatives. Holmes also performs simple pattern-matching along the way to assign the variables that appear in rules (e.g., ?X), and is able to explain its work.
To make this all more concrete, let's step through a simple holmes session. The += interactive command adds a new rule to the rule base by running the rule parser, and @@ prints the current rule base:
C:..\PP2E\Ai\ExpertSystem\holmes\holmes>python holmes.py
-Holmes inference engine-
holmes> += rule pylike if ?X likes coding, ?X likes spam then ?X likes Python
holmes> @@
rule pylike if ?X likes coding, ?X likes spam then ?X likes Python.
Now, to kick off a backward-chaining proof of a goal, use the ?- command. A proof explanation is shown here; holmes can also tell you why it is asking a question. Holmes pattern variables can show up in both rules and queries; in rules, variables provide generalization; in a query, they provide an answer:
holmes> ?- mel likes Python
is this true: "mel likes coding" ? y
is this true: "mel likes spam" ? y
yes: (no variables)
show proof ? yes
"mel likes Python" by rule pylike "mel likes coding" by your answer "mel likes spam" by your answermore solutions? n
holmes> ?- linda likes ?X
is this true: "linda likes coding" ? y
is this true: "linda likes spam" ? y
yes: linda likes Python
Forward-chaining from a set of facts to conclusions is started with a +- command. Here, the same rule is being applied but in a different way:
holmes> +- chris likes spam, chris likes coding
I deduced these facts...
chris likes PythonI started with these facts...
chris likes spam chris likes codingtime: 0.0
More interestingly, deductions chain through multiple rules when part of a rule's "if" is mentioned in another rule's "then":
holmes> += rule 1 if thinks ?x then human ?x
holmes> += rule 2 if human ?x then mortal ?x
holmes> ?- mortal bob
is this true: "thinks bob" ? y
yes: (no variables)
holmes> +- thinks bob
I deduced these facts...
human bob mortal bobI started with these facts...
thinks bobtime: 0.0
Finally, the @= command is used to load files of rules that implement more sophisticated knowledgebases; the rule parser is run on each rule in the file. Here is a file that encodes animal classification rules; other example files are available on the CD (see http://examples.oreilly.com/python2) if you'd like to experiment:
holmes> @= ..¸bases\zoo.kb
holmes> ?- it is a penguin
is this true: "has feathers" ? why
to prove "it is a penguin" by rule 17
this was part of your original query.
is this true: "has feathers" ? y
is this true: "able to fly" ? n
is this true: "black color" ? y
yes: (no variables)
Type "stop" to end a session and "help" for a full commands list, and see the text files in the holmes directories for more details. Holmes is an old system written before Python 1.0 (and around 1993), but still works unchanged on all platforms under Python 1.5.2.
18.4 Regular Expression Matching
Splitting and joining strings is a simple way to process text, as long as it follows the format you expect. For more general text analysis tasks, Python provides regular expression matching utilities. Regular expressions (REs) are simply strings that define patterns to be matched against other strings. You supply a pattern and a string, and ask if the string matches your pattern. After a match, parts of the string matched by parts of the pattern are made available to your script. That is, matches not only give a yes/no answer, but they can pick out substrings as well.
Regular expression pattern strings can be complicated (let's be honest -- they can be downright gross to look at). But once you get the hang of them, they can replace larger hand-coded string search routines. In Python, regular expressions are not part of the syntax of the Python language itself, but are supported by extension modules that you must import to use. The modules define functions for compiling pattern strings into pattern objects, matching these objects against strings, and fetching matched substrings after a match.
Beyond those generalities, Python's regular expression story is complicated a little by history:
The regex module (old)
In earlier Python releases, a module called regex was the standard (and only) RE module. It was fast and supported patterns coded in awg, grep, and emacs style, but it is now somewhat deprecated (though it will likely still be available for some time to come).
The re module (new)
Today, you should use re, a new RE module for Python, that was introduced sometime around Python release 1.5. This module provides a much richer RE pattern syntax that tries to be close to that used to code patterns in the Perl language (yes, REs are a feature of Perl worth emulating). For instance, re supports the notions of named groups, character classes, and non-greedy matches -- RE pattern operators that match as few characters as possible (other RE pattern operators always match the longest possible substring).
Up until very recently, re was generally slower than regex, so you had to choose between speed and Perl-like RE syntax. Today, though, re has been optimized with the sre implementation, to the extent that regex no longer offers any clear advantages. Moreover, re in Python 2.0 now supports matching Unicode strings (strings with 16-bit wide characters for representing large character sets).
Because of this migration, I've recoded RE examples in this text to use the new re module instead of regex. The old regex-based versions are still available on the book's CD (see http://examples.oreilly.com/python2), in directory PP2E\lang\old-regex. If you find yourself having to migrate old regex code, you can also find a document describing the translation steps needed at http://www.python.org. Both modules' interfaces are similar, but re introduces a match object and changes pattern syntax in minor ways.
Having said that, I also want to warn you that REs are a complex topic that cannot be covered in depth here. If this area sparks your interest, the text Mastering Regular Expressions from O'Reilly is a good next step to take.
18.4.1 Using the re Module
The Python re module comes with functions that can search for patterns right away or make compiled pattern objects for running matches later. Pattern objects (and module search calls) in turn generate match objects, which contain information about successful matches and matched substrings. The next few sections describe the module's interfaces and some of the operators you can use to code patterns.
18.4.1.1 Module functions
The top level of the module provides functions for matching, substitution, pre-compiling, and so on:
compile(pattern
[, flags])
Compile a RE pattern string into a regular expression object, for later matching. See the reference manual for the flags argument's meaning.
match(pattern,
string [, flags])
If zero or more characters at start of string match the pattern string, return a corresponding MatchObject instance, or None if no match is found.
search(pattern,
string [, flags])
Scan through string for a location matching pattern, and return a corresponding MatchObject instance, or None if no match is found.
split(pattern,
string [, maxsplit])
Split string by occurrences of pattern. If capturing ( ) are used in the pattern, then occurrences of patterns or subpatterns are also returned.
sub(pattern,
repl, string [, count])
Return the string obtained by replacing the (first count) leftmost non-overlapping occurrences of pattern (a string or a RE object) in string by repl.
subn(pattern,
repl, string [, count])
Same as sub, but returns a tuple: (new-string, number-of-changes-made).
18.4.1.2 Compiled pattern objects
At the next level, pattern objects provide similar attributes, but the pattern string is implied. The re.compile function in the previous section is useful to optimize patterns that may be matched more than once (compiled patterns match faster). Pattern objects returned by re.compile have these sorts of attributes:
match(string
[, pos] [, endpos])
search(string
[, pos] [, endpos])
split(string
[, maxsplit])
sub(repl,
string [, count])
subn(repl,
string [, count])
Same as the re functions, but the pattern is implied, and pos and endpos give start/end string indexes for the match.
18.4.1.3 Match objects
Finally, when a match or search function or method is successful, you get back a match object (None comes back on failed matches). Match objects export a set of attributes of their own, including:
group([g1, g2, ...])
Returns the substring that matched a parenthesized groups in the pattern.
groups( )
Returns a tuple of all groups' substrings of the match.
start([group]) , end([group])
Indices of the start and end of the substring matched by group (or the entire matched string, if no group).
span([group])
Returns the two-item tuple: (start(group),end(group)).
18.4.1.4 Regular expression patterns
Regular expression strings are built up by concatenating single-character regular expression forms, shown in Table 18-1. The longest-matching string is usually matched by each form, except for the non-greedy operators. In the table, R means any regular expression form, C is a character, and N denotes a digit.
Table 18-1. re Pattern Syntax |
|
|
. |
Matches any character (including newline if
DOTALL flag specified) |
|
^ |
Matches start of the string (of every line
in MULTILINE mode) |
|
$ |
Matches end of the string (of every line in
MULTILINE mode) |
|
C |
Any non-special character matches itself |
|
R* |
Zero or more of preceding regular
expression R (as many as possible) |
|
R+ |
One or more of preceding regular expression
R (as many as possible) |
|
R? |
Zero or one occurrence of preceding regular
expression R |
|
R{m,n} |
Matches from m to n
repetitions of preceding regular expression R |
|
R*?, R+?,
R??, R{m,n}? |
Same as *,
+, and ? but
matches as few characters/times as possible; these are known as non-greedy
match operators (unlike others, they match and consume as few characters as
possible) |
|
[ ] |
Defines character set: e.g. [a-zA-Z] to match all letters |
|
[^ ] |
Defines complemented character set: matches
if char is not in set |
|
\ |
Escapes special chars (e.g., *?+|( )) and introduces special sequences |
|
\\ |
Matches a literal \ (write as \\\\ in
pattern, or r\\) |
|
R|R |
Alternative: matches left or right R |
|
RR |
Concatenation: match both Rs |
|
(R) |
Matches any RE inside ( ), and forms a group (retains matched substring) |
|
(?: R) |
Same but doesn't delimit a group |
|
(?= R) |
Matches if R matches next, but doesn't consume any of the string
(e.g., X
(?=Y) matches X only if followed by Y) |
|
(?! R) |
Matches if R doesn't match next. Negative of (?=R) |
|
(?P<name>R) |
Matches any RE inside ( ), and delimits a named group |
|
(?P=name) |
Matches whatever text was matched by the
earlier group named name |
|
(?#...) |
A comment; ignored |
|
(?letter) |
Set mode flag; letter is one of i, L, m, s, x (see library manual) |
Within patterns, ranges and selections can be combined. For instance, [a-zA-Z0-9_]+ matches the longest possible string of one or more letters, digits, or underscores. Special characters can be escaped as usual in Python strings: [\t ]* matches zero or more tabs and spaces (i.e., it skips whitespace).
The parenthesized grouping construct, (R), lets you extract matched substrings after a successful match. The portion of the string matched by the expression in parentheses is retained in a numbered register. It's available through the group method of a match object after a successful match.
In addition to the entries in this table, special sequences in Table 18-2 can be used in patterns, too. Due to Python string rules, you sometimes must double up on backslashes (\\) or use Python raw strings (r'...') to retain backslashes in the pattern.
Table 18-2. re Special Sequences |
|
|
\num |
Match text of group num (numbered from 1) |
|
\A |
Matches only at the start of the string |
|
\b |
Empty string at word boundaries |
|
\B |
Empty string not at word boundary |
|
\d |
Any decimal digit (like [0-9]) |
|
\D |
Any nondecimal digit character (like [^O-9]) |
|
\s |
Any whitespace character (like [ \t\n\r\f\v]) |
|
\S |
Any nonwhitespace character (like [^ \t\n\r\f\v]) |
|
\w |
Any alphanumeric character (uses LOCALE
flag) |
|
\W |
Any nonalphanumeric character (uses LOCALE
flag) |
|
\Z |
Matches only at the end of the string |
The Python library manual gives additional details. But to demonstrate how the re interfaces are typically used, we'll turn to some short examples.
18.4.2 Basic Patterns
To illustrate how to combine RE operators, let's start with a few short test files that match simple pattern forms. Comments in Example 18-3 describe the operations exercised; check Table 18-1 to see which operators are used in these patterns.
Example 18-3. PP2E\lang\re-basics.py
# literals, sets, ranges (all print 2 = offset where pattern found)import re # the one to use todaypattern, string = "A.C.", "xxABCDxx" # nonspecial chars match themselfmatchobj = re.search(pattern, string) # '.' means any one charif matchobj: # search returns match object or None
print matchobj.start( ) # start is index where matched
pattobj = re.compile("A.*C.*") # 'R*' means zero or more Rs
matchobj = pattobj.search("xxABCDxx") # compile returns pattern objif matchobj: # patt.search returns match objprint matchobj.start( )
# selection sets
print re.search(" *A.C[DE][D-F][^G-ZE]G\t+ ?", "..ABCDEFG\t..").start( )# alternatives
print re.search("A|XB|YC|ZD", "..AYCD..").start( ) # R1|R2 means R1 or R2# word boundaries
print re.search(r"\bABCD", "..ABCD ").start( ) # \b means word boundary
print re.search(r"ABCD\b", "..ABCD ").start( ) # use r'...' to escape '\'
Notice that there are a variety of ways to kick off a match with re -- by calling module search functions and by making compiled pattern objects. In either event, you can hang on to the resulting match object or not. All the print statements in this script show a result of 2 -- the offset where the pattern was found in the string. In the first test, for example, "A.C." matches the "ABCD" at offset 2 in the search string (i.e., after the first "xx"):
C:\...\PP2E\Lang>python re-basic.py
2
2
2
2
2
2
In Example 18-4, parts of the pattern strings enclosed in parentheses delimit groups ; the parts of the string they matched are available after the match.
Example 18-4. PP2E\lang\re-groups.py
# groups (extract substrings matched by REs in '( )' parts)import re
patt = re.compile("A(.)B(.)C(.)") # saves 3 substringsmobj = patt.match("A0B1C2") # each '( )' is a group, 1..nprint mobj.group(1), mobj.group(2), mobj.group(3) # group( ) gives substring
patt = re.compile("A(.*)B(.*)C(.*)") # saves 3 substringsmobj = patt.match("A000B111C222") # groups( ) gives all groupsprint mobj.groups( )print re.search("(A|X)(B|Y)(C|Z)D", "..AYCD..").groups( )patt = re.compile(r"[\t ]*#\s*define\s*([a-z0-9_]*)\s*(.*)")
mobj = patt.search(" # define spam 1 + 2 + 3") # parts of C #defineprint mobj.groups( ) # \s is whitespace
In the first test here, for instance, the three (.) groups each match a single character, but retain the character matched; calling group pulls out the bits matched. The second test's (.*) groups match and retain any number of characters. The last test here matches C #define lines; more on this later.
C:\...\PP2E\Lang>python re-groups.py
0 1 2
('000', '111', '222')('A', 'Y', 'C')('spam', '1 + 2 + 3')
Finally, besides matches and substring extraction, re also includes tools for string replacement or substitution (see Example 18-5).
Example 18-5. PP2E\lang\re-subst.py
# substitutions (replace occurrences of patt with repl in string)
import re print re.sub('[ABC]', '*', 'XAXAXBXBXCXC')print re.sub('[ABC]_', '*', 'XA-XA_XB-XB_XC-XC_')
In the first test, all characters in the set are replaced; in the second, they must be followed by an underscore:
C:\...\PP2E\Lang>python re-subst.py
X*X*X*X*X*X*
XA-X*XB-X*XC-X*
18.4.3 Scanning C Header Files for Patterns
The script in Example 18-6 puts these pattern operators to more practical use. It uses regular expressions to find #define and #include lines in C header files and extract their components. The generality of the patterns makes them detect a variety of line formats; pattern groups (the parts in parentheses) are used to extract matched substrings from a line after a match.
Example 18-6. PP2E\Lang\cheader.py
#! /usr/local/bin/python
import sys, re
from string import strip
pattDefine = re.compile( # compile to pattobj'^#[\t ]*define[\t ]+([a-zA-Z0-9_]+)[\t ]*(.*)') # "# define xxx yyy..."
pattInclude = re.compile(
'^#[\t ]*include[\t ]+[<"]([a-zA-Z0-9_/\.]+)') # "# include <xxx>..."
def scan(file):
count = 0while 1: # scan line-by-line
line = file.readline( )
if not line: break count = count + 1matchobj = pattDefine.match(line) # None if match fails
if matchobj:name = matchobj.group(1) # substrings for (...) parts
body = matchobj.group(2)
print count, 'defined', name, '=', strip(body) continue matchobj = pattInclude.match(line) if matchobj:start, stop = matchobj.span(1) # start/stop indexes of (...)
filename = line[start:stop] # slice out of line
print count, 'include', filename # same as matchobj.group(1)
if len(sys.argv) == 1:
scan(sys.stdin) # no args: read stdin
else:
scan(open(sys.argv[1], 'r')) # arg: input file name
To test, let's run this script on the text file in Example 18-7.
Example 18-7. PP2E\Lang\test.h
#ifndef TEST_H
#define TEST_H
#include <stdio.h>
#include <lib/spam.h>
# include "Python.h"
#define DEBUG
#define HELLO 'hello regex world'
# define SPAM 1234
#define EGGS sunny + side + up
#define ADDER(arg) 123 + arg#endif
Notice the spaces after # in some of these lines; regular expressions are flexible enough to account for such departures from the norm. Here is the script at work, picking out #include and #define lines and their parts; for each matched line, it prints the line number, the line type, and any matched substrings:
C:\...\PP2E\Lang>python cheader.py test.h
2 defined TEST_H =
4 include stdio.h
5 include lib/spam.h
6 include Python.h
8 defined DEBUG =
9 defined HELLO = 'hello regex world'
10 defined SPAM = 1234
12 defined EGGS = sunny + side + up
13 defined ADDER = (arg) 123 + arg
18.4.4 A File Pattern Search Utility
The next script searches for patterns in a set of files, much like the grep command-line program. We wrote file and directory searchers earlier, in Chapter 5. Here, the file searches look for patterns instead of simple strings (see Example 18-8). The patterns are typed interactively separated by a space, and the files to be searched are specified by an input pattern for Python's glob.glob filename expansion tool we studied earlier, too.
Example 18-8. PP2E\Lang\pygrep1.py
#!/usr/local/bin/python
import sys, re, glob
from string import split
help_string = """
Usage options.
interactive: % pygrep1.py"""
def getargs( ): if len(sys.argv) == 1: return split(raw_input("patterns? >")), raw_input("files? >") else: try: return sys.argv[1], sys.argv[2] except: print help_string sys.exit(1)def compile_patterns(patterns):
res = [] for pattstr in patterns: try:res.append(re.compile(pattstr)) # make re patt object
except: # or use re.match
print 'pattern ignored:', pattstr return resdef searcher(pattfile, srchfiles):
patts = compile_patterns(pattfile) # compile for speed
for file in glob.glob(srchfiles): # all matching files
lineno = 1 # glob uses re too
print '\n[%s]' % filefor line in open(file, 'r').readlines( ): # all lines in file
for patt in patts:if patt.search(line): # try all patterns
print '%04d)' % lineno, line, # match if not None
break lineno = lineno+1if __name__ == '__main__':
apply(searcher, getargs( ))
Here's what a typical run of this script looks like; it searches all Python files in the current directory for two different patterns, compiled for speed. Notice that files are named by a pattern, too -- Python's glob module also uses reinternally:
C:\...\PP2E\Lang>python pygrep1.py
patterns? >import.*string spam
files? >*.py
[cheader.py]
[finder2.py]
0002) import string, glob, os, sys
[patterns.py]
0048) mobj = patt.search(" # define spam 1 + 2 + 3")[pygrep1.py]
[rules.py]
[summer.py]
0002) import string
[__init__.py]
18.5 Parser Generators
If you have any background in parsing theory, you may know that neither regular expressions nor string splitting is powerful enough to handle more complex language grammars (roughly, they don't have the "memory" required by true grammars). For more sophisticated language analysis tasks, we sometimes need a full-blown parser. Since Python is built for integrating C tools, we can write integrations to traditional parser generator systems such as yacc and bison. Better yet, we could use an integration that already exists.
There are also Python-specific parsing systems accessible from Python's web site. Among them, the kwParsing system, developed by Aaron Watters, is a parser generator written in Python, and the SPARK toolkit, developed by John Aycock, is a lightweight system that employs the Earley algorithm to work around technical problems with LALR parser generation (if you don't know what that means, you probably don't need to care). Since these are all complex tools, though, we'll skip their details in this text. Consult http://www.python.org for information on parser generator tools available for use in Python programs.
Lesson 2: Don't Reinvent the WheelSpeaking of parser generators: to use some of these tools in Python programs, you'll need an extension module that integrates them. The first step in such scenarios should always be to see if the extension already exists in the public domain. Especially for common tools like these, chances are that someone else has already written an integration that you can use off-the-shelf instead of writing one from scratch. Of course, not everyone can donate all their extension modules to the public domain, but there's a growing library of available components that you can pick up for free and a community of experts to query. Visit http://www.python.org for links to Python software resources. With some half a million Python users out there as I write this book, there is much that can be found in the prior-art department. |
Of special interest to this chapter, also see YAPPS -- Yet Another Python Parser System. YAPPS is a parser generator written in Python. It uses supplied rules to generate human-readable Python code that implements a recursive descent parser. The parsers generated by YAPPS look much like (and are inspired by) the hand-coded expression parsers shown in the next section. YAPPS creates LL(1) parsers, which are not as powerful as LALR parsers, but sufficient for many language tasks. For more on YAPPS, see http://theory.stanford.edu/~amitp/Yapps.
18.6 Hand-Coded Parsers
Since Python is a general purpose programming language, it's also reasonable to consider writing a hand-coded parser. For instance, recursive descent parsing is a fairly well-known technique for analyzing language-based information. Since Python is a very high-level language, writing the parser itself is usually easier than it would be in a traditional language like C or C++.
To illustrate, this section develops a custom parser for a simple grammar: it parses and evaluates arithmetic expression strings. This example also demonstrates the utility of Python as a general-purpose programming language. Although Python is often used as a frontend or rapid development language, it's also useful for the kinds of things we'd normally write in a systems development language like C or C++.
18.6.1 The Expression Grammar
The grammar our parser will recognize can be described as follows:
goal -> <expr> END [number, variable, ( ]goal -> <assign> END [set]assign -> 'set' <variable> <expr> [set]expr -> <factor> <expr-tail> [number, variable, ( ]expr-tail -> ^ [END, ) ]
expr-tail -> '+' <factor> <expr-tail> [+]expr-tail -> '-' <factor> <expr-tail> [-]factor -> <term> <factor-tail> [number, variable, ( ]factor-tail -> ^ [+, -, END, ) ]factor-tail -> '*' <term> <factor-tail> [*]factor-tail -> '/' <term> <factor-tail> [/]term -> <number> [number]term -> <variable> [variable]term -> '(' <expr> ')' [(]tokens: (, ), num, var, -, +, /, *, set, end
This is a fairly typical grammar for a simple expression language, and it allows for arbitrary expression nesting (some example expressions appear at the end of the testparser module listing in Example 18-11). Strings to be parsed are either an expression or an assignment to a variable name (set). Expressions involve numbers, variables, and the operators +, -, *, and /. Because factor is nested in expr in the grammar, * and / have higher precedence (i.e., bind tighter) than + and -. Expressions can be enclosed in parentheses to override precedence, and all operators are left associative -- that is, group on the left (e.g., 1-2-3 is treated the same as (1-2)-3).
Tokens are just the most primitive components of the expression language. Each grammar rule earlier is followed in square brackets by a list of tokens used to select it. In recursive descent parsing, we determine the set of tokens that can possibly start a rule's substring, and use that information to predict which rule will work ahead of time. For rules that iterate (the -tail rules), we use the set of possibly following tokens to know when to stop. Typically, tokens are recognized by a string processor (a "scanner"), and a higher-level processor (a "parser") uses the token stream to predict and step through grammar rules and substrings.
18.6.2 The Parser's Code
The system is structured as two modules, holding two classes:
· The scanner handles low-level character-by-character analysis.
· The parser embeds a scanner and handles higher-level grammar analysis.
The parser is also responsible for computing the expression's value and testing the system. In this version, the parser evaluates the expression while it is being parsed. To use the system, we create a parser with an input string and call its parse method. We can also call parse again later with a new expression string.
There's a deliberate division of labor here. The scanner extracts tokens from the string, but knows nothing about the grammar. The parser handles the grammar, but is naive about the string itself. This modular structure keeps the code relatively simple. And it's another example of the OOP composition relationship at work: parsers embed and delegate to scanners.
The module in Example 18-9 implements the lexical analysis task -- detecting the expression's basic tokens by scanning the text string left to right on demand. Notice that this is all straightforward logic here; such analysis can sometimes be performed with regular expressions instead (described earlier), but the pattern needed to detect and extract tokens in this example would be too complex and fragile for my tastes. If your tastes vary, try recoding this module with re.
Example 18-9. PP2E\Lang\Parser\scanner.py
####################################################
# the scanner (lexical analyser)
####################################################
import string
SyntaxError = 'SyntaxError' # local errors
LexicalError = 'LexicalError'class Scanner:
def __init__(self, text): self.next = 0self.text = text + '\0'
def newtext(self, text): Scanner.__init__(self, text) def showerror(self): print '=> ', self.text print '=> ', (' ' * self.start) + '^' def match(self, token): if self.token != token: raise SyntaxError, [token] else: value = self.value if self.token != '\0':self.scan( ) # next token/value
return value # return prior value
def scan(self):self.value = None
ix = self.next while self.text[ix] in string.whitespace: ix = ix+1 self.start = ix if self.text[ix] in ['(', ')', '-', '+', '/', '*', '\0']: self.token = self.text[ix] ix = ix+1
elif self.text[ix] in string.digits: str = '' while self.text[ix] in string.digits: str = str + self.text[ix] ix = ix+1 if self.text[ix] == '.': str = str + '.' ix = ix+1 while self.text[ix] in string.digits: str = str + self.text[ix] ix = ix+1 self.token = 'num' self.value = string.atof(str)else:
self.token = 'num' self.value = string.atol(str) elif self.text[ix] in string.letters: str = '' while self.text[ix] in (string.digits + string.letters): str = str + self.text[ix] ix = ix+1 if string.lower(str) == 'set': self.token = 'set' else: self.token = 'var'self.value = str
else: raise LexicalErrorself.next = ix
The parser module's class creates and embeds a scanner for its lexical chores, and handles interpretation of the expression grammar's rules and evaluation of the expression's result, as shown in Example 18-10.
Example 18-10. PP2E\Lang\Parser\parser1.py
########################################################
# the parser (syntax analyser, evaluates during parse)
########################################################
UndefinedError = 'UndefinedError'
from scanner import Scanner, LexicalError, SyntaxError
class Parser:
def __init__(self, text=''):self.lex = Scanner(text) # embed a scanner
self.vars = {'pi':3.14159} # add a variable
def parse(self, *text):if text: # main entry-point
self.lex.newtext(text[0]) # reuse this parser?
try:self.lex.scan( ) # get first token
self.Goal( ) # parse a sentence
except SyntaxError: print 'Syntax Error at column:', self.lex.startself.lex.showerror( )
except LexicalError: print 'Lexical Error at column:', self.lex.startself.lex.showerror( )
except UndefinedError, name: print "'%s' is undefined at column:" % name, self.lex.startself.lex.showerror( )
def Goal(self): if self.lex.token in ['num', 'var', '(']:val = self.Expr( )
self.lex.match('\0') # expression?
print valelif self.lex.token == 'set': # set command?
self.Assign( )
self.lex.match('\0') else: raise SyntaxError def Assign(self): self.lex.match('set') var = self.lex.match('var')val = self.Expr( )
self.vars[var] = val # assign name in dict
def Expr(self):left = self.Factor( )
while 1: if self.lex.token in ['\0', ')']: return left elif self.lex.token == '+':self.lex.scan( )
left = left + self.Factor( )
elif self.lex.token == '-':self.lex.scan( )
left = left - self.Factor( )
else: raise SyntaxError def Factor(self):left = self.Term( )
while 1: if self.lex.token in ['+', '-', '\0', ')']: return left elif self.lex.token == '*':self.lex.scan( )
left = left * self.Term( )
elif self.lex.token == '/':
self.lex.scan( )
left = left / self.Term( )
else: raise SyntaxError def Term(self): if self.lex.token == 'num':val = self.lex.match('num') # numbers
return val elif self.lex.token == 'var': if self.vars.has_key(self.lex.value):val = self.vars[self.lex.value] # lookup name's value
self.lex.scan( )
return val else: raise UndefinedError, self.lex.value elif self.lex.token == '(':self.lex.scan( )
val = self.Expr( ) # sub-expression
self.lex.match(')')
return val else: raise SyntaxError if __name__ == '__main__':
import testparser # self-test code
testparser.test(Parser, 'parser1') # test local Parser
If you study this code closely, you'll notice that the parser keeps a dictionary (self.vars) to manage variable names: they're stored in the dictionary on a set command and fetched from it when they appear in an expression. Tokens are represented as strings, with an optional associated value (a numeric value for numbers and a string for variable names).
The parser uses iteration (while loops) instead of recursion, for the expr-tail and factor-tail rules. Other than this optimization, the rules of the grammar map directly onto parser methods: tokens become calls to the scanner, and nested rule references become calls to other methods.
When file parser1.py is run as a top-level program, its self-test code is executed, which in turn simply runs a canned test in the module shown in Example 18-11. Note that all integer math uses Python long integers (unlimited precision integers), because the scanner converts numbers to strings with string.atol. Also notice that mixed integer/floating-point operations cast up to floating point since Python operators are used to do the actual calculations.
Example 18-11. PP2E\Lang\Parser\testparser.py
####################################################
# parser test code
####################################################
def test(ParserClass, msg):
print msg, ParserClassx = ParserClass('4 / 2 + 3') # allow different Parser's
x.parse( )
x.parse('3 + 4 / 2') # like eval('3 + 4 / 2')...
x.parse('(3 + 4) / 2') x.parse('4 / (2 + 3)') x.parse('4.0 / (2 + 3)') x.parse('4 / (2.0 + 3)') x.parse('4.0 / 2 * 3') x.parse('(4.0 / 2) * 3')x.parse('4.0 / (2 * 3)')
x.parse('(((3))) + 1')y = ParserClass( )
y.parse('set a 4 / 2 + 1') y.parse('a * 3') y.parse('set b 12 / a') y.parse('b') z = ParserClass( )
z.parse('set a 99') z.parse('set a a + 1') z.parse('a')z = ParserClass( )
z.parse('pi') z.parse('2 * pi') z.parse('1.234 + 2.1')def interact(ParserClass): # command-line entry print ParserClassx = ParserClass( )
while 1: cmd = raw_input('Enter=> ') if cmd == 'stop': break x.parse(cmd)
Correlate the following results to print statements in the self-test module:
C:\...\PP2E\Lang\Parser>python parser1.py
parser1 __main__.Parser
5L
5L
3L
0L
0.8
0.8
6.0
6.0
0.666666666667
4L
9L
4L
100L
3.14159
6.28318
3.334
As usual, we can also test and use the system interactively:
% python
>>> import parser1
>>> x = parser1.Parser( )>>> x.parse('1 + 2')3L
Error cases are trapped and reported:
>>> x.parse('1 + a')'a' is undefined at column: 4
=> 1 + a=> ^>>> x.parse('1+a+2')'a' is undefined at column: 2
=> 1+a+2=> ^>>> x.parse('1 * 2 $')Lexical Error at column: 6
=> 1 * 2 $=> ^>>> x.parse('1 * - 1')Syntax Error at column: 4
=> 1 * - 1=> ^>>> x.parse('1 * (9')Syntax Error at column: 6
=> 1 * (9=> ^
Pathologically big numbers are handled well, because Python's built-in objects and operators are used along the way:
>>> x.parse('888888888888888888888888888888888888888888888.9999999')8.88888888889e+44
>>> x.parse('99999999999999999999999999999999999999999 + 2')100000000000000000000000000000000000000001L
>>> x.parse('999999999999999999999999999999.88888888888 + 1.1')1e+30
In addition, there is an interactive loop interface in the testparser module, if you want to use the parser as a simple command-line calculator (or if you get tired of typing parser method calls). Pass the Parser class, so testparser can make one of its own:
>>> import testparser
>>> testparser.interact(parser1.Parser)
Enter=> 4 * 3 + 5
17L
Enter=> 5 + 4 * 3
17L
Enter=> (5 + 4) * 3
27L
Enter=> set a 99
Enter=> set b 66
Enter=> a + b
165L
Enter=> # + 1
Lexical Error at column: 0
=> # + 1=> ^Enter=> a * b + c
'c' is undefined at column: 8
=> a * b + c=> ^
Enter=> a * b * + c
Syntax Error at column: 8
=> a * b * + c=> ^Enter=> a
99L
Enter=> a * a * a
970299L
Enter=> stop
>>>
Lesson 3: Divide and ConquerAs the parser system demonstrates, modular program design is almost always a major win. By using Python's program structuring tools (functions, modules, classes, etc.), big tasks can be broken down into small, manageable parts that can be coded and tested independently. For instance, the scanner can be tested without the parser by making an instance with an input string and calling its scan or match methods repeatedly. We can even test it like this interactively, from Python's command line. By separating programs into logical components, they become easier to understand and modify. Imagine what the parser would look like if the scanner's logic was embedded rather than called. |
18.6.3 Adding a Parse Tree Interpreter
One weakness in the parser1 program is that it embeds expression evaluation logic in the parsing logic: the result is computed while the string is being parsed. This makes evaluation quick, but it can also make it difficult to modify the code, especially in larger systems. To simplify, we could restructure the program to keep expression parsing and evaluation separate. Instead of evaluating the string, the parser can build up an intermediate representation of it that can be evaluated later. As an added incentive, building the representation separately makes it available to other analysis tools (e.g., optimizers, viewers, and so on).
Example 18-12 shows a variant of parser1 that implements this idea. The parser analyzes the string and builds up a parse tree -- that is, a tree of class instances that represents the expression and that may be evaluated in a separate step. The parse tree is built from classes that "know" how to evaluate themselves: to compute the expression, we just ask the tree to evaluate itself. Root nodes in the tree ask their children to evaluate themselves and then combine the results by applying a single operator. In effect, evaluation in this version is simply a recursive traversal of a tree of embedded class instances constructed by the parser.
Example 18-12. PP2E\Lang\Parser\parser2.py
TraceDefault = 0UndefinedError = "UndefinedError"
from scanner import Scanner, SyntaxError, LexicalError
####################################################
# the interpreter (a smart objects tree)
####################################################
class TreeNode:
def validate(self, dict): # default error check
passdef apply(self, dict): # default evaluator
pass
def trace(self, level): # default unparser
print '.'*level + '<empty>'# ROOTS
class BinaryNode(TreeNode):
def __init__(self, left, right): # inherited methods
self.left, self.right = left, right # left/right branches
def validate(self, dict):
self.left.validate(dict) # recurse down branches
self.right.validate(dict) def trace(self, level): print '.'*level + '[' + self.label + ']' self.left.trace(level+3) self.right.trace(level+3)class TimesNode(BinaryNode):
label = '*' def apply(self, dict): return self.left.apply(dict) * self.right.apply(dict)class DivideNode(BinaryNode):
label = '/' def apply(self, dict): return self.left.apply(dict) / self.right.apply(dict)class PlusNode(BinaryNode):
label = '+' def apply(self, dict): return self.left.apply(dict) + self.right.apply(dict)class MinusNode(BinaryNode):
label = '-' def apply(self, dict): return self.left.apply(dict) - self.right.apply(dict)# LEAVES
class NumNode(TreeNode):
def __init__(self, num):self.num = num # already numeric
def apply(self, dict): # use default validate
return self.num def trace(self, level): print '.'*level + `self.num`class VarNode(TreeNode):
def __init__(self, text, start):self.name = text # variable name
self.column = start # column for errors
def validate(self, dict): if not dict.has_key(self.name): raise UndefinedError, (self.name, self.column) def apply(self, dict):return dict[self.name] # validate before apply
def assign(self, value, dict):dict[self.name] = value # local extension
def trace(self, level): print '.'*level + self.name# COMPOSITES
class AssignNode(TreeNode):
def __init__(self, var, val): self.var, self.val = var, val def validate(self, dict):self.val.validate(dict) # don't validate var
def apply(self, dict): self.var.assign( self.val.apply(dict), dict ) def trace(self, level): print '.'*level + 'set ' self.var.trace(level + 3) self.val.trace(level + 3)####################################################
# the parser (syntax analyser, tree builder)
####################################################
class Parser:
def __init__(self, text=''):self.lex = Scanner(text) # make a scanner
self.vars = {'pi':3.14159} # add constants
self.traceme = TraceDefaultdef parse(self, *text): # external interface
if text: self.lex.newtext(text[0]) # reuse with new text
tree = self.analyse( ) # parse string
if tree:if self.traceme: # dump parse-tree?
print; tree.trace(0)if self.errorCheck(tree): # check names
self.interpret(tree) # evaluate tree
def analyse(self): try:self.lex.scan( ) # get first token
return self.Goal( ) # build a parse-tree
except SyntaxError: print 'Syntax Error at column:', self.lex.startself.lex.showerror( )
except LexicalError: print 'Lexical Error at column:', self.lex.startself.lex.showerror( )
def errorCheck(self, tree): try:tree.validate(self.vars) # error checker
return 'ok' except UndefinedError, varinfo: print "'%s' is undefined at column: %d" % varinfoself.lex.start = varinfo[1]
self.lex.showerror( ) # returns None
def interpret(self, tree):result = tree.apply(self.vars) # tree evals itself
if result != None: # ignore 'set' result
print result def Goal(self): if self.lex.token in ['num', 'var', '(']:tree = self.Expr( )
self.lex.match('\0') return tree elif self.lex.token == 'set':tree = self.Assign( )
self.lex.match('\0') return tree else: raise SyntaxError def Assign(self): self.lex.match('set') vartree = VarNode(self.lex.value, self.lex.start) self.lex.match('var')valtree = self.Expr( )
return AssignNode(vartree, valtree) # two subtrees
def Expr(self):left = self.Factor( ) # left subtree
while 1: if self.lex.token in ['\0', ')']: return left elif self.lex.token == '+':self.lex.scan( )
left = PlusNode(left, self.Factor( )) # add root-node
elif self.lex.token == '-':self.lex.scan( )
left = MinusNode(left, self.Factor( )) # grows up/right
else: raise SyntaxError def Factor(self):left = self.Term( )
while 1: if self.lex.token in ['+', '-', '\0', ')']: return left elif self.lex.token == '*':self.lex.scan( )
left = TimesNode(left, self.Term( ))
elif self.lex.token == '/':self.lex.scan( )
left = DivideNode(left, self.Term( ))
else: raise SyntaxError def Term(self): if self.lex.token == 'num': leaf = NumNode(self.lex.match('num')) return leaf elif self.lex.token == 'var': leaf = VarNode(self.lex.value, self.lex.start)self.lex.scan( )
return leaf elif self.lex.token == '(':self.lex.scan( )
tree = self.Expr( )
self.lex.match(')')
return tree else: raise SyntaxError ####################################################
# self-test code: use my parser, parser1's tester
####################################################
if __name__ == '__main__':
import testparsertestparser.test(Parser, 'parser2') # run with Parser class here
When parser2 is run as a top-level program, we get the same test code output as for parser1. In fact, it reuses the same test code: both parsers pass in their parser class object to testparser.test. And since classes are objects, we can also pass this version of the parser to testparser's interactive loop: testparser.interact(parser2.Parser). The new parser's external behavior is identical to that of the original.
Notice that the new parser reuses the same scanner module, too. To catch errors raised by scanner, it also imports the specific strings that identify the scanner's exceptions. The scanner and parser can both raise exceptions on errors (lexical errors, syntax errors, and undefined name errors). They're caught at the top level of the parser, and end the current parse. There's no need to set and check status flags to terminate the recursion. Since math is done using long integers, floating-point numbers, and Python's operators, there's usually no need to trap numeric overflow or underflow errors. But as is, the parser doesn't handle errors like division by zero: they make the parser system exit with a Python stack dump. Uncovering the cause and fix for this is left as an exercise.
18.6.4 Parse Tree Structure
The intermediate representation of an expression is a tree of class instances, whose shape reflects the order of operator evaluation. This parser also has logic to print an indented listing of the constructed parse tree if the traceme attribute is set. Indentation gives the nesting of subtrees, and binary operators list left subtrees first. For example:
% python
>>> import parser2
>>> p = parser2.Parser( )>>> p.traceme = 1
>>> p.parse('5 + 4 * 2')[+]
...5L
...[*]
......4L
......2L
13L
When this tree is evaluated, the apply method recursively evaluates subtrees and applies root operators to their results. Here, * is evaluated before +, since it's lower in the tree. The Factor method consumes the * substring before returning a right subtree to Expr:
>>> p.parse('5 * 4 - 2')[-]
...[*]
......5L
......4L
...2L
18L
In this example, * is evaluated before -. The Factor method loops though a substring of * and / expressions before returning the resulting left subtree to Expr:
>>> p.parse('1 + 3 * (2 * 3 + 4)')[+]
...1L
...[*]
......3L
......[+]
.........[*]
............2L
............3L
.........4L
31L
Trees are made of nested class instances. From an OOP perspective, it's another way to use composition. Since tree nodes are just class instances, this tree could be created and evaluated manually, too:
PlusNode( NumNode(1),
TimesNode( NumNode(3), PlusNode( TimesNode(NumNode(2), NumNode(3)), NumNode(4) ))).apply({})
But we might as well let the parser build it for us (Python is not that much like Lisp, despite what you may have heard).
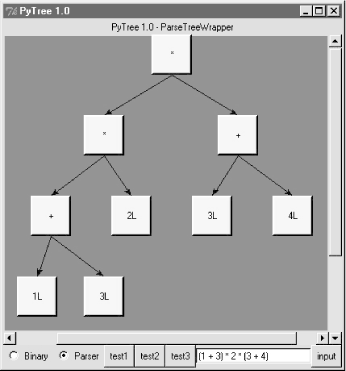
18.6.5 Exploring Parse Trees with Pytree
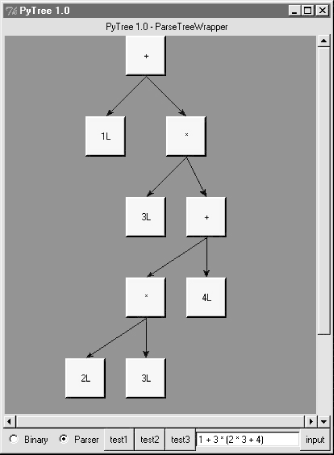
But wait -- there is a better way to explore parse tree structures. Figure 18-1 shows the parse tree generated for string "1 + 3 * (2 * 3 + 4)", displayed in PyTree, the tree visualization GUI presented at the end of the previous chapter. This only works because the parser2 module builds the parse tree explicitly (parser1 evaluates during a parse instead), and because PyTree's code is generic and reusable.
Figure 18-1. Parse tree built for 1 + 3 * (2 * 3 + 4)
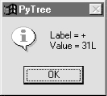
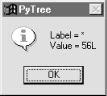
If you read the last chapter, you'll recall that PyTree can draw most any tree data structure, but it is preconfigured to handle binary search trees and the parse trees we're studying in this chapter. You might also remember that clicking on nodes in a displayed parse tree evaluates the subtree rooted there. Figure 18-2 shows the pop-up generated after clicking the tree's root node (you get different results if you click other parts of tree, because smaller subtrees are evaluated).
Figure 18-2. Clicking the root node to evaluate a tree
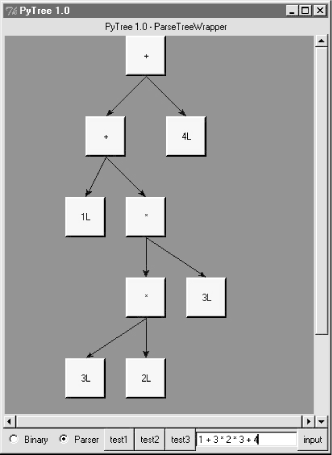
PyTree makes it easy to learn about and experiment with the parser. To determine the tree shape produced for a given expression, start PyTree, click on its Parser radiobutton, type the expression in the input field at the bottom, and press "input" (or your Enter key). The parser class is run to generate a tree from your input, and the GUI displays the result. For instance, Figure 18-3 sketches the parse tree generated if we remove the parentheses from the first expression in the input field. The root node evaluates to 23 this time, due to the different shape's evaluation order.
Figure 18-3. Parse tree for 1 + 3 * 2 * 3 + 4, result=23
To generate an even more different shape, try introducing more parentheses to the expression and hitting the Enter key again. Figure 18-4 shows a much flatter tree structure produced by adding a few parentheses to override operator precedence. Because these parentheses change the tree shape, they also change the expression's overall result again. Figure 18-5 shows the result pop-up after clicking the root node in this display.
Figure 18-4. Parse tree built for "(1 + 3) * (2 * ( 3 + 4))"
Figure 18-5. Clicking and evaluating the root node
Depending upon the operators used within an expression, some very differently shaped trees yield the same result when evaluated. For instance, Figure 18-6 shows a more left-heavy tree generated from a different expression string that evaluates to 56 nevertheless.
Figure 18-6. Parse tree for "(1 + 3) * 2 * ( 3 + 4)", result=56
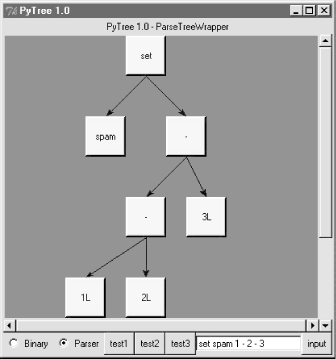
Finally, Figure 18-7 shows a parsed assignment statement; clicking the "set" root assigns variable spam, and clicking node spam then evaluates to -4. If you find the parser puzzling, try running PyTree like this on your computer to get a better feel for the parsing process. (I'd like to show more example trees, but I ran out of page real estate at this point in the book.)
Figure 18-7. Assignment, left-grouping: "set spam 1 - 2 - 3"
18.6.6 Parsers Versus Python
The hand-coded parser programs shown earlier illustrate some interesting concepts and underscore the power of Python for general-purpose programming. Depending on your job description, they may also be typical of the sort of thing you'd write regularly in a traditional language like C. Parsers are an important component in a wide variety of applications, but in some cases, they're not as necessary as you might think. Let me explain why.
So far, we started with an expression parser and added a parse tree interpreter to make the code easier to modify. As is, the parser works, but it may be slow compared to a C implementation. If the parser is used frequently, we could speed it up by moving parts to C extension modules. For instance, the scanner might be moved to C initially, since it's often called from the parser. Ultimately, we might add components to the grammar that allow expressions to access application-specific variables and functions.
All of the these steps constitute good engineering. But depending on your application, this approach may not be the best one in Python. The easiest way to evaluate input expressions in Python is often to let Python do it, by calling the eval built-in function. In fact, we can usually replace the entire expression evaluation program with one function call. The next example will demonstrate how this is done.
More importantly, the next section underscores a core idea behind the language: if you already have an extensible, embeddable, high-level language system, why invent another? Python itself can often satisfy language-based component needs.
18.7 PyCalc: A Calculator Program/Object
To wrap up this chapter, I'm going to show you a practical application for some of the parsing technology introduced in the previous section. This section presents PyCalc -- a Python calculator program with a graphical interface similar to the calculator programs available on most window systems. But like most of the GUI examples in this book, PyCalc offers a few advantages over existing calculators. Because PyCalc is written in Python, it is both easily customized and widely portable across window platforms. And because it is implemented with classes, it is both a standalone program and a reusable object library.
18.7.1 A Simple Calculator GUI
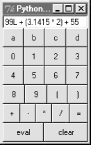
Before I show you how to write a full-blown calculator, though, the module shown in Example 18-13 starts this discussion in simpler terms. It implements a limited calculator GUI, whose buttons just add text to the input field at the top, to compose a Python expression string. Fetching and running the string all at once produces results. Figure 18-8 shows the window this module makes when run as a top-level script.
Figure 18-8. The calc0 script in action on Windows (result=160.283)
Example 18-13. PP2E\Lang\Calculator\calc0.py
#!/usr/local/bin/python
# a simple calculator GUI: expressions run all at once with eval/exec
from Tkinter import *
from PP2E.Dbase.TableBrowser.guitools import frame, button, entry
class CalcGui(Frame):
def __init__(self, parent=None): # an extended frame
Frame.__init__(self, parent) # on default top-level
self.pack(expand=YES, fill=BOTH) # all parts expandable
self.master.title('Python Calculator 0.1') # 6 frames plus entry
self.master.iconname("pcalc1")self.names = {} # namespace for variables
text = StringVar( )
entry(self, TOP, text)rows = ["abcd", "0123", "4567", "89( )"]
for row in rows: frm = frame(self, TOP) for char in row: button(frm, LEFT, char, lambda x=text, y=char: x.set(x.get( ) + y))
frm = frame(self, TOP) for char in "+-*/=": button(frm, LEFT, char,lambda x=text, y=char: x.set(x.get( )+' '+y+' '))
frm = frame(self, BOTTOM)button(frm, LEFT, 'eval', lambda x=self, y=text: x.eval(y) )
button(frm, LEFT, 'clear', lambda x=text: x.set('') ) def eval(self, text): try:text.set(`eval(text.get( ), self.names, self.names)`)
except SyntaxError: try:exec(text.get( ), self.names, self.names)
except:text.set("ERROR") # bad as statement too?
else:text.set('') # worked as a statement
except:text.set("ERROR") # other eval expression errors
if __name__ == '__main__': CalcGui().mainloop( )
18.7.1.1 Building the GUI
Now, this is about as simple as a calculator can be, but it demonstrates the basics. This window comes up with buttons for entry of numbers, variable names, and operators. It is built by attaching buttons to frames: each row of buttons is a nested Frame, and the GUI itself is a Frame subclass, with an attached Entry and six embedded row frames (grids would work here, too). The calculator's frame, entry field, and buttons are made expandable in the imported guitools utility module.
This calculator builds up a string to pass to the Python interpreter all at once on "eval" button presses. Because you can type any Python expression or statement in the entry field, the buttons are really just a convenience. In fact, the entry field isn't much more than a command line. Try typing import sys and then dir(sys) to display sys module attributes in the input field at the top -- it's not what you normally do with a calculator, but demonstrative nevertheless.[3]
In CalcGui's constructor, buttons are coded as lists of strings; each string represents a row and each character in the string represents a button. Lambdas with default argument values are used to set callback data for each button. The callback functions save the button's character and the linked text entry variable, so that the character can be added to the end of the entry widget's current string on a press.
Lesson 4: Embedding Beats ParsersThe calculator uses eval and exec to call Python's parser/interpreter at run-time instead of analyzing and evaluating expressions manually. In effect, the calculator runs embedded Python code from a Python program. This works because Python's development environment (the parser and byte-code compiler) is always a part of systems that use Python. Because there is no difference between the development and delivery environments, Python's parser can be used by Python programs. The net effect here is that the entire expression evaluator has been replaced with a single call to eval. In broader terms, this is a powerful technique to remember: the Python language itself can replace many small custom languages. Besides saving development time, clients have to learn just one language, one that's potentially simple enough for end-user coding. Furthermore, Python can take on the flavor of any application. If a language interface requires application-specific extensions, just add Python classes, or export an API for use in embedded Python code as a C extension. By evaluating Python code that uses application-specific extensions, custom parsers become almost completely unnecessary. There's also a critical added benefit to this approach: embedded Python code has access to all the tools and features of a powerful, full-blown programming language. It can use lists, functions, classes, external modules, and even larger Python tools like Tkinter, shelves, threads, and sockets. You'd probably spend years trying to provide similar functionality in a custom language parser. Just ask Guido. |
18.7.1.2 Running code strings
This module implements a GUI calculator in 45 lines of code (counting comments and blank lines). But to be honest, it cheats: expression evaluation is delegated to Python. In fact, the built-in eval and exec tools do most of the work here:
· eval parses, evaluates, and returns the result of a Python expression represented as a string.
· exec runs an arbitrary Python statement represented as a string; there's no return value because the code is a string.
Both accept optional dictionaries to be used as global and local namespaces for assigning and evaluating names used in the code strings. In the calculator, self.names becomes a symbol table for running calculator expressions. A related Python function, compile, can be used to precompile code strings before passing them to eval and exec (use it if you need to run the same string many times).
By default a code string's namespace defaults to the caller's namespaces. If we didn't pass in dictionaries here, the strings would run in the eval method's namespace. Since the method's local namespace goes away after the method call returns, there would be no way to retain names assigned in the string. Notice the use of nested exception handlers in the eval method:
· It first assumes the string is an expression and tries the built-in eval function.
· If that fails due to a syntax error, it tries evaluating the string as a statement using exec.
· Finally, if both attempts fail, it reports an error in the string (a syntax error, undefined name, etc.).
Statements and invalid expressions might be parsed twice, but the overhead doesn't matter here, and you can't tell if a string is an expression or a statement without parsing it manually. Note that the "eval" button evaluates expressions, but = sets Python variables by running an assignment statement. Variable names are combinations of letter keys abcd (or any name typed directly). They are assigned and evaluated in a dictionary used to represent the calculator's namespace.
18.7.1.3 Extending and attaching
Clients that reuse this calculator are as simple as the calculator itself. Like most class-based Tkinter GUIs, this one can be extended in subclasses -- Example 18-14 customizes the simple calculator's constructor to add extra widgets.
Example 18-14. PP2E\Lang\Calculator\calc0ext.py
from Tkinter import *
from calc0 import CalcGui
class Inner(CalcGui): # extend gui
def __init__(self): CalcGui.__init__(self)Label(self, text='Calc Subclass').pack( ) # add after
Button(self, text='Quit', command=self.quit).pack( ) # top implied
Inner().mainloop( )
It can also be embedded in a container class -- Example 18-15 attaches the simple calculator's widget package, and extras, to a common parent.
Example 18-15. PP2E\Lang\Calculator\calc0emb.py
from Tkinter import *from calc0 import CalcGui # add parent, no master callsclass Outer:
def __init__(self, parent): # embed gui
Label(parent, text='Calc Attachment').pack( ) # side=top
CalcGui(parent) # add calc frame
Button(parent, text='Quit', command=parent.quit).pack( )
root = Tk( )Outer(root)
root.mainloop( )
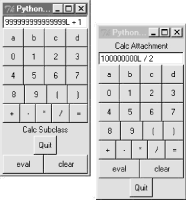
Figure 18-9 shows the result of running both of these scripts from different command lines. Both have a distinct input field at the top. This works; but to see a more practical application of such reuse techniques, we need to make the underlying calculator more practical, too.
Figure 18-9. The calc0 script's object attached and extended
18.7.2 Pycalc -- A Real Calculator GUI
Of course, real calculators don't usually work by building up expression strings and evaluating them all at once; that approach is really little more than a glorified Python command line. Traditionally, expressions are evaluated in piecemeal fashion as they are entered, and temporary results are displayed as soon as they are computed. Implementing this behavior is a bit more work: expressions must be evaluated manually instead of calling the eval function only once. But the end result is much more useful and intuitive.
Lesson 5: Reusability Is PowerThough simple, attaching and subclassing the calculator graphically, as shown in Figure 18-9, illustrates the power of Python as a tool for writing reusable software. By coding programs with modules and classes, components written in isolation almost automatically become general-purpose tools. Python's program organization features promote reusable code. In fact, code reuse is one of Python's major strengths and has been one of the main themes of this book thus far. Good object-oriented design takes some practice and forethought, and the benefits of code reuse aren't apparent immediately. And sometimes we're more interested in a quick fix rather than a future use for the code. But coding with some reusability in mind can save development time in the long run. For instance, the hand-coded parsers shared a scanner, the calculator GUI uses the guitools module we discussed earlier, and the next example will reuse the GuiMixin class. Sometimes we're able to finish part of a job before we start. |
This section presents the implementation of PyCalc -- a Python/Tkinter program that implements such a traditional calculator GUI. Although its evaluation logic is more complex than the simpler calculator above, it demonstrates advanced programming techniques and serves as an interesting finale for this chapter.
18.7.2.1 Running PyCalc
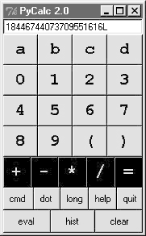
As usual, let's look at the GUI before the code. You can run PyCalc from the PyGadgets and PyDemos launcher bars at the top of the examples tree, or by directly running file calculator.py listed below (e.g., click it in a file explorer). Figure 18-10 shows PyCalc's main window. By default, it shows operand buttons in black-on-blue (and opposite for operator buttons), but font and color options can be passed in to the GUI class's constructor method. Of course, that means gray-on-gray in this book, so you'll have to run PyCalc yourself to see what I mean.
Figure 18-10. PyCalc calculator at work on Windows
If you do run this, you'll notice that PyCalc implements a normal calculator model -- expressions are evaluated as entered, not all at once at the end. That is, parts of an expression are computed and displayed as soon as operator precedence and manually typed parentheses allow. I'll explain how this evaluation works in a moment.
PyCalc's CalcGui class builds the GUI interface as frames of buttons much like the simple calculator of the previous section, but PyCalc adds a host of new features. Among them are another row of action buttons, inherited methods from GuiMixin (presented in Chapter 9), a new "cmd" button that pops up nonmodal dialogs for entry of arbitrary Python code, and a recent calculations history pop-up. Figure 18-11 captures some of PyCalc's pop-up windows.
Figure 18-11. PyCalc calculator with some of its pop-ups

You may enter expressions in PyCalc by clicking buttons in the GUI, typing full expressions in command-line pop-ups, or typing keys on your keyboard. PyCalc intercepts key press events and interprets them the same as corresponding button presses; typing + is like pressing button +, the space bar key is "clear", Enter is "eval", backspace erases a character, and ? is like pressing "help".
The command-line pop-up windows are nonmodal (you can pop up as many as you like). They accept any Python code -- press the Run button or your Enter key to evaluate text in the input field. The result of evaluating this code in the calculator's namespace dictionary is thrown up in the main window, for use in larger expressions. You can use this as an escape mechanism to employ external tools in your calculations. For instance, you can import and use functions coded in Python or C within these pop-ups. The current value in the main calculator window is stored in newly opened command-line pop-ups, too, for use in typed expressions.
PyCalc supports long integers (unlimited precision), negatives, and floating-point numbers, just because Python does: individual operands and expressions are still evaluated with the eval built-in, which calls the Python parser/interpreter at run-time. Variable names can be assigned and referenced in the main window with the letter, =, and "eval" keys; they are assigned in the calculator's namespace dictionary (more complex variable names may be typed in command-line pop-ups). Note the use of pi in the history window: PyCalc preimports names in the math and random modules into the namespace where expressions are evaluated.
18.7.2.2 Evaluating expressions with stacks
Now that you have the general idea of what PyCalc does, I need to say a little bit about how it does what it does. Most of the changes in this version involve managing the expression display and evaluating expressions. PyCalc is structured as two classes:
· The CalcGui class manages the GUI itself. It controls input events and is in charge of the main window's display field at the top. It doesn't evaluate expressions, though; for that, it sends operators and operands entered in the GUI to an embedded instance of the Evaluator class.
· The Evaluator class manages two stacks. One stack records pending operators (e.g., +), and one records pending operands (e.g, 3.141). Temporary results are computed as new operators are sent from CalcGui and pushed onto the operands stack.
As you can see from this, the magic of expression evaluation boils down to juggling the operator and operand stacks. While scanning expression strings from left to right as they are entered, operands are pushed along the way, but operators delimit operands and may trigger temporary results before they are pushed. Here's the general scenario:
· When a new operator is seen (i.e., when an operator button or key is pressed), the prior operand in the entry field is pushed onto the operands stack.
· The operator is then added to the operators stack, but only after all pending operators of higher precedence have been popped and applied to pending operands (e.g., pressing + makes any pending * operators on the stack fire).
· When "eval" is pressed, all remaining operators are popped and applied to all remaining operands, and the result is the last remaining value on the operands stack.
In the end, the last value on the operands stack is displayed in the calculator's entry field, ready for use in another operation. This evaluation algorithm is probably best described by working through examples. Let's step through the entry of a few expressions and watch the evaluation stacks grow.
PyCalc stack tracing is enabled with the debugme flag in the module; if true, the operator and operand stacks are displayed on stdout each time the Evaluator class is about to apply an operator and reduce (pop) the stacks. A tuple holding the stack lists (operators, operands) is printed on each stack reduction; tops of stack are at the ends of the lists. For instance, here is the console output after typing and evaluating a simple string:
1) Entered keys: "5 * 3 + 4 <eval>" [result = 19]
(['*'], ['5', '3']) [on '+' press: displays "15"](['+'], ['15', '4']) [on 'eval' press: displays "19"]
Note that the pending (stacked) * subexpression is evaluated when the + is pressed: * operators bind tighter than +, so the code is evaluated immediately before the + operator is pushed. When the + button is pressed, the entry field contains 3. In general, the entry field always holds the prior operand when an operator button is pressed. Since the text entry's value is pushed onto the operands stack before the operator is applied, we have to pop results before displaying them after "eval" or ) is pressed (otherwise the results are pushed onto the stack twice):
2) "5 + 3 * 4 <eval>" [result = 17]
(['+', '*'], ['5', '3', '4']) [on 'eval' press](['+'], ['5', '12']) [displays "17"]
Here, the pending + isn't evaluated when the * button is pressed: since * binds tighter, we need to postpone the + until the * can be evaluated. The * operator isn't popped until its right operand has been seen. On the "eval" press there are two operators to pop and apply to operand stack entries:
3) "5 + 3 + 4 <eval>" [result = 12]
(['+'], ['5', '3']) [on the second '+'](['+'], ['8', '4']) [on 'eval']
For strings of same-precedence operators like this one, we pop and evaluate immediately as we scan left to right, instead of postponing evaluation. This results in a left-associative evaluation, in the absence of parentheses: 5+3+4 is evaluated as ((5+3)+4). Order doesn't matter for + and * operations:
4) "1 + 3 * ( 1 + 3 * 4 ) <eval>" [result = 40]
(['+', '*', '(', '+', '*'], ['1', '3', '1', '3', '4']) [on ')'](['+', '*', '(', '+'], ['1', '3', '1', '12']) [displays "13"](['+', '*'], ['1', '3', '13']) [on 'eval'](['+'], ['1', '39'])
In this case, all the operators and operands are stacked (postponed) until we press the ) button at the end. When the ) button is pressed, the parenthesized subexpression is popped and evaluated, and 13 is displayed in the entry field. On pressing "eval", the rest is evaluated, and the final result (40) is shown. The result is the left operand of another operator. In fact, any temporary result can be used again: if we keep pressing an operator button without typing new operands, it's reapplied to the result of the prior press. Figure 18-12 shows how the two stacks look at their highest level while scanning the expression in the preceding example trace. The top operator is applied to the top two operands and the result is pushed back for the operator below:
5) "1 + 3 * ( 1 + 3 * 4 <eval>" [result = *ERROR*]
(['+', '*', '(', '+', '*'], ['1', '3', '1', '3', '4']) [on eval](['+', '*', '(', '+'], ['1', '3', '1', '12'])(['+', '*', '('], ['1', '3', '13'])(['+', '*'], ['1', '*ERROR*'])
(['+'], ['*ERROR*'])
(['+'], ['*ERROR*', '*ERROR*'])
Figure 18-12. Evaluation stacks: 1 + 3 * (1 + 3 * 4)
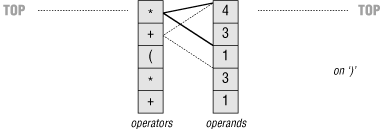
This string triggers an error. PyCalc is casual about error handling. Many errors are made impossible by the algorithm itself, but things like unmatched parentheses still trip up the evaluator. But instead of trying to detect all possible error cases explicitly, a general try statement in the reduce method is used to catch them all: expression errors, undefined name errors, syntax errors, etc.
Operands and temporary results are always stacked as strings, and each operator are applied by calling eval. When an error occurs inside an expression, a result operand of *ERROR* is pushed, which makes all remaining operators fail in eval, too. *ERROR* percolates to the top of the expression. At the end, it's the last operand and is displayed in the text entry field to alert you of the mistake.
18.7.2.3 PyCalc source code
Example 18-16 contains the PyCalc source module that puts these ideas to work in the context of a GUI. It's a single-file implementation (not counting utilities imported and reused). Study the source for more details; and as usual, there's no substitute for interacting with the program on your own to get a better feel for its functionality.
Example 18-16. PP2E\Lang\Calculator\calculator.py
#!/usr/local/bin/python
#########################################################################
# PyCalc 2.0: a Python/Tkinter calculator program and GUI component.
# evaluates expressions as they are entered, catches keyboard keys
# for expression entry; adds integrated command-line popups, recent
# calculations history display popup, fonts and colors configuration,
# help and about popups, preimported math/random constants, and more;
#########################################################################
from Tkinter import * # widgets, consts
from PP2E.Gui.Tools.guimixin import GuiMixin # quit methodfrom PP2E.Dbase.TableBrowser.guitools import * # widget buildersFg, Bg, Font = 'black', 'skyblue', ('courier', 16, 'bold') # default configdebugme = 1
def trace(*args):
if debugme: print args###########################################
# the main class - handles user interface;
# an extended Frame, on new Toplevel, or
# embedded in another container widget
###########################################
class CalcGui(GuiMixin, Frame): Operators = "+-*/=" # button lists
Operands = ["abcd", "0123", "4567", "89( )"] # customizable
def __init__(self, parent=None, fg=Fg, bg=Bg, font=Font):Frame.__init__(self, parent)
self.pack(expand=YES, fill=BOTH) # all parts expandable
self.eval = Evaluator( ) # embed a stack handler
self.text = StringVar( ) # make a linked variable
self.text.set("0")self.erase = 1 # clear "0" text next
self.makeWidgets(fg, bg, font) # build the gui itself
if not parent or not isinstance(parent, Frame):self.master.title('PyCalc 2.0') # title iff owns window
self.master.iconname("PyCalc") # ditto for key bindings
self.master.bind('<KeyPress>', self.onKeyboard) self.entry.config(state='disabled') else: self.entry.config(state='normal')self.entry.focus( )
def makeWidgets(self, fg, bg, font): # 7 frames plus text-entry
self.entry = entry(self, TOP, self.text) # font, color configurable
for row in self.Operands: frm = frame(self, TOP) for char in row: button(frm, LEFT, char, lambda x=self, y=char: x.onOperand(y), fg=fg, bg=bg, font=font) frm = frame(self, TOP) for char in self.Operators: button(frm, LEFT, char, lambda x=self, y=char: x.onOperator(y), fg=bg, bg=fg, font=font) frm = frame(self, TOP) button(frm, LEFT, 'cmd ', self.onMakeCmdline) button(frm, LEFT, 'dot ', lambda x=self: x.onOperand('.')) button(frm, LEFT, 'long', lambda x=self: x.text.set(x.text.get( )+'L'))
button(frm, LEFT, 'help', self.help) button(frm, LEFT, 'quit', self.quit) # from guimixin
frm = frame(self, BOTTOM) button(frm, LEFT, 'eval ', self.onEval) button(frm, LEFT, 'hist ', self.onHist) button(frm, LEFT, 'clear', self.onClear) def onClear(self):self.eval.clear( )
self.text.set('0') self.erase = 1 def onEval(self): self.eval.shiftOpnd(self.text.get( )) # last or only opnd
self.eval.closeall( ) # apply all optrs left
self.text.set(self.eval.popOpnd( )) # need to pop: optr next?
self.erase = 1 def onOperand(self, char): if char == '(':self.eval.open( )
self.text.set('(') # clear text next
self.erase = 1 elif char == ')':self.eval.shiftOpnd(self.text.get( )) # last or only nested opnd
self.eval.close( ) # pop here too: optr next?
self.text.set(self.eval.popOpnd( ))
self.erase = 1 else: if self.erase:self.text.set(char) # clears last value
else:
self.text.set(self.text.get( ) + char) # else append to opnd
self.erase = 0 def onOperator(self, char):self.eval.shiftOpnd(self.text.get( )) # push opnd on left
self.eval.shiftOptr(char) # eval exprs to left?
self.text.set(self.eval.topOpnd( )) # push optr, show opnd|result
self.erase = 1 # erased on next opnd|'('
def onMakeCmdline(self):
new = Toplevel( ) # new top-level window
new.title('PyCalc command line') # arbitrary python code
frm = frame(new, TOP) # only the Entry expands
label(frm, LEFT, '>>>').pack(expand=NO) var = StringVar( )
ent = entry(frm, LEFT, var, width=40) onButton = (lambda s=self, v=var, e=ent: s.onCmdline(v,e)) onReturn = (lambda event, s=self, v=var, e=ent: s.onCmdline(v,e)) button(frm, RIGHT, 'Run', onButton).pack(expand=NO) ent.bind('<Return>', onReturn)var.set(self.text.get( ))
def onCmdline(self, var, ent): # eval cmdline popup input
try:value = self.eval.runstring(var.get( ))
var.set('OKAY')
if value != None: # run in eval namespace dict
self.text.set(value) # expression or statement
self.erase = 1
var.set('OKAY => '+ value)except: # result in calc field
var.set('ERROR') # status in popup field
ent.icursor(END) # insert point after text
ent.select_range(0, END) # select msg so next key deletes
def onKeyboard(self, event):pressed = event.char # on keyboard press event
if pressed != '': # pretend button was pressed
if pressed in self.Operators: self.onOperator(pressed) else: for row in self.Operands: if pressed in row: self.onOperand(pressed) break else:if pressed == '.':
self.onOperand(pressed) # can start opnd
if pressed in 'Ll':self.text.set(self.text.get( )+'L') # can't: no erase
elif pressed == '\r':self.onEval( ) # enter key = eval
elif pressed == ' ':self.onClear( ) # spacebar = clear
elif pressed == '\b':self.text.set(self.text.get( )[:-1]) # backspace
elif pressed == '?':self.help( )
def onHist(self): # show recent calcs log popup# self.infobox('PyCalc History', self.eval.getHist( ))
from ScrolledText import ScrolledTextnew = Toplevel( ) # make new window
ok = Button(new, text="OK", command=new.destroy)ok.pack(pady=1, side=BOTTOM) # pack first=clip last
text = ScrolledText(new, bg='beige') # add Text + scrollbar
text.insert('0.0', self.eval.getHist( )) # get Evaluator text
text.pack(expand=YES, fill=BOTH) # new window goes away on ok press or enter key new.title("PyCalc History")new.bind("<Return>", (lambda event, new=new: new.destroy( )))
ok.focus_set( ) # make new window modal:
new.grab_set( ) # get keyboard focus, grab app
new.wait_window( ) # don't return till new.destroy
def help(self): self.infobox('PyCalc', 'PyCalc 2.0\n' 'A Python/Tk calculator\n''August, 1999\n'
'Programming Python 2E\n\n' 'Use mouse or keyboard to\n' 'input numbers and operators,\n' 'or type code in cmd popup')####################################
# the expression evaluator class
# embedded in and used by a CalcGui
# instance, to perform calculations
####################################
class Evaluator:
def __init__(self):self.names = {} # a names-space for my vars
self.opnd, self.optr = [], [] # two empty stacks
self.hist = [] # my prev calcs history log
self.runstring("from math import *") # preimport math modules
self.runstring("from random import *") # into calc's namespace
def clear(self):self.opnd, self.optr = [], [] # leave names intact
if len(self.hist) > 64: # don't let hist get too big
self.hist = ['clear'] else: self.hist.append('--clear--') def popOpnd(self):value = self.opnd[-1] # pop/return top|last opnd
self.opnd[-1:] = [] # to display and shift next
return value def topOpnd(self):return self.opnd[-1] # top operand (end of list)
def open(self):self.optr.append('(') # treat '(' like an operator
def close(self): # on ')' pop downto higest '('
self.shiftOptr(')') # ok if empty: stays empty
self.optr[-2:] = [] # pop, or added again by optr
def closeall(self):while self.optr: # force rest on 'eval'
self.reduce( ) # last may be a var name
try:
self.opnd[0] = self.runstring(self.opnd[0]) except:self.opnd[0] = '*ERROR*' # pop else added again next:
afterMe = {'*': ['+', '-', '(', '='], # class member
'/': ['+', '-', '(', '='], # optrs to not pop for key
'+': ['(', '='], # if prior optr is this: push
'-': ['(', '='], # else: pop/eval prior optr
')': ['(', '='], # all left-associative as is
'=': ['('] }
def shiftOpnd(self, newopnd): # push opnd at optr, ')', eval
self.opnd.append(newopnd) def shiftOptr(self, newoptr): # apply ops with <= priority
while (self.optr andself.optr[-1] not in self.afterMe[newoptr]):
self.reduce( )
self.optr.append(newoptr) # push this op above result
# optrs assume next opnd erases def reduce(self): trace(self.optr, self.opnd) try: # collapse the top expr
operator = self.optr[-1] # pop top optr (at end)
[left, right] = self.opnd[-2:] # pop top 2 opnds (at end)
self.optr[-1:] = [] # delete slice in-place
self.opnd[-2:] = [] result = self.runstring(left + operator + right) if result == None:result = left # assignment? key var name
self.opnd.append(result) # push result string back
except:self.opnd.append('*ERROR*') # stack/number/name error
def runstring(self, code): try:result = `eval(code, self.names, self.names)` # try expr: string
self.hist.append(code + ' => ' + result) # add to hist log
except:exec code in self.names, self.names # try stmt: None
self.hist.append(code) result = None return result def getHist(self): import string return string.join(self.hist, '\n')def getCalcArgs( ): from sys import argvconfig = {} # get cmdline args in a dict
for arg in argv[1:]: # ex: -bg black -fg red
if arg in ['-bg', '-fg']: # font not yet supported
try:
config[arg[1:]] = argv[argv.index(arg) + 1] except: pass return configif __name__ == '__main__':
apply(CalcGui, (), getCalcArgs()).mainloop( ) # on default toplevel window
18.7.2.4 Using PyCalc as a component
PyCalc serves a standalone program on my desktop, but it's also useful in the context of other GUIs. Like most of the GUI classes in this book, PyCalc can be customized with subclass extensions, or embedded in a larger GUI with attachment. The module in Example 18-17 demonstrates one way to reuse PyCalc's CalcGui class by extending and embedding, much as done for the simple calculator earlier.
Example 18-17. PP2E\Lang\Calculator\calculator_test.py
##########################################################################
# test calculator use as an extended and embedded gui component;
##########################################################################
from Tkinter import *
from calculator import CalcGui
from PP2E.Dbase.TableBrowser.guitools import *
def calcContainer(parent=None):
frm = Frame(parent)
frm.pack(expand=YES, fill=BOTH) Label(frm, text='Calc Container').pack(side=TOP) CalcGui(frm) Label(frm, text='Calc Container').pack(side=BOTTOM) return frmclass calcSubclass(CalcGui):
def makeWidgets(self, fg, bg, font): Label(self, text='Calc Subclass').pack(side=TOP) Label(self, text='Calc Subclass').pack(side=BOTTOM) CalcGui.makeWidgets(self, fg, bg, font) #Label(self, text='Calc Subclass').pack(side=BOTTOM)if __name__ == '__main__':
import sysif len(sys.argv) == 1: # % calculator_test.py
root = Tk( ) # run 3 calcs in same process
CalcGui(Toplevel( )) # each in a new toplevel window
calcContainer(Toplevel( ))
calcSubclass(Toplevel( ))
Button(root, text='quit', command=root.quit).pack( )
root.mainloop( )
if len(sys.argv) == 2: # % calculator_testl.py -
CalcGui().mainloop( ) # as a standalone window (default root)
elif len(sys.argv) == 3: # % calculator_test.py - -
calcContainer().mainloop( ) # as an embedded component
elif len(sys.argv) == 4: # % calculator_test.py - - -
calcSubclass().mainloop( ) # as a customized superclass
Figure 18-13 shows the result of running this script with no command-line arguments. We get instances of the original calculator class, plus the container and subclass classes defined in this script, all attached to new top-level windows.
Figure 18-13. The calculator_test script: attaching and extending
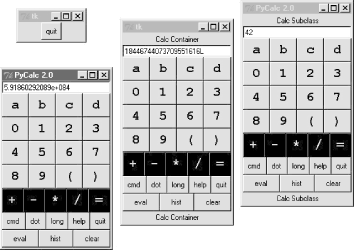
These two windows on the right reuse the core PyCalc code running in the window on the left. All these windows all run in the same process (e.g., quitting one quits them all), but they all function as independent windows. Note that when running three calculators in the same process like this, each has its own distinct expression evaluation namespace because it's a class instance attribute, not a global module-level variable. Because of that, variables set in one calculator are set in that calculator only, and don't overwrite settings made in other windows. Similarly, each calculator has its own evaluation stack manager object, such that calculations in one window don't appear in or impact other windows at all.
The two extensions in this script are artificial, of course -- they simply add labels at the top and bottom of the window -- but the concept is widely applicable. You could reuse the calculator's class by attaching it to any GUI that needs a calculator, and customize it with subclasses arbitrarily. It's a reusable widget.
18.7.2.5 Adding new buttons in new components
One obvious way to reuse the calculator is to add additional expression feature buttons -- square roots, inverses, cubes, and the like. You can type such operations in the command-line pop-ups, but buttons are a bit more convenient. Such features could also be added to the main calculator implementation itself; but since the set of features that will be useful may vary per user and application, a better approach may be to add them in separate extensions. For instance, the class in Example 18-18 adds a few extra buttons to PyCalc by embedding (i.e., attaching) it in a container.
Example 18-18. PP2E\Lang\Calculator\calculator_plus_emb.py
########################################################################
# a container with an extra row of buttons for common operations;
# a more useful customization: adds buttons for more operations (sqrt,
# 1/x, etc.) by embedding/composition, not subclassing; new buttons are
# added after entire CalGui frame because of the packing order/options;
########################################################################
from Tkinter import *
from calculator import CalcGui, getCalcArgs
from PP2E.Dbase.TableBrowser.guitools import frame, button, label
class CalcGuiPlus(Toplevel):
def __init__(self, **args): Toplevel.__init__(self) label(self, TOP, 'PyCalc Plus - Container') self.calc = apply(CalcGui, (self,), args) frm = frame(self, BOTTOM) extras = [('sqrt', 'sqrt(%s)'),('x^2 ', '(%s)**2'),
('x^3 ', '(%s)**3'),
('1/x ', '1.0/(%s)')]
for (lab, expr) in extras: button(frm, LEFT, lab, (lambda m=self.onExtra, e=expr: m(e)) ) button(frm, LEFT, ' pi ', self.onPi) def onExtra(self, expr): text = self.calc.text eval = self.calc.eval try:text.set(eval.runstring(expr % text.get( )))
except: text.set('ERROR') def onPi(self): self.calc.text.set(self.calc.eval.runstring('pi'))if __name__ == '__main__':
root = Tk( )
button(root, TOP, 'Quit', root.quit)apply(CalcGuiPlus, (), getCalcArgs()).mainloop( ) # -bg,-fg to calcgui
Because PyCalc is coded as a Python class, you can always achieve a similar effect by extending PyCalc in a new subclass instead of embedding it, as shown in Example 18-19.
Example 18-19. PP2E\Lang\Calculator\calculator_plus_ext.py
##############################################################################
# a customization with an extra row of buttons for common operations;
# a more useful customization: adds buttons for more operations (sqrt,
# 1/x, etc.) by subclassing to extend the original class, not embedding;
# new buttons show up before frame attached to bottom be calcgui class;
##############################################################################
from Tkinter import *
from calculator import CalcGui, getCalcArgs
from PP2E.Dbase.TableBrowser.guitools import *
class CalcGuiPlus(CalcGui):
def makeWidgets(self, *args): label(self, TOP, 'PyCalc Plus - Subclass') apply(CalcGui.makeWidgets, (self,) + args) frm = frame(self, BOTTOM) extras = [('sqrt', 'sqrt(%s)'),('x^2 ', '(%s)**2'),
('x^3 ', '(%s)**3'), ('1/x ', '1.0/(%s)')] for (lab, expr) in extras: button(frm, LEFT, lab, (lambda m=self.onExtra, e=expr: m(e)) ) button(frm, LEFT, ' pi ', self.onPi) def onExtra(self, expr): try:self.text.set(self.eval.runstring(expr % self.text.get( )))
except: self.text.set('ERROR') def onPi(self): self.text.set(self.eval.runstring('pi'))if __name__ == '__main__':
apply(CalcGuiPlus, (), getCalcArgs()).mainloop( ) # passes -bg, -fg on
Notice that these buttons' callbacks use 1.0/x to force float-point division to be used for inverses (integer division truncates remainders), and wrap entry field values in parentheses (to sidestep precedence issues). They could instead convert the entry's text to a number and do real math, but Python does all the work automatically when expression strings are run raw.
Also note that the buttons added by these scripts simply operate on the current value in the entry field, immediately. That's not quite the same as expression operators applied with the stacks evaluator (additional customizations are needed to make them true operators). Still, these buttons prove the point these scripts are out to make -- they use PyCalc as a component, both from the outside and below.
Finally, to test both of the extended calculator classes, as well as PyCalc configuration options, the script in Example 18-20 puts up four distinct calculator windows (this is the script run by PyDemos).
Example 18-20. PP2E\Lang\Calculator\calculator_plusplus.py
#!/usr/local/bin/python
from Tkinter import Tk, Button, Toplevel
import calculator, calculator_plus_ext, calculator_plus_emb
# demo all 3 calculator flavors at once
# each is a distinct calculator object and window
root=Tk( )calculator.CalcGui(Toplevel( ))calculator.CalcGui(Toplevel( ), fg='white', bg='purple')calculator_plus_ext.CalcGuiPlus(Toplevel( ), fg='gold', bg='black')calculator_plus_emb.CalcGuiPlus(fg='black', bg='red')
Button(root, text='Quit Calcs', command=root.quit).pack( )root.mainloop( )
Figure 18-14 shows the result -- four independent calculators in top-level windows within the same process. The windows on the left and right represent specialized reuses of PyCalc as a component. Although it may not be obvious in this book, all four use different color schemes; calculator classes accept color and font configuration options and pass them down the call chain as needed.
Figure 18-14. The calculator_plusplus script: extend, embed, and configure
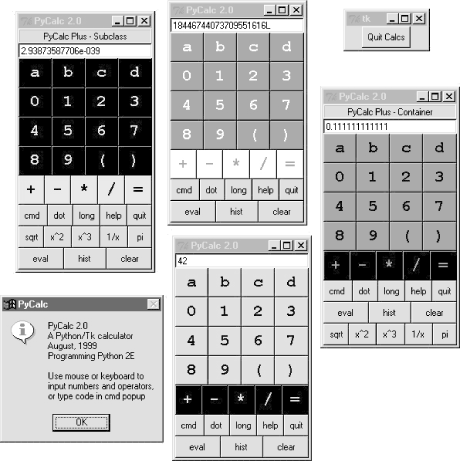
As we learned earlier, these calculators could also be run as independent processes by spawning command lines with the launchmodes module we met in Chapter 3. In fact, that's how the PyGadgets and PyDemos launcher bars run calculators, so see their code for more details.
Lesson 6: Have FunIn closing, here's a less tangible but important aspect of Python programming. A common remark among new users is that it's easy to "say what you mean" in Python without getting bogged down in complex syntax or obscure rules. It's a programmer-friendly language. In fact, it's not too uncommon for Python programs to run on the first attempt. As we've seen in this book, there are a number of factors behind this distinction -- lack of declarations, no compile steps, simple syntax, useful built-in objects, and so on. Python is specifically designed to optimize speed of development (an idea we'll expand on in Chapter 21). For many users, the end result is a remarkably expressive and responsive language, which can actually be fun to use. For instance, the calculator programs shown earlier were first thrown together in one afternoon, starting from vague, incomplete goals. There was no analysis phase, no formal design, and no official coding stage. I typed up some ideas and they worked. Moreover, Python's interactive nature allowed me to experiment with new ideas and get immediate feedback. Since its initial development, the calculator has been polished and expanded, but the core implementation remains unchanged. Naturally, such a laid-back programming mode doesn't work for every project. Sometimes more up-front design is warranted. For more demanding tasks, Python has modular constructs and fosters systems that can be extended in either Python or C. And, a simple calculator GUI may not be what some would call "serious" software development. But maybe that's part of the point, too. |
[1] Earlier Python releases had similar tools called spitfields and joinfields;
the more modern (and less verbose) split and join are the preferred way to spell these today. [back]
[2] Also see the grid examples in Chapter 8, for another
example of eval table magic at work. The summer script here is a much
simpler version of that chapter's column sum logic. [back]
[a] Actually, in Python 2.0, the string module has changed its implementation again: it is now
a frontend to new strng methods, which are able to also handle Unicode
strings. As mentioned, most string
functions are also available as object methods in 2.0. For instance, string.split (X) is now simply a synonym for X.split( ); both forms are supported, but the latter may become
prevalent over time. Either way, clients of the original string module are not affected by this change—yet another
lesson! [back]
[3] And once again, I need to warn you about running
strings like this if you can't be sure they won't cause damage. See the rexec restricted execution mode module in Chapter 15, for
more details. [back]
Chapter 17 TOC Chapter 19