|
|
In the introduction to this chapter, I defined a branch as a forked line of development in your project, with the line that has been forked off called the branch, and the main line the trunk. CVS builds the branch and the trunk from the same source data, up until the point at which they diverge, which is called the base of the branch. From that point, CVS stores the changes made to the branch separately from the changes in the trunk. Revisions on the branch are given their own revision numbers, based on the revision number of the base of the branch.
You can branch a single file, any group of files, or a whole project just as you can tag individual files or any group of them. I usually recommend branching a project. In my experience, if you branch one file, you will eventually need to branch others in the project for the same reason. It is much easier to keep track of a single branch over the whole project than a group of unrelated branches of individual files.
A tag marks a specific revision of each tagged file, and a sandbox checked out with that tag cannot be changed. In contrast, a branch creates revisions that can be edited, committed, checked out, updated, and tagged independently of the revisions on the trunk. In many ways, a branch can be treated as an independant development line of a project.
You can tag a file with any number of tags, as long as each tag name in that file is unique. CVS also allows you to tag branch revisions with several tags on the branch. CVS relies on each tag and branch name to be unique within each file, so it considers the branch name to be a tag name.
A branch is an ongoing line of development, and the tags on the branch mark the specific revisions when significant events occur. Though branches are created using the cvs tag command, branches and tags are different things. A branch represents multiple revisions and a tag represents a single revision.
|
Branches are often used when a public release of a project is due, to allow testers to work on the release candidate while new development goes on independently of the testing. Branches can also keep major changes or experimental work, such as a complete rewrite of a code library, separate from the main line of development.
Ideally, you will know you want a branch before you start modifying your sandbox copies of a project's files. You can then create a branch from the sandbox, as shown in Section 4.3.2 of this chapter.
Sometimes you realize after making changes that your work is experimental or will require a section of the project to be redesigned. At such times, you might create a branch to allow you to keep your revision under version control without affecting the rest of the project's development. See Section 4.3.3 of this chapter for instructions on how to do so. Retroactive branching can be more difficult than standard branching, so try to plan branches in advance.
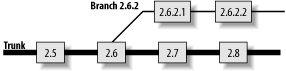
Figure 4-3 shows how a branch is developed from a trunk. Revision 2.6 is the base of the branch, and the branch itself is represented by the revision number 2.6.2. The branch has independent revisions from the trunk, starting with revision 2.6.2.1. The trunk continues with revision 2.7.
The branch is dependent on the main trunk. However, the trunk and the branch are stored in the same file in the repository, and commands that operate on that file at the repository level can affect both trunk and branch. For example, the same tag cannot be used twice in the same file, even if one use is on the trunk and the other is on the branch. Also, the cvs status and cvs log commands show the overall state of the file, including the trunk and the branch.
Changes from the trunk can be merged onto a branch, and changes from a branch can be merged back into the main trunk. The branch can either be abandoned or continued, depending on the purpose for the merge.
Branching has many uses. A project's trunk is usually used for the main line of development, and branches are usually used for variations on that line.
In programming projects and content management, branches are often used for experimental work, candidates for product releases to the users, refactoring code or content, or bug fixes.
For configuration management, the trunk can be used for the default configuration and branches can be the standard variants�one branch for web servers, one for mail servers, and so on.
The following list describes some common uses for different types of branches. Branch types are explained in detail in Section 4.4, later in this chapter.
Use long branches, and occasionally nested branches, for variations on similar themes. Make changes on the trunk and merge them to the branch if the branch needs those changes.
Use long branches for bug fixes, and merge the changes to the trunk.
Use short branches, and merge changes back to the trunk.
Depending on how major the rewrite is, you can use long branches merged to the trunk, long branches merged in both directions, or short branches.
Use long branches, and merge changes to the trunk. You can convert the branch to a bugfix-management branch after release.
You can make a branch with the -b option to the cvs tag or cvs rtag commands. This option can be combined with any of the other tag-creation options of those commands. You can use a date, existing tag, or revision number to specify the revision to be branched from.
If you use cvs tag, you can also make a branch from the most recently synchronized sandbox revision. Doing so acts like tagging from the sandbox revision, as shown earlier in Section 4.1.1 of this chapter.
Example 4-10 demonstrates the creation of a branch from an existing tag using cvs tag. The cvs update command ensures that all files in pre_beta_0.1 are present in the sandbox. The output from the cvs update command can be used to check that no files have changed.
bash-2.05a$ cvs update -d -r pre_beta_0-1
.
.
.
bash-2.05a$ cvs tag -r pre_beta_0-1 -b pre_beta_0-1_branch
cvs server: Tagging .
T Changelog
T INSTALL
T Makefile
T README
T TODO
cvs server: Tagging doc
cvs server: Tagging doc/design
T doc/design/AcceptanceTest.doc
T doc/design/Analysis.rtf
T doc/design/Requirements.doc
T doc/design/Specification.rtf
cvs server: Tagging doc/plan
T doc/plan/Schedule.rtf
cvs server: Tagging src
T src/config.h
T src/main.c
Branch creation occurs in the repository, not the sandbox. To edit the branch revisions of the files, you need to check out a branch sandbox or use update to alter the current sandbox to the branch.
It is good practice to tag the trunk just before splitting off a branch, because this makes it easier to merge the changes back later. To be absolutely certain that the revisions tagged with the prebranch tag are the revisions used as the base of the branch, use cvs rtag -r pre-branch-tag -b branch-tag project to create the branch. This command uses the prebranch tag to specify the revisions the branch is created from.
Example 4-11 shows how to create a prebranch tag and then the branch. Then, cvs status is used to show the tag status of one of the files.
bash-2.05a$ cvs tag beta_0-1_branch_root
cvs server: Tagging .
T Changelog
T INSTALL
.
.
.
cvs server: Tagging src
T src/config.h
T src/main.c
bash-2.05a$ cvs rtag -r beta_0-1_branch_root -b beta_0-1_branch wizzard
cvs rtag: Tagging wizzard
cvs rtag: Tagging wizzard/doc
cvs rtag: Tagging wizzard/doc/design
cvs rtag: Tagging wizzard/doc/plan
cvs rtag: Tagging wizzard/lib
cvs rtag: Tagging wizzard/man
cvs rtag: Tagging wizzard/src
bash-2.05a$ cvs status -v src/main.c
=  =  =  =  =  =  =  =  =  =  =  =  =  =  =  =  =  =  =  =  =  =  =  =  =  =  =  =  =
File: main.c                Status: Up-to-date

   Working revision:    1.9
   Repository revision: 1.9     /var/lib/cvs/wizzard/src/main.c,v
   Sticky Tag:          (none)
   Sticky Date:         (none)
   Sticky Options:      (none)

   Existing Tags:
     beta_0-1_branch               (branch: 1.9.2)
     beta_0-1_branch_root          (revision: 1.9)
     pre_beta_0-1                  (revision: 1.8)
If you make changes and realize at the time you're ready to commit that you want to make a branch, you need to try to make a branch from the revisions before the changes. If you have not committed any of the changes, you can retroactively create a branch from the current sandbox using the following process:
Do not commit your changes until after you have made the branch. This is important, because you are using a feature of the tag command to make the branch point before the latest set of changes.
Because you can't commit your changes before starting, it is a good idea to back up the changed files with your operating system's copy command. Copy the whole sandbox to a temporary directory until after the changes have been successfully committed into CVS.
Use the command cvs tag -b branchname to create the branch. The tag command tags the last revisions that were committed to the repository or updated from the repository, which hopefully are the revisions before the changes you want to branch off of. The cvs tag command does not modify your sandbox.
Use the command cvs update -r branchname to change your sandbox to a branch sandbox. This causes CVS to try to merge the branch revisions into the files currently in the sandbox, but because the sandbox files are based on the branch revisions, this merge results in unchanged files. CVS sets sticky branch tags on the files in the sandbox, marking them as belonging to the branch.
Issue cvs commit to upload your changes in the files to the repository as the next revision on the branch.
Check that the files are correct; then delete the temporary backup copy.
This technique relies on the fact that cvs tag marks the repository at the point when the sandbox was last synchronized with the repository. The branch is created at that time, so when you update the sandbox to your branch, CVS tries to merge the base files your sandbox was created from with the files in the sandbox, leaving your sandbox unchanged.
Example 4-12 shows an example of retroactive branching.
bash-2.05a$ cvs tag -b test_0-1_branch
cvs server: Tagging .
T config.h
T main.c
bash-2.05a$ cvs update -r test_0-1_branch
cvs server: Updating .
M config.h
bash-2.05a$ cvs commit
If you have committed changes, you can retroactively make a branch from a date with the method shown in Example 4-12, but use the -D date command option to the cvs tag command.
|
To change the files in a branch, you need to check out a sandbox that is based on the branch you want to change. In a branch sandbox, cvs commit commits the changes to the branch in the repository and cvs update brings down changes from the repository copy of the branch to the sandbox.
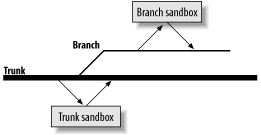
You create a branch sandbox with the -r branch-tag-name argument to cvs checkout or cvs update. Figure 4-4 illustrates the results of checking out a branch sandbox.
CVS marks the sandbox copies of files in a branch sandbox with a sticky tag to record that those files belong to the branch. See Example 4-13 for an example of creating a branch sandbox and a status report of one of the files with a sticky branch tag.
bash-2.05a$ cvs -d cvs:/var/lib/cvs checkout -r beta_0-1_branch wizzard
cvs server: Updating wizzard
U wizzard/Changelog
U wizzard/INSTALL
.
.
.
cvs server: Updating wizzard/src
U wizzard/src/config.h
U wizzard/src/main.c
bash-2.05a$ cd wizzard/src/
bash-2.05a$ cvs status main.c
=  =  =  =  =  =  =  =  =  =  =  =  =  =  =  =  =  =  =  =  =  =  =  =  =  =  =  =  =
File: main.c                Status: Up-to-date

   Working revision:    1.9
   Repository revision: 1.9     /var/lib/cvs/wizzard/src/main.c,v
   Sticky Tag:          beta_0-1_branch (branch: 1.9.2)
   Sticky Date:         (none)
   Sticky Options:      (none)
You can also retrieve individual branch files to a normal sandbox, but I do not recommend allowing yourself to have a sandbox of mixed branch and trunk files. Use checkout from a nonsandbox directory if you want to check out individual files that do not belong to the same branch or trunk as the current sandbox.
|
Use a branch sandbox like a normal sandbox. Actions based on revisions of a file affect the branch rather than the trunk. Actions based on the repository copy of the file as a whole reflect the full file. For instance, running cvs status in a branch sandbox reports the status of the local copy of the files, the trunk revision numbers for the working and repository revisions, and the current branch tag and revision as the sticky tag.
When cvs add or cvs remove are applied to files in a branch sandbox, the addition or removal applies only to the branch and does not affect the trunk. Example 4-14 shows the response from CVS after adding a file to a branch.
bash-2.05a$ cvs add handheld.c
cvs server: scheduling file `handheld.c' for addition on branch `beta_0-1_branch'
cvs server: use 'cvs commit' to add this file permanently
Merging a branch to the trunk applies the differences created during the life of the branch to the most recent revisions of the trunk code. Whether this is desirable depends on the reason for the branch; you may want to apply bug fixes to the main code, or an experimental branch may have content you want to merge into the main code. It is also possible to merge changes from the trunk to the branch, or to merge the contents of two branches together.
When you merge a branch, it is good practice to tag the branch at the merge point. Such tags on the branch act as markers to show you when you did each merge.
Once you have merged two branches, or a branch and a trunk, usually you are left with one unchanged and one changed. If you merge the changes from a branch to the trunk and commit the changed sandbox, the next revision of the trunk will include those changes. If you want to have a copy of the trunk to work from that doesn't have those changes, you may want to consider merging the trunk to the branch instead, or creating another branch to hold both the current trunk and branch data.
When you finish with a branch, it can seem logical to remove it or somehow close it. However, CVS does not expect you to delete branches. Instead, it keeps them as part of the record of the project. There is no command to mark a branch as no longer to be used. Use a log message to mark the end point of the branch.
|
To merge changes from a branch to the trunk, check out a current sandbox of the trunk and run cvs update -j branchbasetag -j branchname. Resolve any conflicts the merge creates and commit the changes. If the changes are complex, the developers or project leads who manage the branch and the trunk should perform this conflict resolution.
If the branch has previously been merged to the trunk and you tagged the branch at that point, the command cvs update -j lastmergetag -j branchname in the same sandbox merges only the changes since the last merge tag.
Example 4-15 demonstrates merging a branch to a trunk. Here, CVS refuses to remove a file that was changed in the trunk but removed in the branch. This example also shows the addition of the handheld.c file, which was created in the branch.
bash-2.05a$ cvs update -j beta_0-1_branch_root -j beta_0-1_branch
cvs server: Updating .
cvs server: file config.h has been modified, but has been removed in revision beta_0-1_
branch
U handheld.c
To merge changes from the trunk to a branch, check out a current sandbox of the branch and run cvs update -j branchbasetag -j HEAD from that sandbox. Resolve any conflicts the merge creates and commit the changes. If the changes are complex, the developers or project leads who manage the branch and the trunk should perform this conflict resolution.
If the trunk has previously been merged to the branch and you tagged the trunk at that point, the command cvs update -j lastmergetag -j HEAD in the same sandbox merges only the changes since the last merge tag.
Example 4-16 shows the result and error messages caused by attempting to merge a trunk to a branch. The config.h file has been removed from the branch but is still active in the trunk. This issue needs to be resolved, probably by reverting the removal. The handheld.c file did not previously exist in the trunk but was added to the trunk in Example 4-15 when the branch was merged to it; the related error message can be ignored.
bash-2.05a$ cvs update -j beta_0-1_branch_root -j HEAD
cvs server: Updating .
cvs server: file config.h does not exist, but is present in revision HEAD
cvs server: file handheld.c exists, but has been added in revision HEAD
U server.c
To merge changes from one branch to another branch, check out a sandbox of the target branch and run cvs update -j branchbasetag -j otherbranch, merging from the other branch to the checked-out branch's sandbox.
If the branches have been previously merged and you tagged the source branch at the time of the merge, the command cvs update -j lastmergetag -j branchname in the sandbox of the target branch merges the changes since the last merge.
Keyword expansion (see Chapter 3) can cause conflicts when merging two different revisions of files together. The Revision keyword is the most obvious cause of conflicts, because it expands to display the current revision of a file. Avoid these conflicts by using the -kk keyword-expansion mode, which prevents keywords from being replaced by their associated values.
|
Changes to binary files and other nonmergeable files cannot be merged from the branch to the trunk automatically. If there are utilities similar to diff and patch for the file type in question, it may be possible to merge such files using those utilities. Otherwise, you'll need to merge changes manually. You should consider this issue when deciding whether to branch development of such files.
An ordinary file's revision numbers consist of a prefix and an incrementing revision identifier; thus, revision 1.1 is succeeded by 1.2, 1.3, and 1.4 as each change is committed.
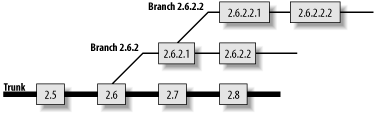
A branched file's branch number is based on the revision it is branched off of. So, a branch based on revision 1.4 of a file may be branch 1.4.2. Each revision within that branch uses the branch number as its base number and then adds its own number to the end. So, revision numbers for branch 1.4.2 would be 1.4.2.x, where x is the incrementing revision identifier. Remember that a branch is not a single revision; a branch is a line of revisions.
Figure 4-5 shows a branched file and its revision numbers.
CVS never gives a user-created branch the branch number 1.1.1; this number is used for a special branch called the vendor branch.
CVS sometimes inserts a 0 in the second-rightmost position of a branch number to make internal code more efficient. This sometimes shows up in cvs log and may affect cvs admin commands on that branch, but it is otherwise hidden by CVS. If this happened to branch 1.4.2, the branch number would be displayed as 1.4.0.2. Revisions on the branch would not have the 0, so the first revision on branch 1.4.0.2 would be 1.4.2.1 and the second would be 1.4.2.2.
This vagary with respect to zeros in branch numbers does not affect how you use CVS; you can refer to a branch without the 0. For example, the commands cvs update -r 1.4.2 and cvs update -r 1.4.0.2 retrieve the same revisions of the same files.
Deleting or moving a branch is done with the -d or -F command options to cvs tag and cvs rtag, in the same way you delete or move any other tag. CVS also requires the -B option in the command as a way of indicating that you know the tag denotes a branch and you really mean to move or delete it.
Unless the branch has just been created and no work has been done on it, I recommend against deleting or moving a branch. Most tags can be deleted or moved without affecting a project's history, but changes on a branch become part of the change record of each file in the branch.
Example 4-17 shows how to delete a just-created branch.
bash-2.05a$ cvs tag -d -B pre_beta_0-1_branch
cvs server: Untagging .
D Changelog
D INSTALL
D Makefile
D README
D TODO
cvs server: Untagging doc
cvs server: Untagging doc/design
D doc/design/AcceptanceTest.doc
D doc/design/Analysis.rtf
D doc/design/Requirements.doc
D doc/design/Specification.rtf
cvs server: Untagging doc/plan
D doc/plan/Schedule.rtf
cvs server: Untagging src
D src/config.h
D src/main.c
|
|
| Top |
