12.5 Implementing a Basic FirewallSometimes you may want a host to provide certain services to only local clients or clients on other hosts of a network that you control. If your network is connected to the Internet, you can use a firewall to prevent undesired access to services. A Linux firewall depends on certain kernel facilities to examine incoming and outgoing packets. Packets that fail to pass specified rules can be rejected, preventing undesired access to private services. A related facility, known as IP masquerading, lets hosts on a network connect to the Internet via a host known as the masquerading host. All packets from the network seem to the outside host to have come from the masquerading host. IP masquerading lets you:
12.5.1 Configuring the FirewallAt installation time, Red Hat Linux lets you configure a firewall for your system; however, you can reconfigure the firewall after installation. For a firewall to be secure and flexible, customization is almost always required. However, customizing a firewall requires an understanding of the ports and protocols used by each running service, an expertise that generally requires considerable time to achieve. To learn more about services, ports, and protocols, see the resources described at the end of this chapter. To configure a firewall, launch the Security Level Tool by
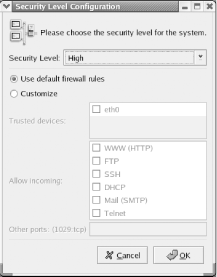
choosing System Settings The Security Level Tool, as shown in Figure 12-8, appears. Figure 12-8. The Firewall Configuration dialog box The Firewall Configuration dialog box lets you select the desired security level:
To customize the access permitted to remote clients, click on Customize. You can use the Allow Incoming checkboxes to allow access to services that would otherwise be blocked by the medium or high security levels. If you want to allow access to a service other than one of the six listed, you can use the Other ports text box. There, you can list the number (or name) of the port, followed by a colon and the port type (tcp or udp). The file /etc/services lists the commonly agreed-upon port numbers and the associated services. For example, the IMAP mail service is associated with port 143 and both TCP and UDP port types. To permit access to IMAP, you could place the specification 143:tcp,143:udp in the Other ports text box. You can list as many ports as you like, separating each from its neighbor by a comma. It is possible to list ports by name, but since the names acceptable to the dialog box are not documented, it's better to use port numbers. You can use the Trusted devices checkbox to specify that packets originating from the specified device will not be blocked by the firewall. This facility is useful when a host has two network adapters: one associated with a public network, such as the Internet, and another associated with a private network. By specifying the network adapter associated with the private network as a trusted device, you permit clients on the private network free access to services, while blocking clients on the public network from access other than that permitted by the firewall configuration. 12.5.2 Controlling the FirewallTo start, stop, or restart the firewall, you can use the Service Configuration Tool, which identifies the firewall as the iptables service. Generally, you should use the Tool to associate the iptables service with runlevels 2-5, so that your system is protected when networking is active. 12.5.3 Configuring IP MasqueradingTo configure IP masquerading, properly configure and start your firewall. Then, issue a command of the following form: # iptables -t nat -A POSTROUTING -o eth0 -s xxx.xxx.xxx.xxx -j MASQUERADE where eth0 is the network adapter that connects to the Internet, and xxx.xxx.xxx.xxx is the IP address of the host to be masqueraded. If more than one host is to be masqueraded, the command can be repeated as necessary. For example, to masquerade the hosts 192.168.0.1 and 192.168.0.2, routing to the Internet via the adapter eth0, issue the commands: # iptables -t nat -A POSTROUTING -o eth0 -s 192.168.0.1 -j MASQUERADE # iptables -t nat -A POSTROUTING -o eth0 -s 192.168.0.2 -j MASQUERADE Then, save the current firewall status by issuing the command: # service ipchains save |