

|
Chapter 17 TCP/IP Services |

|
17.3 Primary UNIX Network Services
This section describes selected network services that are usually provided as part of the standard UNIX network package. It further discusses some of the major security implications of each of these services.
Every network service carries both known and unknown security risks. Some services have relatively small known risks, while others have substantial ones. And with every network service there is the possibility that a security flaw in the protocol or the server will be discovered at some point in the future. Thus, a conservative security policy would remove every service for which there is no demonstrated need.
If you think that the risk of a service outweighs its benefit, then you can disable the service simply by placing a hash mark (#) at the beginning of the lines in the /etc/rc* file(s) or the /etc/inetd.conf file that cause the server program to be executed. This will serve to comment out those lines. Of course, if you turn off a needed service, people who wish to use it are likely to complain! Remember, too, that disabling the ability to receive network connections does not prevent people on your computer from initiating outbound network connections.
Note that the inetd program may not take notice of any changes to its configuration until it is restarted or sent a signal (usually the HUP signal; consult the inetd man page for your system). Changes in the /etc/rc* file(s) may not take effect until you change the run level or restart your system. Thus, if you disable a service, the change may not cause a currently running invocation of the server to terminate - you may need to take some other action before you can verify that you have properly disabled the service.
We recommend that you save a copy of any configuration files before you begin to edit them. That way, if you make a mistake or if something doesn't work as expected, you can roll back to an earlier version of the files to determine what happened. You might consider using the RCS or SCCS revision-control systems to manage these files. These systems allow you to put date stamps and comments on each set of changes, for future reference. Such markings may also be useful for comparison purposes if you believe that the files have been changed by an intruder, although this isn't a particularly strong form of detection.
17.3.1 systat (TCP Port 11)
The systat service is designed to provide status information about your computer to other computers on the network.
Many sites have configured their /etc/inetd.conf file so that connections to TCP port 11 are answered with the output of the who or w command. You can verify if your system is configured in this manner with the telnet command:
unix% telnet media.mit.edu 11
Trying 18.85.0.2... Connected to media.mit.edu.
Escape character is '^]'.
lieber   ttyp0   Aug 12 19:01   (liebernardo.medi)
cahn     ttyp1   Aug 13 14:47   (remedios:0.0)
foner    ttyp2   Aug 11 16:25   (18.85.3.35:0.2)
jrs      ttyp3   Aug 13 17:12   (pu.media.mit.edu)
ereidell ttyp4   Aug 14 08:47   (ISAAC.MIT.EDU)
felice   ttyp5   Aug 14 09:40   (gaudy.media.mit.)
das      ttyp6   Aug 10 19:00   (18.85.4.207:0.0)
...
Although providing this information is certainly a friendly thing to do, usernames, login times, and origination hosts can be used to target specific attacks against your system. We therefore recommend against running this service.
To disable the service, simply comment or remove the line beginning with the word "systat" from your /etc/inetd.conf file. You can also verify that the service has been disabled by using the telnet command:
unix% telnet media.mit.edu 11
Trying 18.85.0.2... Connection refused.
unix%
17.3.2 (FTP) File Transfer Protocol (TCP Ports 20 and 21)
The File Transfer Protocol ( FTP ) allows you to transfer complete files between systems. Its UNIX implementation consists of two programs: ftp is the client program; /etc/ftpd (sometimes called /usr/etc/in.ftpd ) is the server. TCP port 21 is used for sending commands; port 20 is occasionally used for the data stream, although it is more common for the client and server to mutually negotiate a set of port numbers greater than 1024.
When you use FTP to contact a remote machine, the remote computer requires that you log in by providing your username and password; FTP logins are usually recorded on the remote machine in the /usr/adm/wtmp file. Because the passwords typed to FTP are transmitted unencrypted over the network, they can be intercepted (as with the telnet and rexec commands); for this reason, some sites may wish to disable the ftp and ftpd programs, or modify them to use alternative authentication protocols.
17.3.2.1 Using anonymous FTP
FTP can be set up for anonymous access, which allows people on the network who do not have an account on your machine to deposit or retrieve files from a special directory. Many institutions use anonymous FTP as a low-cost method to distribute software and databases to the public.
To use anonymous FTP , simply specify ftp [6] as your username, and your real identity - your email address - as the password.
[6] Some older servers require that you specify "anonymous" for anonymous FTP; most servers accept either username.
%
ftp athena-dist.mit.edu

Connected to AENEAS.MIT.EDU.
220 aeneas FTP server (Version 4.136 Mon Oct 31 23:18:38 EST 1988) ready.
Name (athena-dist.mit.edu:fred):
ftp

331 Guest login ok, send ident as password.
password:
Rachel@ora.com

230 Guest login ok, access restrictions apply.
ftp>
Increasingly, systems on the Internet require that you specify an email address as your "password." However, few of these systems verify that the email address you type is your actual email address.
17.3.2.2 Passive vs. active FTP
The FTP protocol supports two modes of operations, active (often called normal) and passive . These modes determine whether the FTP server or the client initiates the TCP connections that are used to send information from the server to the host.
Active mode is the default. In active mode, the server opens a connection to the client, as illustrated in Figure 17.1 . Active mode complicates the construction of firewalls, because the firewall must anticipate the connection from the FTP server back to the FTP client program and permit that connection through the firewall.
Figure 17.1: Active-mode FTP connection
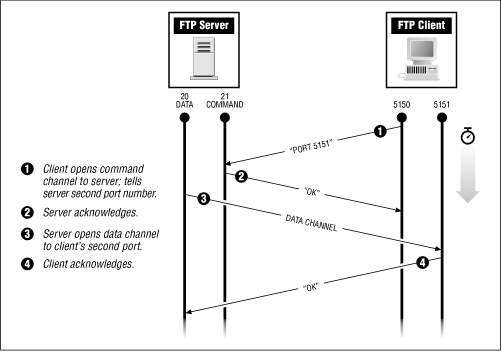
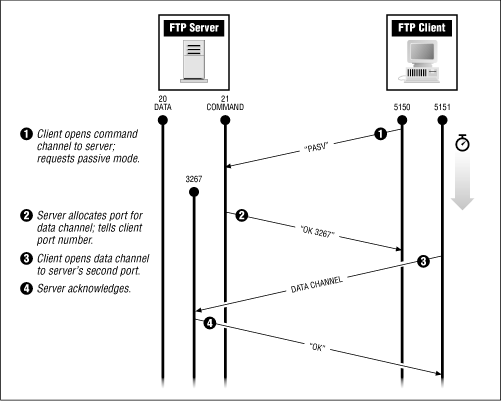
Figure 17.2: Passive-mode FTP connection
17.3.2.3 FTP passive mode
Under normal circumstances, the FTP server initiates the data connection back to the FTP client. Many FTP servers and clients support an alternative mode of operation called passive mode. In passive mode, the FTP client initiates the connection that the server uses to send data back to client. Passive mode is shown in Figure 17.2 . Passive mode is desirable, because it simplifies the task of building a firewall: the firewall simply allows internal connections to pass through to the outside world, but it does not need to allow outside connections to come back in. Not all FTP clients support passive mode, but many do, including the FTP clients that are built in to most popular WWW browsers. If your software does not yet include it, you should upgrade to software that does.
17.3.2.4 Setting up an FTP server
If you wish to provide FTP service, you have three choices for FTP servers:
-
You can use the standard UNIX ftpd that comes with your system. Depending on your UNIX vendor, this version may or may not be secure and bug free. Over the years, many security problems have been found with ftpd . Some vendors have been quick to implement the necessary bug fixes; others have not.
-
You can run wuftpd , an excellent FTP server originally written at Washington University in Saint Louis. The wuftpd server has many useful options that allow you to create different categories of FTP users, allow you to set limits on the number of simultaneous file transfers, and allow you to save network bandwidth by automatically compressing and archiving files as they are transferred. Unfortunately, the program itself is quite complex, is somewhat difficult to configure, and has had security problems in the past. Nevertheless, wuftpd is the FTP server of choice for many major archive sites.
-
If you only want to provide anonymous FTP access, you can use one of several stripped-down, minimal implementations of FTP servers. One such version is the aftpd server, written by Marcus Ranum when he was at Trusted Information Systems. The aftp server is designed to be as simple as possible so as to minimize potential security problems; therefore, it has far fewer features and options than other servers. In particular, it will only serve files in anonymous transfer mode. We suggest that you consider getting a copy of aftp (or something like it) if you only want to offer anonymous access.[7]
[7] This is not the same FTP server as the one included in the TIS Firewall Toolkit. aftp is available from the TIS FTP site, ftp.tis.com .
All of these servers are started by the inetd daemon, and thus require an entry in the /etc/inetd.conf file. You can either have the FTP server run directly or run through a wrapper such as tcpwrapper. Our discussion of FTP services in the following sections applies to the standard UNIX ftpd server.
17.3.2.5 Restricting FTP with the standard UNIX FTP server
The /etc/ftpusers file contains a list of the accounts that are not allowed to use FTP to transfer files. This file should contain all accounts that do not belong to actual human beings:
#
cat /etc/ftpusers

root
uucp
news
bin
ingres
nobody
daemon
In this example, we specifically block access to the root , uucp , news , bin , and other accounts so that attackers on the Internet will not be able to break into these accounts using the FTP program. Blocking system accounts in this manner also prevents the system manager from transferring files to these accounts using FTP , which is a risk because the passwords can be intercepted with a packet sniffer.
Additionally, most versions of FTP will not allow a user to transfer files if the account's shell, as given in the /etc/passwd file of the system, is not also listed in the /etc/shells [8] file. This is to prevent users who have had accounts disabled, or who are using restricted shells, from using FTP . You should test this feature with your own server to determine if it works correctly.
[8] Note that /etc/shells is also used by chfn as a list of allowable shells to change to.
17.3.2.6 Setting up anonymous FTP with the standard UNIX FTP server
Setting up anonymous FTP on a server is relatively easy, but you must do it correctly, because you are potentially giving access to your system to everybody on the network.
To set up anonymous FTP , you must create a special account with the name ftp . For example:
ftp:*:400:400:Anonymous FTP:/var/spool/ftp:/bin/false
Files that are available by anonymous FTP will be placed in the ftp home directory; you should therefore put the directory in a special place, such as /var/spool/ftp .
When it is used for anonymous FTP , ftpd uses the chroot () function call to change the root of the perceived filesystem to the home directory of the ftp account. For this reason, you must set up that account's home directory as a mini filesystem. Three directories go into this mini filesystem:
- bin
-
This directory holds a copy of the /bin/ls program, which ftpd uses to list files. If your system uses dynamic linking and shared libraries, you must either install programs that are statically linked or install the dynamic libraries in the appropriate directory (for example, /var/spool/ftp/lib ).
- etc
-
This directory holds a version of the /etc/passwd and /etc/group files, which are put there so the /bin/ls command will print usernames and groupnames when it lists files. Replace the encrypted passwords in this file with asterisks. Some security-conscious sites may wish to delete some or all account names from the passwd file; the only one that needs to be present is ftp . (Actually, if neither file exists, most FTP servers will still work normally.)
- pub
-
This directory, short for public, holds the files that are actually made available for anonymous FTP transfer. You can have as many subdirectories as you wish in the pub directory.
Be sure to place the actual files in these directories, rather than using symbolic links pointing to other places on your system. Because the ftpd program uses the chroot () system call, symbolic links may not behave properly with anonymous FTP . In general, symbolic links to inside your chroot area will work, and they are commonly used on anonymous FTP sites. However, any symbolic link which points outside the chroot area or is an absolute symbolic link will not work.
Now execute the following commands as the superuser. We assume that you've already created ~ftp .
#
mkdir ~ftp/bin ~ftp/etc ~ftp/pub
			Create needed directories.
Set up ~ftp/bin :
#
chown root ~ftp/bin/ls
		 		 	Make sure root owns the directory	.
#
cp /bin/ls ~ftp/bin
			Make a copy of the ls program.
#
chmod 111 ~ftp/bin/ls
			Make sure ls can't be changed.
#
chmod 111 ~ftp/bin
			Make directory execute only.
#
chown root ~ftp/bin
			Make sure root owns the directory.
Set up ~ftp/etc :
#
cat-passwd awk -F: '{printf "%s:*:%s:%s::\n",$1,$2,$3}' \
	> ~ftp/etc/passwd

			Make a copy of /etc/passwd with
			all passwords changed to asterisks.
#
awk -F: '{printf "%s::%s:%s\n",$1,$3,$4}' /etc/group > ~ftp/etc/group

			Make a copy of /etc/group.

#
chmod 444 ~ftp/etc/*
			Make sure files in etc are not writable.

#
chmod 111 ~ftp/etc
			Make directory execute-only.

#
chown root ~ftp/etc
			Make sure root owns the directory.
Alternatively, note that most ftp servers will work fine if the only entries in the passwd file are for root and ftp , and the only entry in the group file is for group ftp . The only side-effect is that files left in the ftp directories will show numeric owner and groups when clients do a directory listing. The advantage to having a trimmed file is that outsiders cannot gain any clues as to your system's user population if they should obtain a copy of the file.
Some systems will require you to install dynamic libraries and even device files to make the FTP server's file list command work. This is particularly a problem on Solaris systems. In general, the fewer files accessed in the anonymous FTP area, the harder the system will be to compromise.
Set up ~ftp/pub :
#
chown root.wheel ~ftp/pub
			Make sure root owns the directory.
#
chmod 555 ~ftp/pub
			Make directory writable by nobody.[9]
			(See warning.)
And finally, secure the ~ftp directory:
#
chmod 555 ~ftp

#
chown root ~ftp
NOTE: Note that some man pages from some vendors state that the ~ftp directory should be owned by user ftp . This practice is dangerous! If user ftp owns the home directory, anonymous users can change the FTP environment, can delete or create new files at will, and can run any program that they choose. They can also create . rhosts files to gain direct access to your system!
You should also set up a mail alias for the ftp user, so that mail sent to ftp is delivered to one of your system administrators.
17.3.2.7 Allowing only FTP access
Sometimes, you may wish to give people permission to FTP files to and from your computer, but you may not want to give them permission to actually log in. One simple way to accomplish this goal is to set up the person's account with a special shell, such as /bin/ftponly . Follow these directions:[11]
[11] If you are using wuftpd, note that there is a feature which allows a similar configuration.
-
Create a shell script /bin/ftponly , which prints a polite error message if the user attempts to log into his account. Here is an example:
#!/bin/sh
/bin/cat << XX

You may use FTP to put files on this computer, but you may
not use this account to login.
-The Management

XX
/usr/bin/sleep 10
-
Create your user account with /bin/ftponly as its shell:
kelly:Mqu3lQJ41kf/E:502:20:Jim Kelly:/Users/kelly:/bin/ftponly
-
Finally, add the file /bin/ftponly to the file /etc/shells: [12]
[12] On AIX, shells must be added to the /etc/security/login.cfg file.
# List of acceptable shells for chsh/passwd -s
# Ftpd will not allow users to connect who do not have one of
# these shells
#
/bin/sh
/bin/csh
/bin/ftponly
17.3.3 TELNET (TCP Port 23)
Telnet is a service designed to allow you to log onto a remote computer on the Internet. Telnet gives you a "virtual terminal" on the remote computer. The UNIX version of Telnet is implemented with the telnet client and telnetd server programs.
To use telnet, type the name of the command followed by the name of the computer to which you wish to connect. When you get the prompt, simply log in as if you had called your computer using a modem or connected via a hard-wired terminal:
%
telnet prose

Trying...
Connected to prose
Escape character is '^]'

4.3 BSD UNIX (prose.cambridge.ma.us)

login:
nancy

password:
T wrink
Because of the risk of packet sniffing, logging into your computer with Telnet can pose a greater security risk than simply dialing into your computer. On many kinds of networks, such as Ethernet, the packets sent between computers are actually delivered to every computer on the physical piece of wire. The computers on the network are programmed to only respond to the packets that are intended for them. But it is possible to program a computer to force it to listen to and record every packet transmitted. Special programs can capture the first hundred characters (or more) sent in both directions on a Telnet connection and thereby capture your username and password.
Packet sniffing is not only a danger on your local area network, because the Telnet session packets are vulnerable throughout their journey. In recent years, there have been many cases of Internet Service Providers who have had a single computer on their internal network compromised; every Telnet connection passing through that ISP had its password sniffed as a result. The best ways to defeat packet sniffing are through the use of one-time passwords and encryption.
A second danger of Telnet is that an attacker can hijack a Telnet session that is in progress using a technique that is sometimes called session hijacking. Thus, after you log in using your password, the attacker can seize control of the session and type whatever commands he wishes. The only way to eliminate the possibility of Telnet hijacking is through the use of encryption.
Telnet also presents many of the same risks as dial-in modems. Unfortunately, allowing access to your computer by Telnet is significantly more risky than allowing telephone access for a variety of reasons:
-
Although finding the telephone number of a computer's modems can be difficult, one can easily find out the address of a computer on the Internet. Few computer centers publish the telephone numbers of their computer's modems, but a computer's Internet address can be easily determined from its hostname. Although this availability makes access easier for authorized users, it also makes access easier for attackers.
-
Because connecting to a computer via Telnet is significantly faster than calling the computer with a modem, an attacker can try to guess more passwords in a given amount of time.
-
As long distance calls cost the caller money, few attackers try to break into computers outside their local calling area. On the other hand, there is usually no incremental cost associated with using Telnet to break into distant machines. Somebody trying to log into your computer with a stolen password might be across the street, or they might be on the other side of the globe.
-
Because the Internet lacks a sophisticated technology for tracing calls (often available on telephone networks), the Internet gives attackers the added protection of near anonymity.
-
Many modems ring or produce other audible sounds when they receive incoming calls. Telnet connections are silent, and thus less likely to attract outside attention.
-
A network connection allows an attacker to gain much more information about a target machine, which can be used to locate additional points of vulnerability.
Telnet is a useful service. To make it safer, you should avoid using reusable passwords. You can also assign users different passwords on different computers, so that if one account is compromised, others will not be.
17.3.4 Simple Mail Transfer Protocol (SMTP) (TCP Port 25)
The Simple Mail Transfer Protocol ( SMTP ) is an Internet standard for transferring electronic mail between computers. The UNIX program /usr/lib/sendmail usually implements both the client side and the server side of the protocol, and seems to be the predominant software used in UNIX email systems. Using sendmail, mail can be:
-
Delivered to individual users
-
Distributed to mailing lists (of many users)
-
Sent automatically to another machine
-
Appended to files
-
Provided as standard input to programs
A legitimate mail address can be a username or an entry in the alias database. The aliases are located in the aliases file, usually in the /usr/lib , /etc , /etc/mail, or /etc/sendmail directories.
The sendmail program also allows individual users to set up an alias for their accounts by placing a file with the name .forward in their home directories.
Another file, sendmail.cf , controls sendmail's configuration. The sendmail.cf file can also be found in various directories, depending on the version in use and the configuration options chosen.
NOTE: The sendmail program is only one of many different systems for delivering email over the Internet. Others include smail , MMDF , and PMDF . However, Berkeley's sendmail is by far the most common mailer on the Internet. It also seems to be the mailer that is the most plagued with security problems. Whether these problems are because the design of sendmail is fundamentally flawed, because the coding of sendmail is particularly sloppy, or simply because more people are looking for flaws in sendmail than in any other program remains an open question.
17.3.4.1 sendmail and security
sendmail has been the source of numerous security breaches on UNIX systems. For example:
-
Early versions of sendmail allowed mail to be sent directly to any file on the system, including files like /etc/passwd.
-
sendmail supports a " wizard's password," set in the configuration file, that can be used to get a shell on a remote system without logging in.
-
sendmail allows trusted users, who are permitted to forge mail that is delivered to the local machine.
-
sendmail can be compiled in "debug mode," a mode that in the past has been used to allow outsiders unrestricted access to the system sendmail is running on.
-
sendmail used to accept mail with a program as the recipient, thus allowing remote users to invoke shells and other programs on the destination host.
-
sendmail has done a poor job of validating its arguments, thus allowing users to overwrite arbitrary locations in memory, or provide input that results in very bad side effects.
One of the main reasons for sendmail 's problems is its all-in-one design. The program is extremely complicated, runs as superuser, freely accepts connections from any computer on the Internet, and has a rich command language. We are not surprised that the program has been plagued with problems, although it seems to have had more than its share.
Fortunately, there are alternatives. Instead of having a large all-in-one program receive messages from the Internet and then deliver the mail, you could split this functionality into two different programs. The Firewall Toolkit from Trusted Information Systems contains a program called smap that does exactly this. Even if you do not have a firewall, you may wish to use smap for accepting SMTP connections from outside sites. For instructions on how to do this, see "Installing the TIS smap/smapd sendmail Wrapper" in Chapter 22 .
17.3.4.2 Using sendmail to receive email
If you must run sendmail to receive electronic mail, you should take extra measures to protect your system's security.
-
Make sure that your sendmail program does not support the debug , wiz , or kill commands. You can test your sendmail with the following command sequence:
%
telnet localhost smtp

Connected to localhost.
Escape character is "^]".
220 prose.cambridge.ma.us Sendmail 5.52 ready at Mon, 2 Jul 90
15:57:29 EDT

wiz

500 Command unrecognized

debug

500 Command unrecognized

kill

500 Command unrecognized

quit

221 prose.cambridge.ma.us
closing connection
Connection closed by foreign host
%
The command telnet localhost smtp opens up a TCP connection between your terminal and the smtp part of your local computer (which always has the alias localhost ). You are then able to type commands to your sendmail 's command interpreter. If your sendmail responds to the debug or wiz command with any of the following messages - or any message other than "command unrecognized" - replace the version of sendmail that you are running (but see #4 below):
200 Debug set
200 Mother is dead
500 Can't kill Mom
200 Please pass, oh mighty wizard
500 You are no wizard!
-
Delete the " decode" aliases from the alias file. The decode alias is a single line that looks like this:
decode: "|/usr/bin/uudecode"
The decode alias allows mail to be sent directly to the uudecode program. This ability has been shown to be a security hole. Examine carefully every alias that points to a file or program instead of a user account. Remember to run newaliases after changing the aliases file.
-
Make sure that your aliases file is protected so that it cannot be modified by people who are not system administrators. Otherwise, people might add new aliases that run programs, redirect email for system administrators, or play other games. If your version of sendmail creates aliases.dir and aliases.pag dbm files, those files should also be protected.
-
Make sure that the "wizard" password is disabled in the sendmail.cf file. If it is not, then a person who knows the wizard password can connect to your computer's sendmail daemon and start up a shell without logging in! If this feature is enabled in your version of sendmail , you will note that the wizard password is a line that begins with the letters OW (uppercase O, uppercase W). For example:
# Let the wizard do what she wants
OWsitrVlWxktZ67
If you find a line like this, change it to disallow the wizard password:
# Disallow wizard password:
OW*
-
Make sure that you have the most recent version of sendmail installed on your computer. Monitor the CERT mailing list for problems with sendmail and be prepared to upgrade as soon as vulnerabilities are posted.
NOTE: When security flaws are announced, potential intruders are often much quicker to attack than system administrators are to upgrade. We advise you to upgrade as quickly as possible. Sites have been attacked within six hours of the release of a CERT advisory.
17.3.4.3 Improving the security of Berkeley sendmail V8
If you are intent on using Berkeley sendmail for your mail server, you can still improve your security by using sendmail Version 8. If you are not running sendmail Version 8, then you are probably running Version 5; Versions 6 and 7 did not make it out the door.
NOTE: Be sure that you track the current version of sendmail , and obtain new versions as necessary. New security-related bugs are (seemingly) constantly being discovered in sendmail . If you do not keep up, your site may be compromised!
There are well-known vulnerabilities, with exploit scripts, in most older versions of sendmail , including versions provided by many vendors. Besides containing numerous bug fixes over previous versions of sendmail , Version 8 offers a variety of "security options" that can be enabled by inserting a statement in your sendmail.cf configuration file. Many of these options are designed to control the release of information about your internal organization on the Internet.[13] These options are summarized in Table 17.1 :
[13] We recommend that you read the security chapter in Sendmail by Bryan Costales et al. (O'Reilly & Associates, 1993) for additional information.
|
Option |
Effect |
Purpose |
|---|---|---|
|
Disables VRFY command. |
VRFY can be used by outsiders to determine the names of valid users; use novrfy to disable this command. |
|
|
Disables EXPN command. |
EXPN reveals the actual delivery addresses of mail aliases and mailing lists; noexpn disables this command. |
|
|
Requires HELO before a MAIL command. |
Refuses mail unless the sending site has properly identified itself. |
|
|
Requires HELO before VRFY command. |
Allows the use of the VRFY command, but only after the network user has identified himself. |
|
|
Requires HELO before EXPN command. |
Allows use of the EXPN command, but only after the network user has identified himself. |
|
|
Restricts use of mailq command. |
If set, allows only users who belong to the group that owns the mail queue directory to view the mail queue. This restriction can prevent others from monitoring mail that is exchanged between your computer and the outside world. |
You can increase the logging level of sendmail to level 9 by inserting the line "OL9" in your sendmail.cf file, and we recommend that you do so; higher levels are used for debugging and do not serve any obvious security purpose. This will log lots of interesting information to syslog . Be sure that your syslog.conf file is configured so that this information is written to a reasonable place, and be sure to check the logs.
There have been a number of problems with addresses that send mail to programs. This should be disabled, if not needed, by setting the progmailer to a program such as /bin/false . If you do need progmailer functionality, use smrsh (bundled with 8.7.x).
Here is an example of when you might use the security options. Suppose that you have a company-wide alias such as all or marketing, and that you wish to prevent outsiders (such as recruiters) from learning the email addresses of people on these mailing lists. At the same time, you may wish to prevent outsiders from learning the names of valid accounts on your system, to avoid accepting email from sites that do not properly identify themselves, and to prevent employees from spying on another's email correspondence. In this case, you would insert the following line into your sendmail.cf file; note that the "O" is required at the beginning of the Option line.
Onovrfy,noexpn,needmailhelo,restrictmailq
We recommend that you use this setting unless you have a specific reason for divulging your internal account information to the Internet at large. Be aware, though, that sendmail's VERB (verbose) command will still be active, which may still be used by attackers to gain insight into your vulnerabilities. The VERB command cannot be easily disabled.
Note that if you disable the finger command and also turn off the VRFY option in your mailer, you can make it difficult for someone outside your site to determine a valid email address for a user that may be at your site. You should probably set up some form of modified finger service in this case to respond with information about how to obtain a valid email address.
17.3.5 TACACS (UDP Port 49)
TACACS is the TAC Access Control Server protocol. It is a protocol that is used to authenticate logins to terminal servers.
TACACS defines a set of packet types that can be sent from the terminal server to an authentication server. The LOGIN packet is a query indicating that a user wishes to log in to the terminal server. The TACACS server examines the username and the password that are present in the LOGIN packet and sends back an ANSWER packet that either accepts the login or rejects it.
The TACACS and XTACACS (Extended TACACS ) support a variety of additional packets, which allow the terminal server to notify the host when users connect, hang up, log in, log out, and switch into SLIP mode.
Passwords are not encrypted with TACACS . Thus, they are susceptible to packet sniffing.
17.3.6 Domain Name System (DNS) (TCP and UDP Port 53)
The Domain Name System ( DNS ) is a distributed database that is used so that computers may determine IP addresses from hostnames, determine where to deliver mail within an organization, and determine a hostname from an IP address. The process of using this distributed system is called resolving.
When DNS looks up a hostname (or other information), the computer performing the lookup contacts one or more nameservers, seeking records that match the hostname that is currently being resolved.[14] One or more nameserver records can be returned in response to a name lookup. Table 17.2 lists some of the kinds of records that are supported:
[14] Most UNIX DNS implementations use a file called /etc/resolv.conf to specify the IP addresses of the nameservers that should be queried. Further, a default domain can be specified.
|
Record Type |
Purpose |
|---|---|
|
A |
Authoritative address. For the IN domain, this is an IP address. |
|
AAAA |
IP version 6 authoritative address. |
|
CNAME |
Canonical name of an alias for a host. |
|
PTR |
Pointer record; maps IP addresses to a hostname (for IP host). |
|
Mail exchange; specifies a different computer that should actually receive mail destined for this host. |
For example, using DNS , a computer on the Internet might look up the name www.cs.purdue.edu and receive an A record indicating that the computer's IP address is 128.10.19.20. An MX query about the address cs.purdue.edu might return a record indicating that mail for that address should actually be delivered to the machine arthur.cs.purdue.edu. You can have multiple MX records for robustness; if the first host is unavailable, the program attempting to deliver your electronic mail will try the second, and then the third. Of course, a program trying to deliver email would then have to resolve each of the MX hostnames to determine that computer's IP address.
DNS also makes provision for mapping IP addresses back to hostnames. This reverse translation is accomplished with a special domain called IN-ADDR.ARPA, which is populated exclusively by PTR records. In this example, attempting to resolve the address 20.19.10.128. IN-ADDR.ARPA would return a PTR record pointing to the hostname, which is lucan.cs.purdue.edu (the CNAME of www.cs.purdue.edu).
Besides individual hostname resolutions, DNS also provides a system for downloading a copy of the entire database from a nameserver. This process is called a zone transfer , and it is the process that secondary servers use to obtain a copy of the primary server's database.
DNS communicates over both UDP and TCP , using the different protocols for different purposes. Because UDP is a quick, packet-based protocol that allows for limited data transfer, it is used for the actual process of hostname resolution. TCP , meanwhile, is used for transactions that require large, reliable, and sustained data transfer - that is, zone transfers.
17.3.6.1 DNS zone transfers
Zone transfers can be a security risk, as they potentially give outsiders a complete list of all of an organization's computers connected to the internal network. Many sites choose to allow UDP DNS packets through their firewalls and routers, but explicitly block DNS zone transfers originating at external sites. This design is a compromise between safety and usability: it allows outsiders to determine the IP addresses of each internal computer, but only if the computer's name is already known.
You can block zone transfers with a router that can screen packets, by blocking incoming TCP connections on port 53. Some versions of the Berkeley-named nameserver allow you to place an xfrnets directive in the /etc/named.boot file. If this option is specified, zone transfers will only be permitted from the hosts listed on the xfernets line. This option is useful if you wish to allow zone transfers to a secondary nameserver that is not within your organization, but you don't want to allow zone transfers to anyone else.
For example, if your site operates a single domain, bigcorp.com, and you have a secondary nameserver at IP address 204.17.199.40, you might have the following /etc/named.boot file:
; BigCorp's /etc/named.boot
;
directory		/var/named
;
primary		bigcorp.com		  named.bigcorp
primary		199.17.204.in-addr.arpa		  named.204.17.199
cache		.		  root.ca
xfrnets		204.17.199.40
17.3.6.2 DNS nameserver attacks
Because many UNIX applications use hostnames as the basis of access control lists, an attacker who can gain control of your DNS nameserver or corrupt its contents can use that to break into your systems.
There are two fundamental ways that an attacker can cause a nameserver to serve incorrect information:
-
Incorrect information can be fraudulently loaded into your nameserver's cache over the network, as a false reply to a query.
-
An attacker can change the nameserver's configuration files on the computer where your nameserver resides.
If your nameserver has contact with the outside network, there is a possibility that attackers can exploit a programming bug or a configuration error to load your nameserver with erroneous information. The best way to protect your nameserver from these kinds of attacks is to isolate it from the outside network, so that no contact is made. If you have a firewall, you can achieve this isolation by running two nameservers: one in front of the firewall, and one behind it. The nameserver in front of the firewall contains only the names and IP addresses of your gate computer; the nameserver behind the firewall contains the names and IP addresses of all of your internal hosts. If you couple these nameservers with static routing tables, damaging information will not likely find its way into your nameservers.
To change your configuration files, an attacker must have access to the filesystem of the computer on which the nameserver is running and be able to modify the files. After the files are modified, the nameserver must be restarted (by sending it a kill -HUP signal). As the nameserver must run as superuser, an attacker would need to have superuser access on the server machine to carry out this attack. Unfortunately, by having control of your nameserver, a skillful attacker could use control over the nameserver to parlay control of a single machine into control of your entire network. Furthermore, if the attacker does not have root but can modify the nameserver files, then he can simply wait until the nameserver is restarted by somebody else, or until the system crashes and every program is restarted.
You can minimize the possibility of an attacker modifying your nameserver by following these recommendations:
-
Run your nameserver on a special computer that does not have user accounts.
-
If you must run the nameserver on a computer that is used by ordinary users, make sure that the nameserver's files are all owned by root and have their protection mode set to 444 or 400 (depending on your site's policy). Any directories that are used to store nameserver files should be owned by root and have their protection mode set to 755 or 700 (again, depending on your site's policy). And all parent directories of those directories should be owned by root, mode 755 or 700.
-
Remember, there are many files that are used by the nameserver. For example, the Berkeley named nameserver (by far the most common on UNIX systems) first looks at the file /etc/named.boot when it starts up. This file specifies other files and other directories that may be located anywhere on your computer. Be sure that all of these files are properly protected.
-
If you know of a specific site that is attempting to attack your nameserver, you can use BIND 's bogusns directive to prevent the program from sending nameserver queries to that host.
You can further protect yourself from nameserver attacks by using IP addresses in your access control lists, rather than by using hostnames. Unfortunately, several significant programs do not allow the use of IP addresses. For example, the Solaris rlogind/rshd does not allow you to specify an IP address in the /etc/hosts.equiv file or the .rhosts file. We believe that vendors should modify their software to permit an IP address to be specified wherever hostnames are currently allowed.
17.3.7 Trivial File Transfer Protocol (TFTP) (UDP Port 69)
The Trivial File Transfer Protocol ( TFTP ) is a UDP -based file-transfer program that provides no security. There is a set of files that the TFTP program is allowed to transmit from your computer, and the program will transmit them to anybody on the Internet who asks for them. One of the main uses of TFTP is to allow workstations to boot over the network; the TFTP protocol is simple enough to be programmed into a small read-only memory chip.
Because TFTP has no security, tftpd , the TFTP daemon, is normally restricted so that it can transfer files only to or from a certain directory. Unfortunately, many early versions of tftpd had no such restriction. For example, versions of the SunOS operating systems prior to Release 4.0 did not restrict file transfer from the TFTP program.
You can test your version of tftpd for this restriction with the following sequence:
%
tftp localhost

tftp>
get /etc/passwd tmp

Error code 1: File not found
tftp>
quit

%
If tftp does not respond with "Error code 1: File not found," or simply hangs with no message, then get a current version of the program.
On AIX , tftp access can be restricted through the use of the /etc/tftpaccess.ctl file.
17.3.8 finger (TCP Port 79)
The finger program has two uses:
-
If you run finger with no arguments, the program prints the username, full name, location, login time, and office telephone number of every user currently logged into your system (assuming that this information is stored in the /etc/passwd file).
-
If you run finger with a name argument, the program searches through the /etc/passwd file and prints detailed information for every user with a first name, last name, or username that matches the name you specified.
Normally, finger runs on the local machine. However, you can find out who is logged onto a remote machine (in this case, a machine at MIT ) by typing:
% finger @media-lab.media.mit.edu
To look up a specific user's finger entry on this machine, you might type:
% finger gandalf@media-lab.media.mit.edu
The /etc/fingerd program implements the network finger protocol, which makes finger service available to anybody on the network.
finger provides a simple, easy-to-use system for making personal information (like telephone numbers) available to other people. Novice users are often surprised, however, that information that is available on their local machine is also available to anyone on any network to which their local machine is connected. Thus, users should be cautioned to think twice about the information they store using the chfn command, and in their files printed by finger . finger makes it easy for intruders to get a list of the users on your system, which dramatically increases the intruders' chances of breaking into your system.
17.3.8.1 The .plan and .project files
Most versions of the UNIX finger program display the contents of the .plan and .project files in a person's home directory when that person is "fingered." On older versions of UNIX , the finger daemon ran as root. As a result, an intrepid user could read the contents of any file on the system by making her .plan a symbolic link to that file, and then running finger against her own account.
One easy way that you can check for this is to create a .plan file and change its file mode to 000. Then run finger against your own account. If you see the contents of your .plan file, then your version of fingerd is unsecure.
17.3.8.2 Disabling finger
The finger system reveals information that could be used as the basis for a social engineering attack. For example, an attacker could "finger" a user on the system, determine their name and office number, then call up the system operator and say "Hi, this is Jack Smith. I work in office E15, but I'm at home today. I've forgotten my password; could you please change my password to foo*bar so that I can log on?"
Many system administrators choose to disable the finger system. There are two ways that you can do this:
-
You can remove (or comment out) the finger server line in the file /etc/inetd.conf . This change will cause people trying to finger your site to receive a "Connection refused" error. Disabling finger in this way can cause problems for trying to determine mail addresses or phone numbers. Outsiders may be attempting to contact you to warn you that your site has been broken into by others. Therefore, completely disabling finger in this way might actually decrease your overall security, in addition to causing an overall inconvenience for everybody.
-
You can replace the finger server with a shell script that prints a message instructing people how to contact your site. For example, you might use a script that looks like this:
#!/bin/sh
#
/bin/cat << 'XX'
Welcome to Big Whammix Inc.

For information on contacting a specific employee, please call our
company operator at 1-999-555-1212 or send electronic mail to
the address postmaster@whammix.com

Thank you.

XX
exit 0
Store this script in an executable file, such as /usr/local/etc/no_finger. Then in the file /etc/inetd.conf, replace the normal finger entry with this line:
finger stream tcp nowait nobody /usr/local/etc/no_finger no_finger
Remember to restart inetd .
17.3.8.3 Replacing finger
As an alternative to finger , you can use the ph (phone book) server. This server allows you to place information into a database, and specify which information should be returned for queries originating from inside and outside your network.
You can download the ph server from ftp://vixen.cso.uiuc.edu/pub/ph.tar.gz.
17.3.9 HyperText Transfer Protocol (HTTP) (TCP Port 80)
The Hypertext Transfer Protocol is the protocol that is used to request and receive documents from servers on the World Wide Web ( WWW ). Access to the World Wide Web is one of the driving forces behind the growth of the Internet, and many sites that have Internet connectivity will be pressured to provide both client applications and WWW servers for their users.
One of the reasons for the success of HTTP is its simplicity. When a client contacts a WWW server, the client asks for a filename; the server responds with a MIME document formatted in either plain ASCII or HTML (HyperText Markup Language). The document is then displayed.[15]
[15] HTML is a simple use of SGML (Standard Generalized Markup Language).
WWW browsers can implement as much (or as little) of HTML as they wish; the documents displayed will still be viewable. HTML documents can have embedded tags for images (which are separately retrieved) and for hypertext links to other documents. The servers are configured so that a specified directory on the system (for example, /usr/local/etc/httpd/htdocs) corresponds with the root directory of the WWW client (for example, http://www.oreilly.com/ ).
Because there are many security considerations when setting up a WWW server and using a WWW client, we have written a whole chapter about them. See Chapter 18, WWW Security , for the complete story.
17.3.10 Post Office Protocol (POP) (TCP Ports 109 and 110)
The Post Office Protocol ( POP ) is a system that provides users on client machines a way to retrieve their electronic mail - without mounting a shared mail-spool directory using a remote file-access protocol such as NFS . POP allows users to access individual mail messages, to set limits on the maximum length of the message that the client wishes to retrieve, and to leave mail on the server until the message has been explicitly deleted.
POP requires that users authenticate themselves before they can access their mail. There are at least three ways to do this:
-
You can use simple passwords. This is by far the most common way for POP users to authenticate themselves to POP servers. Unfortunately, most POP clients use the same password for retrieving mail that they do for unrestricted system access. As a result, the user's password is a tempting target for an attacker armed with a packet sniffer. And it's an easy target, as it is always sent properly, it is always sent to the same port, and it is sent frequently - typically every few minutes.
-
You can use POP 's APOP option. Instead of passwords, APOP uses a simple challenge/response system. It is described in RFC 1725, the same RFC that describes POP3 .
When a client program connects to a POP3 server, the server sends a banner that must include a unique timestamp string located within a pair of angle-brackets. For example, the UNIX POP server might return the following:
+OK POP3 server ready <1896.697170952@dbc.mtview.ca.us>
When using simple passwords, the client program would next send through the username and the password, like this:
+OK POP3 server ready <1896.697170952@dbc.mtview.ca.us>

user mrose

+OK Password required for mrose.

pass fooby$#

+OK maildrop has 1 message (369 octets)
With APOP , the client program does not send the USER and PASS commands; instead, it sends an APOP command that contains the username and a 128-bit hexadecimal number that is the MD5 hash code of the timestamp (including the angle brackets) and a secret passphrase that is known to both the user and the POP server. For example, the user might have the password tanstaaf. To determine the appropriate MD5 code, the user's client program would compute the MD5 hash of:
<1896.697170952@dbc.mtview.ca.us>tanstaaf
which is:
c4c9334bac560ecc979e58001b3e22fb
Thus, the APOP message sent to the server would be:
APOP mrose c4c9334bac560ecc979e58001b3e22fb

+OK maildrop has 1 message (369 octets)
Note that because the POP3 server must know the shared secret, it should not be the same phrase as your password.
-
You can use a version of POP that has been modified to work with Kerberos. (Kerberos is described in Chapter 19, RPC, NIS, NIS+, and Kerberos .)
Note that both your POP server and your POP client must support the authentication system that you wish to use. For example, early popular Eudora email clients only support traditional passwords, but later versions include support for both APOP and Kerberos.[16]
[16] Actually, Eudora doesn't support Kerberos directly. Instead, it uses the Kclient application program that is available for both the Macintosh and Windows.
17.3.11 Sun RPC's portmapper (UDP and TCP Ports 111)
The portmapper program is used as part of Sun Microsystem's Remote Procedure Call ( RPC ) system to dynamically assign the TCP and UDP ports used for remote procedure calls. portmapper is thus similar to the inetd daemon, in that it mediates communications between network clients and network servers that may have security problems.
The standard UNIX portmapper assumes that security will be handled by the servers, and therefore allows any network client to communicate with any RPC server. You can improve security by using Wietse Venema's portmapper replacement program, which can be obtained via anonymous FTP from the site ftp.win.tue.nl /pub/security/portmap.shar . This portmapper allows for improved logging, as well as access control lists.
Many sites further restrict access to their portmappers by setting their firewalls to block packets on port 111.
17.3.12 Identification Protocol (auth) (TCP Port 113)
The TCP/IP protocol is a system for creating communication channels between computers, not users. However, it is sometimes useful to know the name of the user associated with a particular TCP/IP connection. For example, when somebody sends mail to your computer, you should be able to verify that the username in the mail message's " From: " field is actually the name of the user who is sending the message.
The identification protocol gives you a way of addressing this problem with a simple callback scheme. When a server wants to know the "real name" of a person initiating a TCP/IP connection, it simply opens a connection to the client machine's identd daemon and sends a description of the TCP/IP connection in progress; the remote machine sends a human-readable representation of the user who is initiating the connection - usually the user's username and the full name from the /etc/passwd file.
The identification protocol is usually not a very good approach to network security, because it depends on the honesty of the computer at the other end of the TCP/IP connection. Thus, if somebody is trying to break into your computer from another computer that they have already gained control of, ident will not tell you that person's name. On the other hand, it is useful for organizations such as universities who want to track down the perpetrators of simplistic, sophomoric email forgery attempts.
If an intruder has a normal account (no root privileges) that he is using as a stepping stone to other hosts, running an ident server may be very useful in tracking down the intruder. Sites that have a reasonable number of users should run ident to help track down accounts that have been compromised during an incident.
In general, the responses of ident queries are more useful to the administrators of the site that sends the response than the site that receives it. Thus, logging ident queries may not help you, but can be a courtesy to others.
To make use of the identification protocol, you need to have a server program that understands the protocol and knows to place the callback. sendmail version 8 will do so, for instance, as will tcpwrapper .
17.3.13 Network News Transport Protocol (NNTP) (TCP Port 119)
The Network News Transport Protocol ( NNTP ) is used by many large sites to transport Usenet articles between news servers. The protocol also allows users on distributed workstations to read news and post messages to the Usenet.
NNTP can be configured with an access control list ( ACL ) to determine which computers are allowed to use which features. The access control list is based on hostname; thus NNTP 's security can be bypassed through IP spoofing or through DNS attacks.
Under normal circumstances, a compromised NNTP server does not represent a serious security threat - it simply means that an unauthorized individual may be able to read or post Usenet articles without permission. However, there are two potential circumstances in which unauthorized use of NNTP could cause problems:
-
If you have special newsgroups for your own organization's internal discussions, there is a chance that a compromised NNTP server could reveal confidential information to outsiders.
-
If an outsider can post from your NNTP server, that outsider could post a message that is libelous, scandalous, or offensive - potentially causing a liability for your organization.
You can protect your NNTP server from these forms of abuse with a good firewall.
INND is an alternative Usenet news transport program written by Rich Salz. If you are running INND , make sure that you have at least version 1.4 and have applied the relevant security patches, or have a version higher than 1.4. Versions of INND prior to and including version 1.4 had a serious problem.[17]
[17] For any software like this that you install, you should check to be sure that you have the most current version.
17.3.14 Network Time Protocol (NTP) (UDP Port 123)
The Network Time Protocol ( NTP ) is the latest in a long series of protocols designed to let computers on a local or wide area network figure out the current time. NTP is a sophisticated protocol that can take into account network delay and the existence of different servers with different clocks. Nevertheless, NTP was not designed to resist attack, and several versions of ntpd , the NTP daemon, can be fooled into making significant and erroneous changes to the system's clock.
A variety of problems can arise if an attacker can change your system clock:
-
The attacker can attempt a replay attack. For example, if your system uses Kerberos, old Kerberos tickets may work once again. If you use a time-based password system, old passwords may work.
-
Your system log files will no longer accurately indicate the correct time at which events took place. If your attacker can move the system's clock far into the future, he or she might even be able to cause your system to erase all of its log files as the result of a weekly or monthly cleanup procedure.
-
Batch jobs run from the cron daemon may not be executed if your system's clock jumps over the time specified in your crontab file or directory. This type of failure in your system's clock may have an impact on your security.
17.3.15 Simple Network Management Protocol (SNMP) (UDP Ports 161 and 162)
The Simple Network Management Protocol ( SNMP ) is a protocol designed to allow the remote management of devices on your network. To be managed with SNMP , a device must be able to receive packets over a network.
SNMP allows for two types of management messages:
-
Messages that monitor the current status of the network (for example, the current load of a communications link)
-
Messages that change the status of network devices (for example, take a communications link up or down)
SNMP can be of great value to attackers. With carefully constructed SNMP messages, an attacker can learn the internal structure of your network, change your network configuration, and even shut down your operations. Although some SNMP systems include provisions for password-based security, others don't. SNMP version 2.0 was intended to include better security features, but as this book goes to press, the standards committee is unable to agree on the necessary features, so the prospects look bleak. Each site must therefore judge the value of each particular SNMP service and weigh that value against the risk.
NOTE: If you use SNMP , you should be sure to change your SNMP "community" from "public" to some other value. When an SNMP monitoring program queries an SNMP agent for information, the monitoring program must provide the correct community or the agent does not return any information. By changing your SNMP community from the default (public) to some other value, you can limit the amount of information that an unknowledgeable attacker can learn about your network.
17.3.16 NEXTSTEP Window Server (NSWS) (TCP Port 178)
NEXTSTEP applications (don't laugh; there are still quite a few out there) use TCP connections on port 178 to communicate with the NEXTSTEP Display PostScript Window Server. An application that can connect to the Window Server has total control of the workstation on which that Window Server is running: as with X, the application can read the contents of the screen and send events to other applications. Furthermore, the application can use the Display PostScript Server to read or write any file on the workstation to which the logged-in user has access.
Current versions of the NEXTSTEP Window Server have a simplistic approach to security. There is no authentication of incoming connections. The Window Server either accepts connections from remote machines or it doesn't. Whether or not connections are accepted is set by a check box in the NEXTSTEP Preference application. The preference is stored in the user's "defaults database," which means that it can be toggled on by rogue applications without the user's knowledge.
Accept remote connections at your own risk.
If you place a computer running NEXTSTEP on the Internet, be sure that you place it behind a firewall, or be absolutely sure that you do not allow remote applications to connect to your Window Server.
17.3.17 rexec (TCP Port 512)
The remote execution daemon /usr/sbin/rexecd allows users to execute commands on other computers without having to log into them. The client opens up a connection and transmits a message that specifies the username, the password, and the name of the command to execute. As rexecd does not use the trusted host mechanism, it can be issued from any host on the network. However, because rexecd requires that the password be transmitted over the network, it is susceptible to the same password snooping as Telnet.
Unlike login and telnet , rexecd provides different error messages for invalid usernames and invalid passwords. If the username that the client program provides is invalid, rexecd returns the error message "Login incorrect." If the username is correct and the password is wrong, however, rexecd returns the error message "Password incorrect."
Because of this flaw, a cracker can use rexecd to probe your system for the names of valid accounts and then to target those accounts for password guessing attacks.
If you do not expect to use this service, disable it in /etc/inetd.conf.
17.3.18 rlogin and rsh (TCP Ports 513 and 514)
The rlogin and rlogind programs provide remote terminal service that is similar to telnet . rlogin is the client program, and rlogind is the server. There are two important differences between rlogin and telnet :
-
rlogind does not require that the user type his or her username; the username is automatically transmitted at the start of the connection.
-
If the connection is coming from a "trusted host" or "trusted user," (described in the next section), the receiving computer lets the user log in without typing a password.
rsh/rshd are similar to rlogin/rlogind, except that instead of logging the user in, they simply allow the user to run a single command on the remote system. rsh is the client program, while rshd is the server. rsh/rshd only works from trusted hosts or trusted users (described in the next section).
rlogin is used both with local area networks and over the Internet. Unfortunately, it poses security problems in both environments.
rlogin and rsh are designed for communication only between Berkeley UNIX systems. Users who want to communicate between UNIX and TOPS , VMS , or other kinds of systems should use the telnet protocol, not the rlogin protocol.
17.3.18.1 Trusted hosts and users
Trusted host is a term that was invented by the people who developed the Berkeley UNIX networking software. If one host trusts another host, then any user who has the same username on both hosts can log in from the trusted host to the other computer without typing a password.
Trusted users are like trusted hosts, except they are users, not hosts. If you designate a user on another computer as a trusted user for your account, then that user can log into your account without typing a password.
The UNIX system of trusted hosts allows you to use the network to its fullest extent. rlogin lets you easily jump from computer to computer, and rsh lets you run a command on a remote computer without even having to log in!
Trust has a lot of advantages. In a small, closed environment, computers often trust each other. Trust allows a user to provide a password once, the first time he logs in, and then to use any other machine in the cluster without having to provide a password a second time. If one user sometimes uses the network to log into an account at another organization, then that user can set up the accounts to trust each other, thus speeding up the process of jumping between the two organizations.
But trust is also dangerous, because there are numerous ways that it can be compromised.
NOTE: The trusted-host mechanism uses IP addresses for authentication and is thus vulnerable to IP spoofing (as well as to DNS attacks). Do not use trusted hosts in security-critical environments.
17.3.18.2 The problem with trusted hosts
Because you don't need to type your password when you use rlogin to log into a computer from another machine that is a trusted host, rlogin is usually less susceptible to eavesdropping than telnet . However, trusted hosts introduce security problems for two reasons: you can't always trust a host, and you can't trust the users on that host.
If an attacker manages to break into the account of someone who has an account on two computers - and the two computers trust each other - then the person's account on the second computer is also compromised. Having an attacker break into the first computer is easier than it may sound. Most workstations can be booted in single-user mode with relative ease. As the superuser, the attacker can su to any account at all. If the server trusts the workstation - perhaps to let users execute commands on the server with rsh - then the attacker can use rlogin to log into the server and thereby gain access to anybody's files.
Although some workstations can be password protected against being booted in single-user mode, this protection gives only an illusion of security. In theory, an attacker could simply unplug the current workstation and plug in her own. Portable UNIX workstations with Ethernet boards are available that weigh less than four pounds. By reconfiguring her portable workstation's network address and hostname, she could program it to masquerade as any other computer on the local area network.
Another problem with trusted hosts involves NFS . Often, a user's home directory is exported with NFS to other machines. Someone who is able to write to the user's home directory on that partition on a remote machine can add arbitrary entries to the .rhosts file. These additions then allow the attacker to log in to that account on every machine that imports the home directory.
Trusted hosts and trusted users have been responsible for many security breaches in recent years. Trust causes breaches in security to propagate quickly: If charon trusts ringworld and an intruder breaks into ringworld , then charon is also compromised. Nevertheless, system administrators frequently set up computers as trusted clusters to enable users to take advantage of the network environment with greater ease. Although there is technically no reason to create these trusted clusters in a networked computing environment, at many computing facilities administrators believe that the benefits outweigh the risks.
Trusted hosts are also vulnerable to IP spoofing, a technique in which one computer sends out IP packets that appear to come from a different computer. Using a form of IP spoofing, users on one host can masquerade, and appear to come from a second host. They can then log into your computer, if the second host is trusted.
17.3.18.3 Setting up trusted hosts
The /etc/hosts.equiv file contains a list of trusted hosts for your computer. Each line of the file lists a different host. If you have Sun's NIS (or use another system that supports netgroups), you can also extend or remove trust from entire groups of machines.
Any hostname listed in hosts.equiv is considered trusted; a user who connects with rlogin or rsh from that host will be allowed to log in or execute a command from a local account with the same username, without typing a password. When using Sun's NIS (described in Chapter 19 ), a line of the form +@hostgroup makes all of the hosts in the network group hostgroup trusted; likewise, a line that has the form -@anotherhostgroup makes all of the hosts in the network group anotherhostgroup specifically not trusted. The file is scanned from the beginning to the end; the scanning stops after the first match.[18]
[18] Beware that +@hostgroup and -@hostgroup features are broken in some NIS implementations. Check to be sure they are doing what you intend.
Consider this example file:
gold.acs.com
silver.acs.com
platinum.acs.com
-@metals
+@gasses
This file makes your computer trust the computers gold , silver , and platinum in the acs.com domain. Furthermore, your computer will trust all of the machines in the gasses netgroup, except for the hosts that are also in the metals netgroup.
17.3.18.4 The ~/.rhosts file
After scanning the hosts.equiv file, the rlogind and rshd programs scan the user's home directory for a file called .rhosts. A user's .rhosts file allows each user to build a set of trusted hosts applicable only to that user.
For example, suppose the ~keith/.rhosts file on the math.harvard.edu computer contains the lines:
prose.cambridge.ma.us
garp.mit.edu
With this .rhosts file, a user name keith on prose or on garp can rlogin into keith 's account on math without typing a password.
A user's .rhosts file can also contain hostname-username pairs extending trust to other usernames. For example, suppose that keith 's .rhosts file also contains the line:
hydra.gatech.edu lenny
In this case, the user named lenny at the host hydra could log into keith 's account without providing a password.
NOTE: Only place machine names in the /etc/hosts.equiv file; do not place machine /username pairs! Although many versions of UNIX allow you to add usernames to the file, the UNIX networking utilities do not do the sensible thing by extending trust only to that particular user on that particular machine. Instead, they allow that particular user on that particular machine to log into any account on your system ! If you wish to extend trust to a particular user on a particular machine, have that user create a ~/.rhosts file, described below.
.rhosts files are powerful and dangerous. If a person works at two organizations, using a .rhosts file allows that person to use the rsh command between the two machines. It also lets you make your account available to your friends without telling them your password. (We don't recommend this as sound policy, however!) Also, note that the superusers of each organization can make use of the entries in .rhosts files to gain access to your account in the other organization. This could lead to big problems in some situations.
The trust implied by the ~/.rhosts file is transitive. If you trust somebody, then you trust everybody that they trust, and so on.
.rhosts files are easily exploited for unintended purposes. For example, crackers who break into computer systems frequently add their usernames to unsuspecting users' .rhosts files so that they can more easily break into the systems again in the future. For this reason, you may not want to allow these files on your computer.
NOTE: The ~/.rhosts file should be set up with mode 600 so that other users on your system cannot easily determine the hosts that you trust. Always use fully qualified domain names in this file, and do not include any comment characters. (# or ! can create vulnerabilities.) The same restrictions apply to hosts.equiv and hosts.lpd .
17.3.18.5 Searching for .rhosts files
Because of the obvious risks posted by .rhosts files, many system administrators have chosen to disallow them entirely. How do you do this? One approach is to remove (or comment out) the entries for rshd and rlogind in the inetd.conf file, thus disabling the commands that might use the files. Another way is to use Wietse Venema's logdaemon package. A third option is to obtain the source code for the rshd and rlogind programs and remove the feature directly.[19] This method is relatively easy to do. Another approach is to scan your system periodically for users who have these files and to take appropriate action when you find them. Finally, you can patch the binary of your rshd and rlogind programs, search for the string /.rhosts , and then change it to the empty string.
[19] Before you hack the code, try checking your rshd documentation. Some vendors have a flag to limit .rhosts (usually to just the supervisor).
You can find all of the .rhosts files on your system using a simple shell script:
#!/bin/ksh
# Search for .rhosts files in home directories

PATH=/usr/bin

for user in $(cat-passwd | awk -F: 'length($6) > 0 {print $6}'| sort -u)
do
    [[ -f $user/.rhosts ]] && print "There is a .rhosts file in $user"
done
where the cat-passwd command is the same one we described earlier.
To delete the .rhosts files automatically, add a rm command to the shell script after the print :
#!/bin/ksh
# Search for .rhosts files in home directories

PATH=/usr/bin

for user in $(cat-passwd | awk -F: 'length($6) > 0 {print $6}'| sort -u)
do
    [[ -f $user/.rhosts ]] || continue
    rm -f $user/.rhosts
    print "$user/.rhosts has been deleted"
done
NOTE: Many older SunOS systems were distributed with a single line containing only a plus sign (+) as their hosts.equiv file: The plus sign has the effect of making every host a trusted host, which is precisely the wrong thing to do. This line is a major security hole, because hosts outside the local organization (over which the system administrator has no control) should never be trusted. If you have a plus sign in your hosts.equiv file, REMOVE IT . This change will disable some other features, such as the ability for other machines to print on your printer using the remote printer system. To retain remote printing, follow the steps detailed later.
17.3.18.6 /etc/hosts.lpd file
Normally, the UNIX lpd system allows only trusted hosts to print on your local printer. However, this restriction presents a security problem, because you may wish to let some computers use your printer without making them equivalent hosts.
The way out of this quandary is to amend the /etc/hosts.lpd file. By placing a hostname in this file, you let that host use your printers without making it an equivalent host. For example, if you want to let the machines dearth and black use your computer's printer, you can insert their names in /etc/hosts.lpd:
%
cat /etc/hosts.lpd

dearth
black
%
The hosts.lpd file has the same format as the hosts.equiv file. Thus, to allow any computer on the Internet to print on your printer, you could use the following entry:
%
cat /etc/hosts.lpd

+
%
We do not recommend that you do this, however!
17.3.19 Routing Internet Protocol (RIP routed) (UDP Port 520)
The RIP routing protocol is used by Internet gateways to exchange information about new networks and gateways. It is implemented on many UNIX systems by the routed daemon. An alternative daemon called gated offers more control over which routing information is accepted and distributed.
The routed daemon is quite a trusting program: it will happily receive (and believe) a packet from another computer on the network that says, in effect, "I am the best gateway to get anywhere; send all of your packets to me." Clearly, this trust presents even inexperienced attackers with a simple way for confounding your network. Even worse: it gives sophisticated attackers a way to eavesdrop on all of your communications.
For these reasons, many sites no longer run the routed daemon. Instead, they use static routes. For most network configurations, static routing is all that is really needed: if there is only one gateway out of the local network, all traffic should be routed to it.
17.3.20 UUCP over TCP (TCP Port 540)
The main use for sending UUCP data over TCP connections is that some UUCP systems can transmit Usenet news more efficiently than the more modern NNTP .
UUCP over TCP presents a security risk, as UUCP passwords are sent unencrypted. Furthermore, if you use news to transfer confidential information between corporate sites, that information may be monitored by other sites situated between the two endpoints.
17.3.21 The X Window System (TCP Ports 6000-6063)
X is a popular network-based window system that allows many programs to share a single graphical display. X-based programs display their output in windows, which can be either on the same computer on which the program is running or on any other computer on the network.
Each graphical device that runs X is controlled by a special program, called the X Window Server. Other programs, called X clients, connect to the X Window Server over the network and tell it what to display. Two popular X clients are xterm (the X terminal emulator) and xclock (which displays an analog or digital clock on the screen).
17.3.21.1 /etc/fbtab and /etc/logindevperm
Multiuser workstations provide a challenge for X security. On early implementations of X, the logical devices for the keyboard, screen, and sound devices were world readable and world writable; this availability caused security problems, because it meant that anybody could read the contents of the user's screen or keyboard, or could listen to the microphone in his office.
Some versions of UNIX have a special file that is used to solve this problem. The file, which is called /etc/fbtab under SunOS and /etc/logindevperm under Solaris (for example), specifies a list of devices that should have their owner changed to the account that has logged into the UNIX workstation. This approach is similar to the way that the /bin/login changes the ownership of tty devices to the person who has logged into a serial device.
Here is a portion of the Solaris /etc/logindevperm file. Under Solaris, the file is read by the /bin/ttymon program. When a person logs onto the device that is listed in the first field, the program sets the device listed in the third field to the UID of the user that has logged in. The mode of the device is set to the value contained in the second field:
/dev/console    0600    /dev/mouse:/dev/kbd
/dev/console    0600    /dev/sound/*        # audio devices
/dev/console    0600    /dev/fbs/*          # frame buffers
/dev/console    0600    /dev/rtvc0          # nachos capture device 0
/dev/console    0400    /dev/rtvcctl0       # nachos control device 0
17.3.21.2 X security
The X Window System has a simple security model - all or nothing. The X security mechanisms are used to determine whether or not a client can connect to the X Window Server. After a client successfully connects, that client can exercise complete control over the display.
X clients can take over the mouse or the keyboard, send keystrokes to other applications, or even kill the windows associated with other clients. This capability allows considerable flexibility in the creation of new clients. Unfortunately, it also creates a rich opportunity for Trojan horse programs: the multi-user tank war game that you are running in a corner of your screen may actually be covertly monitoring all of the email messages that you type on your keyboard, or may be making a copy of every password that you type.
The simplest way for an X client program to monitor your keystrokes is to overlay the entire screen with a transparent, invisible window. Such a program records keystrokes, saves them for later use, and forwards the event to the appropriate subwindows so that the user can't tell that he or she is being monitored. Releases of the X Window System later than X11R4 have a "secure" feature on the xterm command that grabs the input from the keyboard and mouse in such a way that no transparent overlay can intercept the input. The xterm window changes color to show that this is in effect. The option is usually on a pop-up menu that is selected by holding down both the control key and the left mouse button. This is a partial fix, but it is not complete.
Rather than develop a system that uses access control lists and multiple levels of privilege, the designers of the X Window System have merely worked to refine the all-or-nothing access control. X Version 11, Release 6 has five different mechanisms for implementing access control. They are listed in Table 17.3 .
17.3.21.3 The xhost facility
X maintains a host access control list of all hosts that are allowed to access the X server. The host list is maintained via the xhost command. The host list is always active, no matter what other forms of authentication are used. Thus, you should fully understand the xhost facility and the potential problems that it can create.
The xhost command lets users view and change the current list of " xhosted " hosts. Typing xhost by itself displays a list of the current hosts that may connect to your X Window Server.
%
xhost

prose.cambridge.ma.us
next.cambridge.ma.us
%
|
System |
Technique |
Advantages |
Disadvantages |
|---|---|---|---|
|
xhost |
User specifies the hosts from which client connections are allowed; all others are rejected. |
Simple to use and understand. |
Not suited to environments in which workstations or servers are used by more than one person at a time. Server is susceptible to IP spoofing. |
|
MIT-MAGIC-COOKIE-1 |
Xdm or user creates a 128-bit "cookie" that is stored in the user's .Xauthority file at login. Each client program reads the cookie from the .Xauthority file and passes it to the server when the connection is established. |
Access to the user's display is limited to processes that have access to the user's .Xauthority file. |
Cookies are transmitted over the network without encryption, allowing them to be intercepted. Cookies are stored in the user's .Xauthority file, making it a target. |
|
XDM-AUTHORIZATION-1 |
Xdm creates a 56-bit DES key and a 64-bit random "authenticator" that are stored in the user's .Xauthority file. Each client uses the DES key to encrypt a 192-bit packet that is sent to the X server to validate the connection. |
X authenticator is not susceptible to network eavesdropping. |
The authenticator is stored in the .Xauthority file, making it a target. If the user's home directory is mounted using NFS or another network filesystem, the 56-bit DES can be eavesdropped from the network when it is read by the X client program. This authorization system uses strong encryption and is therefore not exportable. |
|
SUN-DES-1 |
Authentication based on Sun's Secure RPC. Uses the xhost command as its interface. |
Communication to the X server is encrypted with the X server's public key; the secret key is not stored in the .Xauthority file, removing it as a target. |
Only runs on systems that have Sun Microsystem's Secure RPC (mostly Solaris). This authorization system uses strong encryption and is therefore not exportable. |
|
MIT-KERBEROS-5 |
Xdm obtains Kerberos tickets when the user logs in; these tickets are stored in a special credentials cache file that is pointed to by the KRB5CCNAME environment variable. |
Extends the Kerberos network-based authentication system to the X Window System. |
Credentials file is a target. Stolen tickets can be used after the user logs out. Kerberos can be a challenge to install. |
You can add a host to the xhost list by supplying a plus sign, followed by the host's name on the command line after the xhost command. You can remove a host from the xhost list by supplying its name preceded by a hyphen:
%
xhost +idr.cambridge.ma.us

idr.cambridge.ma.us being added to access control list
%
xhost

next.cambridge.ma.us
prose.cambridge.ma.us
idr.cambridge.ma.us
%
xhost -next.cambridge.ma.us

next.cambridge.ma.us being removed from access control list
%
xhost

prose.cambridge.ma.us
idr.cambridge.ma.us
If you xhost a computer, any user on that computer can connect to your X Server and issue commands. If a client connects to your X Window Server, removing that host from your xhost list will not terminate the connection. The change will simply prevent future access from that host.
If you are using SUN-DES -1 authentication, you can use the xhost command to specify the network principals (users) who are allowed to connect to your X server. The xhost command distinguishes principals from usernames because principals contain an at sign (@). For example, to allow the network principal debby@oreilly to access your server, you could type:
prose%
xhost debby@oreilly
If you are using MIT-KERBEROS -5 authentication, you can use the xhost command to specify the Kerberos users who are allowed to connect to your server. Kerberos usernames must be preceded by the string krb5 :. For example, if you wished to allow the Kerberos user alice to access your server, you would use the command:
prose%
xhost krb5:alice
The file /etc/X0.hosts contains a default list of xhost hosts for X display 0. This file contains a list of lines that determine the default host access to the X display. The format is the same as the xhost command: if a hostname appears by itself or is preceded by a plus sign, that host is allowed. If a hostname appears preceded by a minus sign, that host is denied. If a plus sign appears on a line by itself, access control is disabled.
For example, this file allows default access to X display 0 for the hosts oreo and nutterbutter :
%
cat /etc/X0.hosts

-
+oreo
+nutterbutter
If you have more than one display, you can create files /etc/X1.hosts , /etc/X2.hosts , and so forth.
17.3.21.4 Using Xauthority magic cookies
Normally, the Xauthority facility is automatically invoked when you use the xdm terminal management system. However, you can also enable it manually if you start the X server yourself.
To start, you should preload your .Xauthority file with an appropriate key for your display. If you have the Kerberos or Sun Secure RPC mechanisms available, you should use those. Otherwise, you need to create a "magic cookie" for your current session. This cookie should be a random value that is not predictable to an attacker. (The script given in "A Good Random Seed Generator" in Chapter 23, Writing Secure SUID and Network Programs can be used for this.) You should generate your "cookie" and store it in your .Xauthority file (normally, $HOME/.Xauthority) :
$ typeset -RZ28 key=$(randbits -n 14)
$ EXPORT XAUTHORITY=${XAUTHORITY:=$HOME/.Xauthority}
$ umask 077
$ rm -f $XAUTHORITY
$ cp /dev/null $XAUTHORITY
$ chmod 600 $XAUTHORITY
$ xauth add $HOSTNAME:$displ . $key
$ xauth add $HOSTNAME/unix:$displ . $key
$ xauth add localhost:$displ . $key
$ unset key
Next, when you start your X server, do so with the -auth option:
$ xinit -- -auth $XAUTHORITY
All your local client programs will now consult the .Xauthority file to identify the correct "magic cookie" and then send it to the server. If you want to run a program from another machine to display on this one, you will need to export the "cookies" to the other machine. If your home directory is exported with NFS , the file should already be available - you simply need to set the XAUTHORITY environment variable to the pathname of the .Xauthority file (or whatever else you've named it).
Otherwise, you can do something similar to:
$ xauth extract - $DISPLAY | rsh otherhost xauth merge -
Keep in mind that the "magic cookies" in this scheme can be read from your account or found by anyone reading network packets. However, this method is considerably safer than using the xhosts mechanism, and should be used in preference to xhosts when feasible.
NOTE: Versions of X11R6 xdm prior to public patch 13 contain a weakness in the xauth generation method, which allows an intruder to access its display. For details, see " CERT advisory VB-95:08.X_Authentication_Vul."
17.3.21.5 Denial of service attacks under X
Even if you use the xhost facility, your X Window System may be vulnerable to attack from computers that are not in your xhost list. Some X window servers read a small packet from the client before they determine whether or not the client is in the xhost list. If a client connects to the X server but does not transmit this initial packet, the X server halts all operation until it times out in 30 seconds.
You can determine whether your X server has this problem by executing the following command:
prose%
telnet localhost 6000
Here, 6000 is the TCP/IP port address of the first X server on the system. (The second X display on the system has a TCP/IP address of 6001.)
If your X server has this problem, your workstation's display will freeze. The cursor will not move, and you will be unable to type anything. In some X implementations, the X server will time out after 30 seconds and resume normal operations. Under other X implementations, the server will remain blocked until the connection is aborted.
Although this attack cannot be used to destroy information, it can be used to incapacitate any workstation that runs one of these servers and is connected to the network. If you have this problem with your software, ask your vendor for a corrected update.
17.3.22 RPC rpc.rexd (TCP Port 512)
The rpc.rexd is a Sun RPC server that allows for remote program execution. Using rpc.rexd, any user who can execute RPC commands on your machine can run arbitrary shell commands.
The rpc.rexd daemon is usually started from the /etc/inetd.conf file with the following line:
# We are being stupid and running the rexd server without Secure RPC:
#
rexd/1          tli  rpc/tcp wait root /usr/sbin/rpc.rexd     rpc.rexd
As the comment indicates, you should not run the rexd server. We make this warning because running rexd without secure RPC basically leaves your computer wide open, which is why Sun distributes their /etc/inetd.conf file with rexd commented out:
# The rexd server provides only minimal
# authentication and is often not run
#
#rexd/1          tli  rpc/tcp wait root /usr/sbin/rpc.rexd     rpc.rexd
We think that vendors should remove the rexd line from the /etc/inetd.conf file altogether.
17.3.23 Other TCP Ports: MUDs and Internet Relay Chat (IRC)
Multi-User Dungeons ( MUDS ) are role-playing games that allow many people over a network to interact in the same virtual environment. Most MUDS are recreational, although some MUDS have been created to allow scientists and other professionals to interact. (The MIT Media Lab's Media MOO is an example of such a virtual environment.)
Internet Relay Chat ( IRC ) is the Citizen's Band radio of the Internet. IRC permits real-time communication between many different people on different computers. Messages can be automatically forwarded from system to system.
While both MUDS and IRC can be useful and entertaining to use, these systems can also have profound security implications:
-
Because these systems permit unrestricted communication between people on your computer and others on the Internet, they create an excellent opportunity for social engineering. Often an attacker will tell a naive user that there is some "great new feature" that they can enable simply by typing a certain command - a command that then allows the attacker to log in and take over the user's account. Unfortunately, there is no simple way to protect users from this kind of attack, other than to educate them to be suspicious of what they are told by strangers on the net.
-
Most MUDS require users to create an account with a username and a password. Unfortunately, many users will blindly type the same username and password that they use for their UNIX account. This creates a profound security risk, as it permits anybody who has access to the MUD server (such as its administrator) to break into the user's UNIX account.
-
Although many MUDS and IRCS can be used with Telnet, they are more fun when used with specially written client programs. Unfortunately, some of these programs have been distributed with intentional security holes and back doors. Determining whether or not a client program is equipped with this kind of "feature" is very difficult.
-
Even if your MUD or IRC client doesn't have a built-in back door, many of these clients will execute commands from remote machines if such a feature is enabled by the user. The world of MUDS and IRCS is rife with malicious users who attempt to get unsuspecting users to enable these features.
-
The server programs for MUDS and IRCS can place a significant load on the computers on which they reside. Unfortunately, as MUDS and IRCS do not use "trusted ports," users can run their own servers even if they don't have root access.
|
|

|
|
| 17.2 Controlling Access to Servers |

|
17.4 Security Implications of Network Services |